Why Ribbon Length Needs Approval Before Bulk Production
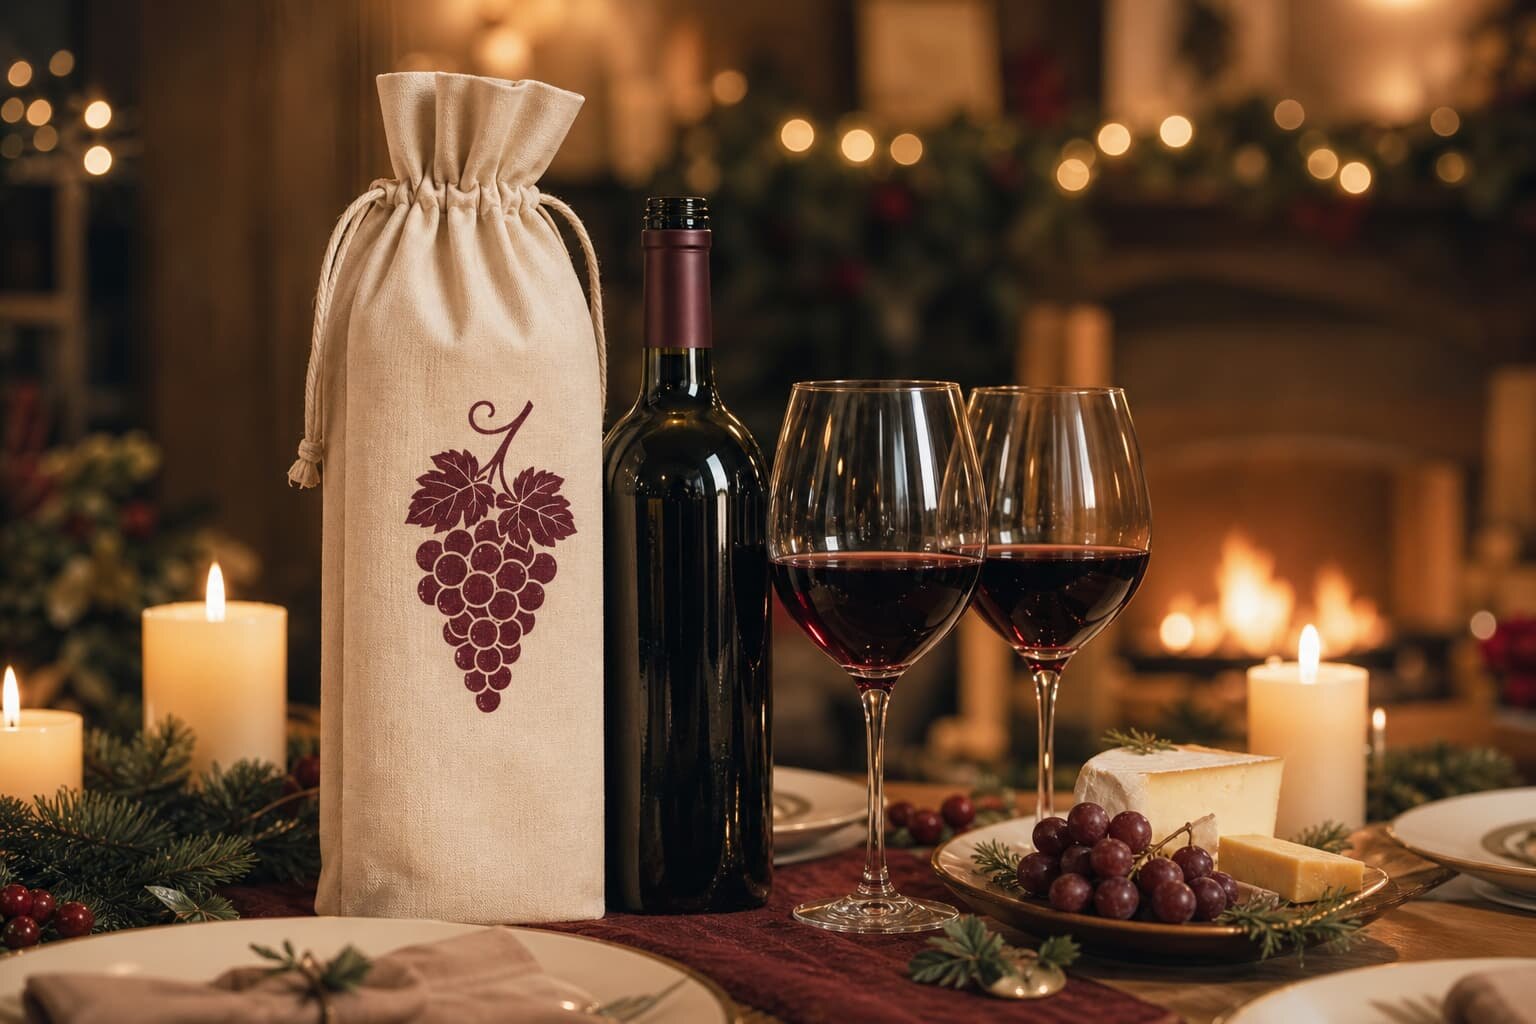
Ribbon length looks like a small detail until the buyer receives 20,000 wine bottle bags that cannot close neatly around the bottle neck. For wine packaging, the drawstring is not only a closure. It controls shelf appearance, gift presentation, unboxing feel, and how easily retail staff can pack bottles during busy selling periods. A ribbon that is 4cm too short may still pass a flat measurement check, but it can become difficult to tie once the bottle shoulder, fabric thickness, and gathered mouth are involved.
Procurement teams should treat ribbon length as an approval item, not a factory decision left to habit. Different suppliers may quote the same bag size but include different ribbon lengths, ribbon widths, casing heights, and end treatments. That makes quote comparison unreliable unless the RFQ states exactly how the ribbon will be measured, tested, and accepted.
- Approve ribbon length on a filled or weighted sample, not only on an empty flat bag.
- Define whether the bag is expected to close above the cork, around the neck, or below the bottle shoulder.
- Ask the supplier to state total ribbon consumption per bag, because ribbon length affects cost.
- Record the approved tied appearance with photos before cutting bulk ribbon.
Start With the Bottle Shape, Not the Bag Drawing
A wine bottle bag drawing usually shows width, height, gusset, seam allowance, and handle or drawstring position. That is useful, but ribbon approval starts with the bottle. A standard 750ml Bordeaux bottle has a different shoulder shape from a Burgundy bottle. Champagne and sparkling wine bottles are wider, heavier, and often need more fabric volume at the top. If the bag is used for spirits, olive oil, or mixed gift packs, the closure test may need several bottle profiles.
When the bottle shoulder is large, more fabric gathers at the draw channel. This increases friction and reduces the free ribbon tail available for a bow. A ribbon that works on a slim Bordeaux bottle may look short on a Champagne bottle. For retail buyers, the safest method is to tell the factory the maximum bottle diameter and height, then require the supplier to test the ribbon length against that bottle or a weighted dummy with the same dimensions.
- State bottle type: Bordeaux, Burgundy, Champagne, spirits, or mixed use.
- Provide bottle height, body diameter, shoulder diameter, and neck diameter if available.
- Confirm whether the top of the bottle must remain visible or be fully covered.
- For distributor programs, approve the ribbon against the largest bottle expected in the range.
How to Specify Ribbon Length in an RFQ
Many RFQs only say drawstring ribbon closure, which is not enough. The supplier may choose a standard length based on old production habits or local ribbon stock. A better RFQ states the ribbon material, width, total length, tolerance, end treatment, color, and test method. If the buyer does not know the best length yet, the RFQ can ask the factory to propose two options and show the difference on a sample bottle.
Be careful with measurement wording. Some factories measure one side after the ribbon is threaded through the casing. Others measure the total cut length before threading. Some quote one ribbon loop, while others quote two separate cords. To avoid misunderstanding, write the measurement method into the spec sheet. For example: total ribbon cut length per bag before threading, measured straight from end to end, plus or minus 1cm.
- Use total cut length per bag when comparing ribbon consumption and supplier quotes.
- Use visible tail length after tying when approving retail appearance.
- Define tolerance if consistent bow size matters across multiple stores or gift sets.
- Ask for ruler photos during sample approval and pre-production checking.
Material Choice Changes the Right Ribbon Length
Ribbon material affects how much length is needed. Polyester satin slides easily and gives a bright gift look, but it can loosen if tied with a soft bow. Grosgrain ribbon has ribbed texture and better grip, so it can hold a knot with slightly shorter tails. Cotton tape matches natural cotton or canvas bags, but it may be thicker and may need a wider channel. Jute cord gives a rustic look but changes the product from ribbon style to cord style, which may not suit premium wine gifting.
The bag fabric also changes closure behavior. A 140gsm cotton bag gathers easily and usually needs less pulling force. A 10oz or 12oz canvas wine bag has more body, so the draw channel may need extra width and the ribbon may need more length to form a clean bow. Jute and laminated jute can be stiffer at the mouth; if the top hem is bulky, short ribbon tails will look worse.
- For 140-220gsm cotton, 10-15mm satin ribbon is common for promotional and retail gift bags.
- For 10-12oz canvas, test a wider casing and stronger ribbon because fabric gathers with more resistance.
- For jute bags, check whether the ribbon slides smoothly or catches on loose fibers.
- For premium retail packs, compare satin and grosgrain with the actual bottle before final approval.
Fabric Weight, GSM, and Channel Construction
Fabric weight is not separate from ribbon approval. A light cotton bag may use 140gsm, 170gsm, or 220gsm fabric depending on target price and print method. A reusable wine carrier may use 8oz, 10oz, or 12oz canvas. The heavier the fabric, the more important the draw channel becomes. If the folded top hem is narrow, thick ribbon will not run smoothly and the operator may pull harder, stressing the casing openings.
For factory production, the channel should be checked after sewing, not only on the pattern. Seam allowance, folding, ironing, and fabric shrinkage can reduce the actual opening. Buyers should ask for the finished channel height and the ribbon width together. A 15mm ribbon in a tight 18mm channel may pass on one sample but jam in bulk if sewing tolerance varies. The safer approach is to approve a channel with enough clearance for the selected ribbon and fabric weight.
- Ask for finished channel height after sewing, not just pattern allowance.
- Check side opening reinforcement, because that is where tearing often starts.
- For washed cotton or canvas, confirm whether shrinkage testing is needed before approving ribbon movement.
- For heat transfer printing near the mouth, confirm that pressing does not flatten or distort the channel.
Print Method and Logo Position Around the Gathered Neck
Ribbon length approval should include a filled-bag appearance check because the print changes once the bag is gathered. A logo that looks centered on the flat panel may shift visually after the drawstring closes. On wine bottle bags, common decoration methods include screen printing, heat transfer, digital printing, woven side labels, and sometimes embroidery on heavier canvas. Each method has limits for position, detail, and production cost.
For screen printing, keep the artwork away from heavy folds near the top draw channel. For heat transfer, avoid placing the logo where the bag will crease sharply after tying. For woven labels, confirm whether the label is on the side seam, lower front, or top hem. If the ribbon tails hang in front of the logo, the bag may look messy on shelf photos. Buyers should approve logo position with the ribbon tied, not only with the bag laid flat.
- Request one photo flat and one photo filled, closed, and tied.
- Keep important artwork below the gathered area and away from ribbon tails.
- For metallic or foil prints, check cracking after the bag is tied and squeezed.
- For multi-color printing, confirm print registration tolerance before bulk production.
MOQ Logic: Why Custom Ribbon Changes the Quote
Ribbon length affects cost, but custom ribbon affects MOQ even more. If the buyer uses stock satin ribbon in black, red, gold, or natural, the supplier may support lower quantities. If the ribbon must be custom dyed to Pantone, printed with a logo, woven with a brand name, or matched to a seasonal packaging palette, the factory may need to meet the ribbon mill minimum. That minimum may be higher than the bag sewing MOQ.
This is where many quote comparisons become misleading. Supplier A may quote a low bag price using stock 10mm red satin ribbon. Supplier B may quote higher because the RFQ mentions custom burgundy grosgrain ribbon with printed logo. The buyer should separate bag body cost, ribbon cost, printing cost, setup cost, sample cost, and packing cost. If the program has multiple SKUs, ask whether the same ribbon can be used across all colors to improve MOQ efficiency.
- Ask whether the quoted ribbon is stock color or custom dyed.
- Confirm if MOQ is controlled by fabric, ribbon, printing, or carton quantity.
- For custom printed ribbon, request the minimum order length and waste allowance.
- If ordering several bag sizes, standardize ribbon width and color where possible.
Sample Approval: What to Measure Before Signing Off
A wine bottle bag sample should not be approved by looking at the front photo only. The buyer needs to measure the ribbon, test the closure, inspect the channel, review the logo position, and check packing recovery. One approved sample should be kept by the buyer and one sealed sample should stay at the factory. If the order is large or seasonal, a pre-production sample should be approved after all materials are bulk-ready.
The most useful approval record is simple: ruler photos, tied sample photos, material swatches, and written tolerances. Ask the factory to show the ribbon pulled straight before tying, then tied around the target bottle. If the ribbon is cut by hand during sampling but by machine during bulk production, confirm the bulk cutting tolerance. A small cutting variation can create uneven tail lengths across cartons.
- Measure total ribbon cut length before threading or on a sample pulled straight.
- Measure left and right tail length after tying a standard bow.
- Check whether the ribbon ends fray after repeated tying.
- Confirm the bag can close without twisting the channel or puckering the front logo.
- Keep photos of the approved sample in the purchase order file.
Packing and Carton Handling for Ribbon Wine Bags
Ribbon bags can look good at the sewing table and poor after export packing. Long satin ribbons tangle easily if bags are loose in cartons. Pre-tied bows can be crushed during compression, especially when cartons are stacked. Light-colored ribbon can pick up lint or color transfer from dark fabric if packing is not controlled. For retail buyers, these are not minor issues because staff may not have time to retie every bag before display.
The packing method should match the selling channel. For wholesale promotional use, flat packing with ribbons tucked inside may be acceptable. For retail gift packaging, each bag may need a polybag, paper band, belly band, or inner carton arrangement. If plastic reduction is a requirement, ask the factory for paper-based grouping options, but still test whether ribbon tails stay clean and untangled.
- Define whether bags ship flat, folded, individually packed, or bundled.
- Avoid fully tied bows unless the buyer accepts compression marks.
- Use carton liners if light ribbon may rub against kraft cartons or printed outer boxes.
- Confirm carton quantity by actual packed sample, not only by theoretical bag size.
- Add a simple ribbon position instruction for packing workers.
Lead Time Risks Connected to Ribbon Approval
Ribbon approval can delay production if it is treated as a late detail. Stock ribbon usually moves quickly, but custom dyed ribbon, logo printed ribbon, or special woven tape may require extra sampling and color matching. If the ribbon is rejected after the bag body has already been cut and printed, the factory may have finished goods waiting for one missing trim. That creates schedule pressure and increases the chance of accepting a borderline match.
A practical timeline separates fabric purchase, ribbon confirmation, print approval, cutting, sewing, inspection, and packing. Procurement teams should ask the supplier to identify which item is the longest lead time component. For seasonal wine promotions, confirm the final ribbon decision before mass cutting begins. If the ribbon color must match a bottle label or gift box, approve all packaging components together under the same light source.
- Approve ribbon material and color before bulk fabric cutting if the look is brand critical.
- Build extra time for custom dyed or printed ribbon sampling.
- Ask whether ribbon stock is reserved after sample approval.
- Require pre-production confirmation before all ribbon is cut to final length.
- Check whether public holidays or peak season affect trim procurement.
Specification comparison for buyers
| Spec decision | Recommended option | When it fits | Buyer risk to check |
|---|---|---|---|
| Ribbon length for single 750ml bottle bag | Approx. 55-65cm per side before tying, confirmed on sealed sample | Standard cotton, canvas, jute, or nonwoven wine bag with drawstring closure | Too short makes a tight knot and poor shelf look; too long increases cost and carton tangling |
| Ribbon width | 10-15mm satin or grosgrain ribbon for most promotional wine bags | Retail gift packaging, seasonal promotions, tasting events, or distributor packs | Narrow ribbon may cut into fabric channel; wide ribbon may jam in a small casing |
| Fabric weight | 140-220gsm cotton for light gift bags; 10-12oz canvas for reusable premium bags | Match fabric strength to bottle weight, retail positioning, and print requirement | Heavy fabric with a small ribbon channel can restrict closing and distort the mouth |
| Ribbon material | Polyester satin for shine, cotton tape for natural look, grosgrain for better grip | Choose based on brand style, knot retention, and budget | Different materials shrink, fray, and slide differently during tying tests |
| Closure construction | Folded top hem with clean casing and bar tacks or reinforced side openings | Suitable for repeat opening and closing during retail handling | Weak openings tear first when buyers pull the ribbon hard |
| Print position near ribbon area | Keep logo below the gathered neck and away from folds | Needed when screen printing, heat transfer, or digital printing the front panel | Artwork can disappear into the gathered fabric if approved flat only |
| Packing method | Ribbon loosely tied or tucked, bag flat-packed by size and color | Bulk export cartons for importers, distributors, and retail replenishment | Pre-tied bows crush during compression and create uneven shelf presentation |
Buyer checklist before sampling
- Confirm the target bottle size: 750ml Bordeaux, Burgundy, Champagne, spirits, or mixed assortment.
- Approve ribbon length on a real filled or weighted bottle, not only on a flat empty bag.
- Measure both visible tail length and total ribbon length before bulk production.
- Check whether the bag must close fully over the cork, neck label, or bottle shoulder.
- Specify ribbon width, material, color, sheen, and whether it must match a Pantone reference.
- Check the draw channel height and opening size after sewing, especially on thicker canvas or jute.
- Tie and untie the sample at least ten times to test fraying, sliding, and fabric stress.
- Confirm logo visibility after the ribbon is pulled closed and the fabric is gathered.
- Define tolerance, such as ribbon total length plus or minus 1cm, if consistent presentation matters.
- Approve whether ribbon ends are heat cut, folded, metal tipped, knotted, or left straight cut.
Factory quote questions to send
- What ribbon length is included in your quote, measured as total length per bag or length per side?
- Is the ribbon satin, grosgrain, cotton tape, or another material, and what is the width in millimeters?
- Will ribbon ends be heat cut, ultrasonic cut, folded, stitched, or knotted?
- What fabric GSM or canvas ounce weight is quoted, and will shrinkage affect the draw channel after washing or ironing?
- What bottle size was used to test the sample closure, and can you test our target bottle shape?
- Does the quoted MOQ change if we use custom ribbon color, printed ribbon, woven label, or multiple bag colors?
- Which print method is quoted for the bag logo, and how far is the artwork kept from the gathered neck area?
- Can you provide pre-production photos with ruler measurements before cutting all ribbon for bulk production?
- How are ribbon, bag body, labels, and cartons packed to avoid tangling, color transfer, or compression marks?
- What is the lead time for fabric procurement, ribbon dyeing, printing, sewing, inspection, and final packing?
Quality-control points to confirm
- Measure ribbon length from a pulled-straight sample before tying and record the approved tolerance.
- Test closure on the actual bottle profile and check whether the mouth closes without excessive force.
- Inspect draw channel width and side openings for skipped stitches, rough edges, and weak bar tacks.
- Check ribbon color under neutral light against the approved swatch or Pantone target.
- Tie a standard bow and check left and right tail balance on at least five random samples.
- Pull the ribbon firmly to confirm the fabric does not tear at the casing opening.
- Check print alignment after the bag is filled and closed, not only when flat on the inspection table.
- Confirm ribbon ends do not fray after handling and carton vibration simulation.
- Review carton packing to make sure ribbons are not caught in tape, carton flaps, or divider edges.
- Record any approved deviation before mass production, especially if ribbon stock is changed.