Why bakery totes fail in sourcing
Artisan bakery buyers usually start with the wrong question: they ask for a "cotton tote" and assume the factory will fill in the details. That works until the first carton arrives with soft fabric, weak handles, or a print that looks fine on screen but disappears against natural cotton. For bakery use, the bag has to survive repeated carry, light food contamination concerns, counter display, and retail resale. If those use cases are not written into the RFQ, suppliers will price the easiest build, not the one you actually need.
The most common failure is mismatch between brand intent and construction. A bakery tote is often sold as a reusable item, which means the buyer is paying for both packaging and merchandise value. If the tote is too thin, it feels disposable. If it is too heavy, freight and unit cost rise without a clear customer benefit. A clean brief should define what the bag is carrying, how long it must last, and whether it needs to look premium at point of sale or simply function as a takeaway carrier.
- Write the primary use: pastry carry, bread carry, retail merch, or mixed takeaway.
- Define whether the tote is a giveaway, a margin product, or a brand accessory.
- State any reuse expectation, because that changes fabric weight and seam reinforcement.
Set the spec around load, not just appearance
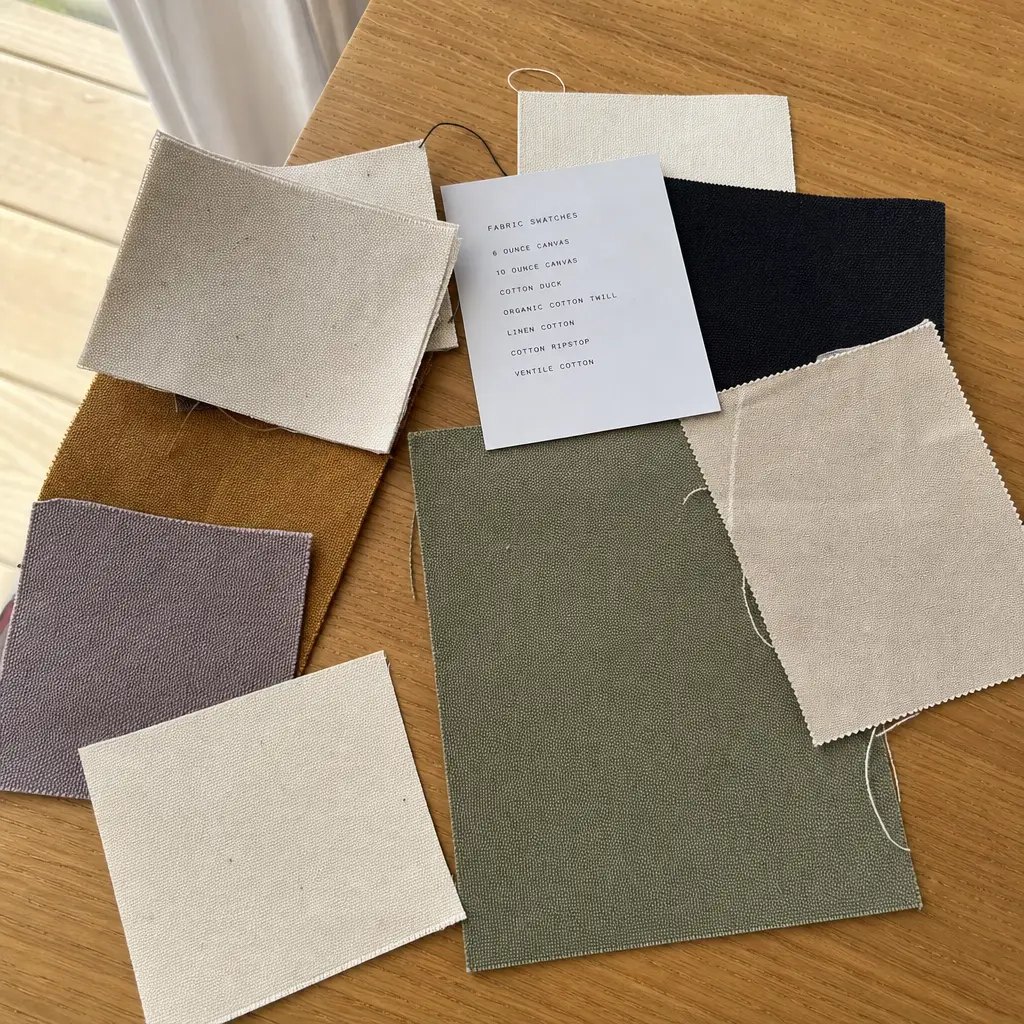
For wholesale organic cotton totes for artisan bakeries, fabric weight is the first commercial decision. A 6 oz tote can work for light pastries or a small merchandising program, but it usually feels too soft for bread and boxed items. In most bakery programs, 8 oz is the practical baseline because it balances structure, print clarity, and cost. If the tote needs to carry heavier loaves, tins, or multi-item orders, 10 oz gives a better hand feel and reduces the chance of handle stretch and corner collapse.
The body size matters as much as the fabric. Buyers often oversize the bag to create a sense of value, then discover that a larger blank area increases freight, folding inefficiency, and print waste. If the tote is meant to hold standard bakery packs, define the target contents first and then build the bag around that volume. Ask the supplier to show how the tote folds, whether it stands upright, and how the gusset behaves when loaded. Those details tell you more than a flat spec sheet.
- Use 6 oz only for light merch or short-term campaign bags.
- Use 8 oz as the default for most artisan bakery retail programs.
- Move to 10 oz when the tote must handle heavy loaves, tins, or repeated reuse.
Choose the print and label method before you ask for price
Print choice drives more quoting errors than fabric choice. Screen print is usually the most predictable option for a bakery logo because it gives stable color, clear edges, and controlled unit cost at scale. If the design is simple and the order is large enough to spread setup cost, it is the safest route. For a more premium look, a sewn side label or woven label can work better than trying to print a detailed logo directly onto coarse cotton, especially when the artwork is small or needs a tactile finish.
The wrong method can make an otherwise good tote look off-brand. Fine type, thin lines, and gradients are weak on natural cotton weave, especially when the surface is not heavily finished. If the bakery wants a clean retail item, a one-color or two-color logo is usually a better sourcing decision than a complex art treatment. Ask the supplier to quote the same tote with blank fabric, one-color print, and print plus label so you can see the real cost of decoration, not just the bag.
- Screen print is usually best for simple logos and stable repeat orders.
- Woven or sewn labels help when the brand wants a quieter premium look.
- Avoid intricate artwork unless the supplier has already proven that print on similar cotton.
Use MOQ logic to expose hidden setup cost
MOQ on a tote order is not just a factory preference. It is the point where cutting, printing, thread color, label sourcing, and carton setup become commercially viable. Buyers should not accept a single MOQ number without understanding what is included. A quote for 2,000 pcs with a high setup charge can be less attractive than a quote for 5,000 pcs with lower pre-production costs. You need the full cost curve, not one isolated unit price.
For bakery programs, ask for three volume bands if you plan to grow: a trial run, a rollout quantity, and a replenishment quantity. That shows whether the supplier is actually efficient at scale or just padding the first order. If different bakery locations need different artwork or regional messaging, ask whether the MOQ applies per design, per print color, or per size. Many sourcing problems start because the buyer assumed MOQ was for the whole program, while the factory priced it per SKU.
- Request pricing at three volume bands, not one headline number.
- Separate setup charges from unit price so you can compare suppliers fairly.
- Clarify whether MOQ is per size, per color, per artwork version, or per shipment.
Read the sample like a production engineer
A sample is not proof of production capability unless it reflects the real process. The right first sample sequence is usually blank sample, decoration sample, then pre-production sample if the design is sensitive. If the supplier only sends a polished photo sample, you have not learned enough about stitching, seam quality, or how the print sits on the fabric. The sample should be measured, weighed, and inspected under consistent light, because natural cotton can hide variation in a casual photo.
The buyer should compare the sample against specific acceptance points: handle length, top hem firmness, print placement, and the way the tote folds after stitching. If the sample uses better material than the mass order, you will not discover it from the image alone. Ask the factory to identify the exact fabric lot and thread color used in the approved sample and state that it becomes the production reference unless changed in writing. This is the simplest way to reduce disputes later.
- Approve a blank sample before decoration if the build is new.
- Keep a signed reference sample with measurements and close-up photos.
- Treat any uncontrolled sample upgrade as a warning sign, not a bonus.
Inspect the construction points that actually fail
Most tote defects show up at the same places: handle joins, top hems, side seams, and print edges near folds. These are the spots where load, folding, and sewing tension concentrate. A buyer does not need a full lab program to catch real risk. Measure the bag, inspect stitch density, pull lightly on the handles, and check whether the top edge twists after the bag is loaded. If the tote cannot survive a simple hand pull without deformation, it will not hold up in retail use.
For organic cotton totes, the stitching should be even and secure, but not overbuilt to the point that the fabric puckers. Cheap construction often hides in the details that are hard to see in a spec sheet. Loose threads, skipped stitches, crooked handle placement, and print drift are all visible before shipment if someone knows where to look. Put the inspection list into the PO or quality annex so the factory knows which defects are grounds for rejection or rework.
- Check handle join strength and bar tacks on every size.
- Inspect seam alignment at the side gusset and top hem.
- Reject prints that drift into seams, folds, or stitch lines.
Build the packing spec around warehouse reality
Packing is often treated as an afterthought, but for bakery buyers it affects damage rate, warehouse labor, and store readiness. Flat-packed totes are usually the best option because they reduce carton volume and make counting easier. If the bag is folded inconsistently, store teams waste time re-folding and the first impression suffers. Ask the factory to show the fold method and finished bundle count so you know how the product will land in your warehouse.
Carton details matter in a way that many RFQs ignore. The same tote can cost more to ship if the carton is oversized or if the pack density is too loose. You need carton dimensions, gross weight, pack count, and whether each carton contains one artwork version only. Mixed versions create receiving mistakes and make it hard to use the bags by store or campaign. For retail buyers, a clean pack plan is part of the product, not a logistics footnote.
- Specify one style and one artwork version per carton when possible.
- Ask for bundle count and fold method before approving the order.
- Verify carton size early if freight cost is a major part of the landed price.
Schedule risk is usually an artwork or approval problem
Lead time on custom totes is rarely just sewing time. The real clock includes fabric booking, print screen or plate setup, sample approval, packing confirmation, and any corrections after the first sample. If you are launching for a bakery opening or seasonal campaign, the schedule should include a buffer for label changes and color approvals. A buyer who waits until the final week to approve artwork is usually creating the delay that later looks like a factory problem.
The safest way to manage schedule risk is to separate must-have approvals from nice-to-have refinements. Decide what must be frozen before production starts: bag size, fabric weight, logo placement, pack method, and carton markings. Everything else should be treated as non-blocking unless it changes cost or function. If the factory is slow to confirm details in writing, that is useful information. It usually means the production file is not ready, even if the sales quote looks polished.
- Freeze critical specs before sample approval moves to production.
- Treat artwork, label text, and carton marks as schedule-critical items.
- Ask the supplier to show a production calendar with milestones, not a vague lead time.
Compare sourcing routes by landed cost, not unit price
The cheapest quote is often the most expensive route once freight, packing, and rework are included. A direct cut-and-sew factory may quote higher setup cost, but it can be the better choice if the bag, print, and packing are controlled in one file. A trading company can help when the buyer needs consolidation across multiple items, but it can also add layers that hide accountability. The right route depends on how much process control you need and how much time you can spend managing the program.
For artisan bakery buyers, landed cost should include the bag, decoration, carton packing, freight, and the cost of bad units you may have to reject. If a supplier cannot separate those components, it is harder to compare quotes. Ask for the same quote structure from every supplier so you can compare apples to apples. That is the only way to see whether a lower unit price is real or just a stripped spec.
- Compare bag cost, print cost, packing cost, and freight separately.
- Ask whether the quote includes QC rework allowance or sample rework.
- Use the same spec sheet for every supplier to avoid quote distortion.
Turn the final approval into a release document
When the sample is approved, convert the approval into a short release document that names the approved fabric weight, dimensions, print method, packing method, and carton marks. That document becomes the reference if the factory changes something later. It is easier to prevent a dispute than to solve one after goods are on the water. For procurement teams, this is the point where the bag stops being a sample and becomes a controlled product.
The final release should also state what constitutes a rejectable change. A small color shift may be acceptable on natural cotton, but a handle length change or a different fold method is not. This matters because factories sometimes substitute materials or packing formats to save time. If those substitutions are not pre-authorized, you will discover them during receiving instead of during approval. A tight release note protects both the buyer and the supplier from ambiguous expectations.
- Name the approved sample as the production reference.
- List the non-negotiable specs that cannot change without written approval.
- Keep the release document attached to the PO and QC file.
Specification comparison for buyers
| Spec decision | Recommended option | When it fits | Buyer risk to check |
|---|---|---|---|
| Fabric weight | 6-8 oz for light bakery carry; 8-10 oz for bread and retail reuse | Single loaves, pastry orders, and branded takeaway bags that need better structure | Very light fabric can look cheap and stretch at the handle point |
| Bag size | Approx. 14 x 16 in. with 10-12 in. gusset only if you need boxy volume | When the tote must hold bakery boxes, tins, or multiple pastry packs | Oversized bags raise freight and print cost without improving sell-through |
| Handle build | Long handles with double stitching and bar tacks at stress points | Retail carry, shoulder use, and heavier bakery fills | Thin handles fail first, even when the body fabric is acceptable |
| Print method | 1-2 color screen print for volume; woven label or side label for premium positioning | When you need clean logos, low artwork risk, and stable unit cost | Fine text, gradients, or soft-touch effects often fail on coarse cotton weave |
| Decoration placement | Front center for retail visibility; small side label for subtle branding | When the tote is part of the bakery's take-home brand system | Artwork too close to seams or hems can distort after sewing and washing |
| Supplier route | Direct cut-and-sew factory with print in-house or tightly managed | When you need repeatability, sample control, and clearer defect accountability | Trading layers can hide the real process owner and slow issue resolution |
| MOQ strategy | Quote at 3 volume bands: sample, trial run, and production run | When you are testing a new bakery chain, seasonal promotion, or first import | Low MOQ can carry a high setup charge that makes landed cost misleading |
| Packing method | Flat packed in inner poly with master carton by size and artwork version | When you need clean warehouse receiving and easy store allocation | Mixed packing creates counting errors and makes rework expensive |
| Lead time buffer | Add time for fabric weaving, print screens, sample approval, and carton confirmation | When launch dates are tied to store openings or campaign calendars | Late artwork or label changes are the most common reason shipments slip |
Buyer checklist before sampling
- Confirm the exact bag size, gusset depth, handle length, and whether the tote must stand upright when filled.
- Set the fabric weight target in GSM or oz and define the minimum hand feel you will accept.
- Choose the decoration method before quoting: screen print, woven label, sewn side label, or embroidery.
- State whether the tote must carry bakery boxes, loaves, pastries, or mixed retail items, because load needs change construction.
- Ask for sample photos of stitching, handle joins, hem finish, and print close-ups under natural light.
- Request packed carton dimensions, carton count, and carton weight before you compare freight.
- Set the tolerance for color variation, print registration, and measurement shrinkage after washing if washing matters.
- Quote at least three volume bands so you can see where setup cost drops and where unit price actually stabilizes.
Factory quote questions to send
- What is the exact fabric composition and fabric weight, and can you show the mill spec or in-house fabric record?
- Is the bag cut and sewn in one factory, or are printing and sewing split across vendors?
- What is the stitching spec at the handle join, side seam, and top hem, and do you use bar tacks?
- How many print colors are included in the quote, and what is the screen or plate setup cost?
- What is the minimum order quantity per design, per color, and per print version?
- What sample will you send first: blank sample, pre-production sample, or production reference sample?
- How are the totes packed inside the carton, and can you quote master carton dimensions and gross weight?
- What is the standard production lead time after sample approval, and what items usually delay it?
Quality-control points to confirm
- Fabric weight must stay within the agreed tolerance, not just look similar by eye.
- Handle stitching must be even, secure, and reinforced at the stress points with no skipped stitches.
- Print registration must stay aligned on all cartons and not drift near the hem or side seam.
- Bag dimensions must match the approved sample within the agreed tolerance for width, height, and gusset.
- Color shade should match the signed-off sample or approved reference, especially on natural cotton where dye lots vary.
- Trim, loose threads, and needle damage should be limited before packing, not hidden by folding.
- Carton counts must be verified against the packing list, with the correct style and artwork version in each carton.
- A pre-shipment check should confirm clean folding, no odor, no stains, and no crushed corners from overpacking.