Start with the real cost problem, not the cheapest pouch quote
For liquor retailers, a cotton drawstring pouch looks simple until the first production order exposes the gaps. A buyer may ask for a bottle pouch with a logo and drawstring, but a factory still has to decide fabric weight, weave, cut size, seam allowance, channel depth, print order, drawcord quality, packing method, and inspection rules. If those decisions are left open, every supplier fills in the blanks differently. That is why a wholesale cotton drawstring pouches for liquor retailers bulk pricing plan should be more than a price collection exercise. It should make every quote comparable before anyone negotiates cents.
The cheapest offer often wins because it is the easiest number to understand. Yet the larger risk is usually not paying three or five cents too much. It is receiving a pouch that feels too thin for a premium bottle, closes below the cap, shows a crooked logo, arrives mixed by size, or creates avoidable warehouse sorting. Those costs show up after the purchase order, when the commercial team is trying to launch a gifting program and operations is trying to receive cartons cleanly.
A stronger buying process fixes the main variables first: bottle geometry, finished pouch size, usable internal height, fabric GSM, color route, decoration method, logo tolerance, drawcord construction, MOQ by SKU, packing format, and QC standard. With those points written into the RFQ, a buyer can compare two factories without guessing what each one assumed. Without them, a low price may simply mean lighter fabric, looser print placement, weaker packing, or fewer quality checks.
The goal is not to over-engineer a soft pouch. The goal is to pay for the right pouch once. For liquor retailers, the pouch is often part of giftability, shelf presentation, seasonal merchandising, and private label brand perception. A pouch that technically ships but looks cheap on the bottle does not do its job. Procurement should therefore compare cost per approved, usable pouch, not just ex-factory unit price.
- Lock the construction before asking for final pricing.
- Compare finished sewn size, not generic pouch descriptions.
- Separate first-order setup charges from repeat-order unit cost.
- Treat warehouse handling and retail presentation as procurement value.
Define the bottle before defining the pouch
Most pouch problems begin with incomplete bottle information. Height alone is not enough. A straight wine-style bottle, a broad-shouldered whisky bottle, a round gin bottle, and a short premium spirits bottle can all need different allowances even when their nominal capacity is similar. Body diameter, base shape, shoulder slope, neck width, cork or cap height, and closure target all affect how the pouch fits.
Give suppliers dimensions in millimeters. Include total height, widest body diameter, base profile, neck diameter, shoulder shape, and closure style. Then say what the pouch must do. Does it need to cover the full cap? Should the drawcord close above the cork? Is a decorative gather at the neck enough? A pouch that only covers the bottle body may be shorter and less costly than one designed to close neatly over a tall capsule or gift stopper.
Purpose matters too. A promotional pouch for a limited offer can often accept lighter fabric and simpler finishing. A premium gift pouch for spirits may need a stronger handfeel, cleaner logo registration, and better shade consistency across replenishment orders. If the pouch is meant to reduce scuffing during store handling, the fabric and fit choices may differ again. Suppliers quote better when they know what success looks like on the retail floor.
Whenever possible, send an actual bottle or an accurate dummy. Dimensions are useful, but they do not fully describe how a shoulder pushes into fabric or how a drawstring gathers around a cap. A physical fit check is especially important for launch-critical retail programs, multiple bottle formats, and unusually shaped bottles. It is a small upfront cost that prevents expensive arguments after bulk sewing.
- Provide total height, body diameter, neck diameter, shoulder shape, and cap style in mm.
- State whether the closure sits above the cap, at the neck, or only gathers decoratively.
- Clarify whether the pouch is for gifting, shelf presentation, promotion, or light protection.
- Approve fit on the actual bottle or an exact dummy whenever possible.
Choose fabric with numbers, not adjectives
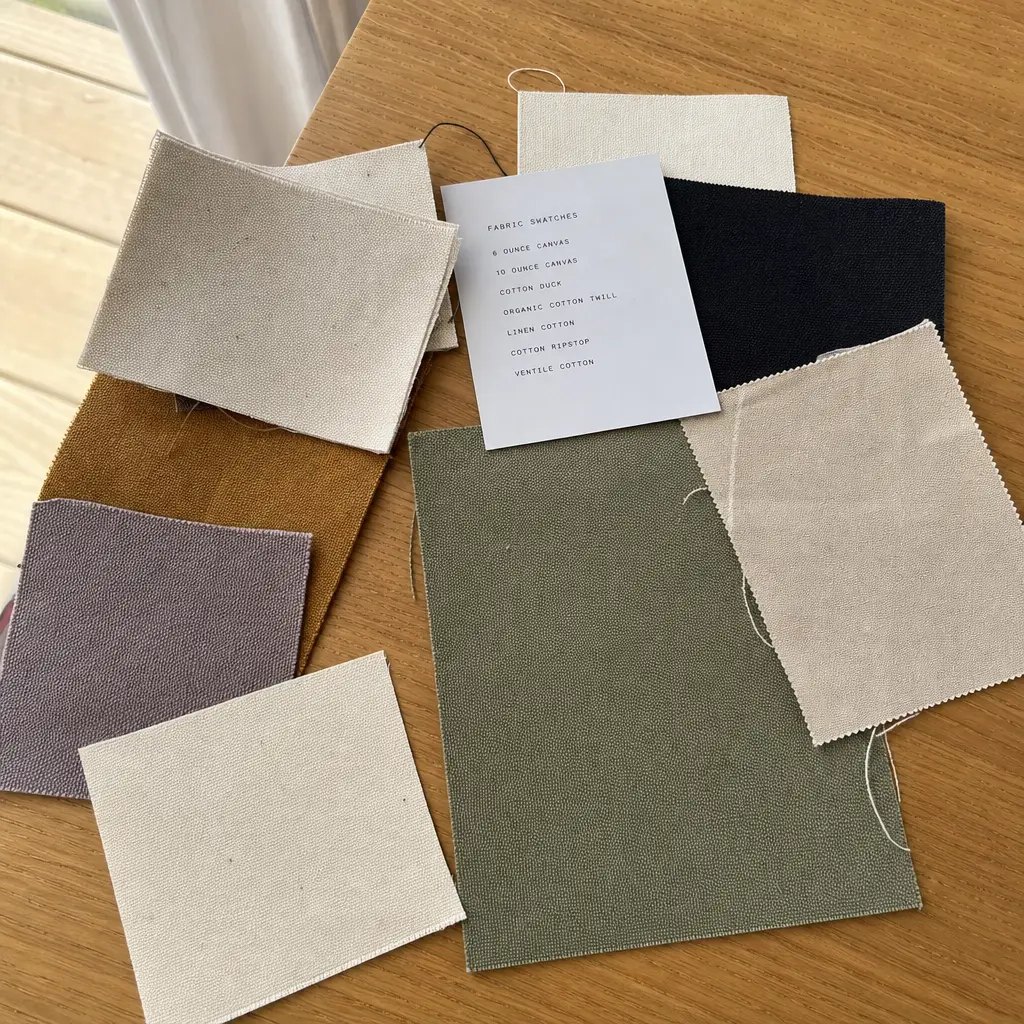
Fabric drives the first impression. It also drives a large share of cost. This is where vague language causes trouble. Words such as premium cotton, thick cotton, luxury canvas, or eco-style fabric are not specifications. One supplier may interpret them as light plain cotton. Another may quote midweight canvas. A third may use a heavier fabric but save cost elsewhere. Procurement teams should specify fiber content, weave, GSM, color, and finish.
Light cotton in the 120-180 GSM range can work for budget promotions, bottle giveaways, or very cost-sensitive campaigns. It will usually feel softer and lighter, but it may collapse on shelf, show the bottle outline, and give less support to printed artwork. Midweight cotton canvas around 220-280 GSM is often the practical middle ground for retail programs. It has more body without pushing freight and sewing cost too high. Heavier canvas around 300-340 GSM can improve perceived value, drape, and print presence, but it increases material weight, bulk at the seams, and shipping cube.
Color route deserves early attention. Natural cotton is often the easiest starting point because it simplifies MOQ, sampling, screen print approval, and repeat shade control. Stock black or navy can look strong for spirits and gift sets, but dark dyed fabric brings different checks: lint visibility, crocking, shade variation, and print contrast. Custom dyed Pantone fabric can support brand identity, yet it adds lab dip approvals, dye-lot risk, longer preparation time, and higher minimums. If the retailer expects reorders, shade continuity should be planned before the first PO.
Finish can change dimensions and print behavior. Untreated cotton has a more natural hand. Washed or softened finishes may feel better, but they can shrink, relax, or change the way ink sits on the surface. If you ask multiple suppliers to bid, request the base fabric and any finish as separate, clearly named options. That keeps price differences visible instead of buried inside broad descriptions.
- Budget promo range: about 120-180 GSM.
- Standard retail range: about 220-280 GSM.
- Premium gift range: about 300-340 GSM.
- Natural cotton usually gives easier MOQ, sampling, and print approval than custom dyed colors.
Plan size around finished fit and usable height
A pouch can match the quoted flat size and still fail on the bottle. Cut dimensions, finished sewn dimensions, and usable internal dimensions are not the same. Seam allowances reduce width. The drawstring channel reduces usable height. A thick bottle base can push the fabric outward and pull height down. The result is familiar: the pouch looks stretched, the logo distorts, or the drawstring closes lower than planned.
Ask suppliers to quote finished sewn size, not only cut-panel size. Then ask for usable internal height after the channel is sewn. For liquor packaging, that detail matters. Tall-neck bottles need enough top allowance for the drawcord to gather properly. Broad bottles need enough width so the seams are not under strain. Oversizing is not a perfect fix either. Too much extra width can make the pouch look shapeless and waste fabric, especially when the bottle is displayed upright.
Tolerance should be written in millimeters. Width, total height, and drawstring channel depth may need separate tolerances. Soft goods will never behave like rigid packaging, but a retailer still needs a practical acceptance range. If tolerance is left vague, the supplier’s internal standard may be much looser than the buyer’s visual expectation. That becomes difficult to resolve once thousands of pieces are sewn.
Fit approval should happen before bulk cutting and before bulk printing. Test the sample on the intended bottle and review the front view, side view, bottom seating, closure position, and logo panel. If a retailer has several bottle formats, approve each size independently. One pouch can sometimes cover a small range, but assuming one universal size often leads to uneven shelf presentation and avoidable material cost.
- Request finished sewn size and usable internal height separately.
- Define tolerance for width, height, and channel depth in mm.
- Test insertion, base seating, and closure on the actual bottle.
- Approve each size SKU separately when multiple bottle formats are involved.
Match decoration to the retail job
Decoration is where a low-cost pouch becomes a branded retail item. It is also where unclear RFQs create expensive revisions. Buyers should specify the print method, number of colors, artwork size, print location, orientation, ink expectations, and tolerance. A logo request by itself is not enough for accurate bulk pricing.
For most wholesale liquor pouch programs, one-color or two-color screen printing is the best balance of cost, speed, and visual impact. It works well on cotton when the artwork is suitable and the fabric surface is approved. Natural cotton is usually forgiving. Dark cotton can look premium, but the ink color, opacity, and curing must be checked. Large solid logos need special care because heavy ink deposits may feel stiff, crack, or rub if curing is weak. Fine lines and small text should be tested before the buyer commits to bulk artwork.
Embroidery can look more premium for small marks, initials, or compact logos, but it increases cost and production time. It may also pucker lighter fabrics or distort the panel around the stitch area. Woven side labels or printed labels are useful when the retailer wants quiet branding rather than a large front graphic. They can also make repeat orders easier if the pouch body stays the same and the label carries the brand detail.
Placement control is just as important as method. Do not rely only on the word centered. On a soft pouch, visual centering can shift with sewing, pressing, and bottle insertion. Give measurements from the bottom seam and side seam, plus an acceptable tolerance. Ask whether the factory prints before sewing or after sewing. Printing before sewing can support flatter printing but requires accurate panel cutting. Printing after sewing can reduce panel registration issues but may make placement and skew harder to control.
- Best value for most bulk orders: 1-color or 2-color screen print.
- Embroidery suits smaller premium logos but raises cost and can distort light fabric.
- Woven or printed labels work well for understated, repeatable branding.
- Define logo position by measurements from seams, not visual wording only.
Build MOQ and pricing around real production lots
A useful bulk pricing plan does not ask for one unit price and stop there. Cotton drawstring pouch cost is built from several moving parts: fabric purchase, dyeing, cutting efficiency, screen setup, print color changes, sewing output, drawcord supply, labels, cartons, and packing labor. Those parts do not all scale the same way. A single total order quantity can hide the real cost structure.
This matters when a liquor retailer splits a program across sizes, bottle types, colors, or artwork versions. A 10,000-piece PO may sound efficient, but if it becomes 3,000 pieces for one bottle, 3,000 for another, 2,000 with a holiday logo, and 2,000 with a private label mark, the factory may treat it as several smaller lots. Each lot can need different cutting markers, screen setups, print positions, bundle labels, or cartons. If the quote does not show that logic, surcharges tend to appear late.
Ask for tiered pricing by SKU and quantity break. Common breaks might include 1,000, 3,000, 5,000, and 10,000 pieces, but the right levels depend on your program. Separate setup charges from recurring unit cost. List screens, lab dips, custom dyeing, labels, hangtags, carton changes, and packing changes as visible line items. Also ask what can be reused on repeat orders. Reused screens, approved patterns, and stable fabric sourcing can materially change reorder economics.
This structure helps procurement and merchandising work from the same numbers. Launch volume, seasonal variants, replenishment orders, and safety stock can be modeled with fewer surprises. It also makes supplier comparison fairer. One quote may be cheaper on the first order but weaker on repeats; another may have a higher setup cost and a better long-term unit cost once the program stabilizes.
- Request quantity breaks by SKU, such as 1,000, 3,000, 5,000, and 10,000 pieces.
- Separate setup charges from recurring unit price.
- Show MOQ by size, color, and artwork instead of one blended total.
- Ask suppliers to state repeat-order assumptions and reusable tooling clearly.
Compare landed cost, not just ex-factory price
Ex-factory price is only one part of the buying decision. Cotton pouches are soft goods, but they still create freight, receiving, inspection, rework, and storage costs. A cheaper pouch can become expensive if cartons are oversized, SKU marks are unclear, sizes are mixed, print defects are common, or the warehouse has to sort and relabel before goods can be used.
Fabric weight is one trade-off. Heavier canvas costs more and ships heavier, but it may deliver the retail look the program needs. Lighter cotton may save money, but if it looks too promotional for a premium spirits bottle, the saving is not very useful. Packing choices create the same type of trade-off. Flat packing is usually efficient for wholesale programs. Individual polybags may protect presentation or support unit-level handling, but they add material cost, waste, and unpacking labor. Pre-inserted bottle packaging changes the entire freight and handling model and should be quoted separately.
A practical landed-cost worksheet should include unit price, sample charges, strike-off charges, screen costs, lab dip or dye charges, carton dimensions, carton gross weight, estimated cube, inspection cost, duty assumptions if applicable, and warehouse handling method. For an urgent seasonal promotion, speed and reliability may outweigh a minor unit-price gap. For a year-round private label packaging line, shade continuity, carton discipline, and repeat-order stability may matter more.
The most useful metric is cost per approved usable unit. If a supplier ships a slightly higher-priced pouch with cleaner fit, better logo placement, and fewer receiving issues, the real commercial cost can be lower than a cheaper shipment that needs sorting or creates complaints. B2B buyers should make that comparison before awarding the order, not after the cartons arrive.
- Do not compare unit prices without carton size and gross weight.
- Include sample, setup, inspection, freight, and handling costs in the model.
- Compare usable approved units, not only delivered units.
- Match packing style to the warehouse flow and replenishment model.
Use a sample sequence that catches problems early
Sampling should not be a single photo approval. A liquor bottle pouch has to fit, close, print cleanly, and arrive in a usable packing format. Those checks happen best in sequence. Rushing directly from artwork to bulk production often saves a few days on paper and loses much more time if the first production run is wrong.
Start with a construction sample. This confirms finished size, usable height, seam position, drawstring channel, and bottle fit. The bottle should insert smoothly, sit properly at the base, and close at the intended point. Next, approve a print strike-off on the actual fabric color and texture. This is where the buyer checks ink color, opacity, edge clarity, handfeel, rubbing, and how the artwork behaves on the chosen weave. Digital artwork cannot answer those questions.
The pre-production sample should combine the approved fabric, approved construction, approved drawcord, approved decoration, and any labels or tags. Treat it as the commercial standard for the shipment. For retailer review, photos on the actual bottle from several angles are helpful, but a physical sample is better when timing allows. If the program includes barcodes, hangtags, size stickers, or branded labels, include them at this stage rather than adding them later.
Finally, approve a packing mock pack. This can be simple, but it should show folding method, bundle count, inner bag use, carton quantity, carton marks, SKU code, and gross weight. Many receiving issues come from packing assumptions, not pouch construction. A mock pack gives procurement, operations, and the supplier the same reference before bulk cartons are sealed.
- Construction sample checks fit, usable height, and closure.
- Strike-off checks print color, clarity, opacity, and ink behavior.
- Pre-production sample checks the full commercial item.
- Packing mock pack checks bundle count, carton marks, and handling practicality.
Write QC standards for appearance, fit, and function
Factory inspection often focuses on whether the pouch is sewn and counted. Retail buyers need a tighter view. A pouch can have closed seams and still fail because the logo is crooked, the drawcord binds, the fabric shade is mixed, the print rubs, or the bottle strains the bottom seam. Quality control should cover what the customer and store team will actually see and handle.
Start with measurable items. Finished width, total height, and channel depth should have tolerances. Print placement should be measured from seams, not judged by eye. Shade should be reviewed under consistent lighting, especially for black, navy, burgundy, and custom dyed colors. Natural cotton may show seed specks or slubs; decide in advance what level is acceptable. Dark dyed cotton should be checked for crocking and lint visibility if the retail presentation is premium.
Function checks are just as important. Drawcords should glide smoothly, close evenly, and not tear the tunnel opening. Random bottle insertion should be part of inspection, using the approved bottle or dummy. The inspector should check base seating, seam strain, closure height, and whether the print distorts badly when the bottle is inside. Print durability should be checked after curing, particularly for large solid areas and specialty inks.
Carton checks complete the QC picture. Verify count, SKU separation, carton marks, shade consistency, and packing method. If the buyer uses a third-party inspector, the inspection protocol should not be a generic apparel checklist. It should tell the inspector what bottle to use, where to measure, which panel is front-facing, what defects matter, and how mixed packing should be flagged. Clear standards reduce subjective arguments and make corrective action easier.
- Write visual and functional standards, not sewing-only standards.
- Measure print placement from seams and bottom edge.
- Test random bottle insertion during inspection.
- Check drawcord glide, carton count, shade consistency, stains, and odor before shipment release.
Control packing and lead time before the seasonal clock starts
Packing is not an afterthought for liquor retailer pouch programs. It affects freight cube, warehouse speed, presentation quality, and replenishment accuracy. Poor carton discipline can wrinkle printed panels, mix sizes, hide shade variation, or slow receiving. Since pouches often match specific bottle SKUs, packing errors create practical problems even when the pouch itself is acceptable.
For most wholesale orders, flat-packed pouches in fixed bundle quantities are efficient. One SKU per carton is usually the cleanest method unless the buyer intentionally requests assortment cartons. Carton marks should include PO number, style code, size code, color, quantity, carton sequence, and any barcode or warehouse label requirement. Define maximum carton gross weight if goods will be handled manually or moved through parcel networks. A factory may prefer dense cartons, but the densest carton is not always the easiest carton to receive.
Lead time should be broken into stages: artwork review, construction sample, print strike-off, pre-production sample, material booking, bulk cutting, printing, sewing, inspection, packing, and dispatch. The risky steps are often not sewing. They are fabric booking, dye approval, artwork changes, strike-off rejection, and sample revision. Natural stock cotton with simple screen print can move more smoothly. Custom dyeing, specialty decoration, and repeated artwork changes create more approval gates.
For seasonal liquor gifting, a missed window can be more costly than a small unit-price saving. Ask suppliers where the schedule is tight and what approvals they need from you by which date. A supplier with disciplined sample control, clear carton planning, and honest lead-time communication may be the safer option, even if another quote looks slightly cheaper at first glance.
- Use one SKU per carton unless mixed packing is intentional.
- Define carton marks, bundle count, and maximum gross weight in advance.
- Break lead time into approval, material, production, inspection, packing, and dispatch stages.
- For seasonal launches, reliability often matters more than the lowest nominal quote.
Specification comparison for buyers
| Spec decision | Recommended option | When it fits | Buyer risk to check |
|---|---|---|---|
| Sourcing route | Direct cut-and-sew factory with clear control of sewing, print coordination, inspection, and final packing | Best for repeat wholesale programs, custom sizing, and cost control once order volume justifies direct management | Some factories outsource printing, dyeing, or cord production; confirm who approves defects, pays remake cost, and owns delivery recovery |
| Trading company vs factory | Use a trading company only when you need multi-category consolidation or local project management | Useful when one shipment combines pouches, totes, gift bags, labels, tags, and other retail packaging from several plants | Markup can hide weak production control; ask for the actual maker, subcontract map, and inspection responsibility |
| Fabric base | 8 oz to 10 oz cotton canvas, roughly 270-340 GSM depending on bottle weight, shelf look, and budget | Strong fit for liquor bottle presentation, logo stability, and a more substantial handfeel | Too light can look promotional and reveal bottle outlines; too heavy can raise freight cost and make closure stiff |
| Fabric color route | Natural cotton or stock black first; custom Pantone dye only when brand color is commercially important | Best for buyers balancing MOQ, lead time, shade repeatability, and reorder simplicity | Custom dye adds lab dip approvals, dye-lot variance, and replenishment risk between seasons |
| Print route | 1-color or 2-color screen print on approved fabric, with a physical strike-off before bulk printing | Best value for retailer private label gifting, seasonal promotions, and core bottle pouch programs | Large solids, metallic effects, tiny text, or fine lines may crack, blur, or rub if not tested on the actual fabric |
| Logo position | Centered front print with numeric placement from bottom seam and side seam | Fits shelf-facing programs where logo orientation and retail presentation matter | If tolerance is undefined, visibly off-center prints may still pass under loose supplier standards |
| Drawcord style | Cotton rope or braided cord with specified diameter, color, length, and end finish | Standard choice for mid-range to premium liquor presentation and sourcing continuity | Thin, rough, or inconsistent cord can fray, bind in the tunnel, or create uneven store presentation |
| MOQ logic | Set MOQ by size SKU, fabric color, and artwork instead of total PO quantity only | Important when one retailer uses several bottle formats, colorways, or seasonal graphics | A blended MOQ can hide setup charges, split-lot surcharges, and inefficient packing costs |
| Packing route | Flat-packed in fixed inner bundle counts, one SKU per carton, with clear carton marks | Best for warehouse receiving, scanning, replenishment, and lower freight cube than pre-insert packing | Mixed sizes or shades in one carton increase sorting errors, relabel labor, and receiving disputes |
Buyer checklist before sampling
- Send bottle dimensions in mm: total height, widest body diameter, base profile, neck width, shoulder shape, and whether the pouch must cover cork, capsule, screw cap, or decorative topper.
- Specify finished pouch size with tolerance, including usable internal height after the drawstring channel is sewn and the intended closure position on the bottle.
- Choose fabric by fiber content, weave, and GSM, such as plain cotton or cotton canvas, instead of vague terms like premium cotton, thick cotton, or luxury fabric.
- Define fabric color clearly: natural, bleached, stock black, stock navy, or custom dyed Pantone reference, and state acceptable lot-to-lot shade variation.
- State print method, number of colors, logo dimensions, print location, artwork orientation, and placement tolerance in mm from bottom seam and side seam.
- Confirm drawcord material, diameter, color, cord length, cord path, end finish, knot style, and whether tassels, exposed knots, or sealed ends are acceptable.
- Set MOQ by SKU, fabric color, and artwork, and ask suppliers to separate setup charges, split-size surcharges, repeat-order pricing, and material assumptions.
- Require a fit sample using the actual bottle or an approved dimensional bottle dummy before bulk fabric cutting or bulk printing starts.
- Define packing method: pieces per inner bundle, bundles per carton, carton size, maximum gross weight, carton marks, barcode or SKU labels, and whether individual polybags are allowed or excluded.
- Request inspection criteria for size, stitching, print rubbing, odor, stains, shade mixing, drawcord function, bottle fit, and carton count accuracy before shipment release.
Factory quote questions to send
- What fabric construction are you quoting exactly: fiber content, weave, GSM, fabric width, and whether GSM is measured before or after washing or finishing?
- Is the quoted pouch size the cut-panel size or the finished sewn size, and what tolerance do you control for width, total height, and drawstring channel depth?
- Do you print before sewing or after sewing, and what print placement tolerance can you consistently hold on this bottle pouch size?
- How many screens, setup charges, and color stations are included in the quote, and which charges repeat on future orders?
- What is the MOQ by size SKU, fabric color, and artwork, and what surcharge applies if one PO is split across multiple bottle formats?
- Which materials are stock and which are custom ordered, including fabric, drawcord, labels, inner bags, export cartons, hangtags, and retail stickers?
- Can you provide a construction sample, print strike-off on actual fabric, pre-production sample, and packing mock pack before bulk production?
- What inspection standard do you use for open seams, size variance, print defects, shade variation, drawcord defects, stains, odor, and short-packed cartons?
- What export carton dimensions and gross weight are planned, and can packing be adjusted for pallet loading, parcel replenishment, or manual-handling limits?
- Which production steps are subcontracted, if any, such as dyeing, printing, cord making, label weaving, tag printing, or final packing, and who owns corrective action if defects appear?
Quality-control points to confirm
- Finished size should be measured after sewing and light pressing, with separate tolerance for width, total height, and drawstring channel depth.
- Usable internal height must be checked because the drawstring tunnel reduces true bottle clearance; this is a common failure point on tall-neck liquor bottles.
- Fabric GSM should be spot-checked from bulk fabric, especially when comparing light cotton against heavier canvas options.
- Fabric shade should be checked under consistent light, particularly for black, navy, burgundy, or custom dyed colors used in repeat retail programs.
- Print color should be approved from a physical strike-off on the same fabric color and texture, not from digital artwork alone.
- Print placement should be measured from bottom seam and side seam, not judged only by visual centering.
- Print rubbing, cracking, ink feel, and edge clarity should be checked after curing, especially on large solid logos or metallic-effect artwork.
- Seam security should be checked at side seams, bottom seam, drawstring tunnel openings, and any reinforcement point where bottle insertion creates stress.
- Drawcord diameter, length, glide, and finish must be consistent across the shipment so pouches close evenly and present uniformly on shelf.
- Random bottle insertion testing should be done during inspection to confirm fit, closure function, seam stability, and no excessive strain at the bottle base.