1. Start With the Bottle and the Event Flow
Wholesale canvas wine carriers are easy to under-specify because they look simple. In production terms, they are not just logo sleeves. They are small load-bearing textile products that may be handled by warehouse teams, event staff, guests, hotel teams, couriers, or retail buyers before the bottle reaches its final user. A carrier for a seated gala table gift does not face the same stress as a two-bottle sponsor kit carried across a convention center or sorted into several venue shipments.
Begin with the bottle. A nominal 750 ml wine bottle is not one fixed shape. Bordeaux-style bottles are usually straighter, Burgundy bottles tend to have wider shoulders, and sparkling wine bottles are often heavier and wider. Spirits, olive oil, and specialty bottles may need different height, base width, and opening clearance. A useful RFQ gives diameter, height, shoulder profile, filled weight, and bottle count. If the actual bottle is not available yet, send a drawing, measured photos, or a dummy that matches both size and weight.
Then map the handling path. Will carriers ship empty and be filled on site? Will bottles be inserted by the factory, a co-packer, a warehouse, or event staff working against a tight setup window? Will guests carry the item for a few minutes, through a hotel lobby, or across a trade-show floor? These answers affect handle reinforcement, opening size, lining smoothness, carton packing, and inspection. A bag that looks tidy when empty can still fail when loaded with glass and moved repeatedly.
- State the event format: guest giveaway, VIP gifting, wine tasting, sponsor kit, hotel welcome gift, retail resale, distributor stock, or e-commerce item.
- Provide bottle diameter, height, filled weight, shoulder shape, and whether bottles are still wine, sparkling wine, spirits, oil, or mixed formats.
- Confirm who inserts the bottles: factory, warehouse, event staff, venue team, or final recipient.
- Identify whether the carrier must stand upright, hang from a chair, fit inside a gift box, or travel with accessories.
- List accessories such as tasting cards, corkscrews, openers, coasters, tissue, sleeves, sponsor inserts, or hangtags because they change clearance and abrasion risk.
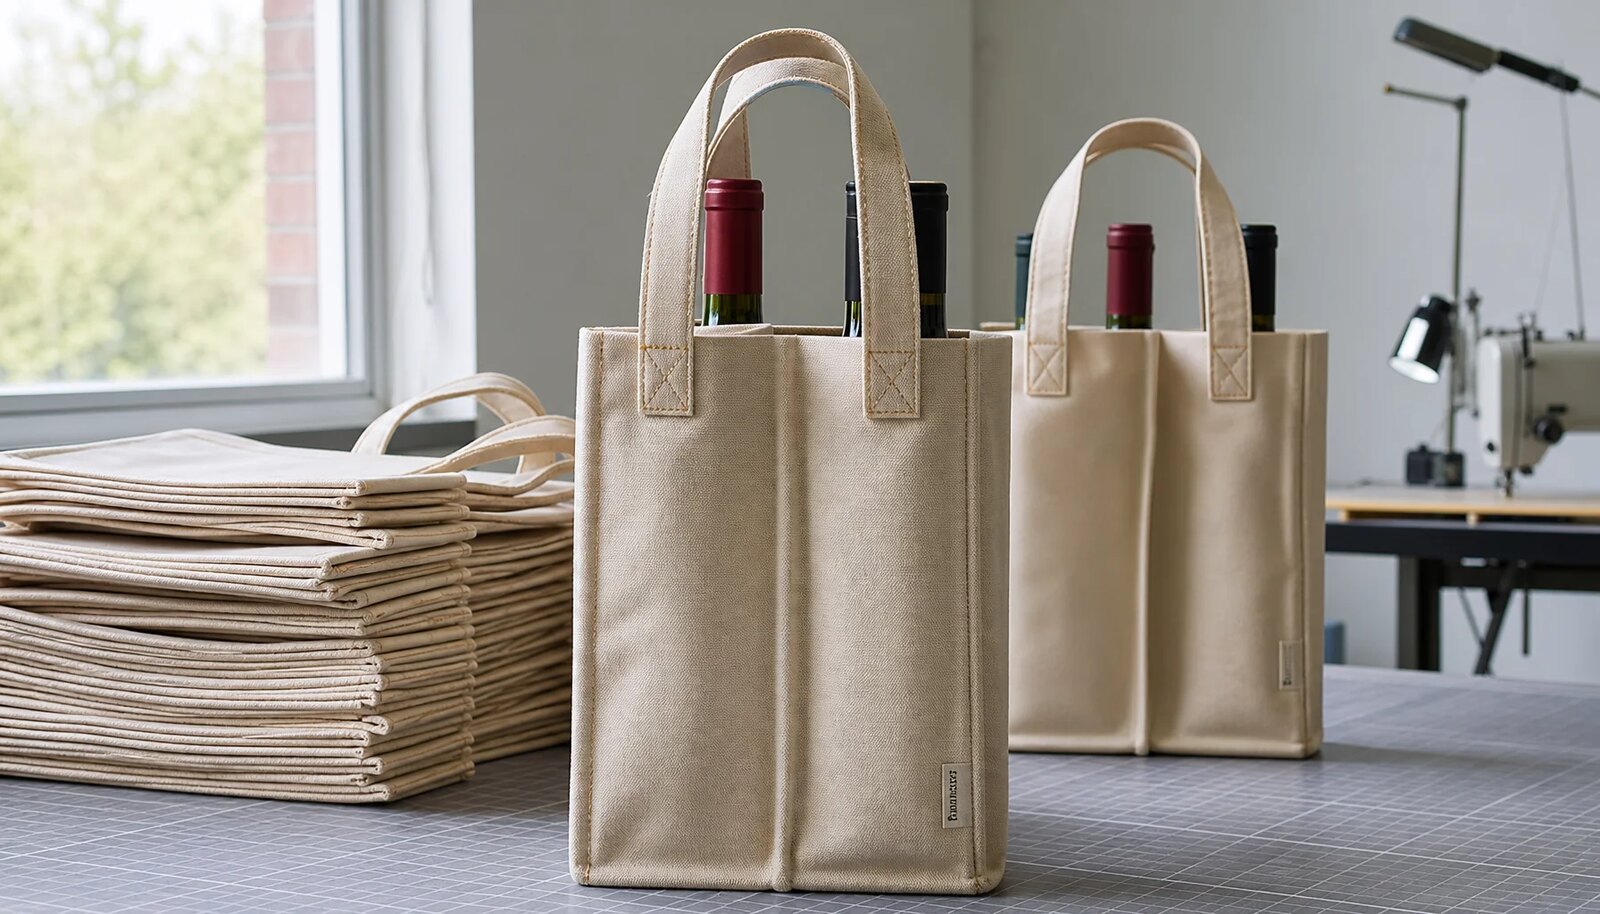
2. Specify Canvas by Weight, Finish, and Behavior
Fabric is one of the biggest cost drivers, but the phrase "heavy canvas" does not protect a buyer. For many wholesale canvas wine carriers for event planners, a practical range is 12 oz to 16 oz, often about 340 to 450 GSM after finishing. Lighter 8 oz to 10 oz canvas can work for short-use promotional sleeves, but it may sag around a filled bottle, show less structure, and print less cleanly. Premium gifting, two-bottle formats, and repeat-use merchandise usually need stronger material and better reinforcement.
Ask suppliers to quote both oz and GSM. Ounce ratings are not always reported the same way across mills and regions, and finishing can change the final feel. Confirm whether the weight is greige, dyed, washed, coated, or finished. Washing can soften the hand but may introduce shrinkage or twist. Pigment dyeing can create intentional variation. Coating can add body, but it may affect ink adhesion and odor. A tightly woven 12 oz fabric may perform better than a loose fabric with a higher GSM number, so the sample should be tested while loaded.
Color standards deserve the same care. Natural canvas keeps sourcing simpler, but cotton seed specks, flecks, small slubs, and minor shade variation may appear. Decide what is normal and what is rejectable before bulk production. Dyed canvas needs lab dips or swatch approval when brand color matters. If the carrier must match a sponsor color or event palette, define the accepted shade range or require buyer approval of production fabric before cutting.
- Use about 10 oz to 12 oz only for low-load, short-duration programs where structure is not critical.
- Use about 12 oz to 14 oz for many single-bottle open-top carriers with simple event branding.
- Use about 14 oz to 16 oz for premium presentation, two-bottle formats, stronger stand-up shape, or heavier handling.
- Request fabric composition, weave, finish, color standard, and whether the fabric is stock or custom-made.
- Approve natural canvas character in writing: acceptable flecks, slubs, shade variation, and whether obvious front-panel marks count as major defects.
3. Control Finished Dimensions and Bottle Clearance
A few millimeters can decide whether an event team loves or hates the carrier. If the body is too tight, staff may struggle to insert bottles, and bottle labels can scrape against seams. If the body is too loose, the bottle swings, the front panel bulges, and the gift feels less considered. For many single-bottle carriers, 8 to 15 mm of side clearance around the bottle diameter is a sensible starting point, but lining, seam bulk, canvas stiffness, and bottle shoulder shape all change the result.
Do not approve only flat panel dimensions. Specify finished measurements after sewing: body height, body width, gusset depth, base width, opening width, divider location, handle drop, handle spacing, and logo location from fixed reference points. Common tolerances for this product type are often around ±5 mm for height and width, ±3 to 5 mm for gusset, ±5 mm for handle drop, and ±3 to 5 mm for print placement. If the design needs tighter alignment, confirm production capability before artwork is locked.
Two-bottle carriers need particular attention. The divider must stop glass-to-glass contact while still allowing both bottles to slide in without force. If the divider is off-center, one pocket may be tight while the other looks loose. At event scale, that is more than a visual issue. It slows packing and increases the chance of damage. Ask for a loaded sample photographed from front, side, and top, with both intended bottles inserted.
- Give suppliers actual bottle dimensions and filled weight before they finalize pattern and price.
- Define finished measurement points on a drawing, not only in a written note.
- Use written tolerances such as body height/width ±5 mm, gusset ±3-5 mm, divider ±5 mm, handle drop ±5 mm, and print placement ±3-5 mm unless the approved sample sets tighter control.
- Test bottle insertion speed if event staff will pack carriers on site.
- Check that the top opening clears corks, caps, foil, and shoulder width without scraping bottle labels.
4. Normalize Construction Before Comparing Prices
Two factories can quote a "canvas wine carrier" and mean two different products. One price may cover an unlined body, simple seams, and a single row of handle stitching. Another may include a top hem, bound interior seams, a boxed base, reinforced handle patches, a stitched divider, and more careful carton packing. The cheaper quote is not automatically wrong, but it may not match the event use. Procurement needs a shared construction spec before comparing unit prices.
The main construction choices are body shape, seam finish, base style, handle material, reinforcement, lining, divider, and closure. An unlined carrier with overlocked seams can be suitable for a budget event giveaway. Bound seams give the inside a cleaner finish and reduce fraying. A lining can improve presentation for VIP gifting or retail, but it adds cost and can reduce internal clearance if the pattern is not adjusted. A gusseted or boxed base helps the carrier stand more upright, but it requires more sewing control than a flat sleeve.
Treat the handle as a load-bearing part, not a decorative detail. A filled wine bottle often weighs roughly 1.1 to 1.6 kg depending on bottle type. A two-bottle carrier may exceed 3 kg when loaded. Ask for the handle material, handle drop, stitch pattern, thread type, reinforcement size, and agreed load test. A box-X stitch, bar-tack, or reinforcement patch can all be appropriate if they are visible on the approved sample and repeated in production.
- Request separate quotes for unlined, bound-seam, and lined versions instead of comparing mixed constructions.
- Ask for a construction drawing or marked sample showing top hem, seam allowance, divider anchoring, base, and handle reinforcement.
- Confirm whether the body is flat, gusseted, boxed, cylindrical, or patterned to a specific bottle profile.
- Specify visible thread color and whether contrast stitching is acceptable.
- Treat any downgrade in handle reinforcement, divider anchoring, or seam finish as a quote deviation requiring written approval.
5. Match the Logo Method to Canvas Texture
Canvas has texture, and texture changes artwork. A logo that looks crisp in a PDF may lose edge definition on a coarse weave. Screen printing is often the safest method for one to three solid colors on cotton canvas at wholesale volume. It can deliver good opacity and repeatability when ink, mesh, pressure, and curing are controlled. Very small type, hairline strokes, and tight multi-color registration are still risky on textured fabric.
Heat transfer and digital printing can be useful for short runs, gradients, or full-color artwork, but they need production-matched samples. Transfers may feel smoother or glossier than the surrounding canvas and can show edge lifting or cracking if poorly applied. Digital print can handle more complex images, but results may look muted on natural canvas or inconsistent on dyed fabric without proper pretreatment. Embroidery can feel premium, yet dense stitches may pucker narrow panels and are usually a poor match for tiny sponsor text.
Event programs often include several sponsors, locations, or artwork versions. That creates a second kind of risk: the carrier may be well made but unusable because the wrong logo went to the wrong venue. Build an artwork matrix with design name, quantity, fabric color, print color, print position, label requirement, carton mark, and destination. Final inspection should include every version, not only the largest production lot.
- Provide vector artwork and define print size and location from fixed sewn references, such as top edge, side seam, or center line.
- Use Pantone references for spot colors and approve a strike-off on the actual fabric color and finish.
- Avoid tiny text below about 6 pt and strokes below about 0.3 mm unless the supplier proves readability on production canvas.
- Ask how printed panels are cured, cooled, stacked, and protected from offset before sewing or packing.
- For multi-sponsor orders, require SKU-level carton labeling and inspection coverage for every artwork version.
6. Use Samples as Production Control Documents
A pre-production sample is not a keepsake. It is the control document for bulk production. The strongest sample uses final canvas, final color, final print method, final stitching, final handle reinforcement, final lining, final closure, final trims, final labels, and representative packing. If anything is substituted, the supplier should list the difference in writing. Without that note, a buyer may approve a sample that the factory never intended to repeat exactly.
Measure the sample as an inspector would. Record finished height, width, gusset, divider position, handle drop, handle spacing, print size, print location, label placement, and finished unit weight. Insert the actual bottle and check whether the carrier stands upright, hangs straight, closes correctly, and avoids pressure on the bottle label. If staff will load bottles quickly during event setup, test loading and unloading several times. The sample should answer operational questions, not just visual ones.
Packing should be sampled too. Fold the carrier the way it will be packed. Place printed faces in their planned orientation. Check whether interleaving, tissue, or individual polybags are needed. Leave a packed sample under light compression and inspect for print transfer, hard creases, lint pick-up, and handle deformation. If barcodes, hangtags, woven labels, or destination labels are required, include them in the sample approval package.
- Keep one approved physical sample with the buyer, one with the supplier, and one available to the inspection team for higher-risk orders.
- Record sample measurements and photos in an approval sheet so final inspection has a clear baseline.
- Load the sample with the actual bottle or a dimension-and-weight equivalent, not a generic empty prop.
- Reject or revise samples with tight insertion, body twist, uneven handles, crooked print, unstable base, or label snagging.
- Approve packing materials, folding method, carton labels, and barcode placement before bulk production starts.
7. Read the Quote Like a Production Buyer
A useful quote makes assumptions visible. It should state fabric weight and composition, fabric color, finish, lining, handle style, reinforcement, print method, number of print colors and positions, trim items, packing method, carton count, sample charge, bulk lead time, payment terms, and exclusions. If those details are missing, the quote may cover only the simplest version of the product. That is risky for event planners because the delivery date is usually fixed.
Look at the cost drivers one by one. Fabric weight, custom dyeing, lining, dividers, bar-tacks, woven labels, hangtags, barcode stickers, individual polybags, interleaving, export cartons, destination sorting, and inspection support can all move the price. A supplier that includes careful packing and documentation may appear higher at first but reduce warehouse work and event risk. A lower quote that excludes labels, carton marks, or inspection support may simply move the cost to the buyer later.
MOQ can also shift when the order is split. A 5,000-unit order across five sponsor designs is not the same as one 5,000-unit print run. Screen setup, color changes, trim sorting, and destination packing can add time and cost. For multi-location programs, ask for price breaks and a carton-level packing plan before issuing the purchase order.
- Ask every supplier to quote the same specification and list deviations separately.
- Request price breaks by total quantity, artwork version, colorway, packing style, and shipment destination.
- Confirm whether logo setup, labels, hangtags, barcodes, polybags, export cartons, inspection support, and sample freight are included.
- Request carton dimensions and estimated gross weight early for freight costing.
- Align payment terms with sample approval and final inspection so the buyer has leverage before shipment.
8. Build the QC Checklist Around Real Failure Modes
A canvas wine carrier should be inspected as a load-bearing event product. Appearance matters, but the bigger failures are handle detachment, seam opening, poor bottle fit, wrong artwork, print rub-off, stains, odor, wrong labels, mixed SKUs, and packing damage. A generic soft-goods checklist may miss these issues unless it includes bottle loading, handle checks, print checks, and artwork segregation.
Use an AQL framework when appropriate, such as ISO 2859-1 or ANSI/ASQ Z1.4, but define the defect severity for this specific product. Critical defects may include handle failure during the agreed load check, sharp trim that can injure users, severe mold odor, or a construction that cannot hold the intended bottle. Major defects may include open seams, skipped stitches at stress points, wrong artwork, wrong barcode, obvious front-panel stains, severe print smears, crooked dividers, and bottle-fit failure. Minor defects may include small interior thread tails or natural flecks that match the approved standard.
Inspection should sample across cartons, colors, artwork versions, and production batches. Inspectors should measure finished dimensions, load-test representative units, insert the intended bottle, compare print to the approved strike-off, verify barcode data, and photograph carton marks. Do not let the inspection cover only the top layer of the cleanest carton. If defects exceed the agreed standard, the buyer needs enough time for sorting, repair, replacement, or a partial shipment decision.
- Measure body height, width, gusset, divider, handle drop, handle spacing, print size, and print location against the approved sample and written tolerances.
- Perform a load check using the intended bottle weight or agreed equivalent; inspect handle roots and seams after the test.
- Classify handle failure, open seams, wrong artwork, wrong barcode, severe odor, and bottle-fit failure as major or critical before production.
- Check print for color, registration, opacity, cracking, offset, lint, smearing, poor curing, and rub-off.
- Require inspection photos for defects, measured units, load-test units, reworked units, packed cartons, and outer carton marks.
9. Specify Packing So Carriers Arrive Event-Ready
Packing is part of product quality. Canvas can pick up lint, dust, creases, and print scuffs during transit. Handles can be compressed into awkward folds. Printed panels can rub against rough fabric backs. If the order ships straight to a venue, the event team may not have time to steam, re-sort, relabel, or rebag product. The packing plan should protect the carrier and make receiving simple.
The right packing method depends on the distribution route. Bulk packing can work for internal event use when staff will unpack and insert bottles locally. Individual polybags may be required for retail, warehouse storage, e-commerce, or multi-site delivery. Tissue or paper interleaving can reduce print abrasion. If carriers are packed with bottles, the project becomes a different packaging exercise and should include bottle protection, drop-risk review, and carton strength. Empty carrier packing mainly needs clean handling, compression control, and print protection.
Put carton details in the PO. State units per inner pack, units per master carton, folding method, print orientation, carton dimensions, maximum gross weight, barcode placement, carton marks, and whether mixed cartons are allowed. The maximum carton weight should match internal receiving rules, not only the factory's preference. For multi-venue programs, carton numbers should connect to a destination-level packing list.
- Specify bulk pack, individual polybag, tissue interleaving, retail hangtag, barcode, or destination pack-out before production.
- Set units per carton and maximum gross carton weight; do not let the factory decide only by carton fullness.
- Require carton labels showing PO number, SKU, artwork version, fabric color, quantity, carton number, and destination code when applicable.
- Use print-facing rules or interleaving where printed panels could rub during freight.
- Ask for packed-carton photos before shipment to verify count, orientation, protection, carton labels, and outer marks.
10. Plan Lead Time Backward From the Event Date
Event merchandise has a real deadline, so the calendar needs more than sewing time. A workable schedule includes artwork approval, lab dip or swatch approval, sample making, sample transit, sample review, material booking, cutting, printing, curing, sewing, trimming, packing, inspection, possible rework, export handling, freight, customs, inland delivery, warehouse receiving, and event allocation. If those stages are not visible, the schedule is too thin for procurement control.
Approval gates are where many delays appear. Sponsors may take longer to sign off artwork. A fabric color may need a second lab dip. A sample may show that the bottle is tight or the logo sits too low after sewing. Print curing and packing cannot be rushed without raising defect risk. Ocean freight protects landed cost when there is enough time. Air freight can rescue a deadline, but it may remove the savings that made the project attractive.
Reserve time for inspection and correction. If final inspection happens the day before cargo cutoff, the buyer has little room to act if defects appear. A better plan leaves days for sorting, rework, replacement, or a split-shipment decision. For multi-location events, add time for receiving, destination allocation, and final count checks. The order is not truly complete until the correct artwork and quantity reach the correct destination in usable condition.
- Request a schedule that separates artwork, sample, material, production, inspection, rework, shipping, and final delivery milestones.
- Lock bottle dimensions, artwork, fabric color, construction, packing, and destination split before cutting begins.
- Do not approve bulk production from photos only when bottle fit, fabric color, or print quality is high risk.
- Schedule final inspection early enough to allow rework before the freight cutoff.
- Confirm last safe ship dates for ocean, air, courier, and domestic trucking before issuing the purchase order.
Specification comparison for buyers
| Spec decision | Recommended option | When it fits | Buyer risk to check |
|---|---|---|---|
| Fabric weight | 12 oz to 16 oz canvas, commonly about 340 to 450 GSM after finishing; request both oz and GSM because conversion varies by weave and reporting method | Single-bottle event gifts, corporate hospitality, tasting kits, and carriers that need body without excessive freight weight | A low quote may use 8 oz to 10 oz promotional canvas that sags under a filled bottle; heavier fabric can increase sewing difficulty, carton cube, and freight cost |
| Fabric composition and weave | 100% cotton canvas or cotton-rich canvas, plain or duck weave; specify recycled cotton, polyester blend, or organic cotton only when those claims are required and verifiable | Natural branding programs, wine-club merchandise, retail-ready gifting, and buyers with material claims to control | Unverified composition claims create compliance and marketing risk; loose weaves can distort print edges and stretch at handle roots |
| Color and finish | Natural greige/off-white, dyed, washed, pigment-dyed, or coated canvas, with lab dip or swatch approval for dyed colors | Natural canvas for simple print and faster sourcing; dyed fabric for brand or event color themes; washed fabric for softer hand feel | Dyed lots can shift visibly; washed fabric may shrink or twist; coated canvas can reduce ink adhesion and introduce odor risk |
| Lining and interior finish | Unlined with overlocked seams, unlined with bound seams, or lined with lightweight cotton/polyester depending on presentation level | Unlined for cost-controlled giveaways; bound seams for cleaner handoff; lining for VIP gifting, retail, or bottle-plus-accessory sets | Raw or poorly overlocked seams can fray and snag labels; lining may reduce internal clearance by 3-8 mm if the pattern is not adjusted |
| Finished size and bottle clearance | Pattern based on actual bottle diameter, height, shoulder, and filled weight; allow practical clearance of 8-15 mm around bottle diameter depending on construction | 750 ml still wine, sparkling wine, spirits, olive oil, or mixed bottle programs where dimensions vary | A generic 750 ml pattern may be too tight for sparkling bottles; a loose fit can cause bottle swing, clinking, and panel bulge |
| Handle construction | Self-fabric folded handle or cotton webbing handle, reinforced with box-X stitch, bar-tack, or an added patch at the handle root | Any carrier expected to hold a filled glass bottle, especially guest hand-carry, hotel delivery, or two-bottle formats | Handle root failure is a high-severity defect; request stitch density, thread type, reinforcement dimensions, and agreed load-test weight |
| Stitching specification | Lockstitch or chain/overlock where appropriate; typical visible stitch density 7-10 stitches per inch unless the approved sample sets another standard | Standard canvas carriers requiring clean seams and repeatable appearance | Too few stitches weaken seams; too many can perforate heavy canvas; inconsistent thread tension causes puckering and seam opening |
| Capacity and divider | Single bottle sleeve, two-bottle carrier with fixed divider, or bottle-plus-pocket construction; divider anchored at top and bottom | Wine-pair gifts, sponsor tasting sets, hotel welcome kits, and premium bottle pairings | Divider placement tolerance matters: if off by more than about ±5 mm, bottles may clink, lean, or make the body look twisted |
| Closure | Open top, drawstring, tie, flap with button/snap, or hook-and-loop tab | Open top for fast event assembly; tie or flap for gifting and retail display; drawstring for dust protection | Metal trims may scratch bottles; closure misalignment over 5-8 mm can look defective; drawcord holes may require reinforcement |
Buyer checklist before sampling
- Confirm bottle diameter, height, shoulder profile, filled weight, bottle count, and whether the order includes sparkling, Burgundy, Bordeaux, spirits, olive oil, or other nonstandard bottles.
- State the target finished internal clearance, not only outside bag size; for most single-bottle carriers, confirm whether 8-15 mm side clearance is acceptable after lining and seams.
- Specify canvas weight in both oz and GSM, fabric composition, weave type, finish, color standard, and whether shade variation, cotton flecks, slubs, and seed specks are acceptable.
- Define finished measurement tolerances: body height and width commonly ±5 mm, gusset ±3-5 mm, handle drop ±5 mm, divider placement ±5 mm, and print placement ±3-5 mm unless the approved sample requires tighter control.
- Provide vector logo files, Pantone or CMYK references, print dimensions, print location from seam or top edge, artwork version matrix, and minimum legibility requirements for small text.
- State handle style, handle drop, stitch type, reinforcement size, thread color, and minimum load test, such as 3 kg static hang for a single-bottle carrier or a buyer-approved equivalent.
- Request a pre-production sample made with final fabric, final dye/finish, final trim, final print method, final stitching, and representative packing; list any substitute materials in writing.
- Define critical, major, and minor defects before production, including handle failure, open seams, wrong artwork, stains, odor, print offset, crooked panels, wrong barcode, and carton shortage.
- Specify carton pack count, folding method, print-facing rules, interleaving or polybag policy, carton dimensions, maximum gross carton weight, barcode label format, pallet pattern, and destination marks.
- Ask for a lead-time schedule separating artwork approval, lab dip, sample making, sample transit, material booking, cutting, printing, curing, sewing, trimming, packing, inspection, rework buffer, and dispatch.
Factory quote questions to send
- What exact canvas weight in oz and GSM is included, and is that weight measured before or after washing, dyeing, coating, or finishing?
- What is the fabric composition, weave type, yarn count if available, and finish? Can you provide a swatch from the production lot before cutting?
- Is the fabric stock, current mill availability, or mill-custom? What MOQ and lead time apply to each color and each fabric weight?
- Will bulk fabric come from one dye lot? If not, how will you control shade variation between panels, handles, dividers, and reorder shipments?
- Which bottle dimensions did you use to develop the pattern? Can you test our actual bottle or a dimension-and-weight dummy before production approval?
- What finished dimensions and tolerances will you commit to for height, width, gusset, base, divider placement, handle drop, handle spacing, print size, and print placement?
- What stitching method, stitch density, thread type, and reinforcement are included at handle roots, side seams, top hem, divider, closure points, and base corners?
- What load test do you recommend for this carrier, and what result will be considered a pass or fail after the test?
- Which logo method is included, how many colors and positions are covered, what setup charges apply, and what minimum line thickness or type size should we avoid on canvas?
- How will printed panels be cured, dried, stacked, and protected before sewing and packing to prevent offset, cracking, lint, or odor?
Quality-control points to confirm
- Fabric GSM should be checked against the approved range using production fabric, not only supplier claims; panels should be free of holes, severe slubs, oil marks, mildew, loose dye dust, heavy shade variation, and unacceptable odor.
- Fabric shade should be compared under consistent lighting against the approved swatch or lab dip; natural cotton flecks should be judged against the approved sample so inspectors do not reject normal material character or accept excessive contamination.
- Finished body dimensions should stay within written tolerances for height, width, gusset, base, divider, handle drop, handle spacing, print size, and print placement; record actual measurements from multiple cartons.
- Stitching should be straight and secure, with no skipped stitches, broken threads, seam slippage, open seams, needle cuts, thread nests, or long visible thread tails; visible stitch density should match the approved sample or written SPI range.
- Handle attachment should pass the agreed load check using the intended filled bottle weight or a defined equivalent, with no tearing, stitch popping, seam opening, or permanent distortion at the handle root.
- Bottle fit should be verified with the actual bottle or a dimensionally equivalent dummy, including shoulder shape, cap or cork clearance, divider placement, lining thickness, and any inserted tissue, card, or accessory.
- Print should match approved artwork for color, location, scale, registration, opacity, edge definition, and hand feel; check for cracking, smearing, pinholes, offset transfer, lint contamination, poor curing odor, and rub-off.
- Lining, dividers, bound seams, and interior edges should be smooth enough that bottle labels do not snag, tear, or rub against bulky seam allowances during insertion and carrying.
- Closures and trims should match the approved sample, including drawcord length, button or snap alignment, hook-and-loop grip, eyelet setting, woven label placement, hangtag string, and barcode data.
- Artwork versions must be segregated by SKU or destination; inspectors should sample every logo version, colorway, and pack-out, not only the largest production lot.