Start With the Event Load, Not the Bag Photo
Event planners buy messenger bags for a fixed delivery date and a specific job. The bag may be filled at a warehouse, stacked by volunteers, handed out at registration, carried through a venue, dropped under a chair, and reused on the flight home. That handling is different from a retail customer testing one sample in a store. Procurement has to judge whether every carton will perform consistently when the schedule leaves little room for replacement.
The first sourcing mistake is asking for a generic canvas messenger bag and comparing unit prices. One supplier may quote a light unlined satchel. Another may quote a structured gusseted bag with a zipper, lining, and reinforced strap anchors. Both may look similar in a product photo, but the durability, packing volume, and cost structure are different. The RFQ should begin with the real contents: notebook, A4 or letter documents, badge, catalog, charger, tablet, bottle, product sample, or staff equipment.
Once the contents are known, convert them into measurable requirements. A document-only attendee bag may need a flat main compartment and a simple flap. A staff carry bag may need a wider strap, better closure, reinforced bottom corners, and a pocket that does not collapse under daily use. A sponsor kit with catalogs needs a gusset and load-tested strap anchors. This is why a wholesale canvas messenger bags for event planners durability testing checklist must connect use case, specification, testing, inspection, and packing in one procurement plan.
- List the actual event contents and estimated loaded weight before choosing canvas weight.
- Decide whether the bag is for one event day, multi-day staff use, or longer post-event reuse.
- Translate contents into finished dimensions, gusset depth, flap drop, and pocket layout.
- Treat registration handling, warehouse sorting, and carton stacking as part of the use case.
Write Canvas Specs Buyers Can Enforce
Canvas terminology can be loose in supplier quotes. A buyer who specifies only canvas leaves room for wide variation in yarn, weave, weight, finish, and hand feel. For B2B comparison, specify the fabric weight in both ounces and grams per square meter. A 12 oz cotton canvas commonly falls around 340-380 gsm and is often suitable for standard event kits. A 14 oz canvas commonly falls around 400-475 gsm and is better for heavier inserts or higher perceived value, provided the sewing construction is upgraded as well.
Weight is not the only fabric variable. A loose weave at the same nominal weight may stretch more than a tighter weave. Washed canvas can feel softer and more casual but may show more shade and dimension variation. Unwashed canvas can provide a cleaner printing surface but may feel stiffer. Dyed canvas requires color control by lab dip or approved color standard, while natural canvas should still be checked for shade, seed flecks, and finish consistency. None of these options is universally best; the correct choice depends on the brand look, decoration method, and load requirement.
Tolerances should be written before the sample is approved. Buyers often use plus or minus 5% as a practical starting point for fabric weight tolerance when the supplier can verify it, but the final tolerance should match the factory's process and the buyer's risk level. Also clarify shrinkage expectations if the bag may be washed by end users, especially when the artwork or dimensions are sensitive. For event distribution, the immediate concern is usually load performance, appearance, odor, and packing stability, but shrinkage and colorfastness still matter when the bag is intended for reuse.
- Specify cotton, cotton blend, or recycled-content requirement only when the supplier can document it.
- Use oz and gsm together to reduce confusion across sourcing markets.
- Record the approved fabric hand feel because two fabrics with the same weight can feel different.
- Ask how the factory controls shade variation across fabric lots and cut panels.
- Define whether small natural slubs are acceptable or whether a cleaner surface is required for printing.
Turn Dimensions Into Fit Controls
Messenger bag dimensions should be finished measurements, not rough pattern targets. Event buyers should state the main body width and height, gusset depth, flap drop, strap width, strap length range, pocket opening, and logo placement from fixed reference points. If the bag must hold A4 folders, US letter inserts, tablets, or catalogs, include the actual insert dimensions and whether they must fit flat without bending.
A common tolerance approach is plus or minus 10 mm for main body dimensions and plus or minus 5 mm for smaller details such as pocket opening or logo position, but procurement should agree the final tolerance with the supplier based on the design. Soft canvas moves during cutting and sewing, so the tolerance cannot be treated like molded plastic. At the same time, loose tolerances create practical problems. A short flap may expose contents when the bag is full. A narrow gusset may distort the front panel. A strap that is too short or too long can make the bag uncomfortable for the target audience.
Fit should be checked with the real event kit during sample approval. Load the notebook, program, inserts, tablet mockup, bottle, or product sample, then close the flap and wear the bag. Inspect whether the side seams twist, the bottom corners bulge, the flap lifts, or the closure sits under strain. Empty bag measurements are useful, but loaded fit shows how the bag will behave at registration and during venue use.
- State all measurements as finished product dimensions unless a pattern measurement is specifically requested.
- Provide insert sizes for documents, tablets, catalogs, and sponsor materials.
- Check whether the flap closes properly after the bag is loaded, not only when empty.
- Confirm strap length range for crossbody or shoulder use.
- Match carton packing assumptions to the finished bag size and fold method.
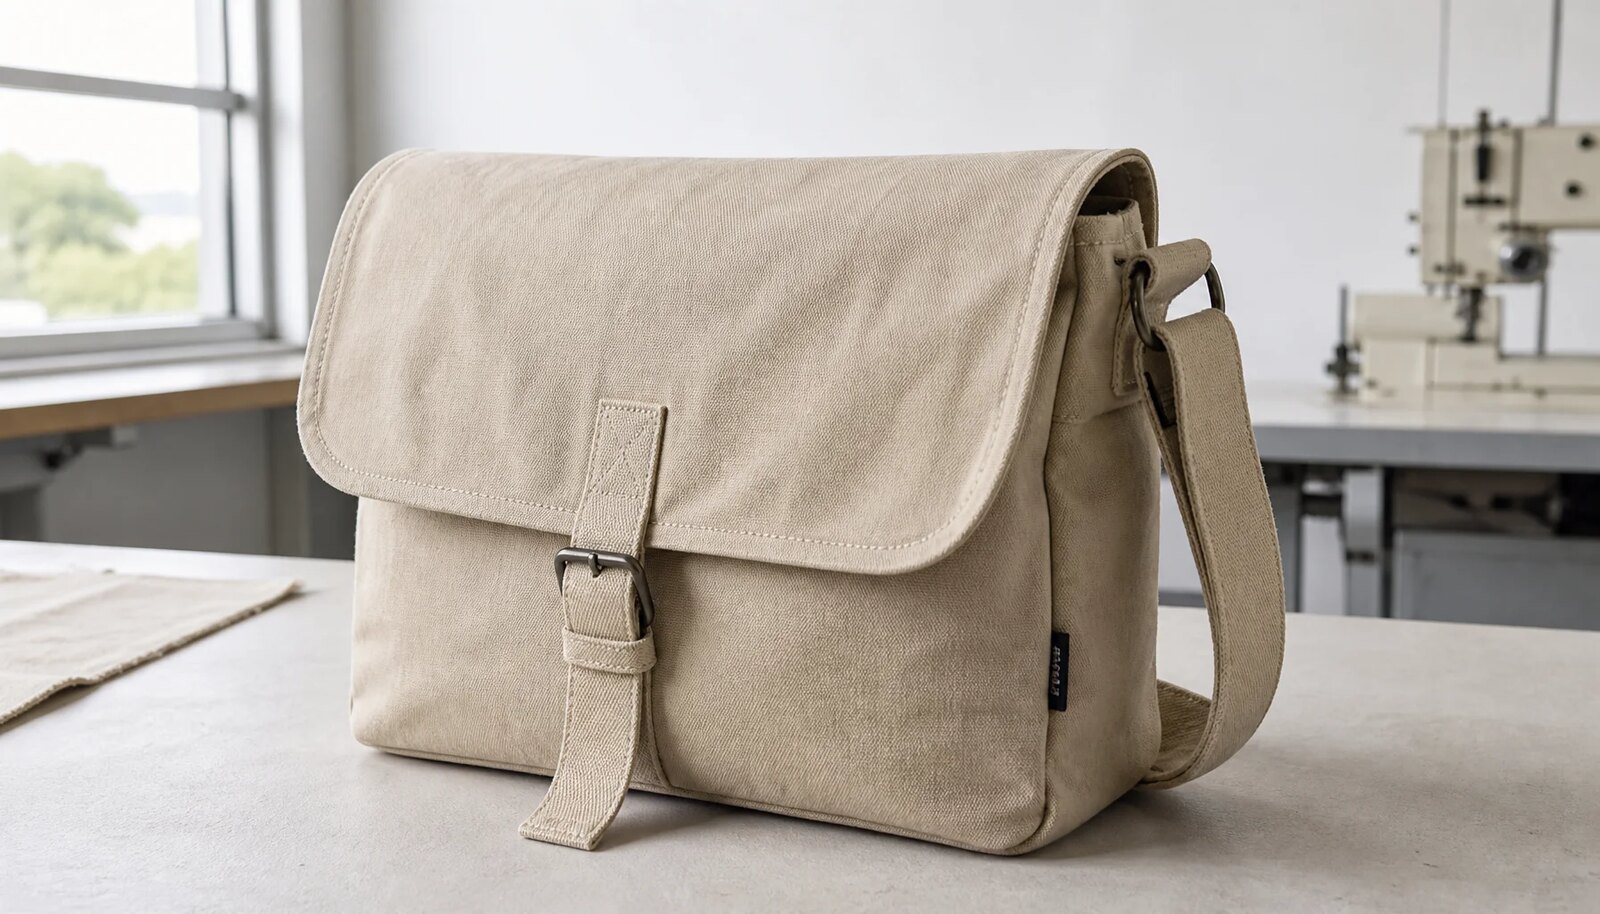
Specify Stress-Point Construction Before Price Comparison
Most durability failures happen at predictable stress points. Strap anchors carry the load. Bottom corners take pressure from books and kits. Pocket openings are pulled repeatedly. Flap corners rub during stacking and carry. Zipper ends receive concentrated force when users open and close the bag quickly. A procurement spec should name these areas and define how they are reinforced.
For strap anchors, buyers should ask for bartacks, box-X stitching, or another visible reinforcement pattern suitable for the fabric and strap type. The reinforcement should distribute force into the body panel rather than concentrating it on one line of stitching. For heavier kits, strap webbing may be more stable than self-fabric straps, although the final choice depends on styling and cost. Strap width matters too. A 30-40 mm strap is often more comfortable than a narrow strap for loaded event bags, while heavier staff bags may require a wider or padded solution.
Stitch density, thread tension, seam allowance, and seam finish should not be left to chance. A practical spec may require consistent stitching with no skipped stitches, backtacking at seam ends, and clean seam allowance. Raw edges may be bound, overlocked, folded, or hidden inside a lining, but the method should be stated. When moving to heavier canvas, the factory may need different needle and thread settings to avoid skipped stitches or puckering. A strong material sewn poorly is still a weak bag.
- Define reinforcement method at strap anchors and confirm it on the sample.
- Require pocket openings and zipper ends to be secured against repeated pulling.
- Ask for seam finish details, especially on unlined bags where raw edges are visible inside.
- Check bottom corners after load testing because they reveal pattern and seam weakness.
- Compare supplier quotes only after reinforcement details are included in each quote.
Choose Closures and Hardware for Actual Handling
Closure choice affects access, durability, perceived value, and production risk. A flap with hook-and-loop is easy for registration kits because attendees can open it quickly, but the sound and appearance may not suit every brand. A #5 nylon zipper is a common practical choice when the contents need better security, and it usually performs better than a small zipper on thicker canvas. Buckles can create a premium look but add cost, weight, and rubbing points. Magnets are clean visually, but they must be tested on a loaded bag because hold strength can feel different once the bag is full.
Hardware should be inspected for finish, edges, corrosion risk, and interaction with the logo. A buckle or slider that presses into a screen-printed flap during packing can leave marks before the bag reaches the venue. Metal hardware can feel premium but may scratch adjacent panels if the fold method is poor. Plastic hardware can reduce weight and cost but should be checked for molding defects, cracking, and color consistency.
Cycle testing helps buyers avoid weak closure choices. A pre-production sample can be opened and closed 50-100 times as a practical internal screen, then inspected for zipper snagging, tooth separation, loose hook-and-loop stitching, magnet pullout, buckle edge damage, and panel distortion. The exact cycle count can be adjusted by program risk, but the principle is simple: do not approve a closure that has only been viewed once on an empty showroom sample.
- Use #5 nylon zippers or comparable durable closures for bags expected to carry higher-value contents.
- Test magnets after loading the bag, not only on an empty sample.
- Check whether buckles, sliders, or zipper pulls rub the printed panel during packing.
- Confirm hardware color, material, finish, and replacement responsibility for defective parts.
- Include closure cycling in sample approval and final inspection.
Match Logo Method to Canvas, Fold, and Wear
Branding often drives the purchase, but logo durability is where many event bags disappoint. Screen print is usually a strong option for one or two flat colors on canvas when ink coverage, curing, and placement are controlled. It is cost-efficient for larger runs and can look crisp on suitable fabric. Woven labels and woven patches are useful when the buyer wants a durable brand detail with clean edges. Embroidery can work well for smaller marks, but large dense embroidery may pucker lighter canvas or make a flap feel stiff.
Heat transfer can be useful for complex artwork or shorter runs, but it should be tested carefully on messenger bags. Fold lines, flap bends, and hardware pressure can cause cracking, lifting, or edge wear if the transfer material and placement are not suitable. If a supplier recommends heat transfer, ask for the exact transfer type, application temperature range, pressure, dwell time, and a sample on final canvas. A digital proof is not enough because it does not show how decoration behaves when sewn, folded, rubbed, and packed.
Logo placement should be approved on the actual sewn sample. Artwork too close to a fold may wear early. Artwork crossing a seam may distort. A mark placed under a buckle may scuff in transit. For sponsor-heavy events, placement tolerance should be written clearly, for example measured from the flap edge or bag centerline. If multiple artwork versions are used, confirm MOQ, labeling, carton separation, and inspection rules by version.
- Approve decoration on final fabric, not on substitute swatches only.
- Use dry rub checks to look for smearing, transfer, cracking, lifting, or edge wear.
- Keep logos away from hard folds, buckle contact, and high-friction corners when possible.
- State logo size and placement tolerance using fixed measurement points.
- Confirm carton separation and labeling for multiple sponsor logo versions.
Use Durability Tests With Pass-Fail Limits
A durability checklist is useful only when it includes acceptance limits. Buyers do not need a laboratory program for every event order, but they do need repeatable checks before bulk approval. A practical sequence includes a load test, strap anchor inspection, seam pull review, closure cycle test, dry rub test, dimension check, odor check, and packing review. The test should match the intended event kit as closely as possible.
For load testing, use the actual event contents or a documented substitute weight. For many document, tablet, charger, and insert kits, buyers may start with a 5-7 kg sample load for 30 minutes as an internal screen, then adjust upward if the real contents are heavier. After the test, inspect strap anchors, bottom corners, side seams, pocket openings, and fabric around reinforcement. A passing sample should show no stitch popping, seam opening, panel tearing, broken reinforcement, or severe deformation. If the buyer expects daily staff use, the test should be stricter than for a one-day document giveaway.
Decoration and packing should be tested together. Rub the logo with a dry white cloth and inspect for ink transfer, cracking, lifting, or abrasion. Fold the bag using the proposed packing method, then unpack it and check whether hardware has marked the logo or flap. Cycle zippers, hook-and-loop, buckles, snaps, or magnets and inspect stitching afterward. Record the test method and pass/fail result in the sample approval file so bulk inspection has a standard beyond personal opinion.
- Set the load test weight before placing the PO.
- Inspect the same stress points before and after the load test.
- Use closure cycling to expose zipper, hook-and-loop, buckle, snap, or magnet weakness.
- Run rub checks on the actual approved decoration method.
- Photograph test results and attach them to the approved sample record.
Approve Samples as Production Standards
A pre-production sample should be a production reference, not a loose style suggestion. It should be made with final canvas, final color, final thread, final lining or binding, final closure, final hardware, final logo method, final label, and final packing. If the factory uses substitute material for speed, the buyer should record the substitution and decide whether a corrected sample is required before mass production.
Sample review should be systematic. Measure the bag, load it, close it, wear it, open every pocket, inspect the inside, check the logo, and review the fold. Look for skipped stitches, loose thread ends, seam puckering, raw edges, sharp hardware, odor, stains, print defects, and shade differences. Compare the sample against the RFQ line by line. If a detail is approved as an exception, write it down. Verbal comments are easy to lose once production moves from sales to purchasing, cutting, printing, sewing, trimming, and packing.
A sealed reference sample reduces disputes. Keep one approved sample with the buyer or inspection team and require the factory to retain a matching unit. The signed approval record should include dimensions, tolerances, fabric weight, logo color, logo size, closure behavior, reinforcement method, packing method, and any accepted variation. During final inspection, bulk goods should be judged against this standard and the written specification together.
- Reject vague sample approvals such as looks good unless the spec has been checked.
- Measure the loaded sample as well as the empty sample.
- Seal and label the approved buyer reference sample with date, version, and artwork code.
- Require the factory to keep the same reference sample at the production site.
- Approve packing with the product, not after all bags are sewn.
Normalize Quotes, MOQs, and Cost Drivers
Wholesale messenger bag quotes can vary because suppliers are pricing different assumptions. MOQ may be tied to fabric color, dye lot, zipper color, hardware finish, woven label, patch, screen print setup, embroidery tape, or packing format. A factory may be able to sew 500 bags but require a higher minimum for custom dyed canvas or a woven patch. Procurement should ask for MOQ by component so the real constraint is visible before artwork and budget are locked.
Line-item pricing makes quotes easier to compare. Ask suppliers to separate the base bag, canvas upgrade, lining, reinforcement, closure hardware, screen print or embroidery, woven label or patch, sample fee, setup charge, packing material, carton, inspection support, and freight terms if included. Some factories will not disclose every internal cost, but they can still confirm whether each item is included. This reduces late-stage surprises such as extra screen charges, label minimums, or packing upgrades.
Price ladders are also useful. Request pricing at the pilot quantity, expected order quantity, and a higher break quantity. The unit price may be higher at small volumes because setup and sample costs are spread over fewer units. That is normal if it is visible. Also clarify whether the quote allows overage or shortage, how defective units will be replaced, and who pays for rework when goods fail agreed inspection criteria. A low unit price is not a saving if the buyer later pays for sorting, repacking, or emergency replacement.
- Ask for MOQ by fabric, bag color, artwork version, label, patch, hardware, and packing.
- Request pricing at two or three realistic order quantities.
- Separate setup fees from recurring unit cost where possible.
- Confirm whether inspection failures, shortages, or rework are covered by the supplier.
- Do not compare unit prices until every supplier has acknowledged the same specification.
Make Packing and Cartons Inspection Items
Packing is part of product quality for event programs. A bag can pass sewing inspection and still arrive with creased flaps, rubbed logos, damp odor, or count errors. Event goods often move from factory to forwarder, warehouse, kit assembly, venue storage, and registration tables. Each transfer increases the value of clear packing rules.
Start with the fold. The approved folding method should protect the flap, logo, and hardware. Buckles, sliders, zipper pulls, and snaps should not press directly into decorated panels. If the front panel must stay flat, the buyer may need tissue, a paper insert, or a protective sheet. Individual polybags can reduce dust and moisture exposure, but buyers should check sustainability policy, local requirements, and warehouse handling preferences. For humid routes or long storage, discuss ventilation, desiccant, carton strength, and mildew prevention.
Carton instructions should be operational, not decorative. State units per inner pack, units per master carton, carton dimensions if constrained by the warehouse, gross weight target, PO number, item number, color, artwork version, destination, barcode labels, and shipping marks. Ask for pre-shipment packing photos for large or deadline-sensitive programs. During inspection, carton counts and packing list accuracy should be checked along with bag quality.
- Approve the fold method before mass packing starts.
- Prevent hardware from marking printed or transferred artwork inside cartons.
- Define inner pack count, master carton count, carton marks, and barcode requirements.
- Check carton gross weight so cartons are practical for warehouse handling.
- Require carton count verification before shipment release.
Specification comparison for buyers
| Procurement decision | Recommended specification | Typical tolerance or check | Risk if left vague |
|---|---|---|---|
| Canvas weight | 12 oz cotton canvas, typically about 340-380 gsm, for standard event kits; 14 oz, typically about 400-475 gsm, for heavier reuse programs | Agree fabric weight tolerance before sampling, commonly plus or minus 5% if the supplier can verify by test report or cutting-room weight check | Supplier may quote a lighter loose-weave canvas that looks acceptable empty but stretches, wrinkles, or tears earlier under load |
| Finished dimensions | State width, height, gusset depth, flap drop, pocket opening, strap width, and strap length in finished measurements | Common bag dimension tolerance is plus or minus 5 mm for small details and plus or minus 10 mm for main body dimensions, subject to pattern and material | Event inserts may not fit flat, flap may lift when loaded, or cartons may not match warehouse plans |
| Strap system | Cotton webbing or reinforced self-fabric strap with defined width, adjustability, and anchor construction | For attendee carry, many buyers specify 30-40 mm strap width; heavy kits may need wider webbing and stronger anchors | Narrow straps cut into the shoulder, anchors distort, and seam failure appears after registration handout |
| Reinforcement | Bartack, box-X, or double-row reinforcement at strap anchors, side seams, bottom corners, pocket openings, zipper ends, and flap corners | Confirm reinforcement pattern on technical drawing and pre-production sample; compare bulk units against the sealed sample | The supplier may call a bag reinforced while using only extra topstitching in low-stress areas |
| Stitching | Consistent lockstitch or chainstitch where appropriate, controlled thread tension, backtacking at seam ends, and no skipped stitches | Ask factory to state stitch density range, for example 7-9 stitches per inch where suitable for the fabric and operation | Loose tension, skipped stitches, seam grinning, and open ends can pass a quick visual check but fail during load testing |
| Closure | Flap with hook-and-loop for fast access, #5 nylon zipper for security, buckle for styling, or magnet only when load testing proves hold strength | Cycle the actual closure 50-100 times on the approved sample and inspect stitching, alignment, snagging, and hold | Weak magnets, misaligned zippers, noisy hook-and-loop, or buckles rubbing the logo can create field complaints |
| Logo method | Screen print for simple flat artwork, woven label or woven patch for durable brand detail, embroidery for smaller premium marks on suitable canvas | Check logo size, placement tolerance, Pantone or approved color reference, rub resistance, curing, and edge quality | Heat transfers may crack on fold lines; embroidery may pucker; screen print may scuff if ink, curing, or placement is wrong |
| Sample approval | Pre-production sample made with final fabric, final hardware, final thread, final logo method, final color, and final packing | Seal one approved buyer sample and require a matching factory reference sample with signed comments | Bulk production may drift because verbal sample notes are interpreted differently by purchasing, sewing, printing, and QC teams |
| Durability testing | Load test, seam inspection, strap pull review, closure cycle test, dry rub test, dimension check, odor check, and carton drop or compression review | Use written pass/fail limits before PO approval; test against actual event kit weight or a documented substitute load | Testing without limits creates argument; testing only after all units are packed leaves little time for corrective action |
Buyer checklist before sampling
- Define the event use case before requesting quotes: document satchel, sponsor kit, tablet bag, staff carry bag, VIP gift, or retail-style reusable item.
- Estimate the loaded weight in kilograms using the actual event contents or a documented substitute list, then specify the required load test weight.
- State finished dimensions for width, height, gusset depth, flap drop, strap width, strap length range, pocket opening, and logo position.
- Specify canvas weight in both oz and gsm, with tolerance, weave description, color standard, finish, and whether the fabric is washed, dyed, natural, or coated.
- Require the supplier to confirm fabric shrinkage expectations, colorfastness risk, shade-lot handling, and whether cutting will be done after fabric relaxation if needed.
- Name the reinforcement method at strap anchors, bottom corners, side seams, pocket openings, zipper ends, and flap corners instead of using only the word reinforced.
- Choose the logo method before sampling so screen print, embroidery, woven patch, woven label, or heat transfer can be tested on final canvas at final placement.
- Ask for a pre-production sample made with final fabric, thread, hardware, lining, closure, label, logo process, fold method, and packing material.
- Set written acceptance criteria for load testing, seam integrity, closure cycling, rub testing, dimensions, cleanliness, odor, and packing condition.
- Request a line-item quote separating bag body, fabric upgrade, lining, reinforcement, hardware, decoration, labels, packing, cartons, sampling, inspection, and freight terms if included.
Factory quote questions to send
- What exact canvas construction are you quoting: weight in oz and gsm, fiber content, weave type, finish, color standard, and bulk tolerance?
- Is the canvas natural, bleached, dyed, pigment dyed, washed, or coated, and what shade variation should we expect between sample and bulk?
- What are the finished dimensions and tolerances for body width, height, gusset, flap drop, pocket opening, strap width, and strap length?
- Will the bag be unlined, bound, partially lined, or fully lined, and what fabric or binding material is included?
- What reinforcement pattern will you use at strap anchors, side seams, bottom corners, pocket openings, flap corners, and zipper ends?
- What stitch density, thread type, needle size range, and seam finish do you use for this canvas weight?
- Is the price based on cotton webbing, self-fabric strap, adjustable hardware, fixed strap, metal buckle, plastic buckle, zipper, hook-and-loop, magnet, or snap closure?
- Which logo method is included, and does the price include screen setup, embroidery tape, woven label setup, patch mold, Pantone matching, and placement testing?
- Can you make a pre-production sample using final fabric, final thread, final hardware, final logo method, final label, and final packing?
- Will you keep a sealed factory reference sample, and can our inspector compare bulk units against the same approved sample?
Quality-control points to confirm
- Fabric weight, color, hand feel, weave density, and finish match the approved sample and written spec, with no thin spots, holes, stains, oil marks, shade bands, or excessive slubs outside the agreed standard.
- Cut panels follow the approved pattern, grain direction where relevant, and shape symmetry; body, flap, gusset, pocket, and strap pieces must not twist after sewing or loading.
- Finished dimensions for body, gusset, flap, pocket, strap width, and strap length stay within agreed tolerance so event documents, tablets, and inserts fit correctly.
- Main seams are straight, secure, and free from skipped stitches, broken thread, loose tension, seam grinning, open seam ends, exposed raw edges, heavy puckering, and needle damage.
- Strap anchors use the approved bartack, box-X, or reinforcement pattern and show no stitch popping, panel tearing, thread breakage, or severe distortion after load testing.
- Bottom corners, side seams, pocket openings, flap corners, and zipper ends are reinforced or finished as specified because these are common failure points during event packing and carry.
- Logo size, placement, color, registration, edge quality, curing, and alignment match the approved sample; decoration must not crack, lift, smear, bleed, or transfer during rub checks.
- Zippers, buckles, snaps, hook-and-loop, magnets, and flap closures operate smoothly through repeated cycles without snagging, sharp edges, broken teeth, weak hold, or scraping the printed panel.
- Interior finish is clean for the intended use, with controlled seam allowance, no loose cut threads, no trapped fabric waste, no sharp hardware backs, and no glue or marker residue.
- Odor, mildew risk, color transfer, dust, stains, loose threads, and surface contamination are corrected before packing and not hidden inside cartons.