Why this bag works for wellness event giveaways
For wellness brands, a printed canvas shopping bag is not just a carrier. It is often the first physical item a guest takes home after a retreat, studio launch, expo, or community activation. That matters because the bag has to do two jobs at once: carry product efficiently on event day and still look good enough to be reused later. If the tote feels flimsy, the brand looks careless. If the print is overworked or the bag is awkward to fold and pack, the giveaway becomes expensive without adding much value. The useful buying question is not whether canvas is the right category. It is how much structure, print quality, and packing discipline the event actually needs.
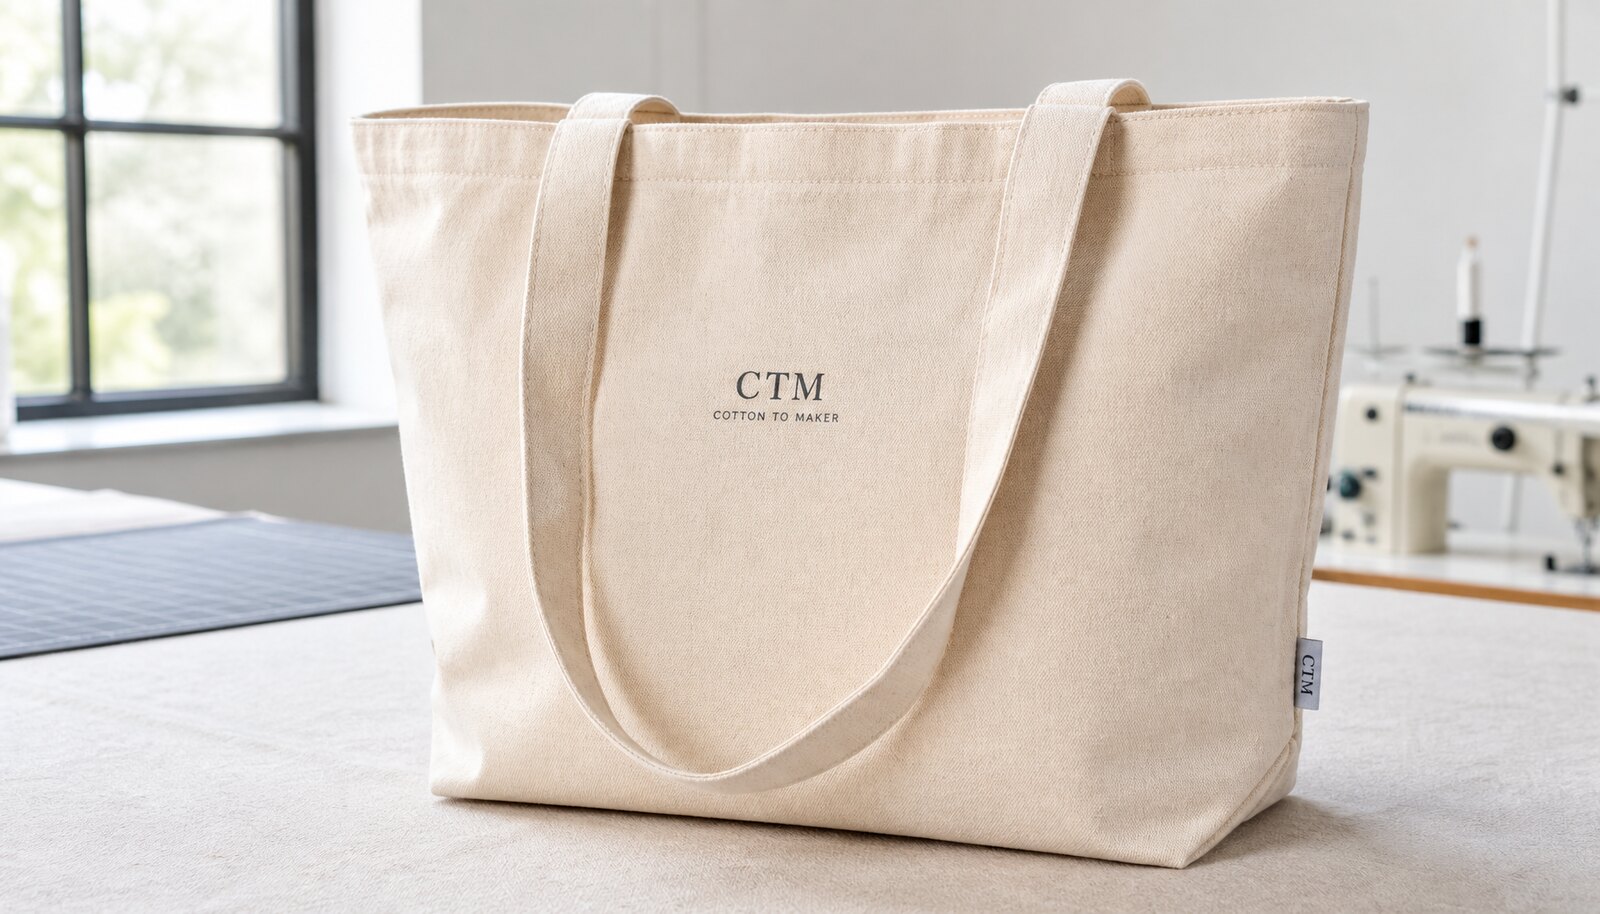
A wellness giveaway usually includes lighter items such as samples, cards, stationery, or a small retail product set, so the tote does not need to be overbuilt. What it does need is a clean silhouette, predictable print placement, and a fabric that feels substantial in hand. Buyers often under-spec these bags because the content inside seems light, then discover that a thin bag wrinkles badly, prints poorly, and arrives looking generic. The right spec gives you a bag that reads as part of the brand experience, not as a cheap throw-in.
- Use canvas when the bag needs to be reused after the event, not only handed out once.
- Keep the visual language simple if the bag will be distributed fast at registration tables or welcome counters.
- Treat the tote as part of the merch kit, not as loose promotional packaging.
Start with fabric weight, size, and construction
The most practical starting point is fabric weight. For printed canvas shopping bags for wellness brands, 10 oz canvas, roughly 340 gsm, is usually the best baseline. It is heavy enough to feel structured, supports clear print edges, and keeps freight and folding manageable. If the bag is expected to carry bottles, thicker samples, or a premium retail set, move up to 12 oz, roughly 400 gsm. If the giveaway is mostly paper inserts and lightweight samples, 8 oz can work, but it needs to be accepted as an entry-level option. Do not compare quotes across different fabric weights as if they are the same product.
Size and construction should match the event content, not a generic catalog template. A common useful format is about 38 x 42 cm with a 10 cm gusset, or a flat tote close to 35 x 40 cm if the pack is light. Handle drop matters more than most buyers expect. If the handle is too short, the bag is awkward over a shoulder; too long and the bag swings badly in transit. Ask the factory to confirm handle width, attachment method, seam reinforcement, and whether the body uses a top hem or bound edge. These details affect both durability and presentation.
- 10 oz / 340 gsm is the most balanced spec for event giveaways with moderate weight.
- 12 oz / 400 gsm is better when the bag has to look premium or carry bottles and boxed items.
- Ask for a measurement sheet covering body size, gusset depth, handle length, and handle drop.
- Prefer bar-tack or cross-stitch reinforcement at stress points, especially on longer handles.
Choose the print method around artwork, not habit
For most wellness brand giveaways, screen printing is still the best default when the artwork is a logo, a short line of copy, or a simple icon. It gives solid color coverage, a consistent finish across volume, and a unit cost that usually stays predictable once the setup is done. That said, the method only works cleanly if the artwork is prepared for it. Keep line weights strong, avoid tiny reversed text, and target a print size that fits the tote without crowding the seams. A simple one-color or two-color layout is often stronger than a complicated design that loses clarity in production.
Transfer and digital methods are useful when the artwork includes gradients, multi-color illustration, or a short event-specific campaign graphic. They can solve design problems, but they also add tradeoffs: higher unit cost, different surface handfeel, and more risk if the buyer assumes the print will behave like screen ink. The practical rule is to choose the print method after you know the artwork complexity, quantity, and reusability target. For a wellness event bag that needs to look calm, clean, and premium, less is often safer than more. Ask the factory to show print position relative to the seams, not just on a flat artwork proof.
- Use screen print for sharp logos, short phrases, and repeatable volumes.
- Use transfer or digital only when the artwork truly needs more color complexity.
- Set Pantone targets early and confirm whether the factory prints to a wet or dry color standard.
- Keep the logo clear of seams, gussets, and folded hem lines.
Understand MOQ logic before you compare quotes
MOQ is not just a factory policy. It is a cost structure. When the buyer requests a custom canvas bag with a specific size, one print location, and a defined color, the setup is relatively efficient. When the buyer adds multiple colors, mixed sizes, special packing, or a different handle material, the factory absorbs more changeover cost and usually pushes the MOQ upward. This is why one quote may look cheap at 1,000 pieces and another looks expensive at 3,000 pieces: the spread is often driven by setup assumptions, not just margin. A clean quote should identify where the minimum applies: per design, per size, per color, or per shipment.
For wellness event planning, the most useful MOQ strategy is to keep the bag spec consistent across the order and let the event content vary inside the tote. That means one body size, one fabric weight, one print location, and one packing method. If you need different campaign versions, consider making the artwork variable while holding the bag constant. That lets the factory keep a lower MOQ and avoids the hidden cost of splitting production across too many SKUs. As a buyer, you want the quote to show what is fixed and what changes. If the supplier cannot break that down clearly, the price comparison is not trustworthy.
- MOQ usually rises when you change size, fabric, print color count, or packing format.
- Ask whether the MOQ applies to the whole order or separately to each artwork or colorway.
- Use one tote spec and vary the insert or campaign card if you need multiple event messages.
- Request a line-item quote for blank bag, print setup, packing, and shipping.
Approve the sample for more than appearance
A photo proof is useful, but it is not enough for production sign-off. A physical sample should be checked for fabric handfeel, print density, stitch quality, handle balance, and how the bag folds in a carton. Wellness event bags often get packed in quantity and handled by non-specialist staff, so the sample should also reflect the final packaging method. If the bag is meant to arrive flat-packed for event distribution, the sample should be folded that way. If it will be delivered with tissue, inserts, or tags, the sample should include those items. Otherwise, the bulk order can look right in isolation and still fail in the final kit format.
The approval checklist should be practical. Measure the body width and height, inspect print edge sharpness, rub the print lightly to see if it sheds, and check the handle attachment points under tension. If the sample is a natural cotton bag, look for slubs, specks, and shade variation so the finished order does not surprise you with a more rustic texture than expected. For a wellness brand, the acceptable level of variation is usually low: the bag should read as clean, calm, and organized. Lock the approved sample, mark it as the standard, and make sure the factory knows it is the reference for bulk production.
- Use a physical pre-production sample as the production reference.
- Check print coverage, rub resistance, and seam alignment, not only the logo artwork.
- Approve the bag in the same packing condition it will ship in.
- Keep one signed or photographed master sample for disputes and final inspection.
Plan packing for event distribution, not just carton loading
Packing is where many giveaway programs lose time. A tote that looks fine in the factory can become awkward if it is packed too tightly, folded across the logo, or shipped in carton counts that do not match the receiving plan. The simplest and cheapest route is bulk packing by carton, but that only works when the receiving team can sort and stage the bags themselves. If the bags go straight to a venue, fulfillment center, or regional distributor, carton count and outer marks matter as much as the bag spec. Ask the factory to state how many bags per carton, the gross weight, and the carton dimensions so the logistics team can plan handling correctly.
Single polybagging is not always necessary, and for many event giveaways it adds cost without adding value. It becomes useful when the bags are going to retail channels, multiple venues, or long storage periods where dust and humidity are concerns. If inserts are included, define whether they are packed inside each bag or separately in cartons. The goal is to avoid receiving a pallet of canvas bags that then requires a second round of manual packing. For a wellness event, smooth distribution is part of the brand experience, so the packing method should support speed, count accuracy, and low damage risk.
- Bulk pack is usually the lowest-cost route for direct event distribution.
- Single polybag makes sense when the bags are stored, resold, or moved between sites.
- Confirm carton count, carton size, gross weight, and shipping marks before production.
- Keep folded logos visible or avoid folds that crease the main print area.
Work backward from the event date
A real schedule starts with the event date and works backward through sample approval, bulk production, inspection, and freight. For a custom printed canvas tote, a practical factory timeline often looks like this: a few days for artwork confirmation, about a week for samples depending on setup, two to four weeks for bulk production, then shipping time that varies by route. Ocean freight can be acceptable for planned campaigns, but it requires a wider buffer. Air freight can rescue a late order, but it changes landed cost quickly. If the event has a fixed launch date, do not use the factory's earliest estimate as your only plan.
Schedule risk usually comes from three places: late artwork changes, capacity congestion, and packing or inspection corrections. If you change print placement after sample approval, the factory may need new screens or a revised layout. If you buy near a peak period, the tote itself may be simple but the line becomes slower because of other orders. And if the QC rules are vague, rework can sit at the end of the schedule and push freight bookings. The best defense is to freeze the spec early, approve the sample quickly, and keep a modest buffer between arrival and event date. That buffer is what lets procurement solve problems without panic.
- Plan backward from the event date, not forward from order placement.
- Separate sample time, bulk time, inspection time, and freight time.
- Keep a buffer for artwork corrections, reprints, or customs delays.
- Do not promise a launch schedule until the packing list and shipment mode are fixed.
Compare landed cost by sourcing route
The cheapest unit price is not always the lowest landed cost. A direct factory quote may win on production cost, but it can add coordination work and higher responsibility for artwork, QC, and shipping management. A trading company can simplify communication and bundle services, but you may pay more and lose visibility into where the cost is coming from. A local decorator or regional supplier can be useful when speed matters, though the bag weight, print control, and fabric choice may be limited by stock availability. For wellness brands and event teams, the right route depends on whether the priority is speed, control, or repeatable volume.
To compare fairly, break the landed cost into parts: blank tote, print setup, packaging, internal transport, inspection, freight, duty, and local delivery. If one quote includes all of those costs and another quote only covers factory EXW pricing, the apparent difference is misleading. Ask each supplier to state the same commercial term and the same packing basis. For recurring programs, direct factory sourcing is often the best long-term route because you can hold the spec steady and improve cost over repeat orders. For one-off events with a short schedule, a higher-cost route can still be the smarter move if it reduces execution risk.
- Compare quotes only after converting them to the same Incoterm and packing basis.
- Include inspection, freight, duty, and local delivery in the landed-cost view.
- Direct factory sourcing usually gives the best control on repeat programs.
- Regional suppliers can be justified when speed matters more than unit cost.
Build the RFQ so the factory can price it cleanly
A useful RFQ for printed canvas shopping bags should read like a production instruction, not a loose request for a tote quote. Include quantity, size, fabric weight, color, print location, print colors, handle style, packing method, delivery address, and target date. Add the artwork file in vector format and state whether the factory should quote one-side or two-side print. If you want the supplier to include samples, testing, or carton marks, say so. The clearer the RFQ, the narrower the price spread, and the faster the buyer can compare offers without chasing clarifications.
It also helps to state what is non-negotiable. If the wellness brand needs a natural canvas tone, a specific handle drop, or a certain print placement for photography, put that in the brief. If the order will be split between event kits and retail stock, explain whether the bags must arrive in one batch or in staged deliveries. The point of the RFQ is not to give the factory room to guess. It is to define the bag tightly enough that quote differences reflect real commercial tradeoffs rather than missing information.
- Specify quantity, size, fabric weight, color, logo artwork, packing, and delivery terms.
- State if the supplier should quote samples, plates, tags, inserts, and cartons.
- Tell the factory what cannot change after approval, especially print placement and bag size.
- Ask for a quote version that separates production cost from logistics cost.
Specification comparison for buyers
| Spec decision | Recommended option | When it fits | Buyer risk to check |
|---|---|---|---|
| Fabric weight | 10 oz / about 340 gsm unbleached canvas | Best balance for wellness event giveaways that need a sturdier, retail-like feel without heavy freight cost | Confirm actual gsm, weave density, and whether the quote includes pre-shrunk or washed fabric |
| Fabric upgrade | 12 oz / about 400 gsm canvas | Use when the bag carries samples, bottled products, or premium retreat kits | Heavier cloth changes cost, print ink coverage, folding behavior, and carton weight |
| Print method | 1-2 color screen print | Best for clean logos, short brand messages, and repeatable bulk production | Check color registration tolerance, ink handfeel, and whether the print sits flat over seams |
| Artwork style | Simple logo on one side with a small secondary mark on the reverse | Fits giveaway bags meant for fast distribution and later reuse | Avoid artwork that runs too close to side seams, handles, or the bottom gusset |
| Handle construction | Self-fabric handles or cotton webbing handles with bar-tacks | Use self-fabric for cost control; use webbing for a more durable premium feel | Verify handle width, drop length, and pull strength at the seam attachment |
| Bag structure | Flat tote or modest gusseted tote | Flat totes suit brochures and lightweight merch; gusseted bags suit product kits and bottles | Do not assume the same artwork placement works on both formats |
| Packing route | Bulk packed with carton marks for event distribution | Best when bags go directly to an event warehouse or fulfillment center | Confirm carton count, compression folding, moisture control, and whether inner polybags are excluded |
| Supplier route | Direct factory with pre-production sample approval | Best for 1,000 pcs and up, or when color, print, and packing need tight control | Watch for hidden charges on plates, sampling, carton marks, and freight terms |
Buyer checklist before sampling
- Lock the bag size, fabric weight, handle length, and one approved print placement before requesting quotes.
- Send vector artwork, Pantone targets, and a real-life logo size reference, not only a screenshot.
- State whether the bags will be used empty, with inserts, or as fully packed event kits.
- Ask for sample photos of the exact fabric weight, not a similar tote in a different cloth grade.
- Confirm the packaging method, carton count, and the delivery address type before the factory prices freight.
- Set a tolerance for print position, stitch defects, and over-run or under-run quantity before production starts.
- Get the lead time split into sample, bulk production, inspection, and shipping instead of one vague date.
- Compare at least two sourcing routes so unit price is weighed against control, speed, and freight risk.
Factory quote questions to send
- What exact canvas weight, weave, and finish are you quoting, and can you confirm the gsm?
- Is the price for one-side print or two-side print, and how many colors are included?
- What is the MOQ per artwork, per color, and per bag size?
- What are the sample charges, and are they deductible from the bulk order?
- Can you separate bag cost, print cost, packing cost, and freight in the quote?
- What carton pack, carton size, and gross weight will you use for shipment?
- What is the production lead time after sample approval and deposit receipt?
- What overrun or underrun percentage do you allow, and how do you handle rejected pieces?
Quality-control points to confirm
- Fabric weight matches the approved spec within a reasonable tolerance and feels consistent across the lot.
- Bag size, gusset depth, and handle drop stay within the agreed measurement tolerance on a carton sample.
- Stitching is even, seams are straight, and bar-tacks or reinforcement points do not open under normal pull force.
- Print color, position, and sharpness match the approved sample, with no blotting, cracking, or major misregistration.
- Logo placement leaves enough clearance from seams, corners, and the top hem so the artwork is not distorted.
- Handles are aligned, securely attached, and identical left to right so the bag hangs evenly.
- Odor, dust, loose threads, and staining are controlled before packing.
- Carton count, carton marks, and outer packing are correct so event distribution does not require recounting on arrival.