Start with the use case, not the tote
A printed canvas bag for a farmers market can be a giveaway, a resale item, a membership perk, or a branded retail SKU. Those uses are similar on the surface, but they create different buying rules. A giveaway can tolerate simpler finishing if the price is right. A retail bag needs cleaner seams, tighter print placement, and packaging that looks deliberate on a shelf. If procurement skips this decision, every later conversation becomes vague because the supplier does not know which standard matters most.
The best approval checklist starts with how the end user will actually carry the bag. Farmers market buyers often load produce, bread, jars, flowers, or boxed goods. That means the bag needs more than a logo. It needs enough body to hold shape, handles that are comfortable in hand or on the shoulder, and a bottom seam that does not distort when weight shifts. If the bag will be folded, stored in a car, and reused every week, the sample should be judged on repeated handling, not a single lift.
Write the commercial goal into the spec before asking for samples. For example: reusable enough for weekly market trips, clean enough for resale, and priced so the landed cost still leaves room for margin or promotion spend. That turns the approval from a subjective “looks fine” exercise into a practical buying decision. It also helps the factory choose the right cloth and construction from the start, which usually saves at least one revision round.
- Define the bag’s use case before quoting: giveaway, resale, or member benefit.
- Set the realistic load profile based on market goods, not light office carry.
- Document the brand standard, because a retail bag and a promo bag are not the same purchase.
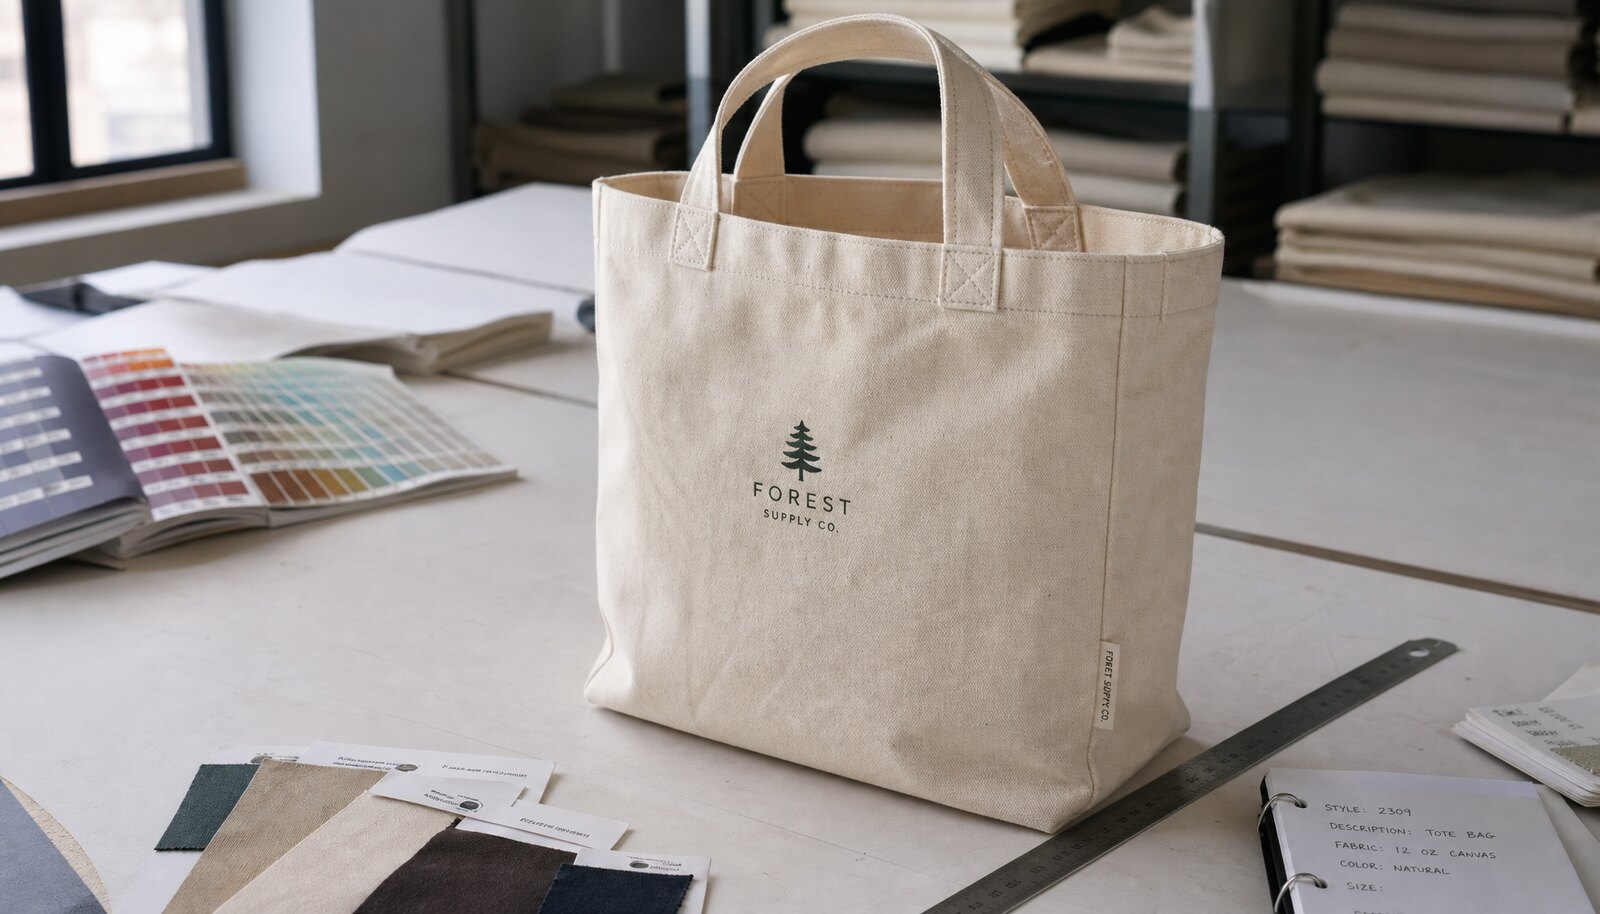
Choose fabric weight and finish with the load in mind
Fabric weight is the first commercial decision that affects the rest of the build. For most farmers market programs, 12 oz to 14 oz cotton canvas is the practical middle ground because it usually balances hand feel, printability, and everyday carry strength. Lighter cloth can work for lower-load or price-sensitive bags, but buyers should expect less structure and more risk of sagging once the bag is filled with groceries or bottles. Heavier canvas can be a better fit for premium retail programs, but the added cost, stiffness, and shipping weight need to be justified.
Ask for the actual spec, not just the marketing label. The useful details are GSM, weave density, yarn count if available, and whether the fabric has been pre-shrunk, washed, or left raw. Raw canvas can change after pressing or after the first wash, which matters when the buyer cares about finished dimensions. A sample that measures correctly before production can come back short if the cloth behaves differently in bulk. That is one of the most common sources of avoidable rejection when the spec sheet is too loose.
Finish matters as much as weight. A tightly woven canvas tends to take print more cleanly and hide minor surface variation better than a loose weave. A softer cloth may fold more easily for packing, but it can also show print irregularities sooner and may not stand upright as well in a display bin. Buyers should ask for a swatch or mill reference so the sample can be judged against the same surface the bulk order is supposed to use. If the supplier cannot identify the cloth, the quote is not specific enough for procurement.
For tight budgets, the decision should be explicit: accept a lighter cloth and simpler finish, or spend more for structure and repeat use. What should not happen is an unspecified mid-range tote that looks acceptable in the sample room but underperforms once customers actually carry it home.
- Use 10 oz to 11 oz only when the bag is clearly light-duty or promotional.
- Use 12 oz to 14 oz for the standard farmers market reusable tote.
- Request cloth details in GSM, finish, and shrink behavior, not just a generic canvas label.
Match the print method to artwork complexity and reorder plan
For most printed canvas shopping bags, screen printing is the strongest default when the artwork is simple and the order will repeat. It gives solid opacity, clean edges, and predictable bulk consistency, especially for one to three spot colors. That matters in procurement because simple logos often need to survive rough handling, repeated folding, and quick visual recognition from a distance. A good screen print usually looks better in real use than a transfer that sits on top of the cloth.
Transfer or digital methods have a place, but they should be chosen for a reason. They can help with low MOQ runs, gradient art, or highly detailed logos that would be expensive to screen. The tradeoff is durability and feel. Buyers should ask how the transfer is applied, what adhesive or film is used, and whether the sample was cured under the same conditions planned for bulk. If the answer is vague, the sample may be a one-off that is not representative of production.
Artwork placement is another common source of avoidable dispute. A centered logo on a flat front panel is easier to control than artwork that crosses a gusset or seam. If the design needs to sit close to a seam line, the buyer should specify the reference point, such as top edge or side seam, and measure the sample from that same point. This gives both sides a fixed standard and reduces arguments about what “centered” means. It also makes reorders cleaner because the factory can reproduce the same placement without guessing.
The practical rule is simple: if the artwork is basic and you expect repeat orders, screen print is usually the safest commercial choice. If the art is complex or the volume is small, use a transfer method only if the sample passes a stricter durability check than a standard promo tote would require.
- Use screen print for simple logos, clean edges, and repeated orders.
- Use transfer methods only when artwork complexity or low MOQ justifies the tradeoff.
- Fix print size and placement from a measurable reference point before approval.
Use the quote to expose hidden cost drivers
A useful factory quote should break the bag into production elements that procurement can compare across suppliers. Those elements usually include fabric, sewing, printing, packing, carton materials, sample charges, and any setup fees tied to artwork or screens. When a supplier offers only a single all-in number, it becomes difficult to know whether the sample and bulk order are truly the same build. That is a common failure point in tote sourcing because the sample can be made from better cloth, a cleaner print process, or extra manual finishing that disappears in production.
The buyer’s job is to normalize the quote. Ask for the same assumptions across suppliers: same size, same canvas weight, same number of print colors, same handle length, same packing format, and same order quantity tier. That is the only way to compare true unit cost. A slightly higher price from a factory with tighter QC and fewer revision issues can be the better buy if it reduces rework, freight surprises, or warehouse repacking later.
Hidden cost drivers matter more than many buyers expect. Artwork cleanup, screen setup, color matching, carton changes, barcode labels, moisture protection, and rush lead time can all add costs after the quote is issued. If the supplier did not list them, they are not really priced. The most disciplined procurement approach is to ask the factory to show what is included and what is excluded in plain language. That one step often surfaces the difference between a real landed cost and a number designed to win the order.
For farmers market programs, hidden cost matters because bags are often bought in medium volumes and need enough margin to stay viable. A quote that looks cheap but requires repacking, relabeling, or a second sample round can end up being the most expensive option.
- Ask for separate pricing lines for fabric, sewing, printing, packing, and cartons.
- Compare identical assumptions across all suppliers before you judge price.
- Force the supplier to name any exclusions that could change landed cost.
Turn the sample into the approval standard
The sample should do more than look good. It should become the written standard for the bulk order. That means the buyer records finished dimensions, handle drop, print position, stitch pattern, and packing format before approving production. A practical tolerance should be set in advance, because a tote bag that is off by a small amount may still be acceptable in use but not in retail presentation. The exact tolerance can vary by size and buyer policy, but the key is to define it before the factory starts bulk sewing.
The sample should also be tested in the way the bag will actually be used. Fill it with market goods, lift it repeatedly, set it down, and check how the handles and bottom seam respond. If the bag is going to hold jars or heavier produce, the approval should include a load that reflects that reality. A tote that passes a cosmetic review but distorts under normal carry weight is not ready for bulk. It may still look fine in a photo, which is why buyers should insist on a physical load test.
If your program includes multiple colors or sizes, do not assume one approved sample covers everything. A print that looks strong on natural canvas can shift on dyed canvas. A handle that feels right on a medium tote may be too short on a large one. Reusing one sample for all variants is a procurement shortcut that often creates reorder friction. Approve the meaningful variants separately, then keep a sealed reference sample and a dated photo record so everyone can compare the bulk lot against the same standard.
- Measure after the sample is pressed and packed, not while it is wrinkled from shipping.
- Record dimensions and print placement against a fixed reference line.
- Approve each meaningful color or size variant separately if the build changes.
Inspect the points where bulk failures usually start
The fastest way to reject bad bulk is to inspect the failure points that matter most in production. On canvas tote bags, that usually starts with the handle joins. Pull on both handles and look at the reinforcement. Whether the factory uses bar-tacks, an X-box, or another stitch pattern, the joining point should be dense, even, and symmetric. If the reinforcement looks sloppy on the sample, it will usually be worse in production unless the factory is making a special effort just for approval.
After the handles, inspect the side seams, gusset corners, and bottom seam. These are the stress areas. Look for skipped stitches, loose thread nests, uneven seam allowance, and any twisting that makes the bag sit crooked. If the tote does not stand or hang evenly, that is a design or sewing issue, not a cosmetic one. The sample should also be checked under load because a bag can look square when empty and distort once it is filled with real goods.
Print inspection should be operational, not just visual. Check color opacity, edge sharpness, position relative to seams, and cure quality. A dry rub test is the minimum if the bag will be handled repeatedly. If the bag may be used around damp produce, condensation, or rain, add a light wet rub check. Buyers do not need a lab report for every order, but they do need a repeatable pass/fail rule. The supplier should know in advance which defects are critical, which are acceptable, and which trigger rework.
Also inspect for contamination, because canvas shows it well. Oil marks, dust, fibers, and shade breaks can lower perceived quality even when the bag is structurally sound. That matters for resale and brand presentation. If the sample has visible contamination, buyers should treat it as a process warning, not a minor cosmetic issue.
- Check handle joins for reinforcement symmetry, stitch density, and clean anchoring.
- Inspect bottom seams and gusset corners under load, not only on an empty bag.
- Use dry rub and, when relevant, wet rub checks on the printed area.
Use inspection thresholds that procurement can actually enforce
A good approval process needs pass/fail rules that are specific enough to use. The goal is not to invent a perfect lab standard for every tote. The goal is to give procurement a workable threshold for sample review and shipment inspection. One practical approach is to define a critical, major, and minor defect framework and tie it to the purchase order. Critical defects are the ones that affect function or brand integrity: seam failure, handle failure, wrong size beyond tolerance, major print shift, or visible contamination that makes the bag unsellable.
For many buyer teams, a sample can be accepted only if there are no critical defects and only a small number of major defects, with the exact limit set by the order value and risk tolerance. If the buyer uses third-party inspection, ask the inspection partner to follow the same categories so the factory cannot argue the standard changed after the sample was signed. On canvas bags, a useful inspection checklist usually includes stitching, dimensions, print quality, packing count, label accuracy, and carton condition.
The key point is to avoid vague comments like “looks decent” or “good enough.” Those phrases create disagreement during production. A better standard is: handle reinforcement must be intact, print must not rub off under dry rub, dimensions must stay within the agreed tolerance, and packing must match the purchase order exactly. Once those rules are in writing, the supplier can build against them and the buyer can reject with confidence if the bulk lot drifts.
Where buyers need extra protection, ask for photos of the first production units before full mass run continues. That early checkpoint is often cheaper than discovering a large lot of bags that need sorting or rework after they have already been packed.
- Classify defects as critical, major, or minor before bulk starts.
- Treat seam failure, handle failure, and wrong size as critical defects.
- Use the same defect definitions for the sample, in-line checks, and final inspection.
Pack and label the tote like a real inbound product
Packing is part of the product spec, not an afterthought. A canvas tote can meet all visual requirements and still create receiving friction if it is folded inconsistently, counted incorrectly, or labeled badly. Buyers who distribute through retail, warehousing, or multiple market locations should specify the fold method, inner pack count, master carton count, and carton marking before sample approval. The supplier should not be deciding these details late in the process.
The packing decision should match the channel. For shelf resale, clean flat-fold packing with consistent labeling may be enough. For warehouse replenishment or chain distribution, outer carton marks, style codes, color codes, quantity, and sequence labels matter because they reduce receiving time and picking errors. If the bags will sit in humid storage or transit with mixed freight, ask whether a polybag or moisture-control option is needed. That decision should be made before bulk, not after a carton has already absorbed damage.
Freight cost is another reason packaging deserves attention. Carton dimensions and gross weight affect how the shipment moves and how the receiving team handles it. A carton that is too heavy creates handling risk. A carton that is oversized can raise freight charges or make pallet planning inefficient. Procurement should ask for carton specs in the quote stage so the landed cost reflects the real shipping profile. When the packing spec is clear, the factory is less likely to improvise, and the buyer is less likely to spend time fixing avoidable receiving problems.
For farmers market programs, good packing also helps the retail team. Bags that arrive in the wrong fold or without clear labels often need repacking before sale. That labor is easy to miss during sourcing, but it shows up fast once the shipment lands.
- Specify fold style, pack count, and carton count before approval.
- Use outer carton labels with style code, color, quantity, and carton sequence.
- Request carton dimensions and gross weight with the quote so freight can be planned properly.
Close the loop with a buyer-side approval record
The last step is to make the approval auditable. A sample that passes discussion but leaves no paper trail creates risk for the bulk order. Procurement should keep the approved sample, a measurement sheet, artwork proof, packing photos, and any inspection notes in one file. If the supplier later sends a slightly different sample or tries to substitute a different print method, the buyer needs a clear record of what was actually approved. That is basic commercial control, not paperwork for its own sake.
It also helps to assign one final approver. If merchandising, marketing, and operations all give separate comments without a single owner, the supplier may receive conflicting instructions. The result is usually a bag that satisfies the latest email but not the real buying intent. One approver does not mean other functions are ignored. It means the internal team consolidates input before the factory gets direction. That is the only way to prevent revision churn.
For buyers running repeat orders, the approval record becomes the reorder standard. When the next lot is quoted, the supplier can reference the same cloth, print setup, stitch pattern, and packing format. That is how a tote program becomes stable instead of relearned every season. If the sample file is incomplete, each reorder becomes a new negotiation, which wastes time and weakens leverage. A disciplined approval record protects both margin and continuity.
In short, the sample is not the end of the process. It is the baseline for production, inspection, and future reorders. The better the approval file, the fewer surprises you should see when the bulk shipment arrives.
- Keep the sealed sample, photos, measurements, and packing record together.
- Assign one internal final approver to avoid conflicting factory instructions.
- Use the approved sample file as the reference for future reorders.
Specification comparison for buyers
| Sourcing route | Commercial fit | Cost and lead-time profile | QA and approval risk to verify |
|---|---|---|---|
| Direct factory | Best when you need control over cloth weight, stitch construction, print method, and repeatability for reorders. | Usually strongest on unit price at scale, but sample development and revision can take longer if the supplier is overseas or busy. | Verify whether the sample was built on the same sewing line and print setup that will run bulk, and confirm who owns the signed reference sample. |
| Trading company or sourcing agent | Best when the buyer wants one contact point for multiple SKUs, mixed trims, or multi-step coordination across factories. | Can shorten communication time, but unit price often includes margin and the real factory lead time may be less transparent. | Check whether the agent can identify the actual factory, the exact production process, and the escalation path if the bulk lot drifts from the approved sample. |
| Local decorator or print shop | Best for low MOQ, event-driven buys, pilot runs, or programs where fast turnaround matters more than deep spec control. | Often faster for simple print jobs, but the cost per bag can rise quickly and fabric/construction options are usually narrower. | Confirm the bag blank quality, print durability, and whether the shop can repeat the same result after the first small run. |
| Stock bag plus custom print | Best when the size and construction can be standard and the artwork is simple enough to fit a stock blank. | Often the shortest lead time and lowest setup burden, but fewer options for handle length, gusset shape, and brand-specific finishing. | Make sure the stock blank still meets the load, size, and retail appearance standard, not just the print requirement. |
| Material | 8-12 oz cotton canvas, 120-220 gsm cotton, recycled cotton, or blended fabric selected by use case and target price | Before price comparison | Different cloth weights, backing, or certification claims make quotes hard to compare |
| Construction | bag size, gusset, handle drop, seam allowance, stitch density, reinforcement patch, and loading expectation | Before sampling | Weak stress points create returns and failed inspections |
| Decoration | screen print, heat transfer, embroidery, woven label, or hangtag matched to fabric texture and brand durability needs | Before artwork approval | The wrong method can crack, bleed, pucker, or fail on the chosen fabric |
| MOQ | Base MOQ plus change drivers | During quote review | Custom colors, trims, and packing can change minimums |
Buyer checklist before sampling
- Define the end use first: resale, giveaway, membership gift, or point-of-sale bag, because the acceptable fabric, finish, and price point change with the use case.
- Lock the finished size, handle drop, gusset depth, and fabric weight before you ask for a pre-production sample.
- Approve the artwork separately from the physical sample so a correct logo file does not mask a bad build.
- Confirm the sample uses the same cloth, thread, print process, and packing method that the factory will use in bulk.
- Load-test the sample with real market goods such as produce, jars, or boxed items instead of a light demo fill.
- Check seam quality at the handle joins, side seams, gusset corners, and bottom seam under load.
- Perform a dry rub test on cured print and a light wet rub test if the bags may be handled with damp produce or in rain.
- Inspect for shade breaks, contamination, oil marks, panel skew, loose thread tails, and print misregistration.
- Record the measurement results and keep one sealed reference sample for bulk comparison.
- Review packing count, carton marks, barcode placement, and fold direction before you release the order.
Factory quote questions to send
- What exact canvas specification is included in the quote: GSM, weave type, yarn count if available, and whether the cloth is raw, pre-shrunk, washed, or finished?
- Is the quoted sample made from the same bulk cloth, same thread, same needle setup, and same print process that will run in production?
- What are the finished dimensions, handle length, handle drop, gusset depth, seam allowance, and the tolerance on each measurement?
- How many print colors are included, what is the print area, and what setup charges or screen charges are separate?
- What is the minimum order quantity per design, per colorway, and per size, and what are the next price breaks?
- What is included in the unit price: fabric, sewing, printing, inner packing, master cartons, and outer labels?
- What are the sample charges, are they credited against bulk, and how many revision rounds are included before extra cost starts?
- What is the separate lead time for sample development, sample correction, bulk production, and carton proof approval?
- What packing format is assumed, including polybag type, inner pack count, carton count, and target gross weight per carton?
- What inspection standard will be used before shipment, and who pays for third-party inspection if the buyer requires it?
Quality-control points to confirm
- Finished dimensions are within the agreed tolerance after pressing and final packing.
- Handle length, handle drop, and strap symmetry match the approved sample on both sides of the bag.
- Top edge stitching, side seams, gusset seams, and bottom corners are straight, secure, and free of skipped stitches or loose thread nests.
- Handle reinforcement uses the agreed pattern, such as bar-tacks or X-box stitching, with consistent placement and density.
- Print placement matches the approved artwork position and does not drift across the panel, gusset, or seam line.
- Ink is fully cured and passes a dry rub test without tackiness, peeling, or visible color transfer.
- If wet rub resistance matters for your use case, the print does not smear or bleed after light pressure with a damp cloth.
- Fabric is free from holes, heavy slubs, oil marks, shade breaks, and visible contamination that shows through the print.
- The bag carries the agreed test load without seam pop, handle failure, or excessive distortion.
- Carton counts, labels, and folded packing direction match the approved packing spec.