Why cosmetic brand buyers need a stricter sample approval step
Printed canvas shopping bags for cosmetic brands look straightforward, but the buying risk is not simple. The tote has to support product weight, present the brand cleanly at retail, and survive repeated customer handling. A sample that photographs well can still fail in use if the handle feels weak, the logo shifts off center, or the print scuffs when the bag is folded and packed.
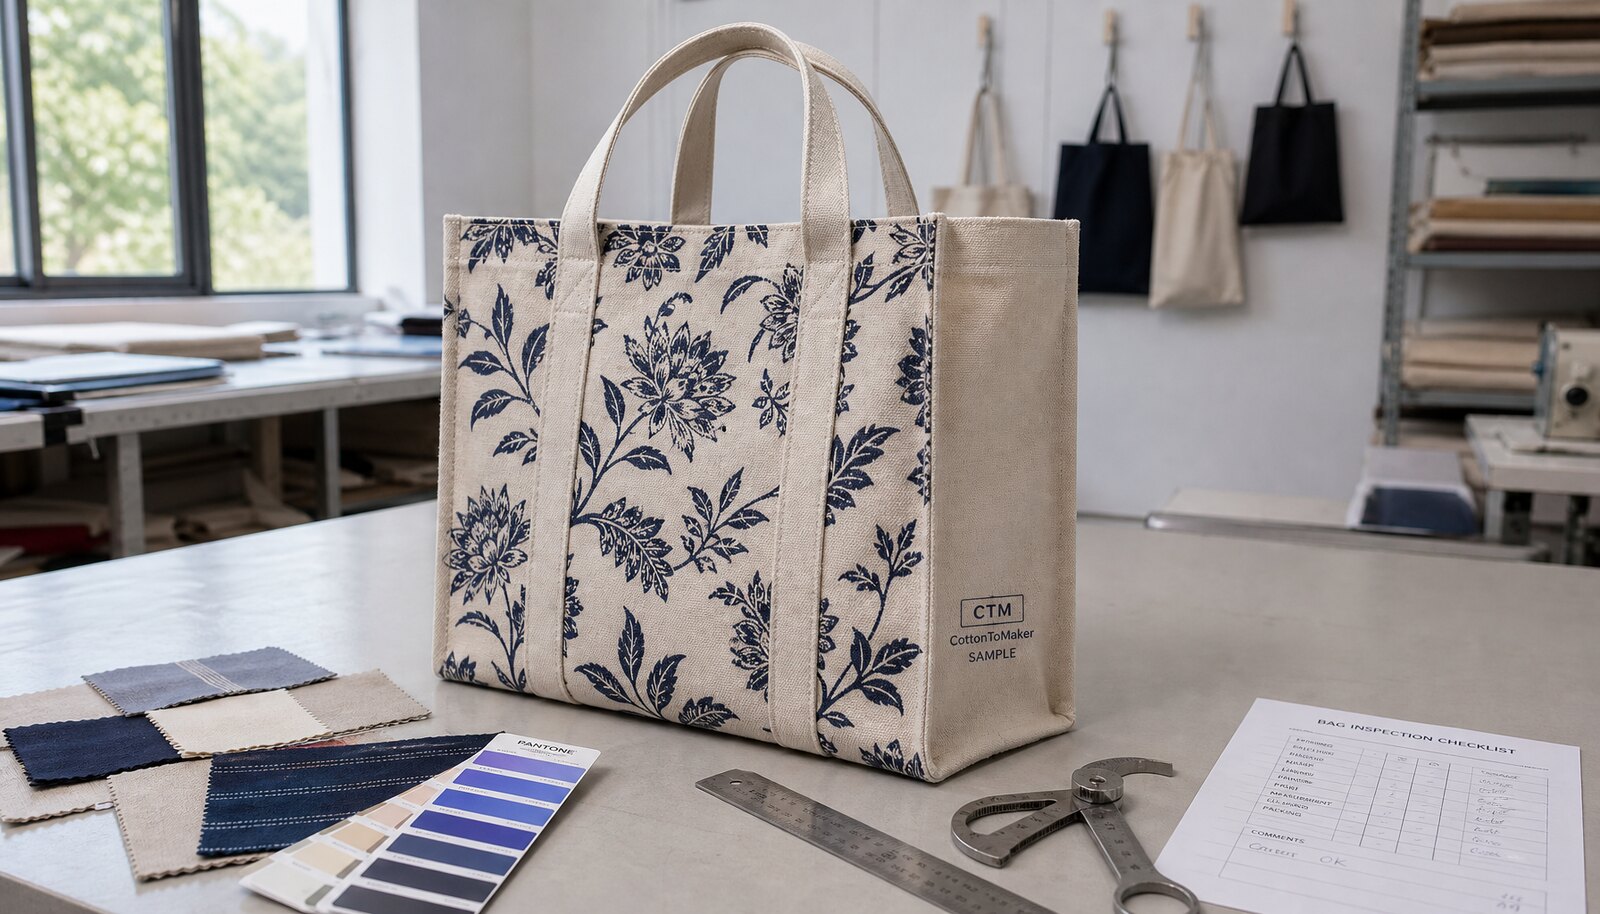
For procurement teams, sample approval is where design intent becomes a measurable production standard. This is not only about saying yes to the look of the bag. It is about creating a reference that the factory can follow during bulk sewing, printing, packing, and inspection. If you approve a sample that is vague on artwork placement or fabric weight, you are effectively approving a moving target.
Cosmetic buyers usually have higher presentation expectations than general promotional buyers. A skincare gift bag may be handed to a customer who will reuse it in public, carry it to a store, or take product photos with it. That means surface finish, stitch discipline, and packout quality matter more than they would on a plain event tote. Procurement should therefore treat the sample as a controlled commercial object, not a courtesy sample.
The strongest approval process separates three questions. First, does the bag match the technical spec? Second, does it survive the intended use case? Third, can the factory repeat it at scale without hidden cost increases or quality drift? If you cannot answer all three, the order is not ready for bulk commitment.
For that reason, a useful approval workflow starts before the sample is made. The buyer should send a version-controlled tech pack, a real artwork file, a target packout, and the intended inspection method. That gives the factory a benchmark and gives procurement a basis for comparison when the sample returns.
- Treat the sample as a production reference, not a display item.
- Approve the bag against the real retail use case, including product weight and handling.
- Use version control so the sample, quote, and bulk order all point to the same spec.
Start with the right fabric weight, weave, and finish
For many cosmetic programs, the most practical starting range is 12 oz to 14 oz canvas, roughly 340 to 400 GSM. That range typically gives a good balance of body, print appearance, and sewing efficiency. It feels more substantial than lightweight promotional fabric but is still manageable for cutting and stitching. If the bag is intended for boxed skincare, gift-with-purchase programs, or repeated retail use, the upper end of that range usually gives the better commercial feel.
That said, fabric weight alone is not enough. Two canvases at the same GSM can behave differently depending on yarn thickness, weave balance, and surface finish. A tighter weave often improves print sharpness and reduces visible pinholes, while a more open weave can look rustic but may cause patchy ink coverage. Buyers should ask suppliers whether the cloth is raw, pre-shrunk, washed, or finished with any coating, because those differences can change both appearance and shrink performance.
If the brand wants a more premium hand-feel, some factories will suggest heavier fabric or a washed finish. That can be a good direction, but it should be tested in the sample because the final print may soften or the bag may shrink more after finishing. A washed canvas can look richer, yet the buyer needs to verify that the bag still matches finished dimension, handle drop, and artwork proportions after finishing.
For cost control, it helps to think in use-case tiers. A lighter canvas may be sufficient for giveaway bags handed out once, but a cosmetic retail tote is often expected to be reused. When the brand is positioning the bag as part of the product experience, the bag should not feel disposable. The sample should therefore be evaluated not only by touch but by the way it holds shape when empty and when loaded with the actual product mix.
- Use 12 oz canvas for lighter promotional use where price pressure is high.
- Use 14 oz canvas when the bag must look structured, premium, and reusable.
- Ask whether the cloth is pre-shrunk or washed, because that affects both size and print appearance.
Choose the print method before you compare quotes
A common sourcing mistake is to compare bag prices before the print method is fixed. That produces misleading quotes because screen print, digital print, heat transfer, and embroidery do not carry the same setup, waste, or defect profile. The buyer should decide what the artwork needs first, then ask suppliers to quote the same method on the same bag specification.
Screen print is still the workhorse option for simple brand logos, especially when the artwork uses one to four solid colors. It usually gives stronger opacity on canvas and is often the most economical route for medium and large volumes. It is also relatively easy for a procurement team to inspect because color blocks and edge definition are visible. The tradeoff is that fine lines, small text, and multi-tone shading can become less reliable.
Transfer and digital print are better when the art direction depends on gradients, tonal transitions, or detailed imagery. The buyer should, however, treat these methods as different products rather than cheaper versions of screen print. They can be excellent, but the QC focus changes: you need to watch color density, edge sharpness, rub resistance, and whether the ink or film sits too heavily on the fabric surface.
Embroidery can work for a small logo or a premium brand mark, but it should be used carefully on canvas shopping bags. If the embroidery is large or the fabric is too light, the stitching can pull the cloth or distort the panel. For that reason, it is usually best reserved for limited areas where the brand wants a more tactile effect rather than full-panel decoration.
The sample approval step should explicitly state the method, the number of colors, and the acceptable artwork resolution or line thickness. If a supplier sends a sample made by a different method than the quote, do not treat it as equivalent. A quote for screen print is not directly comparable to a quote for transfer print, even if the visible result appears similar in a photo.
- Use screen print for bold, stable branding and repeat orders.
- Use transfer or digital print when the design needs detail that screen printing cannot reproduce well.
- Do not compare quotes unless the print method, number of colors, and setup assumptions are identical.
How to read the sample like a production inspector
A useful sample review starts with measuring, not just looking. Lay the bag flat on a clean surface and verify width, height, gusset depth, and handle drop against the tech pack. For cosmetic brands, handle drop deserves special attention because it affects both customer comfort and how the bag wears in store. A tote that looks elegant in hand but cannot sit comfortably on the shoulder can create a real user complaint later.
Next, inspect the bag under the right light. Natural daylight is ideal, but if the brand will approve samples in a showroom or office, use the same light source for comparison. Cotton canvas can make colors appear warmer or duller depending on the light. If the supplier provides a physical master or a Pantone reference, compare the sample against that reference under controlled lighting rather than relying on memory or a photo.
Check the bag from top to bottom and inside to outside. Open every seam you can inspect. Cosmetic buyers often focus on the print face and ignore the hidden build, yet hidden seams are where repeat defects show up: skipped stitches, thread tension problems, or poor seam allowance can all cause later failure. If the bag includes an inner pocket, lining, snap, zipper, or label, inspect those elements separately. A clean front panel does not excuse a weak pocket seam.
It also helps to run a real pack-out test during sample review. Put the products the bag is expected to carry into the bag: boxed lipstick sets, serum cartons, cream jars, pouches, or a gift bundle. Then note whether the bag bulges, tips, or strains at the handle. This test often reveals issues that are invisible on an empty sample, such as bottom sag, side twist, or a handle that feels too short when loaded.
Finally, record the sample as if it were an inspection report. Take photos of the front, back, inside, top hem, handle attachment, and any problem area. Save the ruler shots too. When a bulk dispute happens later, the inspection photo set is often more useful than a signed yes/no note because it shows exactly what was approved.
- Measure the bag flat before visual approval.
- Inspect under the same lighting that will be used for sign-off.
- Test the bag with the actual cosmetic pack-out, not an empty bag.
Sample approval checklist that prevents expensive bulk corrections
A strong sample approval checklist has to be specific enough for the factory to follow and practical enough for procurement to enforce. For printed canvas shopping bags for cosmetic brands, the checklist should cover the same four things every time: fabric, construction, artwork, and packing. If one of those categories is missing, bulk production can drift from the approved sample without anyone noticing until arrival.
The best checklist separates hard requirements from preferences. Hard requirements are the items that affect sellability, function, or warehouse handling: fabric weight, dimensions, print location, handle reinforcement, carton count, and label format. Preferences are items like thread color nuance, fold aesthetics, or minor texture variation. This distinction matters because buyers often lose time arguing over details that do not change the commercial use of the bag.
Here is a practical approval structure procurement teams can use. First, verify the master tech pack number and sample version. Second, compare the physical sample with the approved artwork file and any prior sample. Third, inspect all measurements and construction details. Fourth, run the pack-out and stress checks. Fifth, record any deviations and state clearly whether they are acceptable, require correction, or require a new sample. That process is much stronger than a free-form comment like “looks okay.”
Buyers should also decide in advance what happens if the sample is close but not perfect. For example, if the logo sits 4 mm lower than the target but still reads correctly, is that a pass or a rework? If the answer is not written down, the decision will depend on who is reviewing the bag and what mood they are in that day. Procurement should define tolerances before approval, not after.
A final point: sample approval should be attached to the production commitment. If the factory says the bulk will follow the approved sample, then the sample approval record should name the fabric batch, print method, dimensions, packing method, and any exception. This creates a practical reference if bulk units arrive with a visible difference.
Checklist items to include in the sign-off document should not be generic. They should be close to the language a production team can execute. For example, instead of saying “print quality good,” say “no ink bleed, no visible cracking after light flex, and logo centered within approved tolerance.” That level of specificity reduces misunderstandings and gives both sides a common standard.
- Must-have items: approved artwork version, fabric weight, size, handle length, and seam reinforcement.
- Must-have items: packing format, carton count, and carton marking.
- Preference items: thread color nuance, minor texture variation, or fold appearance after packing.
Supplier vetting: how to compare factories, traders, and mixed sourcing routes
The supplier side of the decision matters as much as the bag spec. A direct factory that prints, sews, and packs in one place usually gives the buyer better control over sample consistency, defect ownership, and lead-time visibility. That does not mean a trader cannot succeed, but it does mean the buyer must know where the actual production happens. If the sample is made by one team and bulk production is handed to another, the approved sample can drift without a clear accountability chain.
When comparing suppliers, do not stop at the unit price. Ask who owns fabric sourcing, who owns print plate or screen preparation, who does sewing QC, and who packs the cartons. A supplier who can show a clean process flow and responsibility split is usually easier to manage than one who gives short answers. For cosmetic brands, where visual consistency matters, process transparency is often worth more than a small unit-price difference.
A good vetting process should include evidence, not promises. Ask for recent product photos that show the actual workbench or production line, not just studio images. Request the sample-making lead time, the bulk production lead time, and the name of the team that will follow the order if it proceeds. If a supplier refuses to state whether work is subcontracted, that is a risk signal. The issue is not subcontracting itself; the issue is hidden subcontracting without quality control visibility.
You can also compare suppliers by their willingness to discuss tolerances and defects in writing. Strong suppliers usually accept measurable quality terms and can talk through likely failure points, such as print registration, handle stitch consistency, and bag shrinkage after finishing. Weak suppliers often answer only in broad terms like “good quality” or “best material.” Procurement teams should favor the factory that can define the standard, not just praise it.
For first-time orders, it is often wise to start with a pre-production sample from the same route as bulk production rather than a polished prototype made elsewhere. That is especially true when the bag has custom print placement, special packing, or a premium presentation standard. The closer the sample route is to the bulk route, the less room there is for surprises.
Below is a practical comparison buyers can use during supplier evaluation.
Sample-room to bulk-production comparison for buyers
Use the following matrix to compare sourcing routes before you commit the order. The goal is not to declare one route universally better, but to select the route that matches the risk level of the cosmetic launch. A low-risk promotional run can tolerate more flexibility than a premium retail program tied to seasonal launch dates.
If you are unsure whether a supplier is a factory or a trader, ask for a production flow map with named responsibilities. You want to know who makes the sample, who approves the ink recipe, who performs final inspection, and who packs the cartons. If the answers are inconsistent, the sample may not be a reliable guide for mass production.
- Direct factory: usually best for controlled QC and clearer defect accountability.
- Trader or broker: can work for simple orders, but ask where every production step happens.
- Mixed route: acceptable only if sample and bulk follow the same workmanship standard and sign-off process.
Cost drivers that move the quote more than buyers expect
The price of a printed canvas tote is shaped by more than the logo on the front. Fabric weight, bag size, gusset depth, handle material, reinforcement style, artwork complexity, and packing format all move cost. For procurement, the key is to isolate each cost driver so you can understand whether a supplier is quoting a better build or simply a different build. If those variables are not locked, the lowest quote may be the least comparable quote.
Fabric weight is one of the biggest drivers because heavier canvas increases material consumption and can slow sewing. Bag size also matters more than many buyers expect: a wider or deeper tote uses more cloth and creates more labor at the cutting and seam stages. Handle design can add cost quickly if the supplier uses longer webbing, thicker webbing, or extra reinforcement. Even a small change from simple top stitching to box-X reinforcement can alter time and defect risk.
Print complexity affects cost in two ways. First, there is the visible cost of screens, setup, or digital processing. Second, there is the hidden cost of registration, alignment checks, and reject risk. A three-color brand mark may look simple to the buying team, but if the artwork includes thin lines or tight gaps, the supplier may need extra setup time to avoid blur. Buyers should ask the supplier to state whether the quote includes one proof round, one strike-off, and one correction round or whether those are extra.
Packing is another common cost trap. Individual polybags, silica gel, tissue wrap, barcode stickers, retail insert cards, and custom cartons all add labor. If the tote is going to wholesale or export, carton marking and count accuracy become important enough to justify their own line item. Procurement should request a unit-price breakdown when possible, not because every line must be negotiated separately, but because line-item clarity makes comparison much easier.
The most useful buying question is not “What is the cheapest unit price?” It is “What is the landed cost for the exact approved spec?” Landed cost should include sample charge recovery, freight, customs duty if applicable, destination handling, and any inland delivery charges to your warehouse or 3PL. A supplier who appears slightly more expensive on ex-works price can be cheaper overall if their packing is tighter, their rejects are lower, and their transit damage rate is lower.
If your team buys across multiple regions, also clarify the incoterm. EXW, FOB, CIF, and DDP do not mean the same thing in practice. A quote that looks low under EXW can become expensive once freight, export handling, and destination fees are added. Buyers should ask every supplier to quote using the same incoterm or to present a clear landed-cost bridge so the comparison is apples to apples.
- Higher GSM, larger dimensions, and stronger reinforcement all raise unit cost.
- Multiple artwork versions increase setup cost and can create hidden MOQ pressure.
- Compare landed cost, not only ex-works price or headline unit price.
How to write an RFQ that gets usable quotes instead of vague pricing
A usable RFQ for printed canvas shopping bags should read like a production brief, not a brainstorm note. The supplier needs enough detail to quote fabric, printing, sewing, packing, and logistics with confidence. If the RFQ is vague, each supplier will fill in the blanks differently and the resulting quotes will be nearly impossible to compare.
Start with the bag spec in measurable form: finished dimensions, canvas weight, weave or finish, handle length, handle width, gusset depth, and reinforcement method. Then define the print method, artwork size, number of colors, placement location, and inspection standard. If the bag includes lining, pocketing, zipper, snap, or label, state whether those are required or optional. This prevents suppliers from hiding essential costs inside a vague “custom bag” line.
Next, describe the sample approval path. State whether you want a pre-production sample, a strike-off, or both. Tell the supplier who signs off internally, how many correction rounds are allowed, and what must be approved before bulk cutting begins. This is important because some factories start materials or screens before the buyer has formally approved the sample, which can create cost disputes later.
The RFQ should also ask for a supplier-side comparison matrix. For example, ask each factory to state the exact fabric spec, print method, MOQ by artwork, sample lead time, bulk lead time, incoterm, carton packout, and any subcontracted process. This format makes comparison easier and discourages selective quoting. A procurement team can then review differences line by line rather than trying to interpret prose.
Where possible, ask suppliers to quote one exact order and one alternate option. For instance, request a 12 oz version and a 14 oz version, or a screen-printed version and a transfer-printed version. This gives the buyer a commercial comparison without making the supplier guess what “good quality” means. It also helps the brand decide whether the premium build is worth the uplift in unit cost.
The key is consistency. Every supplier should receive the same RFQ structure, the same artwork files, the same reference photos, and the same packing assumptions. Otherwise the quote comparison is not a sourcing exercise; it is a guessing contest.
- State dimensions, GSM, weave, handle spec, and reinforcement method in numbers.
- Specify sample type, approval steps, and the date by which bulk cannot start without sign-off.
- Ask every supplier to quote the same incoterm and to separate optional upgrades from base price.
Testing protocol: rub resistance, shrinkage, seam strength, and color tolerance
QC should be more than a visual inspection. If the bag is intended for retail use, the buyer should define at least a basic test protocol before approving bulk. The goal is not to turn every order into a lab project. The goal is to make sure the bag can survive the handling patterns that cosmetic shoppers and warehouse teams will actually create.
For rub resistance, use a dry rub or crocking-style check with a white cloth or equivalent rub medium. The exact number of rub cycles should be set in the spec, but the pass criterion should be simple: no visible transfer that would mark clothing, packaging, or adjacent bags under normal handling. If the artwork uses dark or highly saturated ink, ask for a wet rub check as well because some inks that look fine when dry may transfer when damp or under friction.
For shrinkage, define the wash or soak condition before the sample is approved. Some cosmetic tote programs need a washable bag, while others only need resistance to light moisture and transit humidity. If washability matters, test the sample after a controlled wash and drying cycle that matches the buyer’s intended use. The sample should remain within the written dimensional tolerance, and the artwork should not crack, skew, or become visibly distorted after the test.
For seam strength, the buyer should set a load or pull simulation that reflects the bag’s actual use. A tote for boxed skincare should not be tested only with an empty-bag visual check. Ask the supplier to perform a handle and seam load test on sample units or on a test piece from the same construction. The key pass criteria are no seam opening, no thread breakage at the handle attachment, and no permanent distortion that would be visible to the customer.
For color, the brand should approve the target under a controlled light source. Many disputes happen because the buyer expected a warmer, cleaner, or deeper tone than the factory produced. Where color precision matters, the buyer should define the acceptable deviation against a physical master or Pantone reference and inspect under the same light each time. If the supplier cannot provide a controlled comparison method, color approval becomes subjective and harder to defend.
Document the result of every test in plain language. For example: “Dry rub passed, no visible transfer after agreed cycles,” or “Handle load test passed, no seam opening, no distortion after unloading.” That wording helps both procurement and the factory understand whether the approval is conditional or final.
- Rub resistance: no visible transfer that would mark adjacent materials under normal handling.
- Shrinkage: stays within written dimensional tolerance after the agreed wash or soak cycle.
- Seam strength: no seam opening, popped stitches, or handle detachment under the agreed load test.
- Color tolerance: compare against a physical master or Pantone target under controlled lighting.
Specification comparison for buyers
| Decision area | Recommended benchmark | Why it matters for cosmetic brands | Supplier evidence to request |
|---|---|---|---|
| Fabric weight and weave | 12 oz to 14 oz canvas, roughly 340 to 400 GSM, plain weave or evenly balanced weave | Supports boxed skincare, gift sets, and repeated retail handling without looking flimsy | Mill spec or internal fabric sheet, cut swatch, and photo of the actual roll or stock fabric |
| Print method | Screen print for 1 to 4 spot colors; transfer or digital print only when artwork detail requires it | Spot colors give stronger opacity on canvas; detailed art needs another process but with different QC risk | Print method confirmation, ink type, number of passes, and cured sample photo |
| Bag structure | Gusseted tote, top hem, reinforced handle attachment, and bottom seam reinforcement | A gusseted shape carries retail items better and keeps the tote looking premium on shelf | Tech pack with dimensions, stitch diagram, and annotated sample photos |
| Handle construction | 25 mm to 38 mm cotton webbing or equivalent, with box stitch or X-box reinforcement | Handle failure is a high-claim risk in retail use; cosmetic shoppers often carry the bag on shoulder | Handle material spec, stitch pattern, stitch count, and pull-test evidence |
| Artwork placement | Centered within a written tolerance, with measured distance from top hem and side seam | Improves repeatability across bulk lots and prevents off-center brand presentation | Artwork placement sheet with dimensions from fixed reference points |
| Color control | Pantone target or approved physical master, inspected under D65 or equivalent daylight lamp | Canvas absorbs ink unevenly, so color drift is common if the target is vague | Approved reference sample, ink drawdown or strike-off, and inspection lighting note |
| Packing format | Individual polybag or tissue wrap if scuff risk is meaningful; carton count fixed in writing | Protects printed surfaces and reduces inbound warehouse disputes | Packing instruction, carton spec, and packout photo |
| Supplier route | Direct factory preferred when sample, printing, sewing, and packing are all in-house or clearly subcontracted | Fewer handoffs reduce accountability gaps between sample and bulk production | Process flow, subcontract disclosure, and production responsibility matrix |
Buyer checklist before sampling
- Confirm the exact fabric composition, weave, GSM, and whether the canvas has been pre-shrunk or washed before sampling.
- Approve the final bag dimensions: body width, body height, gusset depth, handle length, and handle drop.
- Lock the artwork version number, print location, Pantone targets, and the allowable color deviation before the pre-production sample is made.
- Request the same print method for sample and bulk; do not approve a sample made by a different method than the quote.
- Inspect seam quality, handle reinforcement, top hem, bottom seam, and side gusset symmetry under good light and with a ruler.
- Test the bag with the real cosmetic pack-out, including boxed products, glass jars, pouches, or gift sets, not an empty bag.
- Require a simple physical test protocol for rub resistance, seam strength, and shrinkage before bulk sign-off.
- Approve the packing method, carton count, carton marks, and any barcode, size sticker, or retail label requirement in the same sign-off document.
- Ask for clear exception handling: what the factory must do if bulk color, size, or sewing differs from the approved sample.
- Tie sample approval to the final quote, lead time, and material reservation so the supplier cannot change assumptions after approval.
Factory quote questions to send
- What is the exact fabric specification in the quote: composition, weave type, GSM, finish, and whether the cloth is pre-shrunk or washed?
- Is the quoted print method screen print, heat transfer, digital print, or embroidery, and what is the setup cost for each method?
- How many colors, screens, or print stations are included in the quote, and what is the added cost for a second artwork version?
- What are the finished dimensions, handle length, gusset depth, and handle reinforcement included in the quoted sample?
- Is the MOQ based on one artwork, one colorway, one size, or a combined order across multiple variants?
- Which costs are optional upgrades: lining, inner pocket, snap closure, zipper, metal eyelet, woven label, hangtag, or custom insert?
- What are the sample charges, courier charges, and whether the sample fee is deducted from the bulk order if the order proceeds?
- Which items are excluded from the unit price: packaging, cartons, inspection, barcode labels, and export documents?
- What is the production lead time after PPS approval, and what part of the process is the bottleneck: fabric sourcing, printing, sewing, or packing?
- Who performs the work in bulk production, and is any step subcontracted to another workshop or print house?
Quality-control points to confirm
- Fabric weight should be measured against the approved spec, with a practical tolerance agreed in writing before production. For procurement use, a common internal target is no more than ±5 percent variance from the approved GSM or oz benchmark.
- Finished dimensions should be checked on a flat surface after light pressing, with width, height, gusset depth, and handle drop all within the written tolerance on the tech pack. If the bag is meant for retail display, also check that left-right symmetry is visually acceptable, not just numerically close.
- Print placement should be measured from fixed reference points such as the top hem and side seam. For the first article or pre-production sample, require the logo centerline to stay within a stated tolerance, often around ±3 mm to ±5 mm depending on bag size and artwork sensitivity.
- Color should be checked under D65 daylight or another agreed inspection lamp against the approved master or Pantone target. If the brand is strict on color, define pass/fail by delta E or by a physical master under a controlled light source rather than by eye alone.
- Rub resistance should be tested with a dry crocking or dry rub method using a white cloth or equivalent rub medium. A practical pass criterion is no visible ink transfer that would materially mark the cloth after the agreed number of rub cycles; for stricter programs, require wet rub evaluation as well.
- Shrinkage should be checked after a controlled wash or soak protocol that matches the brand’s expected care situation. If the bag is intended to be washable, define an acceptable shrinkage limit before sampling; many buyers use a small internal tolerance and reject any sample that warps the artwork or makes the bag miss size spec.
- Seam and handle strength should be checked by pull test or load simulation. A procurement-friendly rule is to test the handle attachment and body seams under a load representative of actual use, then reject samples with skipped stitches, seam opening, popped threads, or visible distortion after unloading.
- Thread tension, top-stitch straightness, and reinforcement pattern should be consistent on both sides of the bag. Box stitch or X-box reinforcement should be complete, with no missing corners, loose thread tails longer than the agreed trim standard, or needle damage that weakens the fabric.
- Packing must match the approved packout sheet. Check polybag presence, fold direction, size label placement, carton count, carton mark, and whether the first opened bag from every carton arrives free of scuffing, dust, or print transfer.
- Any cosmetic defect that affects shelf readiness should be recorded as a clear pass/fail item: print blur, ghosting, ink pinholes, stain, misaligned seam, crooked hem, twisted handle, or broken stitch should not be treated as a minor issue unless the supplier and buyer have written acceptance criteria.