Why Print Proof Approval Controls the Real Risk
For muslin drawstring pouch orders, most production problems do not start at sewing. They start when the buyer approves artwork that looked fine on a PDF but was never tested on real cotton fabric. Muslin absorbs ink, moves slightly during handling, and has natural slubs and seed specks. A logo that is sharp on coated paper may look softer once printed on a 120 GSM cotton pouch. If your brand requires clean shelf presentation, the proof approval stage is where you must control print color, opacity, placement, and fabric behavior.
A good print proof is not just a pretty sample photo. It is a production reference. It tells the factory which fabric, ink, position, drawcord, folding method, and packing style must be repeated in bulk. Procurement teams should treat the proof as a technical checkpoint before the factory cuts fabric or prints panels in volume. Once thousands of panels are printed, a small position error or wrong ink density becomes expensive to fix.
- Approve the print proof only when it uses the same fabric weight, fabric color, artwork size, and drawcord type as the planned bulk order.
- Do not approve from a digital mockup if logo color, print area, or retail appearance matters.
- Record any accepted limitations, such as natural muslin specks or softer ink edges, before production starts.
- Ask the factory to keep the approved proof at the printing station and sewing line as the live production standard.
Define the Pouch Before You Judge the Print
A print proof cannot be judged correctly if the pouch construction is still vague. Buyers often request a logo proof first and then change pouch size, fabric GSM, drawcord color, or seam layout later. That creates a false approval. A 100 x 140 mm pouch in 105 GSM muslin does not behave like a 180 x 240 mm pouch in 140 GSM muslin. The fabric tension, printable flat area, drawcord channel height, and bottom seam all affect how the logo appears.
Before ordering a proof, lock the basic pouch specification in your RFQ. State the finished size, fabric type, fabric weight, color, seam style, drawcord material, and whether the pouch is flat bottom or simple side-and-bottom stitched. Finished size means the usable outside dimension after sewing, not the cut fabric panel. If the factory quotes from cut size while another quotes from finished size, you are not comparing the same product.
- Common fabric options include 90-100 GSM light muslin, 120 GSM standard muslin, and 140-160 GSM heavier cotton muslin.
- For most branded gift, jewelry, candle, soap, and cosmetic pouches, 120-140 GSM gives a better print surface than very light fabric.
- Allow reasonable size tolerance, often around plus or minus 5 mm for small sewn cotton pouches, unless your packing insert requires tighter control.
- Confirm whether the drawcord channel reduces the visible branding area when the pouch is closed.
Choose the Print Method Based on Artwork and Quantity
Screen print is usually the practical choice for simple logos on muslin drawstring pouches. It works well for one-color or two-color brand marks, has a natural handfeel, and is efficient once the order quantity justifies screen setup. On cotton muslin, water-based ink is commonly used when the buyer wants a softer, more natural look. Pigment ink can provide stronger coverage, but the final choice depends on fabric color, logo color, and wash or rub requirements.
Digital print and heat transfer can solve different problems. Digital print may help with multi-color artwork, gradients, or lower quantities where multiple screens are not cost-effective. Heat transfer can create sharper fine details, but it may add a film feel that does not suit eco-style packaging. Embroidery is possible on heavier pouches, but it can distort thin muslin and adds cost and lead time. The right method is not the most advanced one; it is the method that gives stable output at your quantity and matches your brand’s tolerance for texture.
- Use screen print for bold logos, icons, simple lettering, and repeat orders with stable artwork.
- Use digital print when artwork has many colors or short-run customization makes screen setup inefficient.
- Use heat transfer only after checking film edge, handfeel, folding behavior, and long-term cracking risk.
- Avoid very small text on coarse or slubby muslin unless the proof confirms it remains readable.
- Ask whether the factory prints before sewing or after sewing, because this changes placement control and printable area.
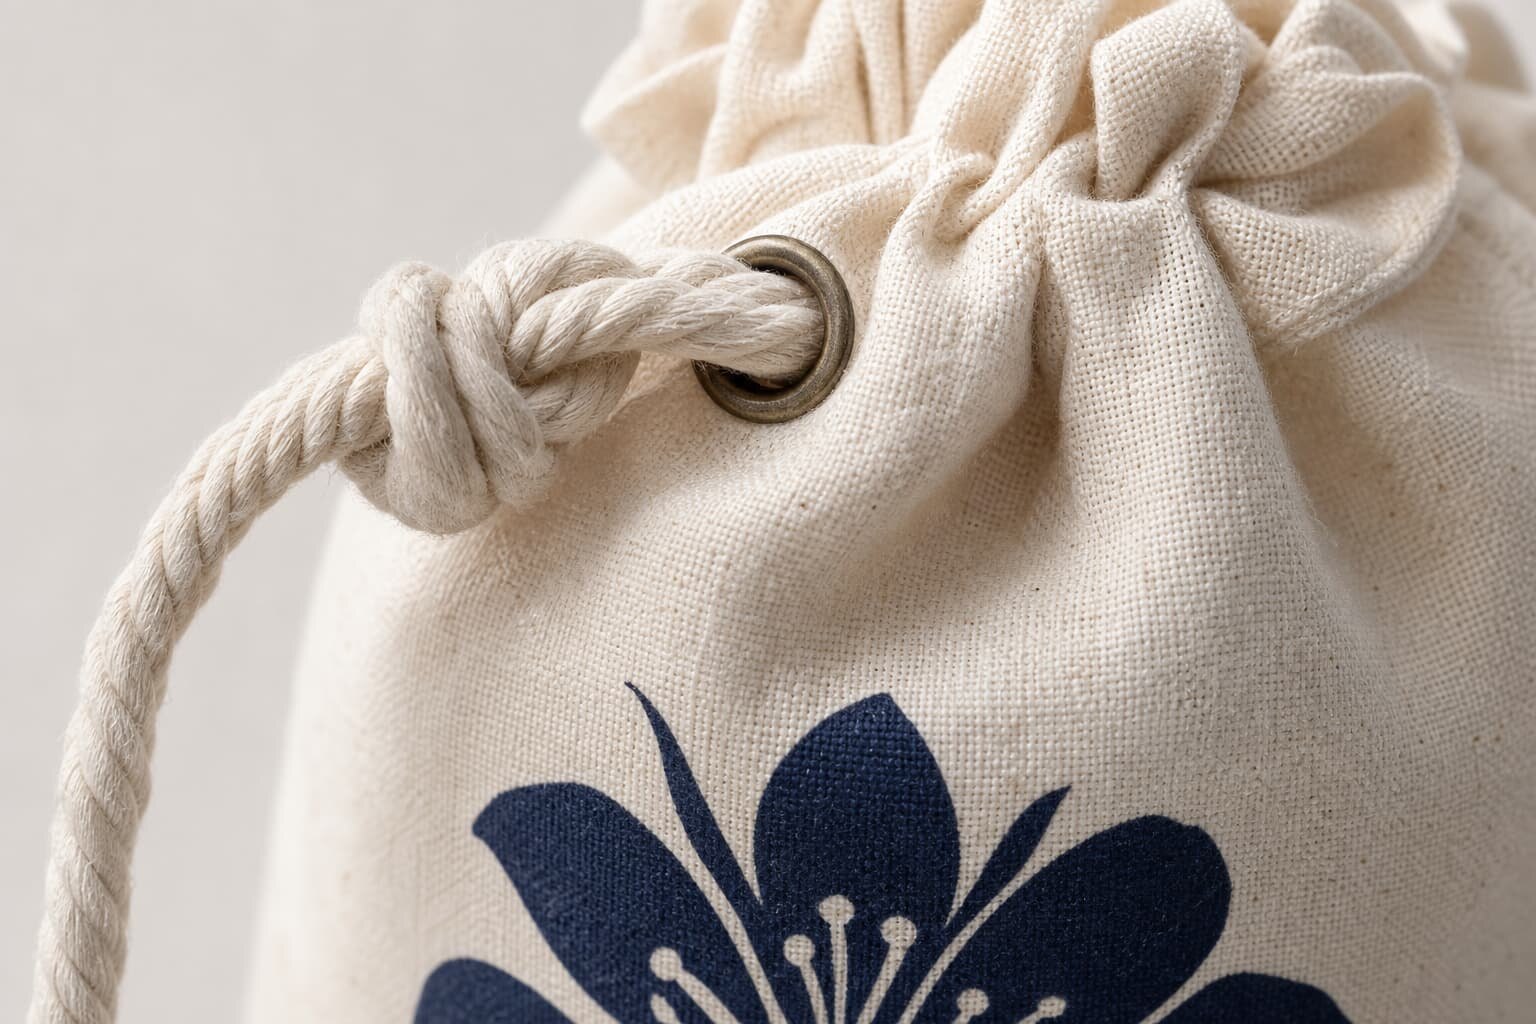
Set Realistic Color Expectations on Natural Muslin
Natural muslin is not a white coated board. It may have a cream tone, cotton seed particles, small slubs, and batch-to-batch shade variation. These details are part of the fabric character, but they also influence logo color. A dark green logo on natural muslin will look warmer and less crisp than the same color printed on white paper. If your brand guideline is strict, you need a physical color reference and a fabric-based proof, not only a Pantone number in an email.
Color proofing should include both the ink color and the background fabric color. If the bulk fabric is natural, bleached, dyed, or washed, each base shade changes the printed result. Buyers should also specify viewing conditions. A phone photo taken under yellow factory light can make the print look wrong even when the sample is acceptable. For serious retail orders, ask for the physical proof to be shipped or compare sample photos with a color card in the same frame.
- Provide Pantone references, but understand that cotton absorption can shift the final appearance.
- Ask for a lab dip or fabric swatch if the pouch body color is dyed instead of natural.
- Check whether white ink is needed under light-colored prints on darker fabric.
- Decide in advance whether cotton seed specks inside the print area are acceptable or should be rejected.
- Keep one signed or sealed approved sample to avoid later disputes over subjective color judgment.
Control Logo Placement Before Bulk Printing
Logo placement on a muslin drawstring pouch is more difficult than it looks because the pouch is soft, flexible, and not always perfectly square after sewing. If printing is done after sewing, the drawstring channel and side seams limit the flat area. If printing is done before sewing, the factory must control cutting, panel alignment, and sewing allowance so the logo ends up in the right position on the finished pouch. Both methods can work, but the buyer must specify measurable placement rules.
Do not only say “center print.” Centered relative to what? The full pouch height, the area below the drawcord channel, or the visible area when the pouch is filled? For small pouches, a 5 mm shift can look serious. For larger pouches, it may be acceptable. Your RFQ should state logo width and height, distance from bottom edge or top channel, and whether the logo must remain visible when the pouch is pulled closed.
- Define print size in millimeters, for example logo width 65 mm, not only percentage scaling.
- State print position from a fixed reference point, such as 45 mm from bottom seam to logo baseline.
- Keep artwork at least 8-12 mm away from seams, folds, and drawcord channel unless the proof proves otherwise.
- For double-sided printing, confirm whether front and back alignment is required or only general placement.
- Ask the factory to measure the first 20-30 printed pieces before continuing bulk production.
MOQ Logic: Why Print Proofs and Unit Prices Change
MOQ for muslin drawstring pouch printing is not only a factory policy. It comes from fabric purchasing, dyeing or bleaching minimums, screen setup, printing line changeover, sewing efficiency, packing labor, and material waste. A simple natural pouch with one-color screen print may have a lower practical MOQ than a dyed pouch with four print colors, individual barcode labels, and multiple sizes. When buyers compare quotes, they should ask what the MOQ is based on, not just push for a lower number.
Below MOQ orders are possible in some cases, but the unit price often rises because setup costs are spread across fewer pieces. For example, a one-color logo may require artwork checking, screen making, ink mixing, proofing, machine setup, and curing control whether the order is 500 pieces or 10,000 pieces. If you are testing a new retail product, it may be better to accept a higher unit cost for a controlled pilot run than to force a factory into a low-price order that receives weak production attention.
- Ask whether MOQ is per size, per fabric color, per print design, or per total order.
- Confirm whether screen charges are included in the unit price or listed separately.
- If you have multiple pouch sizes with the same logo, ask whether the same screen can be reused or needs resizing.
- For distributors, group similar orders by fabric and print method to reduce setup waste.
- For brand owners, separate pilot-order pricing from repeat-order pricing so your cost forecast is realistic.
What to Check on the Physical Print Proof
When the proof arrives, inspect it like a production inspector, not like a catalog buyer. Lay the pouch flat, measure the finished size, pull the drawcord, check the print position, and compare the logo against your artwork. Look closely at the edges of letters, small icons, and filled areas. On muslin, a small amount of ink absorption is normal, but broken lines, heavy bleeding, pinholes, wrong scale, and obvious skew should be corrected before bulk production.
You should also test the pouch in the way it will be used. If it will hold jewelry, cosmetics, candles, hotel amenities, coffee accessories, or retail gift items, insert a similar product and close the drawstring. Some logos look centered when the pouch is flat but move too close to the top once filled. If pouches will be packed tightly in cartons, check whether the ink is fully cured and whether printed surfaces stick or transfer when stacked.
- Measure finished width and height at several points because soft cotton can vary slightly.
- Check print size against the approved artwork dimensions.
- Inspect opacity on solid logo areas and readability of small text.
- Rub the print gently with a dry white cloth after curing to detect obvious transfer.
- Pull and release the drawcord several times to check channel stitching and cord length.
- Photograph accepted and rejected details so the factory understands your comments without guessing.
Quote Data Buyers Should Request for Fair Comparison
Many pouch quotes look cheaper because they omit details. One supplier may quote 100 GSM fabric, bulk packed, one-color print, no sample freight, and no carton labeling. Another may quote 140 GSM fabric, individual packing, barcode sticker, pre-production sample, and stronger export cartons. The unit prices are not comparable until the specification is aligned. Procurement teams should build a quote sheet that forces each factory to show the same cost drivers.
The most useful quote is not always the lowest one. It is the quote that shows what is included, what is optional, what can change cost, and what affects lead time. For muslin drawstring pouch print proof orders, request details on fabric GSM, fabric color, print method, number of print colors, setup charges, sample charge, sample lead time, bulk lead time, packing method, carton size, gross weight, and payment terms. This reduces surprises after approval.
- Ask for price breaks at realistic quantities, such as 1,000, 3,000, 5,000, 10,000, and 20,000 pieces if relevant.
- Separate pouch unit cost from print setup, proof sample, special packing, labeling, and inland freight where possible.
- Require the quoted fabric GSM and finished pouch size to be written in the quotation, not only in a chat thread.
- Ask whether lead time starts after deposit, artwork approval, fabric approval, or physical proof approval.
- Request estimated carton dimensions and gross weight early if air freight or courier delivery is being considered.
Lead Time Planning From Artwork to Packed Cartons
A realistic schedule protects both buyer and factory. The process normally includes artwork review, material confirmation, proof making, proof approval, bulk material preparation, printing, curing, sewing, trimming, inspection, packing, and export carton preparation. Delays often happen when the buyer sends low-resolution artwork, changes logo size after proofing, or approves the sample verbally without confirming final comments in writing.
Lead time also depends on whether the pouch uses stock natural muslin or custom dyed fabric. Stock natural fabric can usually move faster than custom color fabric because dyeing, drying, shade approval, and shrinkage control add steps. Multi-color print adds registration checks. Individual retail packing adds labor and inspection time. Your purchase order should include a time buffer for proof shipping and possible one-round revision, especially for first-time designs.
- Send vector artwork before requesting a firm sample timeline.
- Confirm whether the factory can start fabric booking before print proof approval or only after full sample approval.
- Build extra time for custom dyed fabric, multi-color registration, or retail labeling.
- Avoid approving bulk production on Friday night messages without a final written approval file.
- Ask for production milestones: fabric ready, printing start, sewing start, packing start, and final inspection date.
Packing Decisions That Protect the Approved Print
Packing is part of print quality control. Freshly printed muslin pouches need enough curing time before tight stacking or carton compression. If the factory packs too soon, printed panels may stick together, show pressure marks, or transfer ink. If pouches are folded through the logo, the buyer may receive creased branding even though the print itself passed inspection. The packing method should be confirmed during proof approval, not left until shipment week.
For wholesale or promotional use, bulk flat packing in inner polybags may be enough. For retail buyers, individual polybags, paper bands, barcode labels, hangtags, or SKU separation may be required. Each packing option changes labor cost, carton quantity, carton dimensions, and inspection time. If your downstream warehouse scans cartons or individual units, include barcode and carton mark requirements in the RFQ before the factory quotes.
- Ask the factory to pack printed faces in a direction that avoids hard creases through the logo.
- Confirm inner bag quantity, carton quantity, carton dimensions, net weight, and gross weight.
- Use divider sheets or adjusted stacking if heavy ink coverage might mark adjacent pouches.
- State whether individual polybags must be recyclable, vented, suffocation-warning printed, or avoided.
- For mixed SKUs, require clear carton marks and avoid mixing similar logo designs in the same carton unless approved.
Specification comparison for buyers
| Spec decision | Recommended option | When it fits | Buyer risk to check |
|---|---|---|---|
| Fabric weight for printed pouch | 120-140 GSM cotton muslin for most gift and cosmetic pouches | Good balance of print surface, soft handfeel, and carton weight for bulk promotional or retail packaging orders | Very light 90-100 GSM fabric may show print strike-through, seam puckering, and uneven logo edges |
| Logo size on front panel | Keep solid logo print inside the flat printable area, usually 8-12 mm away from side seams and bottom fold | Works for repeat production where pouches are manually loaded onto a screen or heat press | Artwork placed too close to seams may distort because the panel is not perfectly flat |
| Print method for simple brand mark | Water-based screen print, 1-2 colors | Best for natural muslin, organic-looking brand packaging, and moderate to high quantity orders | Color will look softer on absorbent cotton than on coated paper or polyester |
| Print method for detailed artwork | Digital print or heat transfer after sample approval | Useful for gradients, small lettering, or many colors below efficient screen print quantity | Transfer films can change handfeel and may crack if the pouch is folded sharply |
| Print proof stage | Pre-production sample using bulk fabric and final artwork size | Needed before cutting bulk panels when logo position, color, and fabric shade matter | A proof printed on substitute fabric may not predict bulk color absorption |
| Drawcord color | Natural cotton cord or dyed cord confirmed with fabric swatch | Fits eco packaging, jewelry, soap, candle, and accessory buyers | Dyed cords can bleed or look mismatched if not checked against the pouch fabric and print color |
| Packing method | Flat pack in inner polybag or paper band, then export carton with carton mark | Reduces crease risk and keeps printed panels easier to inspect on receipt | Tight bundle packing can create pressure marks on fresh print if curing time is rushed |
Buyer checklist before sampling
- Confirm pouch size as finished external size, not cut panel size, and state the tolerance you can accept.
- Specify fabric composition and target GSM, for example natural cotton muslin 120 GSM or 140 GSM.
- Send vector artwork with final print dimensions, Pantone or physical color reference, and logo placement from top or bottom edge.
- Require the print proof on the same fabric weight and color planned for bulk production.
- Check print opacity, edge sharpness, registration, drawcord clearance, and seam distance before approving.
- State whether slight cotton seed specks and natural fabric shade variation are acceptable for your retail channel.
- Ask for packed sample photos showing folding direction, inner bag quantity, carton quantity, and carton mark.
- Approve bulk production only after sample comments are closed in writing, not through scattered chat messages.
- Request the factory to keep one approved sample and one print standard in the production room.
- Define AQL level or inspection method for print defects, stains, seam failure, wrong size, and packing errors.
Factory quote questions to send
- What fabric GSM and weave are included in your quote, and is it greige, bleached, dyed, or washed muslin?
- Is the quoted print method screen print, digital print, heat transfer, embroidery, woven label, or another process?
- How many print colors are included, and are screen setup charges or artwork charges listed separately?
- Can the print proof be made using the exact bulk fabric and final drawcord specification?
- What is your normal MOQ for this fabric and print combination, and what changes if we order below MOQ?
- What pouch size tolerance, print position tolerance, and color tolerance do you apply in bulk production?
- How long do you need for artwork review, proof sampling, bulk fabric preparation, printing, sewing, packing, and final inspection?
- How many pieces per inner bag and export carton are included in the quote, and what are the estimated carton dimensions and gross weight?
- Will the unit price change if we request individual polybags, barcode stickers, hangtags, or retail-ready packing?
- Can you provide pre-production sample photos, inline print inspection photos, and packed carton photos before shipment?
Quality-control points to confirm
- Compare the approved proof against bulk production under consistent lighting, not only from phone photos.
- Measure pouch width, height, drawcord length, and print position on the first finished pieces from each production line.
- Check whether the logo is centered after the pouch is pulled closed, because the drawstring channel can visually shift the panel.
- Rub the printed area after curing to confirm the ink is dry and not transferring to adjacent pouches.
- Inspect for fabric stains, oil marks, loose cotton lint trapped in ink, skipped stitches, broken drawcords, and uneven side seams.
- Open several packed cartons to confirm the printed face is not creased, stuck, or pressed against uncured ink.
- Check carton marks, SKU labels, inner quantity, and mixed-design segregation before the goods leave the factory.
- Keep a signed approval sample for any claim discussion if bulk color, size, or print placement is disputed later.