Why Buyers Need a Stitch Reinforcement Memo
On a jute burlap bag, a reinforcement row is not a cosmetic line. It is the small construction decision that decides whether the handle stays attached, the top hem keeps its shape, and the bag survives repeated loading without opening at the stress point. The jute burlap bag stitch reinforcement row approval memo should lock that decision before bulk production starts, because a supplier can easily interpret "stronger stitching" in three different ways and still believe the job is correct.
For procurement teams, the memo is useful because it turns a vague durability request into a measurable approval record. That matters when you are comparing quotes across mills, sewing lines, and print methods. If one supplier quotes a single top row and another quotes a twin row with bar-tack support, the price gap may look like margin difference, but the real difference is construction time, thread consumption, and failure risk.
- Use the memo when the bag will carry groceries, gifts, wine, trade show items, or retail goods that people will reuse.
- Treat the reinforcement row as part of the product spec, not as a repair note after a sample fails.
- Keep the memo tied to the PO, artwork approval, and size chart so the sewing team does not work from memory.
Define the Reinforcement Row Before You Ask for Price
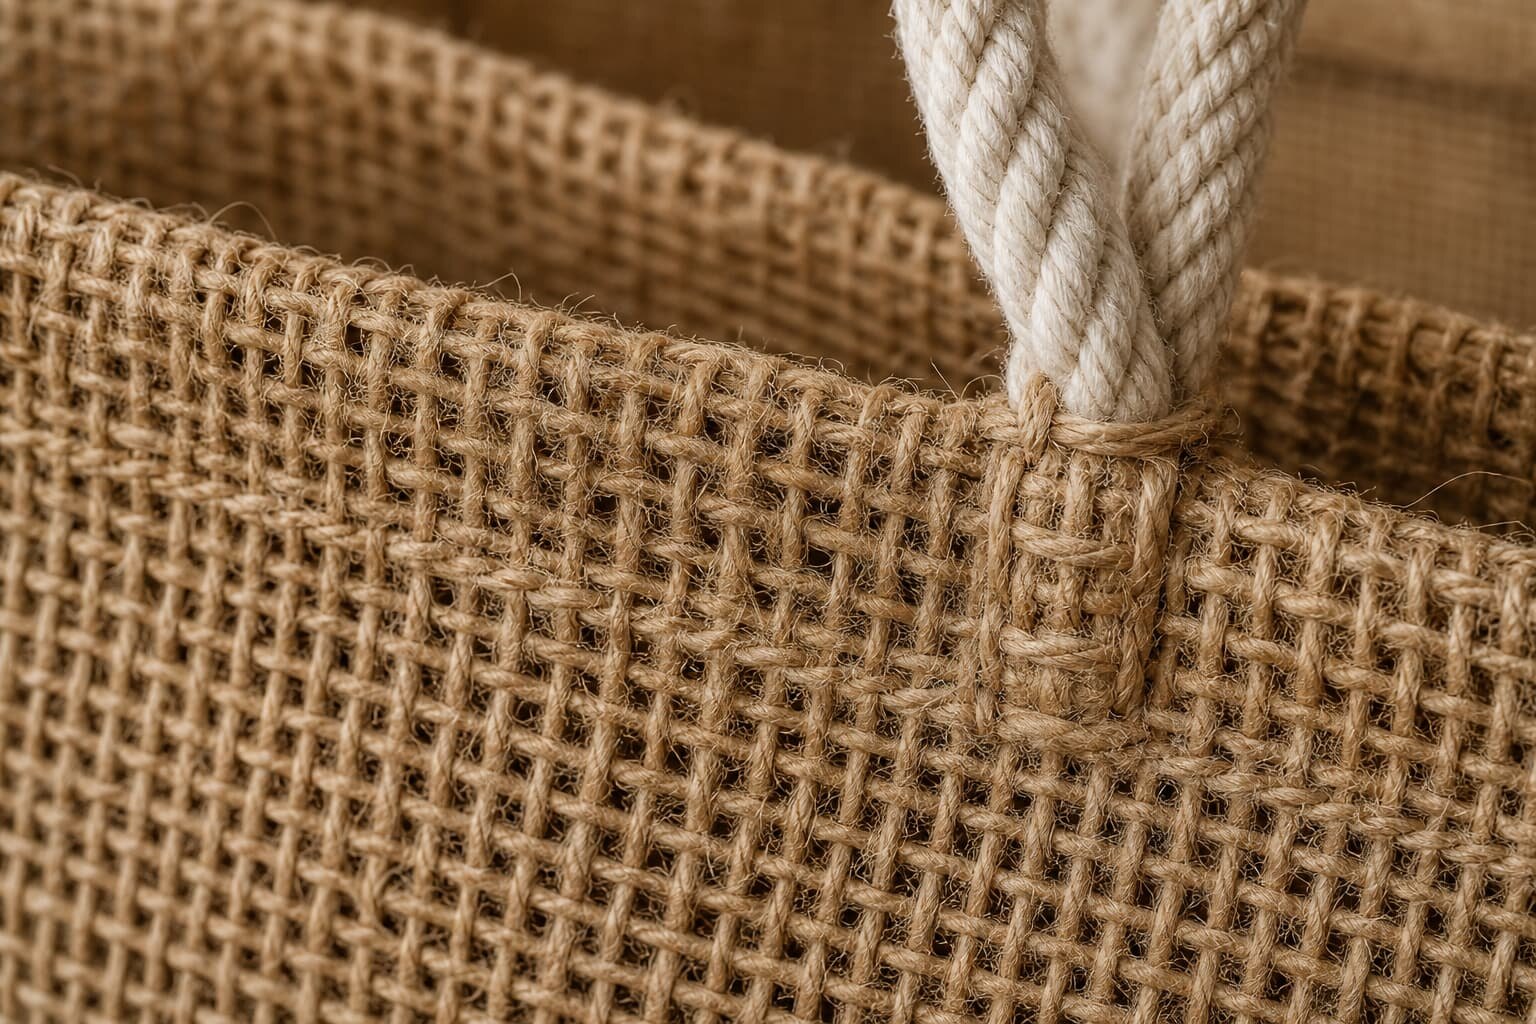
Start with the bag structure. A flat shopper, gusseted tote, wine bag, or drawstring-style burlap pouch all place load in different directions. A handle root on a 240 GSM bag needs a different stitch layout than a gusset seam on a 340 GSM retail carrier. If you do not define where the load enters the bag, a factory may simply add stitches where it is easiest to sew, not where the bag actually needs support.
Write the memo in numbers. Specify the row count, row spacing, stitch length, seam allowance, top hem fold depth, and the exact point where the row starts and ends. If the bag has cotton webbing handles, jute cords, or self-fabric handles, state which one is being reinforced. That keeps the supplier from quoting a generic "double stitching" line item that sounds strong but hides weak placement.
- State the fabric weight in GSM, such as 240, 280, 320, or 340 GSM, because stitch behavior changes with weave density.
- Specify if the row is visible from the outside, hidden inside the hem, or both.
- Describe whether the row is for handle attachment, top hem stabilization, side seam locking, or all three.
Match Fabric Weight, Thread, and Print Method
The reinforcement row cannot be reviewed in isolation. Jute burlap is coarse, fibrous, and more variable than tightly woven cotton canvas, so a heavy stitch line can distort the fabric if the GSM is too low or the needle path is too tight. For buyer planning, the usual useful range is around 240 to 340 GSM depending on bag size and target load. Lighter fabric may work for giveaway bags, but if the product is meant for repeat retail use, the stitch system should be designed around a stronger body and handle path.
Thread choice matters just as much. Bonded polyester is often a safer commercial option than soft, low-twist thread because it gives better pull resistance and less fraying during sewing and use. Print method matters too. Screen print, heat transfer, and embroidery all place different stress near the seam. If artwork sits too close to the stitch row, the factory may need to shift print placement or reduce needle density so the row does not break through ink, foil, or thread detail.
- For heavier use, ask for bonded polyester thread and get the ticket size stated in the quote.
- Keep print artwork clear of the reinforcement path by a defined margin, especially near the handle root.
- If embroidery or woven branding is used, confirm whether a backing layer changes the sew order or stitch tension.
Compare Reinforcement Row Options Like a Buyer, Not a Sew Room
Most quote disputes start because buyers compare prices without comparing stitch architecture. A single row may be acceptable for lightweight promotional use, but a twin row with bar-tack support is often the right commercial choice when the bag will be reused. The right answer depends on load, bag size, and how much the customer can tolerate visible stitch lines. What matters is that every supplier quotes the same build so you can compare true landed cost, not just sewing speed.
The table below is the easiest way to align vendors. Ask each supplier to quote the same fabric GSM, the same handle material, the same stitch row count, and the same inspection standard. If they cannot quote those details cleanly, they probably have not controlled the process well enough for a buyer-facing approval memo.
- Use one sample reference and one memo version for all quotes.
- Ask for a photo of the stitch path from inside and outside the bag.
- Reject quotes that say "as per factory standard" without defining row count or placement.
What the Approval Memo Must Capture
A useful memo is short, visual, and specific. It should show where the reinforcement row begins, what it passes through, how it ties into the handle or hem, and what the approved stitch appearance should look like. The best version usually includes a front photo, back photo, close-up of the handle root, and one annotation that states the measured distance from edge to stitch line. If the supplier wants to change a needle size, row spacing, or thread type later, the memo becomes the reference point for whether that change is acceptable.
The memo should also connect the stitch requirement to the broader bag spec. If the bag uses a logo print, mention the exact print method and the keep-clear zone near the seam. If the bag uses a liner or laminated insert, note whether the reinforcement row is meant to anchor the outer shell only or pass through multiple layers. For buyers, this avoids the classic problem where sample approval looks fine but bulk production shifts the row position by a few millimeters and weakens the load path.
- Include measured stitch placement, row count, and thread color in the memo body.
- Attach one approved sample photo set and keep the same file name in the PO folder.
- Note any acceptable visual variation, such as minor fiber shadow, but do not leave construction details open.
How to Write RFQ Data the Factory Can Price Properly
A quote for a stitched reinforcement row should contain enough detail for the factory to calculate labor, thread, machine time, and QC effort. At minimum, provide bag size, fabric GSM, handle type, row count, stitch length target, print method, color count, packaging style, and target order volume. Without that, the factory may build in margin to cover uncertainty, and you will not know whether the quote is expensive because the product is complex or because the spec is unclear.
It also helps to separate base bag price from special construction price. For example, quote the bag body, then quote the reinforcement upgrade, then quote any print or label changes. That makes supplier comparison cleaner, especially when one vendor includes reinforcement as a standard detail and another treats it as a custom sewing add-on. For importers, this split is useful because it shows where MOQ pressure starts and what can be standardized across future colorways.
- Ask for unit price at the target quantity and at the next lower tier so you can see MOQ logic.
- Request whether setup fees apply to stitch changes, sewing templates, or print screens.
- Confirm whether sample cost will be credited against bulk or billed separately.
Sample Checks That Matter Before Bulk Approval
A stitch reinforcement sample should be judged with a hand test, not only by eye. Pull the handle at a realistic angle, flex the top hem, and feel whether the row tightens or cuts into the burlap weave. Check both sides of the bag because one side can look neat while the other side has loose thread tails or uneven back-tacks. If the bag is gusseted, inspect the corner where the seam transitions, since that is often where the reinforcement row loses consistency.
The pre-production sample should also be checked with the actual print method and packing method. Screen print can change the hand feel near the stitch line, and tight folding can mark the top hem before the bag even reaches the customer. If the final product includes a sewn-on side label or internal care label, verify that it does not cover the stitch area or change the sewing path. The goal is to approve the final production relationship between fabric, print, and stitch, not a perfect standalone sample that cannot be repeated.
- Do a hand pull on the sample using the expected load direction.
- Confirm the sample uses the final fabric GSM, not a lighter approval stock.
- Check whether the bag still opens flat and stacks cleanly after reinforcement is added.
Cost, MOQ, and Lead Time Tradeoffs
Reinforcement rows affect more than sewing time. They can change machine setup, line balancing, thread consumption, inspection time, and reject rate. That is why the price delta between a simple row and a more controlled twin-row build is rarely just the cost of extra thread. If a supplier quotes a low number without showing the build detail, ask whether the line is using a shorter stitch, fewer back-tacks, or looser inspection to hit price.
MOQ logic should be tied to both fabric and construction. If the bag body is standard but the reinforcement row is custom, the factory may still want a minimum by color, by print screen, or by handle style. Lead time also changes with sewing complexity. A straightforward sample might take several days, while a full pre-production sample with corrected reinforcement, artwork alignment, and packaging signoff can take longer. Buyers should plan enough time for one correction cycle, especially if the first sample reveals row misplacement or thread mismatch.
- Ask suppliers to separate standard body cost from reinforcement upgrade cost.
- Confirm whether line changeovers affect MOQ for different colors or print variants.
- Build time for one sample revision into the project schedule instead of hoping the first version passes.
Packing and Transit Can Change the Approved Stitch Look
A good reinforcement row can still arrive looking wrong if the bag is packed badly. Heavy compression can leave a crease over the top hem, and repeated folding can make the stitch row appear wavy or sunk into the burlap. For procurement teams, carton pack count, folding direction, inner polybag use, and carton compression are not just warehouse details. They can affect how the customer sees the reinforcement line when the bag is first opened.
Ask the factory to show the packed state during approval, not after goods are already shipping. If the bags are folded in a way that distorts the top edge, request a different fold or a looser stack height. If the bags are printed, check that ink is not rubbing against the reinforcement row during transit. A memo that ignores packing can create a false approval because the bag looked perfect on the table but ships with a visible crease or stitch memory.
- Confirm folding direction and stack height before bulk.
- Check carton fill so the top hem is not crushed.
- Make sure the packed sample still matches the approved photo set after transport handling.
Common Mistakes and the Fastest Ways to Prevent Them
The most common mistake is approving "double stitching" without defining where the rows sit or what they are supposed to protect. The next mistake is accepting a sample with the right look but the wrong fabric weight, which creates weak pull resistance in bulk. Another frequent problem is ignoring how print, label, or lining changes move the needle path and compromise the seam. These are small errors on paper, but they become expensive when a container arrives with bags that feel inconsistent or fail a customer complaint check.
The best prevention is a controlled memo trail. Use one approved sample, one version number, one photo set, and one line of acceptance criteria. When a supplier suggests an improvement, ask for a revised sample and a clear note on what changed. That keeps the approval process commercial and practical. You are not trying to make the bag overly complicated; you are trying to stop a weak row from becoming a recurring claim.
- Do not approve vague terms like "reinforced" without a measured stitch spec.
- Do not compare quotes unless all vendors use the same GSM and handle build.
- Do not skip a packed sample check just because the sewing sample passed.
Specification comparison for buyers
| Spec decision | Recommended option | When it fits | Buyer risk to check |
|---|---|---|---|
| Reinforcement row count | Two parallel rows at the handle root | Medium to heavy shopping bags, retail reuse, or promotional bags expected to carry 5-10 kg | Rows too close to the edge can tear the burlap instead of spreading load |
| Thread type | Bonded polyester thread, matched to bag color or contrast approved by sample | When handle pull resistance matters and the bag will see repeated use | Low-grade thread can fuzz, slacken, or break after washing, humidity, or flexing |
| Stitch pattern | Dense lockstitch with controlled back-tack at stress points | For handles, side gussets, and top hem reinforcement | Loose stitch length or skipped stitches create weak spots that pass a quick visual check but fail in use |
| Base fabric weight | 240-340 GSM jute burlap, adjusted for bag size and load | For structured retail bags, wine bags, and heavier carry bags | Heavy stitch reinforcement on thin fabric can distort the weave and pucker the top edge |
| Edge finish | Turned hem with reinforcement row over the folded edge | When buyers want cleaner appearance and better tear resistance | Raw edges under the row can fray through the seam and create lint or loose fibers |
Buyer checklist before sampling
- Confirm the exact row count, stitch length, and placement from bag edge to first stitch, not just "reinforced stitching".
- Match reinforcement design to fabric weight, bag size, intended load, and handle type before asking for pricing.
- Request a pre-production sample with the final fabric GSM, thread type, print method, and handle attachment method together.
- Ask the factory to mark the approved stitch row on the sample card or memo so production can copy it without interpretation.
- Verify seam security at the top hem, handle root, side seam, and base corners under hand pull and load test.
- Check whether the quote includes extra machine time, thread consumption, and QA rework for the reinforcement row.
- Confirm packing method, folding direction, carton count, and compression so stitches do not distort before arrival.
- Record the approved memo version, sample date, and photo set in the PO file for supplier reference.
Factory quote questions to send
- What stitch pattern, stitch length, and row spacing are you quoting for the reinforcement area?
- How many stitch rows are included at the handle root, top hem, side seam, and base corners?
- What thread specification are you using, and is it the same color, ticket size, and strength as the approved sample?
- What fabric GSM and weave density are you pricing against for the quoted reinforcement method?
- Does the quote include sample development, memo revision, and one round of stitch correction before bulk?
- What is the MOQ by color, print method, and reinforcement variation?
- What is the expected lead time for the first sample, pre-production sample, and bulk shipment?
- How will you pack the bags so the reinforced rows stay flat and readable during transit and warehouse intake?
Quality-control points to confirm
- Measure row placement from the top edge and from the handle root on every size run.
- Check stitch density and stitch length against the approved sample, not against a generic factory standard.
- Inspect thread tension for puckering, skipped stitches, loose loops, and broken back-tacks.
- Pull-test the handle attachment area on both sides of the bag, especially where the reinforcement row crosses the load path.
- Verify that print ink, embroidery, or woven label placement does not interfere with the stitch row.
- Confirm that the burlap weave is not cut, melted, or crushed by needles or heat during sewing.
- Review carton samples for crease marks or compressed stitch lines after packing and stacking.
- Keep the signed sample, memo photo, and production reference card in the batch file.