Why winery tote quality fails in practice
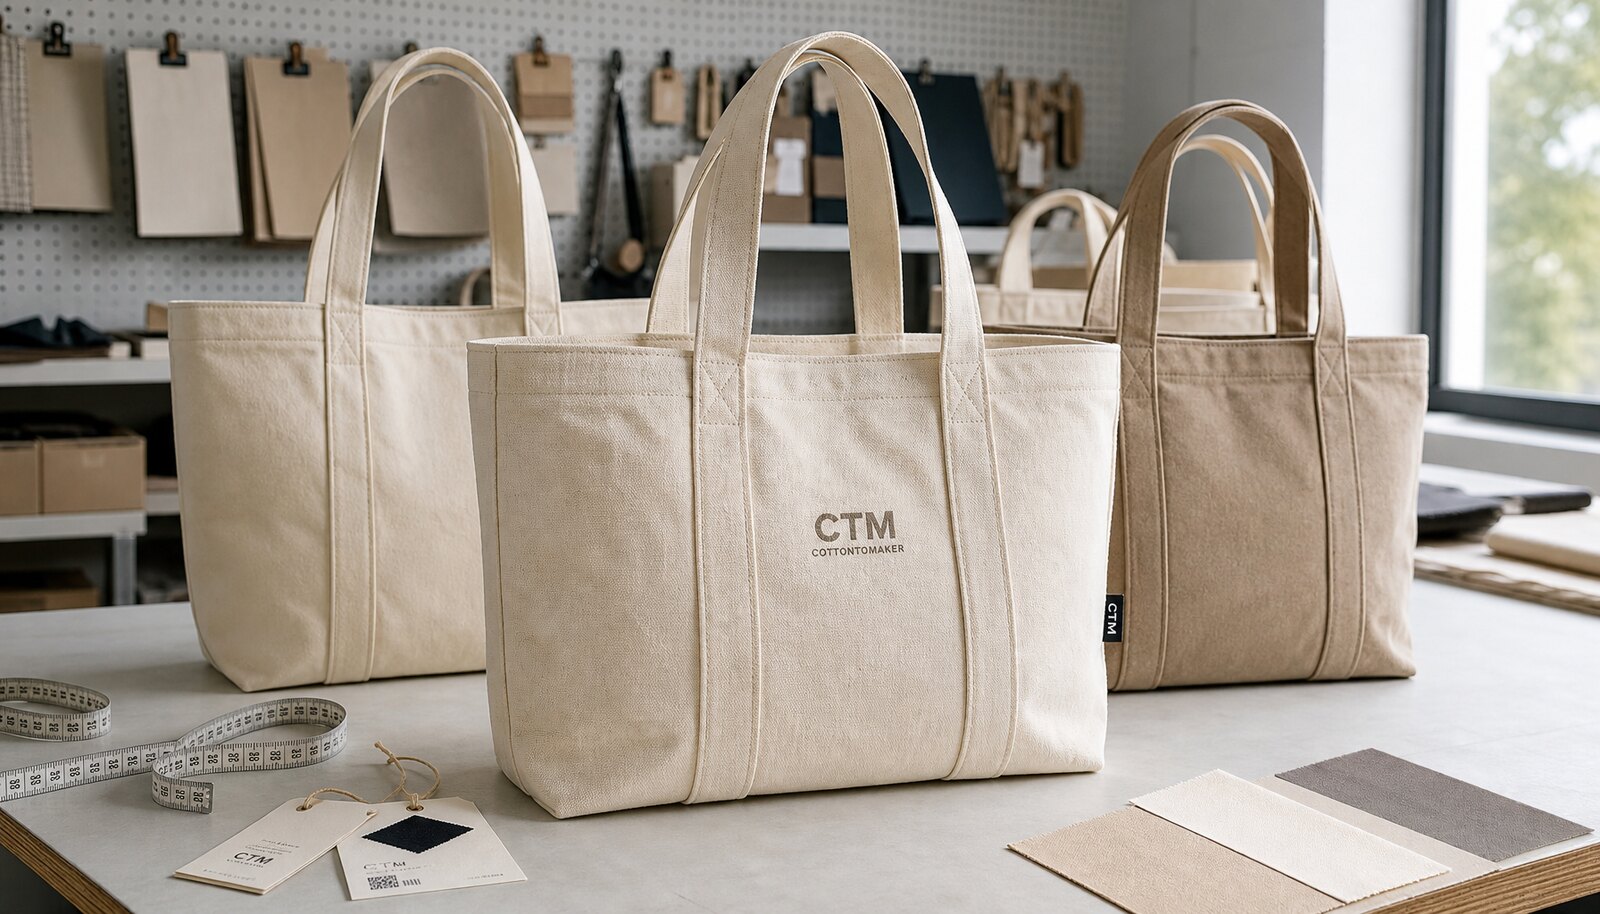
Heavy canvas tote bags for wineries are usually bought for more than carrying a bottle. They are a retail item, a gift carrier, and a brand surface at the same time. That combination creates a common sourcing mistake: buyers focus on artwork approval and ignore the bag body. The result is a tote that looks fine on a screen but arrives too soft, too small, poorly sewn, or inconsistent from carton to carton.
For winery programs, quality complaints usually come from a few repeat problems: weak fabric that sags, handles that pull out under bottle weight, print that looks muddy on rough canvas, and packing that creates wrinkles or scuffs before the bags even reach the store. A useful quality inspection checklist needs to catch those issues before bulk production, not after the freight lands.
- A wine tote must survive carrying glass, not just a light brochure or T-shirt.
- Brand presentation matters because the bag may stay visible in a tasting room, gift shop, or customer home.
- A small defect rate can become a large problem when the bags are used as a retail packaging standard across multiple locations.
Start with the right canvas weight and bag construction
For most winery applications, the practical starting point is 14–16 oz cotton canvas if the tote must carry a bottle with some margin of safety. If the bag is only for light retail use, a lower weight such as 10–12 oz can work, but that choice should be deliberate, not accidental. Ask the supplier to state the canvas weight in GSM or oz and to show how it was measured on the approved sample.
Construction matters as much as fabric. A bottle tote needs enough body to stand or at least hold shape in the hand, plus reinforcement at the handle base and side seams. If the bag has a gusset, the bottom seam and corners should be clean and straight. If it is a flat tote, the side seam must still be strong enough to avoid twisting when the bottle shifts inside.
- For one standard 750 ml bottle, avoid very thin single-layer canvas unless the tote is only decorative.
- For two bottles or a bottle-plus-accessory pack, check both seam strength and handle length.
- If the bag includes an inner divider or insert, confirm whether that insert is sewn in or loose, because it changes cost and lead time.
Compare sourcing routes before you compare price
The cheapest quote is often the one with the least visibility. For winery totes, the sourcing route affects not just cost but also the quality of proofing and the speed of corrections. A factory direct order can give you better control over fabric, sewing, and packing, while a trading company may offer convenience if they manage multiple items or consolidate shipments. Either route can work, but the inspection checklist should change depending on who actually controls production.
If you are buying for multiple retail doors or repeat seasonal promotions, use the same spec sheet across all suppliers and compare them on measurable evidence: sample photos, stitch count, print alignment, packing count, and lead time after approval. Do not compare only unit price. A slightly higher quote can be cheaper if it reduces rework, rejects, and carton claims.
- Factory direct is usually better when you need detailed control over fabric and workmanship.
- A trading partner can help with communication, but insist on factory-level sample photos and production evidence.
- If the supplier cannot state who performs cutting, sewing, printing, and final inspection, the risk is higher.
Supplier comparison table for winery tote buyers
The table below is useful when procurement teams need to separate a strong production partner from a quote that only looks competitive. The point is not to choose the lowest line item. The point is to understand what kind of supplier route supports your artwork, bottle load, carton pack, and reorder timeline.
For wineries, the practical decision is often between a direct canvas factory, a general promotional goods supplier, and a trading partner that can coordinate mixed items. Each route can meet a budget, but the inspection burden changes. If you buy from a broader sourcing partner, ask for the same evidence you would expect from the mill or sewing factory itself.
- Write decisions in measurable language, not only descriptive wording.
- Ask for sample photos plus one physical approval sample for important orders.
- Keep quotation, sample approval, and inspection notes tied to the same spec version.
How to read a quote without missing hidden cost drivers
A solid quote should separate fabric, sewing, printing, packaging, and any special finishing. If the supplier only gives one landed-looking number, you cannot see what is driving the price. That becomes a problem when you need to adjust artwork, increase size, add a divider, or change carton count. For a winery buyer, those small changes often happen after sample review, so the quote needs enough structure to absorb them.
The biggest cost drivers are usually fabric weight, print method, handle reinforcement, and packing. Screen printing may be economical for a simple single-color logo, but multi-color art or fine detail can push you toward transfer or another method. Embroidery can elevate the look, but it adds cost and can distort on very dense canvas if the design is too small. Ask the supplier to quote the same tote with at least two print options if you are deciding between retail appeal and unit cost.
- A bag that is 2 cm larger in width or height can affect fabric usage and carton density.
- Extra stitches, lining, dividers, or woven labels often look minor on paper but change labor time.
- Packing in individual polybags may improve cleanliness, but it adds material cost and waste handling.
Sample approval is where most production errors can still be fixed
For this product, sample approval should not stop at visual approval of the logo. Measure the finished sample, examine the seam corners, pull the handles under realistic tension, and compare the canvas hand feel to your target. If the tote is meant to hold a bottle, place an actual bottle inside the sample and check how the top opening behaves. The bag should not look strained, and the bottle neck should not rub the top seam in a way that could damage presentation.
Treat the sample as the production standard. Mark the approved sample with date, artwork version, size, fabric weight, print method, and label location. Keep one approved reference with procurement and one with the supplier. If later production drifts, that sample becomes the basis for a fast correction rather than a long debate.
- Measure width, height, gusset, handle length, and handle drop on the sample.
- Check whether the print sits flat after curing and does not crack when folded.
- Inspect inside seams for loose threads, broken reinforcement, or uneven trimming.
Inspection thresholds that matter for winery retail use
An inspection checklist works best when it defines what is acceptable, not only what is defective. For heavy canvas tote bags, set visible thresholds for size variance, print registration, thread trimming, stain control, and handle symmetry. If you receive bags for direct retail use, cosmetic flaws matter because the tote becomes part of the brand experience. A bag with crooked printing or dirty marks will often be rejected by store teams even if it technically functions.
For practical production control, focus on load-bearing points and visible brand surfaces. Loose decorative threads can be trimmed in some cases, but poor handle reinforcement or distorted logo placement should trigger rework or rejection. If the supplier is not already using an agreed AQL or equivalent in-house standard, define your own buyer-side acceptance rules before the order begins.
- No obvious staining on the front logo panel.
- No missing stitches at handle joints or bottom corners.
- Logo alignment should remain centered within an agreed margin from the approved sample.
- No mixed sizes or mixed artwork versions in the same carton without prior approval.
Packing, carton marks, and distribution handling
Packing is often overlooked because it is not visible in the catalog photo, but it affects receiving quality more than many buyers expect. Heavy canvas bags should be packed so that they arrive flat enough to use immediately, without deep fold marks or dust exposure. If the bags are intended for multiple stores, carton count accuracy and label readability matter as much as the bag itself. One mispacked carton can create store-level shortages and purchasing disputes that take longer to resolve than the actual product issue.
Ask how the bags are folded, whether they are tissue protected, and whether the cartons are labeled with style, color, quantity, and purchase order reference. If your distribution team uses barcode receiving, make sure the carton label format matches the receiving process. For export, also confirm outer carton strength, gross weight, and whether the packing arrangement changes if you add inserts or bottle dividers.
- Flat packing usually reduces creasing and helps the bags look better on arrival.
- Clear carton counts lower receiving disputes and speed put-away.
- If the bags are gift items, consider whether a polybag is necessary or whether a dust-free folded pack is enough.
Lead time risk and reorder planning for seasonal winery programs
Lead time for heavy canvas tote bags should be planned from sample approval, not from the date of inquiry. Many production delays happen because the buyer expects the bulk schedule to begin before artwork or sample sign-off is complete. For winery programs, that is risky because tote orders often support seasonal gifting, launch events, harvest promotions, or holiday retail packs. Once the calendar slips, the bags can miss the exact moment they were intended to support.
Reorder planning is easier if the supplier keeps the same fabric roll, print screen, label spec, and carton pack on file. That is one reason procurement teams should maintain a clean product record after the first order. If you expect repeat business, keep the approved spec sheet attached to the PO history so the second or third order can be re-run without re-negotiating the basics.
- Separate sample time, bulk production time, and freight time in your internal schedule.
- Build in time for artwork correction or print plate changes if the logo updates.
- For repeat orders, preserve the approved sample and the final QC photos as a reorder reference.
A practical inspection checklist for the production floor and receiving dock
The best winery tote programs use the same checklist at three points: sample approval, in-line production, and final receiving. That does not mean the same person does every inspection, but the criteria should stay consistent. A factory may catch early sewing drift, while your warehouse may catch carton count errors or print rub damage. If the standards differ by stage, defects can slip through because everyone assumes someone else already handled them.
Use the checklist below as a working tool, not a formal document only. It should help you decide whether the order can move forward, whether a corrective action is needed, or whether the supplier should rework before shipment. The goal is fewer surprises when the tote reaches store shelves or tasting rooms.
- Fabric weight and hand feel match the approved sample.
- Handle reinforcement is visible and consistent on both sides.
- Print is sharp, centered, and fully cured.
- Seams are clean with no skipped stitches or open edges.
- Carton packing matches the agreed count and label format.
Specification comparison for buyers
| Spec decision | Recommended option | When it fits | Buyer risk to check |
|---|---|---|---|
| Fabric weight | 14–16 oz cotton canvas, or 10–12 oz if the tote is mainly for bottle carry plus light retail use | Wine shops, tasting rooms, gift-with-purchase programs, and premium retail packs | Too-light canvas collapses under bottle weight; too-heavy canvas can raise cost and slow printing if the artwork is complex |
| Handle construction | Self-fabric handles with bar-tack reinforcement or cross-stitch at stress points | When the tote must carry one bottle, inserts, or heavier retail bundles | Handles cut too short or stitched too close to the edge can tear after repeated use |
| Print method | Screen print for bold logos; heat transfer only for small runs or complex color art; woven label or embroidery for premium branding accents | When branding must stay crisp after repeated handling and occasional abrasion | Fine lines and light colors can fill in on rough canvas; transfers may crack if artwork is oversized or poorly cured |
| Bag size | Sized for 1–2 standard wine bottles with room for tissue, insert card, or gift box | Tasting room retail, gifting, and distributor programs | Oversized bags look cheap and increase freight; undersized bags force bottle necks to rub the top seam |
| Closure style | Open top for retail speed, or gusseted top with insert card if bottles need extra stability | When the bag is used as a purchase carrier rather than a storage pouch | A closure that is too tight can slow packing and frustrate shop staff |
| MOQ route | Direct factory production with one approved sample and a single colorway for the first order | When you need price control and repeatability across reorders | Very low MOQ may hide setup charges, inconsistent finishing, or limited inspection time |
| Packing method | Flat packed, tissue protected, with clear carton count and barcode label on each carton | When bags are shipped to multiple stores or distribution centers | Loose packing creates creases, scuffs, and count disputes at receiving |
| Logo placement | Front center or lower front panel with enough margin from seams and handle attachment | When brand visibility matters at retail shelf and at event gifting | Artwork too close to seams can distort during sewing and create off-center prints |
| Supplier route | Factory direct or audited trading partner with documented sample approval and in-line QC photos | When you need control over lead time, specs, and repeat orders | Agents without factory visibility may miss fabric substitution, sewing drift, or packing errors |
Buyer checklist before sampling
- Confirm the exact canvas weight in oz or GSM, not just the word 'heavy'.
- Approve the finished size with bottle fit, seam allowance, and handle length measured on the production sample.
- Lock the print method, logo position, ink color, and curing standard before bulk production starts.
- Require a pre-production sample or gold seal sample with photos of stitching, corners, handles, and label placement.
- Specify reinforcement points at the handle base and bottom seams if the tote will carry wine bottles.
- Define packing count per carton, carton test requirements, and barcode or shipping mark format.
- Set a defect tolerance for loose threads, broken stitches, crooked prints, stains, and size variation.
- Align lead time with approval timing so the production schedule does not start before the sample is signed off.
Factory quote questions to send
- What is the exact fabric weight in GSM and finished canvas type you are quoting: bleached, natural, dyed, or recycled blend?
- Can you share a measured pre-production sample photo with stitch count, handle reinforcement, and print placement marked?
- What is your MOQ per color and per artwork version, and what changes affect the pricing break?
- Which print method is included in the quoted price, and what is the setup charge for each color or screen?
- How do you pack the bags for export: flat or folded, how many per carton, and what carton size and gross weight do you use?
- What inspection standard do you follow for stitching, size tolerance, and print registration before shipment?
- What is the realistic lead time after sample approval, and what part of the schedule is most likely to delay?
- Can you quote separate landed-cost factors such as unit price, sample fee, packing fee, and extra charge for special labels or inserts?
Quality-control points to confirm
- Fabric weight must match the approved spec within an agreed tolerance; do not accept a vague 'heavy canvas' description.
- Panel cutting must keep size variation under control so finished width, height, and gusset remain consistent across the lot.
- Stitch density should be even, with no skipped stitches, loose thread bundles, or needle damage visible at load-bearing seams.
- Handle attachment must survive a pull test that reflects real use, especially for bottle-carrying bags.
- Print registration should stay centered and legible, with no cracking, smearing, ghosting, or color shift on the first run.
- Seams at bottom corners and handle ends need reinforcement if the tote will be used repeatedly in retail or hospitality settings.
- Fabric surface must be free of oil marks, heavy slubs in visible branding zones, and contamination from cutting or sewing.
- Carton packing must preserve shape and count, with no crushed bags, mixed sizes, or missing inserts on arrival.