Why museum tote samples fail even when the quote looks fine
Museum buyers often focus on price per piece and the logo artwork first, then discover the sample feels too soft, the print sits off-center, or the handles are underbuilt. That usually happens because the quote only captured the visible design, not the manufacturing details that control how the tote performs on the shelf and in the customer’s hand. For heavy canvas tote bags for museums, the sample is not just a visual proof. It is the only reliable way to test fabric feel, stitching strength, print placement, and packing efficiency before bulk production starts.
The biggest commercial risk is not a small defect. It is approving a sample that cannot be repeated at scale. A factory may show a hand-finished sample using a better fabric roll, extra manual stitching, or a print run done by the most experienced operator. If those details are not written into the approval record, the bulk order can drift into a lighter canvas, weaker reinforcement, or inconsistent logo placement. For museum retail, where the bag becomes part of the brand experience, that drift is expensive.
- Sample approval should lock in fabric, print method, construction, and packing—not just size and logo.
- A retail tote that looks acceptable on a table may fail after book weight, daily carry, or repeated folding.
- If the museum sells through multiple channels, the sample needs to reflect the final resale presentation, not a one-off prototype.
Start with the right canvas weight, not just a rough fabric name
For museum programs, the common range is 12 oz to 16 oz cotton canvas, which usually lands around 340-450 GSM depending on weave and finishing. That range gives the bag enough body to feel premium, support books and catalogues, and hold a printed logo cleanly. If you go much lighter, the bag can wrinkle heavily and lose shelf appeal. If you go much heavier, the tote becomes stiff, costs more to sew, and may not fold neatly for packing or retail display.
The sample should state whether the canvas is bleached white, natural, dyed, brushed, or enzyme-washed. These details change the look of the print and the hand feel. Natural canvas often works well for museum brands that want a calm, heritage style. White or bleached canvas gives a cleaner print surface, but it can show marks more easily in transit. If the museum expects the tote to be stocked next to books, posters, or gifts, the fabric tone should be matched to the rest of the retail line.
- 12 oz / 340-360 GSM: good for lighter retail items and controlled cost.
- 14 oz / 380-400 GSM: a balanced option for most museum gift shop programs.
- 16 oz / 420-450 GSM: better for premium positioning and heavier carry loads.
- Confirm the weave density, not only the weight, because loose weave can still look thin.
Choose the print method based on artwork, not supplier habit
Museum totes often carry a clean wordmark, exhibition title, or simple graphic. That makes screen printing the first method to compare because it is usually the best mix of cost, opacity, and repeatability on heavy canvas. A single-color screen print is often the safest route for a standard retail tote, especially on natural canvas. If the artwork has fine lines, multiple colors, or tonal detail, the sample needs to prove the factory can hold line sharpness on the woven surface without fill-in or edge spread.
Heat transfer is sometimes proposed for small runs or complex artwork, but it should not be accepted automatically. On heavy canvas, transfer quality depends on film quality, temperature control, press pressure, and cure time. Poor transfer work can crack at the fold line or look glossy in a way that does not suit museum retail. Woven labels, woven side tags, or sewn patch logos can be a better answer when the brand wants a subtle premium finish without large ink coverage.
- Screen print: best for solid logo coverage and repeat orders.
- Heat transfer: acceptable for short runs or detailed graphics if durability is proven.
- Woven label or sewn patch: useful for restrained branding or when print area is limited.
- Ask for a rub test and a fold test on the sample before approval.
Use a comparison table to separate real factories from broker quotes
Many quote sheets for heavy canvas tote bags look similar at first glance, but the sourcing route changes your risk. A direct factory that cuts, sews, and prints in-house usually gives better control over sample correction and bulk consistency. A trader or broker may offer faster communication, but the production chain can be less transparent. For museum orders, where the bag may need to coordinate with a new exhibition launch or store refresh, the ability to trace who controls the fabric, print, and packing matters as much as the unit price.
The right route depends on volume, urgency, and how strict the museum is about color and finishing. If the order is a one-time promotional run, a flexible route may work. If the tote will be restocked for months, you want a supplier that can repeat the same panel dimensions, print position, and carton count without renegotiating every time.
- Use the sample to test whether the supplier actually owns the critical production steps.
- A lower quote is not useful if the supplier cannot repeat the sample result in bulk.
- If the supplier will not state material origin, print method, and packing method, treat the quote as incomplete.
Sample approval should lock in the exact construction details
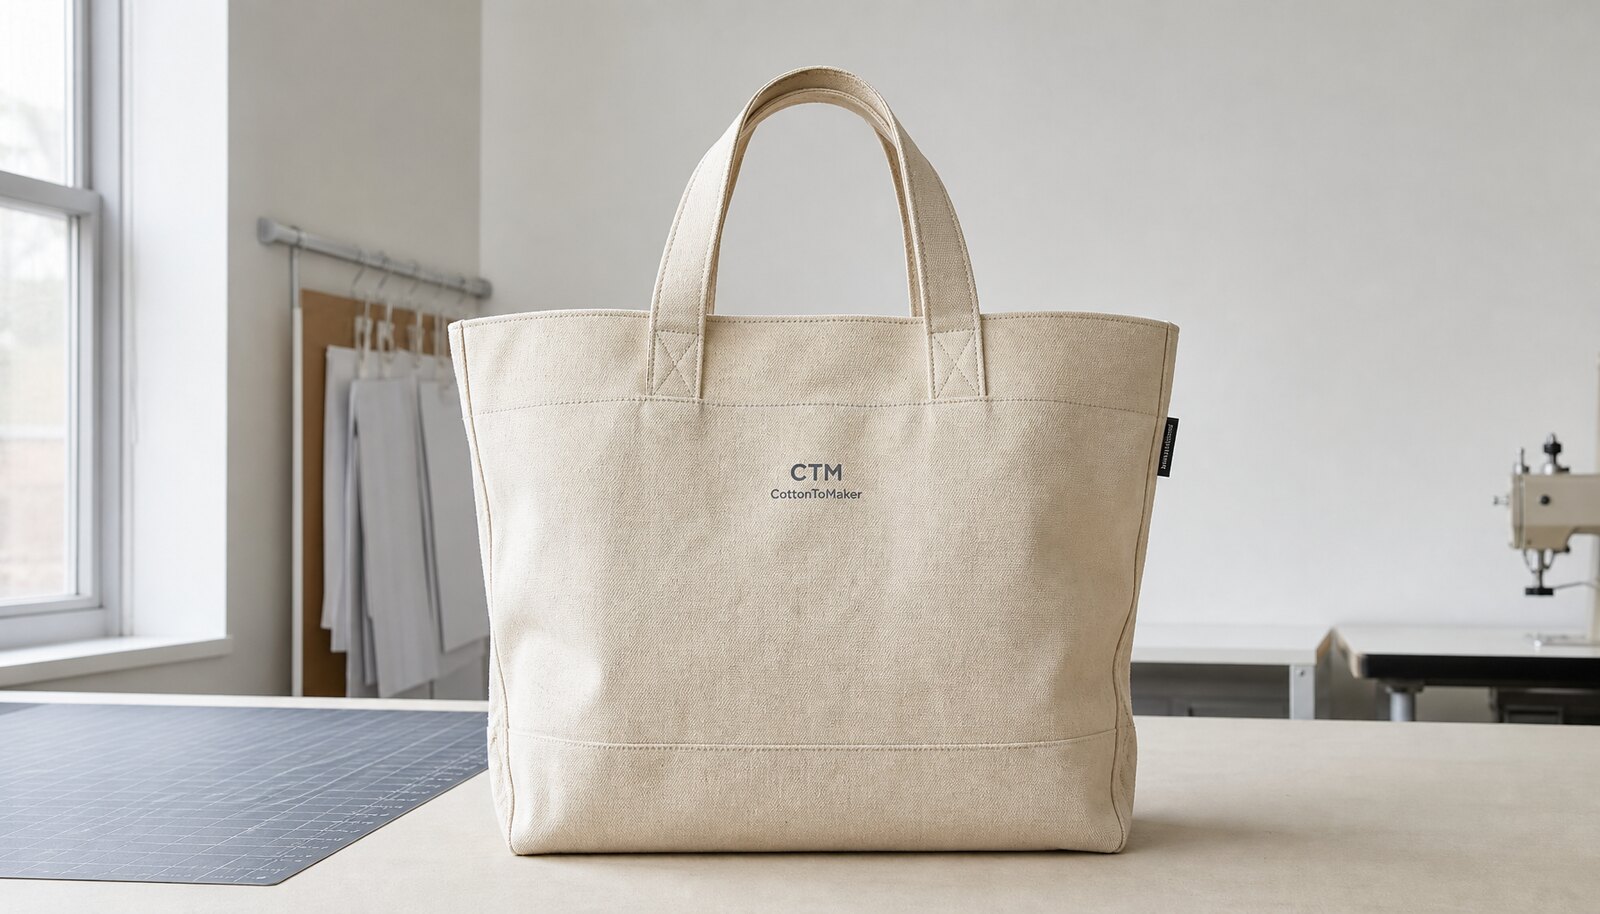
A good sample approval sheet reads like a manufacturing record, not a marketing note. It should specify bag dimensions, canvas weight/GSM, panel construction, handle length and width, seam allowance, reinforcement method, and any lining or pocket details. The sample must also use the final artwork file, final print color, and final label placement. If there is a zipper, snap, or inner pocket, those components need to be on the approval sample too, because each one changes sewing time and bulk yield.
For heavy canvas tote bags for museums, the handle area deserves special attention. The sample should show where the handle is anchored, how many stitches are used, and whether the ends are boxed, bar-tacked, or cross-stitched. A tote that carries brochures and books needs more than a decorative stitch line. The approval standard should say what fails: loose stitches, visible puckering, handle twist, uneven handle drop, or misaligned reinforcement.
- Write down the exact bag size in centimeters or inches.
- State the target fabric weight and acceptable tolerance.
- Record the final print placement in relation to the top edge and side seam.
- Define the handle reinforcement method and sewing count.
- List any accessories such as labels, inserts, zippers, or snaps.
Use acceptance criteria to avoid a pretty but unrepeatable sample
Sample approval goes wrong when the buyer says the tote looks good without defining what good means. The factory then assumes visual acceptance is enough, even if the sample hides weak points. For a museum program, the acceptance criteria should include both appearance and function. The bag should sit flat, open properly, carry weight without seam distortion, and keep the print readable after folding. If the tote has a gusset, the gusset lines should stay straight and symmetrical rather than twisting after sewing.
A practical approval standard also includes reject conditions. For example, more than minor thread trimming may be unacceptable, but a loose thread on a hidden internal seam may be acceptable if it does not affect durability. The point is not to create an impossible standard. The point is to make sure the factory knows which faults are cosmetic and which faults trigger rework or rejection.
- Acceptable: slight natural variation in canvas tone.
- Not acceptable: print blur, major off-center placement, or handle skew.
- Acceptable: tiny stitch backtracking where reinforcement begins.
- Not acceptable: skipped stitches, weak handle anchors, or broken panel symmetry.
Packing details affect shelf readiness and import efficiency
Museum buyers often treat packing as a logistics issue, but it affects product presentation and damage rate too. A heavy canvas tote packed too tightly can crease sharply, distort the print area, or trap moisture in transit. Flat packing is usually the best option, but the carton count must be controlled so the bags do not arrive compressed. If the tote includes a lining or structured base, overpacking can flatten the shape and make first inspection misleading.
Packing instructions should cover whether each bag goes in a polybag, a paper sleeve, or no individual wrap, depending on retail needs. If the museum stores are selling directly from the shelf, barcode stickers and size labels should be placed in a consistent spot that does not cover the logo. For importers and distributors, master carton markings, carton quantity, gross weight, and carton dimensions matter because they affect freight planning and warehouse receiving.
- Flat pack the tote unless the retail display requires pre-shaped packing.
- Avoid excess compression that creates deep fold lines in the logo area.
- Specify the carton quantity and the acceptable weight per carton.
- Use moisture protection if the route includes humid transit or storage.
Lead time risk comes from approvals, not only sewing capacity
Many tote orders are delayed because the buyer assumes the factory lead time starts after payment. In practice, the clock often resets when artwork changes, the print screen needs correction, or the sample is approved with notes that require a new strike-off. For museum retail programs tied to exhibition openings or store launches, the safest schedule is built around sample approval, material confirmation, production booking, and packing completion—not one single promised ship date.
A realistic factory response for a custom heavy canvas tote often looks like this: sample lead time around 5-12 days depending on artwork complexity and trim sourcing, then bulk lead time around 25-45 days depending on quantity and season. Rush orders may be possible, but they usually come with a cost penalty or reduced flexibility on material choice. If the quote does not separate sample time from bulk time, it is hard to judge whether the supplier is actually ready.
- Build time for revised artwork or revised print placement into the schedule.
- Confirm when the factory will buy canvas, ink, webbing, or labels.
- Ask whether production starts only after physical sample approval or after email sign-off.
- Do not count transit time as part of production time.
Read the quote like a merchandiser: what changes the landed cost
A tote quote can look simple until you break it into fabric, sewing, print setup, packaging, and labor. Heavy canvas affects every part of the cost because the fabric itself is more expensive, the sewing takes longer, and the print may require stronger ink coverage. If the tote has reinforcement, lining, or custom labels, those additions may not show clearly in the base unit price unless the supplier itemizes them. Museum buyers should compare quotes on the same basis: same GSM, same print method, same handle construction, same packing, and same MOQ.
The landed cost matters more than ex-factory price when comparing sourcing routes. A low unit price can become expensive if the supplier charges separately for samples, screens, packaging changes, carton marks, or artwork revisions. Freight also changes the picture because heavier canvas increases gross shipment weight. For a museum shop program, it is useful to compare not only the bag price but the total cost to warehouse, including cartons, packing density, and any import handling charges that scale with weight and volume.
- Base fabric cost rises sharply between 12 oz and 16 oz canvas.
- Multiple print colors add setup and reject risk.
- Custom labels, lining, and reinforced handles add sewing time.
- Better carton packing can reduce freight cost per unit.
Use this buyer checklist before sample sign-off
This checklist is designed for procurement teams that need a clear internal approval record before releasing bulk production. It keeps the focus on repeatable manufacturing details rather than subjective style comments. If the museum has more than one stakeholder, use the checklist to gather sign-off from merchandising, operations, and brand management before the factory is told to proceed.
Once the sample is approved, the signed record should be attached to the PO or confirmation email. That reduces dispute risk if the bulk tote arrives with a different hand feel, different print tone, or a minor construction change. In tote production, the fastest way to lose control is to approve by phone and leave the factory to infer the rest.
- Bag size, seam allowance, and handle length match the approved drawing.
- Fabric weight/GSM and fabric color match the physical sample.
- Print method, logo size, and placement are locked.
- Reinforcement points and stitch quality pass load and appearance review.
- Packing method, carton count, and outer marks are approved.
- Bulk lead time, sample lead time, and MOQ are written into the order file.
Specification comparison for buyers
| Spec decision | Recommended option | When it fits | Buyer risk to check |
|---|---|---|---|
| Canvas weight | 12 oz to 16 oz cotton canvas, typically 340-450 GSM | Museum shops, exhibit merch, gift shops, and premium retail programs that need a structured bag | Too light and the bag collapses or feels cheap; too heavy can raise cost, print difficulty, and seam stress |
| Supplier route | Direct factory with tote bag sewing and printing in-house | When you need tighter sample control, lower unit cost at scale, and clearer responsibility for defects | Outsourced printing or sewing can create shade variation, weak seams, and longer correction loops |
| Print method | Screen print for solid logos; heat transfer only for small runs or multicolor detail; woven label for low-ink branding | Museum logos, exhibit names, store identities, and recurring retail programs | Fine text can fill in on heavy weave; transfer prints may crack if cured poorly or packed while hot |
| Sample level | Pre-production sample with final fabric, final artwork, final trim, and final packing | Any order where the museum will approve from a physical sample before bulk production | A loose sample made from substitute fabric is not useful for approval and hides cost or quality problems |
| Handle construction | Cross-stitch plus bar-tack reinforcement or boxed handle ends | For books, catalogs, souvenirs, and heavy retail items | Handles sewn only with a simple straight stitch may fail under load, especially after repeated use |
| Lining | Unlined for cost-sensitive merch; cotton lining for premium retail; optional laminated lining for spill resistance | Choose by use case and price point | Lining can change hand feel, sewing time, and packing dimensions; it also affects print visibility on light colors |
| MOQ logic | Flexible MOQ for stock fabric and standard sizes; higher MOQ for custom GSM, custom dye, or custom trims | When comparing suppliers across multiple museum stores or seasonal launches | Low MOQ quotes may hide setup charges or use stock materials that do not match the approved sample |
| Packing | Flat pack with controlled carton quantity, barcode sticker, and moisture protection when needed | For importers, distributors, and retail fulfillment centers | Overstuffed cartons crush bags; loose packing causes wrinkling and counting errors during receiving |
| Lead time | Sample 5-12 days, bulk 25-45 days depending on artwork, dye, and order volume | Most museum retail programs and gift shop replenishment orders | Artwork revisions, trim sourcing, and approval delays can move the schedule more than sewing capacity |
Buyer checklist before sampling
- Confirm final bag size, canvas weight/GSM, handle length, gusset depth, and whether the bag must stand upright on shelves.
- Approve the print area, print method, ink color reference, and allowable shift from center before the sample is signed off.
- Inspect the sample for stitch density, handle reinforcement, edge finishing, and any loose threads at stress points.
- Verify the sample uses the intended fabric, lining, zipper or snap hardware if included, and the final label or side tag.
- Review packing method, carton quantity, barcode placement, and whether the bag can be packed flat without crushing the body.
- Get written confirmation of MOQ, bulk lead time, sample lead time, and any charge for revisions or extra strike-offs.
Factory quote questions to send
- What exact canvas weight in oz and GSM will be used for the bulk order, and is it the same as the approved sample?
- Is the print price based on one color, one side, one location, and one setup charge, or are there hidden additions for extra screens?
- What is the MOQ for the specified size and print method, and how does the price change if the museum wants a second colorway?
- Will the handles be self-fabric, webbing, or cotton tape, and what reinforcement method is included at the quoted price?
- What packing method is included, how many pieces per carton, and are individual polybags or paper inserts extra?
- What is the estimated sample lead time, bulk lead time, and what events would trigger a schedule reset?
- Which measurements will be inspected before shipment, and what defect rate or AQL standard does the factory use for tote bags?
Quality-control points to confirm
- Canvas weight matches the approved spec within the agreed tolerance; fabric hand should feel consistent across all panels.
- Bag dimensions are within tolerance after sewing, including width, height, gusset, and handle drop.
- Print placement is centered or positioned exactly as approved, with clean edges, no blurring, and no cracking when folded.
- Handle attachment is reinforced properly at all load points; stitches should not skip, pucker, or pull through the canvas.
- All exposed seams are trimmed cleanly; no loose threads, oil marks, broken needles, or fabric holes are acceptable.
- Cartons are strong enough for export handling, with correct inner count, labeling, and moisture protection if needed.