Start With the Job the Pouch Has to Do
For brand launches, the pouch is not just packaging. It is often the first item a buyer or guest touches after the outer carton is opened, so it has to protect the product, look deliberate, and survive handling through the whole launch chain. A pouch that works for an influencer kit may fail in retail distribution because the cord frays, the print rubs, or the size is too loose to keep a bottle, accessory, or sample set in place.
The commercial mistake is to start with decoration before the use case is defined. A launch pouch should be specified around the item it carries, the way it is packed, and the way it will be distributed. If it is going into a press kit, the pouch needs strong presentation and low lint. If it is part of a retail bundle, the pouch needs repeat opening and closure without distortion. If it ships internationally, it also needs packing that keeps units flat and clean.
- Define the end use before asking for quotes: launch kit insert, giveaway item, retail accessory, or sample pack.
- Match the closure style to the load: light drawcord for soft goods, stronger channel stitching for heavier contents.
- Treat the pouch as a branded component, not a generic filler item.
Choose Fabric Weight Before You Talk Price
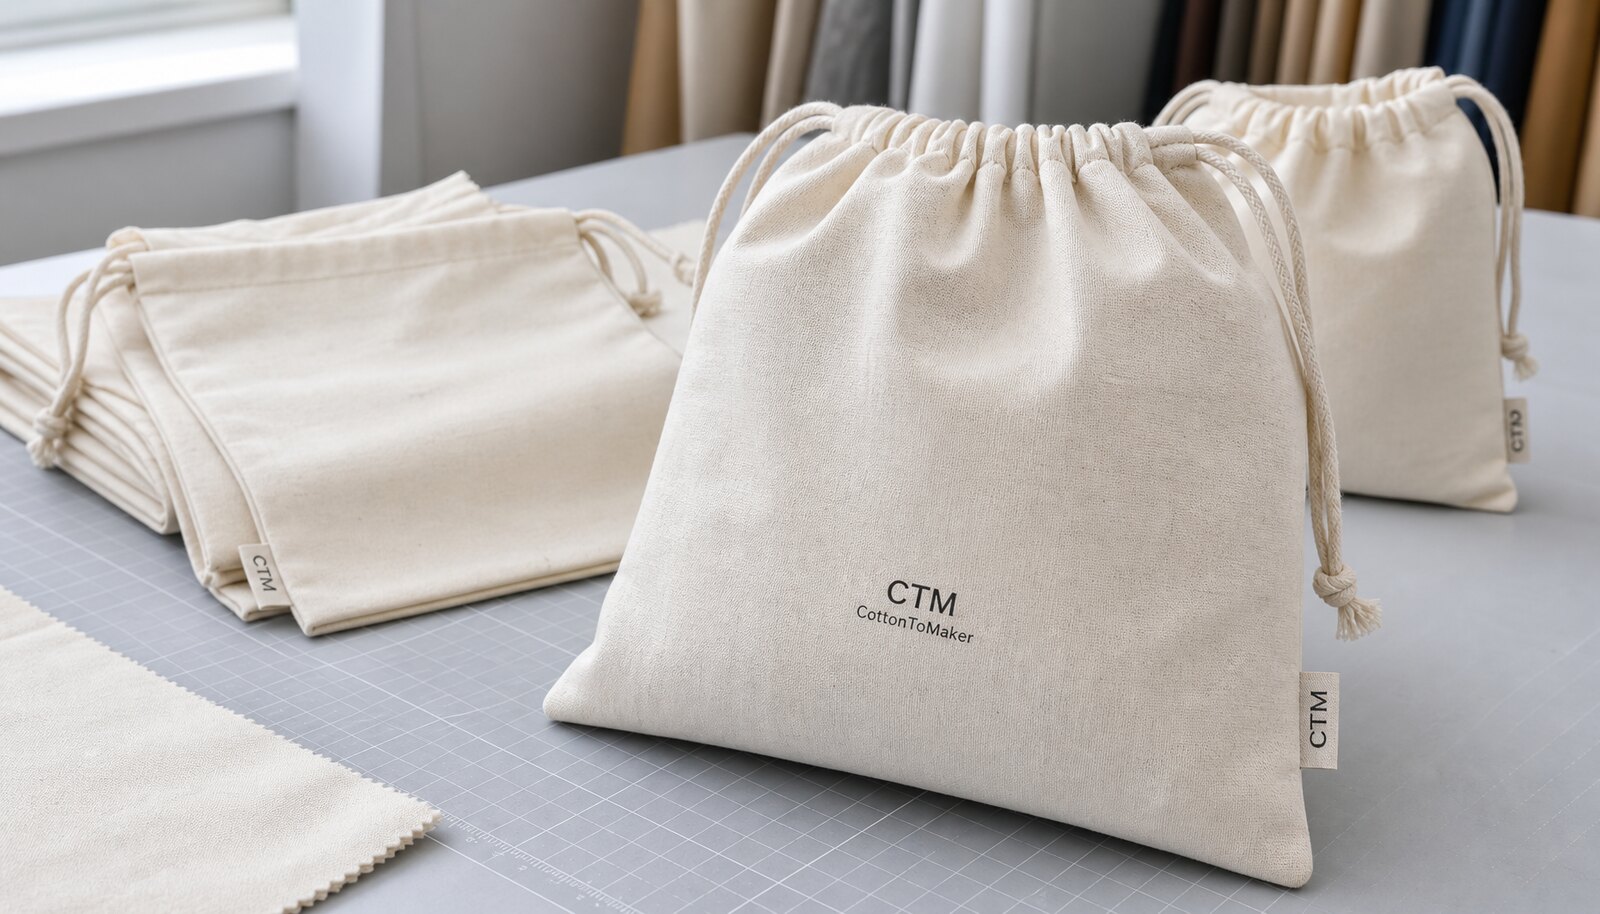
For gift drawstring pouches, cotton is usually the most practical base because it prints well, feels natural in hand, and is easy for factories to sew at scale. The real decision is fabric weight. Light pouches around 120 to 150 gsm suit small cosmetics, jewelry, cards, or low-weight promo items. Mid-weight pouches around 180 to 240 gsm give a better hand feel and hold their shape better for launch gifts. Heavier options around 280 to 340 gsm are more suitable when the pouch is part of a premium kit or needs to carry objects with edges.
The weight choice affects more than appearance. Heavier fabric usually improves body, opacity, and seam stability, but it also raises material cost and may require more sewing control at the cord channel and bottom seam. Lighter fabric can look clean in photos, but if the logo print sits on a thin base cloth, the print may show through or distort once the pouch is filled. If the launch includes mixed contents, ask the factory to quote the same size in at least two GSM options so the buyer can compare price against hand feel, not just unit cost.
- 120 to 150 gsm: light inserts, samples, cards, jewelry, and small accessories.
- 180 to 240 gsm: the safest middle ground for most branded gift pouches.
- 280 gsm and above: premium feel, better opacity, and stronger shape retention.
- Natural, bleached, and dyed fabrics will price and behave differently, even at the same GSM.
Use the Right Sourcing Route for the Launch Schedule
There is no single best supplier model for gift drawstring pouches. A stock pouch from a trading company can work when the launch date is fixed and the branding is simple. A direct factory is stronger when the pouch needs a custom size, a specific print position, or repeat ordering. A local decorator can be useful if the brand needs the pouch printed close to the market, but that route usually adds another handoff and another chance for mismatch between blank stock and final decoration.
The main sourcing risk is assuming all vendors are quoting the same thing. One supplier may quote a fully sewn pouch with print included, while another quotes only the blank body and excludes cords, labels, or inner packing. Ask each supplier to state whether they are quoting stock goods, made-to-order sewing, or a hybrid route. Once that is clear, the real comparison becomes easier: control, speed, and landed cost.
- Stock route: fastest, but weakest on size and trim control.
- Direct factory route: best for repeatability and custom branding.
- Local decoration route: useful for small batches, but watch blank quality and schedule coordination.
- Mixed routes need a clear responsibility split for defects, packing, and rework.
Read the Quote Like a Production Buyer
A useful pouch quote is itemized. If the supplier gives one number with no breakdown, it is hard to know whether the price includes the right fabric weight, the correct cord, the required printing method, and the packing standard your warehouse expects. For brand launches, hidden costs often sit in setup charges, sample charges, carton labeling, or the extra time needed to approve color and artwork. Those items matter because they determine the real landed cost, not just the factory gate price.
When comparing quotes, separate the recurring unit cost from the one-time costs. A slightly higher unit price can still win if it includes lower setup fees, better packing, or fewer rework cycles. Likewise, a cheap quote can become expensive if the factory assumes a lighter GSM, a simpler seam, or a smaller print area than the buyer actually needs. The safest comparison is to ask each supplier to quote the same spec sheet line by line, then compare the full order value and the risk attached to it.
- Separate unit price, setup, sample, packing, carton, and shipping charges.
- Compare the same spec sheet across every supplier, not a generic inquiry.
- Watch for hidden substitutions in fabric weight, cord type, or label material.
- Use landed cost, not only EXW or FOB, when the launch schedule is fixed.
Pick the Branding Method That Will Survive Production
For cotton drawstring pouches, screen printing is still the most practical method for most launch programs. It handles solid logos well, holds up on natural fabric, and is usually easier for a factory to control than a more complex decoration. One-color or two-color art is the cleanest path when the pouch needs volume, a short lead time, and a consistent result. If the branding needs a premium finish, a woven side label or a small woven side tab often gives a better look than trying to force a highly detailed print onto a textured fabric.
Embroidery can work, but it changes the structure of the pouch and may create puckering on lighter cloth. Heat transfer can handle detail, though it must be tested carefully on the exact fabric because some cotton surfaces do not hold the transfer well after folding, packing, or repeated handling. If the logo is small and the pouch will be reused, the safest rule is simple: keep the artwork legible, avoid fine lines that disappear into the weave, and keep decoration away from the seam stress points and cord channel.
- Screen print: best for flat logos, lower risk, and repeatability.
- Woven side label: good for premium branding and small formats.
- Embroidery: only when the fabric weight supports it and the logo is not too detailed.
- Heat transfer: useful for detail, but only after fabric testing on the actual cloth.
Approve the Sample as a Working Spec, Not a Display Piece
The sample process is where most launch problems can be removed cheaply. The pre-production sample should be made from the actual fabric, cord, print method, and label that the bulk order will use. A display sample that looks correct but is built from different materials will not protect the buyer later. Ask for a sample that reflects the real sewing sequence, not a hand-finished showroom version, and use that sample as the reference for dimensions, print placement, and packing format.
The most useful sample test is practical. Put the actual product or a close dummy load inside the pouch, close it, shake it, and inspect the seam tension, cord movement, and body shape. If the pouch is intended for a launch set, test it with the full pack-out, not just with air inside. At approval stage, small defects matter: off-center print, twisted cord exits, weak top stitching, or a logo placed too close to the seam can all look minor in a photo and become visible after one round of warehouse handling.
- Approve actual fabric, actual cord, and actual print method on the sample.
- Check packed fit with the real item or a realistic dummy load.
- Lock print placement and seam tolerance before bulk sewing starts.
- Keep one signed or photographed golden sample for production reference.
Specify Packing So Warehouses Do Not Rework the Order
Packing for gift drawstring pouches should be designed around the next handoff, not just the factory floor. If the pouches go straight into launch kits, the buyer may want them flat-packed in an exact count per inner bag and per master carton. If the goods enter a retail warehouse, barcode labels, item codes, and carton marks matter more than decorative wrapping. A pouch packed too tightly can arrive with hard folds, and a pouch packed too loosely can create count errors or take up more cube than planned.
The carton spec should be written down early because it affects freight and receiving time. Ask for the unit pack count, inner pack style, master carton dimensions, net and gross weight target, and the carton mark format. If the launch involves multiple pouch sizes, color codes, or print variations, the outer label needs to identify them clearly or the warehouse will open cartons to verify contents. That slows inbound checks and increases the chance of mix-ups.
- State inner pack count and master carton count on the RFQ.
- Use clear size codes if the order has more than one pouch dimension.
- Ask for shipping marks that match the warehouse receiving format.
- Do not leave carton size and pack count to the factory's default method.
Protect the Launch Schedule From Common Delays
Launch programs fail when sample approval, material sourcing, and production sequencing are treated as separate tasks. The pouch may look simple, but any delay in artwork sign-off, color approval, or trim sourcing can push the shipment into a missed event window. A realistic planning cycle usually includes sample development, sample approval, bulk material reservation, production, inspection, and packing. If the supplier says the pouch is quick to make, that usually refers to sewing time only, not the whole chain from approved artwork to export-ready cartons.
Schedule risk increases when the order has multiple sizes, special labels, or nonstandard fabrics. The safest approach is to freeze the specification first, then approve the sample quickly, and only then release the bulk order. For seasonal launches, add buffer time for fabric dyeing, print screen preparation, or factory shutdown periods. Even a good factory can only move as fast as the weakest step in the chain, and for branded pouches the weakest step is usually not sewing. It is approval discipline.
- Treat artwork approval as part of the production schedule, not a side task.
- Allow extra time for custom fabric, special labels, or multiple pouch sizes.
- Use a buffer before the launch date so packing and freight do not collide.
- Plan sample approval and bulk release as a controlled sequence.
Build the RFQ So Suppliers Quote the Same Thing
A clean RFQ should make it difficult for a supplier to guess. Include the final size, the fabric weight or target hand feel, the closure type, the print method, the artwork file, the label requirement, the packing count, and the delivery term. If the pouch is going into a brand launch kit, state the contents and how the pouch will be used. That lets the factory tell you whether the size is safe, whether the fabric is too light, or whether the print area is too close to the seam.
When the RFQ is complete, the buyer can compare suppliers on real variables instead of vague promises. The quote should show the production route, the setup charges, the MOQ by color and print, the sample cost, the lead time from sample approval, and the packing method. If one quote is materially cheaper, the reason should be visible on paper. If it is not visible, the buyer should assume the comparison is not yet reliable.
- Attach a dimensioned spec sheet with target GSM or oz range.
- Include artwork, color references, and logo placement notes.
- Ask for line-item pricing for unit cost, setup, sample, and packing.
- Request the lead time from sample approval, not from inquiry date.
- Ask for supplier photos or process images if the order is strategic.
Specification comparison for buyers
| Spec decision | Recommended option | When it fits | Buyer risk to check |
|---|---|---|---|
| Stock pouch from a trading company | Choose a blank pouch in a standard size with no custom trim | When the launch date is tight and branding is minimal | Fabric weight, seam quality, and exact size may vary from the sample |
| Direct factory custom order | Use a sewing factory that handles cutting, stitching, and printing in-house | When the pouch is part of the brand presentation and repeat reorders are likely | MOQ can be higher because each size, color, and print setup adds cost |
| Local decorator on imported blanks | Buy blank pouches and print locally near the launch market | When the order is small or the schedule is split across markets | Blank supply inconsistency can create color, size, and shrinkage differences |
| Premium launch pouch with woven label | Add a side woven label and keep the print understated | When the pouch will be kept and reused, not thrown away after the event | Label placement and stitch density must be controlled to avoid puckering |
| Low-cost promo pouch | Use lighter cotton or cotton blend with one-color print | When the item is packed inside a larger kit and does not carry heavy contents | Thin fabric can show print strike-through, poor drape, or weak cord channels |
| Retail-ready pouch with carton labeling | Specify inner pack labels and master carton marks from the start | When the goods move through warehouse receiving or store replenishment | Missing carton data slows inbound checks and can block distribution |
| Eco-positioned pouch | Request natural cotton, recycled content if available, and a simple water-based print | When the brand story needs a lower-plastic presentation | Do not assume every supplier can document material origin or dye process |
| Multiple pouch sizes in one program | Consolidate the order with one factory and a shared trim set | When the launch kit needs small, medium, and large pouches in one shipment | Mixed sizes raise packing errors unless carton labels and count sheets are strict |
Buyer checklist before sampling
- Confirm the pouch purpose: retail gift, influencer kit, press pack, or event giveaway.
- Lock the finished size with the packed product inside, not by guessing from the empty pouch.
- Choose fabric weight and construction before requesting pricing.
- Approve print method, logo size, placement, and color reference on the same sheet.
- Split MOQ by size, color, and print setup so the supplier cannot blend assumptions.
- Request a pre-production sample made with the actual fabric, cord, and label.
- Define inner pack count, carton count, carton size target, and shipping mark format.
- Ask for lead time from sample approval, not from inquiry date.
- Request photos of the sewing line, printing process, and finished packing before shipment.
- Collect the landed-cost inputs: unit price, setup, sampling, packing, freight, and duty.
Factory quote questions to send
- What fabric weight, weave, and finish are you quoting, and can you show the material specification?
- Is the quote based on a stock size or a made-to-order size, and what tolerance do you allow on finished dimensions?
- Which print method is included, how many colors are covered, and what happens if we change the artwork later?
- What is the MOQ by size, color, and decoration method?
- Does the price include cord, side label, woven label, hang tag, or only the pouch body?
- What is the sample cost, sample lead time, and whether the sample charge is deductible from production?
- How are the goods packed inside master cartons, and what carton count do you recommend for export?
- What inspection standard or defect limit do you use before shipment?
- What is the production lead time after sample approval and deposit?
- Can you separate EXW, FOB, and any local packing or documentation charges line by line?
Quality-control points to confirm
- Finished size must match the approved spec and still fit the intended item without forcing the seams.
- Fabric weight must match the approved GSM or oz range, with no obvious substitution to a thinner cloth.
- Seams at the side and bottom should be straight, balanced, and free of skipped stitches, loose threads, or seam opening.
- Drawcord channels must pull smoothly and stay even, with no twisted cord or collapsed channel edges.
- Print should be centered, legible, and resistant to rubbing, with no smudging, cracking, or color drift beyond the approved sample.
- Labels must be aligned, readable, and stitched cleanly without puckering or cutting into the fabric.
- Cut edges and inside seams should be clean enough that lint, fray, or thread debris does not reach the packed product.
- Cartons should carry the correct count, size code, and shipping mark so warehouse receiving does not need to reopen every box.