Why seam spec review matters before a pouch order
A drawstring pouch looks simple until the first bulk shipment arrives with frayed inner edges, tight drawcord channels, weak bottom corners, or uneven side seams. Most of these problems are not caused by one bad sewing operator. They usually come from a thin RFQ that says only cotton drawstring pouch, logo print, and size. Without a seam spec, each factory quotes the construction that fits its cost target, machine setup, and usual export standard.
For procurement teams, seam review is a cost and risk control step. It helps you compare quotes on the same construction, not just the same visible size. A pouch made with a raw overlocked inner seam, a French seam, or a double-fold side seam may all look similar from the outside, but their sewing time, fabric consumption, durability, and MOQ logic are different. If the seam is not defined before sampling, you may approve a nice front view while missing the part that fails during packing or customer use.
- Review seams before price approval, not after bulk goods are finished.
- Use finished size, fabric GSM, seam type, and drawcord channel details in the same RFQ line.
- Ask for inside seam photos because buyer teams often approve only the printed front panel.
- Compare factory quotes only after confirming they include the same seam and edge finishing.
Start with the pouch use case, not the stitch name
The correct seam is tied to the product going inside the pouch. A lightweight jewelry dust bag does not need the same bottom strength as a pouch carrying hardware pieces, glass jars, or a retail gift set. The buyer should define the expected load, frequency of reuse, packing method, and retail presentation before asking the factory to recommend a seam. This gives the supplier enough information to quote the right labor and material, rather than choosing the cheapest familiar option.
For example, a 120 GSM cotton pouch for hotel amenities may use a neat light construction, while a 280 GSM canvas pouch for tools or candles needs stronger thread, higher seam allowance, and more attention at corners. If the pouch will be sold as reusable packaging, the inside finish matters because customers see it every time they open the bag. If the pouch is only a transit dust cover, you may accept a simpler finish as long as it passes the agreed pull and fill checks.
- State the item weight going inside the pouch, including peak load during packing.
- Confirm whether the pouch is single-use packaging, reusable retail packaging, or a merchandise item.
- Tell the factory if customers will see the inside seam during normal use.
- Define whether the pouch must stand, lie flat, or fit tightly around a product.
Fabric GSM changes the seam decision
Fabric weight is one of the main reasons two suppliers quote different seam options. A 110-140 GSM cotton fabric is soft and easy to fold, but it can fray if the raw edge is not controlled. A 180-220 GSM cotton fabric gives better body and is common for branded pouches. A 10 oz or 12 oz canvas pouch, roughly in the 280-340 GSM range depending on fabric structure, needs stronger needles and may create bulky seams at the channel fold. Jute and linen blends may fray more aggressively than compact cotton, so the edge finish should be reviewed carefully.
Do not review GSM as a separate line from sewing. A low fabric weight with an expensive seam may still feel weak. A heavy canvas with a narrow seam allowance may still split at the corner. The RFQ should connect fabric GSM, seam allowance, stitch density, and intended load. When comparing quotes, ask whether the quoted GSM is before or after dyeing and finishing, because shrinkage and finishing can change handfeel, width, and cutting yield.
- 110-140 GSM cotton: suitable for light packaging but needs clean edge control.
- 160-220 GSM cotton: common range for retail gift pouches and promotional packaging.
- 240-340 GSM canvas: stronger handfeel, more seam bulk, and higher sewing machine requirements.
- Jute or loose-weave fabric: higher fray risk, so seam and edge finishing need closer inspection.
Side seam options buyers should understand
The side seam controls the pouch shape and most of the visible sewing quality. A basic overlock seam is fast and economical, but the buyer must check thread coverage and whether yarns can pull out near the drawcord opening. A lockstitch plus overlock finish is stronger and more stable for many cotton pouch orders. A French seam encloses the raw edge and gives a cleaner inside finish, but it adds labor and can reduce internal space slightly. For very small pouches, French seams may also create corner bulk if the fabric is heavy.
The mistake is to write premium seam or reinforced seam without defining what it means. Factories may interpret those words differently. Instead, specify the actual construction and ask for photos from the inside. If the buyer is unsure, request two sample options using the same fabric and print. The cost difference is usually easier to judge when your team can handle both pouches, open and close the cord, turn them inside out, and fill them with the intended product.
- Overlock seam: economical, but inspect fraying and thread coverage.
- Lockstitch plus overlock: better stability for many cotton and canvas pouch orders.
- French seam: cleaner inside appearance, useful for retail packaging, but adds labor.
- Double-fold seam: tidy but may become bulky on heavier canvas or jute.
Bottom seam and corner strength affect real use
Many failures happen at the bottom corner because that area carries load and is often sewn quickly. A pouch filled with cosmetics, candles, chargers, hardware, or food jars will push against the bottom seam during packing, carton loading, and final use. If the bottom seam is too narrow, if backtacking is weak, or if the corner is clipped too close, the pouch may split even when the side seam looks acceptable.
For flat pouches, ask the factory to show bottom seam construction and corner finishing. For a pouch that needs volume, a boxed bottom or gusseted construction may be better than forcing a flat pouch to hold a thick item. Boxed bottoms use more fabric and sewing time, so they change the quote. They also affect carton packing because the pouch may not fold as flat. Procurement should decide whether product fit and retail presentation justify that added cost.
- Use a filled sample test, not only a flat sample review.
- Check bottom corners for skipped stitches, weak backtack, and clipped seam allowance.
- Consider boxed bottom construction when the product has depth or sharp edges.
- Include expected product weight in the PO so the factory understands the seam load.
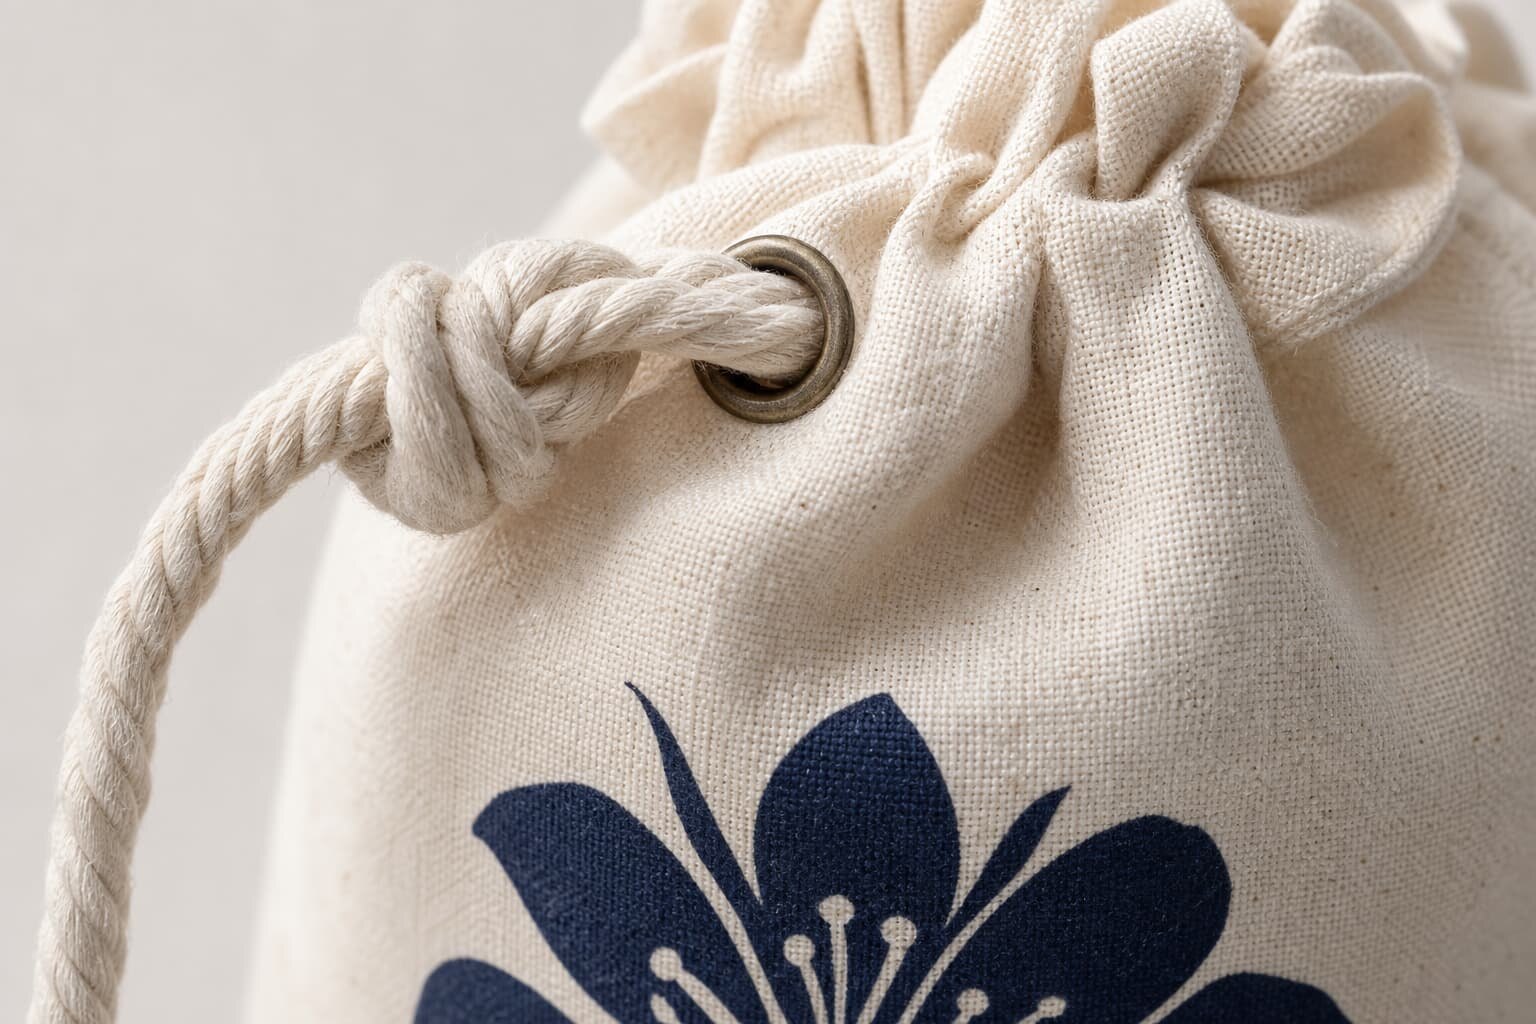
Drawcord channel details are part of the seam spec
The top channel is often treated as a simple fold, but it is one of the highest-friction areas of the pouch. If the channel is too narrow, the cord will bind. If the side opening is not reinforced, the fabric can tear after repeated pulling. If the fold is uneven, the top edge looks twisted and cheap. On dyed cotton or canvas, heavy pressing at the channel may also leave marks if the factory does not control heat and handling.
The cord itself also affects the seam decision. Cotton cord, polyester cord, satin ribbon, jute rope, and flat tape all move differently through the channel. A thick cord needs a wider channel and stronger side opening. A soft cotton cord may match natural pouches well but can shed fibers. Polyester cord may slide smoothly but look less natural. The buyer should approve cord diameter, cord length, knot method, and channel width together, because changing one after sample approval can cause a new sewing issue.
- Confirm channel width after sewing, not only folded fabric allowance.
- Check whether one-cord or two-cord closure is required.
- Review side opening reinforcement if the pouch will be opened frequently.
- Approve cord material, diameter, color, knot, and end finish with the pouch sample.
Print method can create seam and inspection problems
A seam spec review should include the print method because artwork placement and sewing construction interact. Screen printing is common for cotton drawstring pouches and works well on flat panels before sewing. Heat transfer can give sharper detail, but the buyer should check handfeel, edge lift, and heat sensitivity on dyed fabric. Embroidery adds texture but can distort lightweight fabric and may require backing. Woven labels or side labels need exact seam placement so the label is caught securely without twisting.
The safest workflow is to approve artwork position with the seam allowance visible in the technical drawing. If the logo sits too close to the side seam, part of the print may look off-center after sewing. If artwork is near the top, it can be affected by the channel fold. If the pouch is printed after sewing, the factory must confirm platen size and whether seam bulk prevents a flat print surface. Buyers should ask the supplier to identify the print sequence in the quote.
- Screen print: efficient for simple logos, but needs clear distance from seams and folds.
- Heat transfer: useful for fine detail, but check durability and fabric compatibility.
- Embroidery: premium look, but may pucker light GSM fabric.
- Woven label: needs controlled seam placement and label orientation.
- All-over print: requires extra review for seam matching, shrinkage, and cutting tolerance.
MOQ and cost logic behind seam choices
MOQ is not only a fabric purchase issue. Seam construction can change MOQ because it affects operator setup, sewing line speed, thread changes, inspection time, and rejection risk. A simple overlock seam on standard natural cotton may fit a lower MOQ than a dyed canvas pouch with French seams, custom cord, printed lining, and individual retail packing. If your team asks for a low MOQ and a premium seam, the factory may quote a sample that looks good but later push back on bulk efficiency.
For quote comparison, ask the supplier to separate the cost drivers instead of giving only one unit price. You do not need confidential factory costing, but you do need enough structure to understand why one quote is higher. The difference may come from fabric GSM, fabric dye lot minimum, seam labor, printing setup, cord material, packing, or inspection standard. This is especially important for distributors who quote their own customers before the final sample is approved.
- Fabric: GSM, color, dyeing, shrinkage allowance, and cutting yield.
- Sewing: seam type, stitch density, channel construction, and operator speed.
- Branding: print screens, transfer setup, embroidery stitches, labels, and artwork handling.
- Accessories: cord material, cord diameter, cord color, stopper, bead, or tag.
- Packing: individual polybag, paper band, master carton count, barcode, and retail labeling.
Sample approval should include destructive checks
A good sample review is more than checking logo color and pouch size. The buyer should open the pouch repeatedly, pull the cord, fill it with the intended product weight, turn it inside out, and inspect the seams under normal light. If the pouch will be washed or reused, ask whether a wash or rub check is needed. For natural cotton, small slubs may be acceptable, but seam splitting, heavy puckering, loose threads, and uneven channel openings should be corrected before bulk production.
Keep one approved sample sealed and labeled with date, fabric GSM, size, seam construction, cord, print method, and packing method. If changes are made after approval, issue a revised sample or written change note. Many bulk disputes happen because the buyer approved a print sample, the factory used a different sewing sample for production, and neither side had one complete reference sample containing all final details.
- Measure finished width and height after pressing and sewing.
- Turn the pouch inside out and photograph side seam, bottom seam, and top channel.
- Pull the cord several times and check side opening stress.
- Fill the pouch with agreed product weight and hold it by the cord and body.
- Compare seam appearance after folding because packing pressure can reveal puckering.
Packing and lead time details tied to seam quality
Packing can damage or hide seam issues. If pouches are folded tightly before the print is cured, ink transfer or crease marks may appear. If heavy canvas pouches are compressed in cartons, bulky seams can create uneven stacks and carton bulging. If small pouches are bulk packed without inner count control, final inspection may miss mixed sizes or colors. The packing instruction should match the pouch material, print method, and retail use.
Lead time also needs a realistic sequence. A typical order may require fabric booking, dyeing or fabric inspection, cutting, printing, drying or curing, sewing, trimming, pressing, packing, and final inspection. Seam changes after print approval can affect cutting size, channel fold, label position, and sewing time. Buyers should avoid approving artwork first and then changing seam type late in the schedule. If the seam spec is important, lock it before material cutting and print production begin.
- Confirm whether pouches are packed flat, folded once, bundled, or individually bagged.
- Define inner pack quantity so inspectors can count efficiently.
- Ask for carton dimensions and gross weight when seam bulk or canvas weight is high.
- Build lead time around fabric, print, sewing, and inspection steps instead of one vague ship date.
- Do not allow seam construction changes after bulk cutting without written approval.
Specification comparison for buyers
| Spec decision | Recommended option | When it fits | Buyer risk to check |
|---|---|---|---|
| Side seam construction | Overlock plus safety stitch or French seam for lighter cotton | Retail gift pouches, cosmetic sets, jewelry bags, reusable packaging | Loose yarns, seam grin, or fraying after drawcord tension and repeated opening |
| Bottom seam | Double-needle lockstitch with overlock edge or boxed bottom if volume is needed | Heavier contents, bottle accessories, small kits, promotional bundles | Weak corners, skipped stitches, and pouch distortion when filled |
| Seam allowance | Usually 8-10 mm for cotton and canvas, confirmed by sample | Most 4 oz to 10 oz cotton pouch programs | Factory cutting tolerance reducing allowance below approved spec |
| Thread choice | Polyester thread matched to fabric weight and color | Most washable, reusable, or export retail pouches | Cotton thread breaking during use or shade mismatch on dyed fabric |
| Drawcord channel | Folded top channel with reinforced side openings | Pouches opened frequently or packed with dense goods | Cord opening tearing, uneven channel width, or cord binding |
| Fabric GSM link | Match seam style to 120-280 GSM cotton or canvas instead of specifying seam alone | RFQs comparing multiple factories or material options | Quotes look cheaper because fabric is lighter or seam operation is simplified |
| Print and seam position | Keep print clear of side seams and channel fold unless approved by sample | Logo pouches, retail packaging, branded merchandise | Ink cracking, print misalignment, or seam bulk visible through artwork |
Buyer checklist before sampling
- Confirm pouch size as finished size after sewing, not flat cut panel size.
- State fabric composition and weight, such as 100% cotton 140 GSM, 180 GSM, 280 GSM canvas, or jute blend if relevant.
- Specify side seam, bottom seam, top channel, seam allowance, stitch type, and thread color in the RFQ.
- Ask the factory to show inside seam photos from the pre-production sample before approving bulk cutting.
- Check whether the print method affects seam placement, especially screen print, heat transfer, embroidery, woven label, and all-over print.
- Define acceptable tolerance for finished size, seam width, cord length, and packing quantity per carton.
- Request quote data that separates fabric, sewing complexity, printing, cord, packing, sampling, and freight terms.
- Approve one sealed sample with fabric GSM, seam construction, cord, print, and packing confirmed together.
- Include seam inspection points in the purchase order and final inspection checklist.
- Ask how the factory controls seam strength on small pouches, where operators may sew too fast around tight corners.
Factory quote questions to send
- What fabric GSM and fabric width are you quoting, and is the pouch size based on finished dimensions?
- Which seam construction are you using for the side seam, bottom seam, and drawcord channel?
- What seam allowance will be used after cutting, and what tolerance can you hold in bulk production?
- Will the inside raw edge be overlocked, folded, French seamed, or left unfinished?
- What thread type, thread count, needle size, and stitch density are planned for this fabric weight?
- How will you reinforce the cord exit area to avoid tearing during repeated opening?
- Does our print position create any issue with side seams, bottom corners, or the top channel fold?
- Can you provide inside seam photos, cord channel photos, and filled pouch photos with the pre-production sample?
- What MOQ applies to this seam spec, fabric color, cord color, printing method, and packing style?
- What are the estimated lead times for sample, material booking, printing, sewing, packing, and final inspection?
Quality-control points to confirm
- Measure finished pouch width and height after sewing, not only before packing.
- Check seam allowance by turning samples inside out and measuring side and bottom seams.
- Inspect stitch density, skipped stitches, broken thread, backtack length, and loose thread ends.
- Pull the drawcord several times to check top channel smoothness and side opening strength.
- Fill the pouch with the intended product weight or an agreed test weight to check bottom seam stress.
- Confirm print is not distorted by seam bulk, channel fold, or fabric shrinkage after pressing.
- Check carton packing count, pouch folding method, inner polybag count, and mixed color labeling.
- Compare bulk goods against the approved sealed sample for fabric handfeel, GSM, seam type, cord, and label position.