Why the worksheet matters before you ask for a quote
A drawstring pouch private label worksheet solves a common sourcing problem: buyers ask for a quote with only a size and a logo, then every supplier fills in the blanks differently. One factory may assume thin muslin, another may price heavier canvas, and a third may include a woven label or retail folding without saying so. The result is not just a messy comparison; it is a job that can move forward on the wrong spec and create expensive corrections after the sample stage.
For procurement teams, the worksheet is not paperwork for its own sake. It is the fastest way to force a supplier to quote the same construction, the same decoration method, the same pack format, and the same approval path. It also helps brand owners decide whether the pouch is a promotional accessory, a retail item, or a packaging component, because each use case has different expectations for opacity, stitching, printing, and presentation.
- Define the end use first so the supplier does not guess the spec.
- Use one worksheet for all bidders so the quote basis stays aligned.
- Separate must-have items from optional upgrades such as retail inserts or custom labels.
- Ask suppliers to quote against the finished product, not just raw fabric.
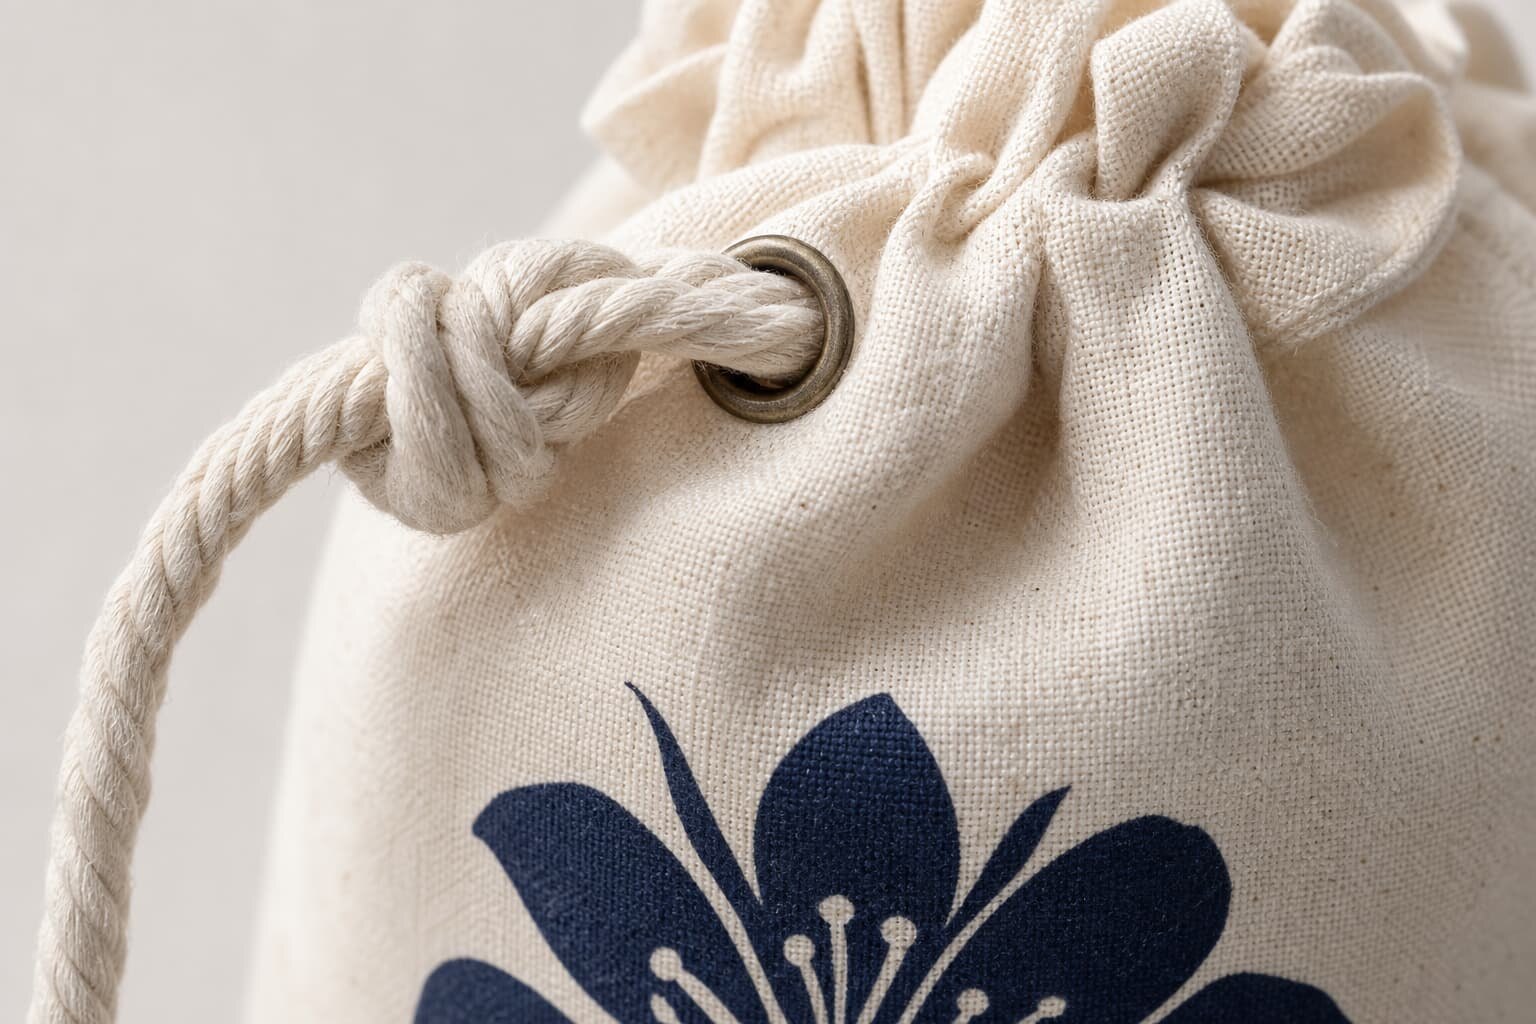
Lock the base build: fabric, GSM, size, and construction
Start with the fabric because it drives hand feel, opacity, print quality, and cost. For light promotional pouches, many buyers work in the 100 to 120 gsm range with cotton muslin or similar plain weave. If the pouch needs better body, a cleaner retail look, or more concealment of contents, 140 to 180 gsm cotton is often a safer starting point. Heavier canvas or jute blend constructions can work well for premium programs, but they change the seam behavior, the fold line, and sometimes the print appearance, so the worksheet must name the exact base cloth, not just the category.
Size must be written in finished terms and flat terms whenever possible. Ask for finished width, finished height, seam allowance, top channel height, and cord drop. If the pouch carries bottles, samples, or heavier gift items, request reinforcement at the bottom seam and at the cord entry points. A good worksheet also states whether the fabric is prewashed or raw, because shrink allowance can change the final fit and alter the way the pouch closes after use.
- State fabric type, weave, and GSM in one line.
- Write finished size and flat size separately.
- Confirm seam allowance, channel height, and cord length.
- Add shrink or wash expectation if the pouch will be laundered or reused.
- Specify reinforcement if the contents have weight or sharp edges.
Choose branding details that fit the run size
Private label buyers often focus on the logo first, but the print method needs to match the run size and the artwork. Screen printing is usually the most practical choice for simple logos, especially when the design is one or two flat colors and the quantity is large enough to justify screens. Heat transfer can help with more detailed art or small runs, but it needs careful testing for rub resistance and adhesion. Digital methods can be useful for complex graphics, yet they are not always the lowest-risk choice for a pouch that will be handled, packed, and moved through retail.
The worksheet should record logo size, placement, color count, and acceptable shift tolerance. A logo near the drawstring channel may distort when the cord is tightened, while a logo placed too low can be hidden by folding or product fill. If the pouch uses a woven side label or sewn brand tag, state the placement relative to the side seam and the bottom hem. Do not assume the factory will pick the right decoration method from the artwork file alone; give them a print map and a clear rule for which color standard to follow.
- Name the print method, not just the logo artwork.
- Limit the color count if you want a cleaner MOQ and lower setup risk.
- Specify exact print placement from seam or hem reference points.
- Ask whether the art will be printed on natural, dyed, or coated fabric.
- Include the label type and location if private label visibility matters.
Use MOQ logic instead of guessing unit cost
MOQ is easier to manage when you understand what drives it. Standard stock fabric, one size, one print color, and a simple bulk pack usually give the lowest barrier to entry. The moment you add custom-dyed fabric, multiple sizes, several print colors, or a special label, the factory may need separate material booking, separate setup, or extra inspection steps. A worksheet should therefore ask for MOQ by size, by color, and by print version, not just one blanket minimum that hides the real constraint.
The best quote comparisons break the job into cost blocks. Fabric, cutting, sewing, printing, labels, packing, cartons, and export handling all affect the final number. If one supplier looks cheaper, check whether they quietly removed a woven label, changed the GSM, simplified the stitching, or assumed plain bulk packing. A clear worksheet reduces the chance that a low quote turns into a scope dispute after the purchase order is issued.
- Ask for MOQ per color, per size, and per artwork version.
- Compare total scope, not just the unit price line.
- Watch for hidden changes to GSM, print count, or packing format.
- Treat custom dye, custom trim, and special packaging as separate cost drivers.
- Use the worksheet to decide which custom features are worth the MOQ impact.
Approve samples in layers, not all at once
A good sample process starts with construction, then moves to print, then to packing. If the pouch is new, ask for a proto sample that proves the shape, cord movement, and seam behavior. After artwork and fabric are final, request a pre-production sample that reflects the exact print method, label, and packing style you expect in bulk. This layered approach makes it easier to isolate problems. If the logo shifts, you know it is a print issue. If the pouch draws unevenly, you know it is a sewing or cord issue.
Do not approve from a single beauty shot. Ask for front, back, side seam, inside, cord channel, and label photos, plus a flat measurement shot with a ruler or gauge. If the pouch is meant to hold a product, test it with the actual product or an agreed weight equivalent. The worksheet should also tell the factory which sample comments are binding and which are reference only, because vague sample feedback often becomes a production argument later.
- Use a proto sample for structure and a pre-production sample for final approval.
- Check front, back, inside, seam, and cord photos before bulk release.
- Test actual fit with the product or a realistic weight load.
- Document sample comments in one place so revisions do not conflict.
- Do not approve final print color until the approved sample is in hand.
Pack for the channel you sell into
Packing decisions matter as much as sewing when the pouch is a private label item. Retail buyers may need a clean folded presentation, a barcode sticker, a hang tag, a care note, or a warning label depending on the market and channel. Distributors often want faster handling and lower cost, so they prefer bulk packed pouches by size and color with minimal secondary packing. The worksheet should state whether the pouch ships flat, folded, nested, tissue-stuffed, or retail sealed, because each version changes labor and carton volume.
Packing also affects damage risk and inbound receiving. If you want a sharper shelf appearance, ask for a consistent fold line, tissue placement, and carton compression control. If you want warehouse efficiency, ask for case pack quantity, carton dimensions, and barcode placement on the outer carton. A supplier that knows the target channel can quote more accurately, but only if the worksheet tells them what the buyer will do with the goods after they land.
- Choose bulk packing or retail packing before asking for a final quote.
- State fold method, tissue use, and barcode placement if required.
- Request carton quantity targets that suit your warehouse or store plan.
- Confirm whether inner polybags, care slips, or hang tags are included.
- Ask for carton strength guidance if the shipment will be stacked or transloaded.
Set lead time from sign-off dates, not from the PO date
Lead time planning goes wrong when the buyer assumes the clock starts at purchase order release. For private label pouches, the real schedule begins after artwork approval, sample approval, and material booking. The workflow usually runs through artwork confirmation, sample production, revision if needed, fabric booking, cutting, printing, sewing, packing, carton close, and final inspection. If any of those steps depends on buyer feedback, the delivery date should reflect that dependency instead of pretending the schedule is fixed.
A useful worksheet asks the supplier to separate sample lead time from bulk lead time and from transit time. That gives procurement teams a better picture of what is actually at risk. If a supplier promises a very short schedule, check whether they are using stock fabric, a standard cord, and a simplified print method. Fast delivery can be real, but only when the worksheet makes it clear which custom elements are already available and which still need to be sourced.
- Start the timeline after final artwork and sample approval.
- Ask for separate dates for sample, bulk production, and transit.
- Confirm which materials are stock and which need booking.
- Set a clear rule for when late comments will move the ship date.
- Do not compare lead times unless the spec scope is identical.
Compare quotes line by line, not supplier by supplier
The main value of the worksheet is quote comparability. A supplier may include a woven label in the unit price, while another lists it separately. One factory may quote print setup and production together, another may split screens, proofing, and color charges. Without a shared worksheet, the cheapest quote can hide a thinner fabric, a weaker seam, or a less complete pack spec. Buyers should ask every bidder to answer the same worksheet and then compare the same commercial and production assumptions.
Normalize the quote before making the decision. Put each supplier on the same basis for GSM, size, print method, label, packing, carton data, and MOQ. Then review the exclusions carefully. The most useful quote is not the one with the lowest headline number; it is the one that clearly states what is included, what is optional, and what would trigger a revision. That level of clarity protects the buyer during order placement and helps the factory avoid scope creep.
- Ask for a line-item quote so you can see every cost driver.
- Normalize all bids to the same fabric, size, print, and packing scope.
- Check exclusions for labels, cartons, inserts, and freight terms.
- Treat vague wording as a risk until the factory clarifies it in writing.
- Use the worksheet to compare landed value, not just ex-works price.
Write acceptance criteria before bulk starts
Acceptance criteria turn a worksheet into a control tool. Define the acceptable range for fabric shade, finished size, stitch quality, print alignment, label placement, and pack count before bulk production begins. If the pouch is going into retail, add a clear rule for cosmetic defects such as visible stains, thread tails, needle damage, or crooked folds. If the pouch is only for promotional use, focus more on function and less on perfect cosmetics, but still set a minimum standard so the job does not drift downward during production.
The most common mistakes are surprisingly basic. Buyers forget to confirm cord length after the bag is filled, they approve a sample without checking shrink after washing, or they assume the print method will remain the same even after artwork changes. Another frequent error is mixing retail and bulk specifications in one purchase order, which leaves the factory unsure which packing standard to follow. A strong worksheet eliminates that confusion by showing the target spec, the acceptable tolerance, and the exact point at which a defect becomes a reject.
- Set defect limits for stains, loose threads, print shifts, and seam failure.
- Define measurement tolerance for both the pouch and the cord drop.
- Write the acceptance rule for retail fold quality and carton count.
- State whether rework is allowed or whether a defect must be replaced.
- Make the worksheet the same document used for approval and receiving.
Specification comparison for buyers
| Spec decision | Recommended option | When it fits | Buyer risk to check |
|---|---|---|---|
| Fabric weight | 100 to 120 gsm cotton muslin for light use or 140 to 180 gsm cotton for better opacity | Promo sets, cosmetics, jewelry, sample kits, and low-cost retail packaging | Thin fabric can show contents, lose shape, or fail opacity expectations |
| Print method | 1-color or 2-color screen print for simple logos; heat transfer only when artwork or quantity makes it practical | Flat logos, clean edges, and repeat orders with stable artwork | Color registration, rub resistance, and extra setup charges can change the quote |
| Cord and channel | Cotton braid cord with reinforced top channel and locked cord ends | Retail-ready pouches, gift sets, and items handled many times | Cord stretch, fraying, or uneven channel height can affect closure quality |
| Packing format | Bulk packed by size and color unless retail folding or tissue is required | Import efficiency, warehouse handling, and distributor programs | Mixed cartons, crush damage, and missed insert requirements can create rework |
| Labeling | Woven side label plus care label, size sticker, or hang tag as needed | Private label programs where the brand must be visible and traceable | Wrong label placement, missing legal copy, or barcode mismatch can block receiving |
Buyer checklist before sampling
- Confirm finished size, flat size, seam allowance, cord length, and tolerance before requesting quotes.
- Lock fabric type and GSM, including whether the number is before or after washing or finishing.
- Approve logo artwork size, placement, print method, color count, and acceptable Pantone range.
- Specify whether the pouch is for bulk shipment, retail shelf display, gift packaging, or sample kits.
- Request a line-item quote that separates fabric, sewing, print setup, printing, labels, packing, cartons, and freight terms.
- Ask for pre-production sample photos and a physical sample before bulk release if the job is new.
- Set packing instructions for inner pack, carton pack, barcode location, and master carton marks.
- Write down defect limits for stains, loose threads, print shifts, seam failure, and measurement variance.
Factory quote questions to send
- What exact fabric, weave, and finished GSM are you quoting, and is the GSM measured before or after washing or finishing?
- What are the finished dimensions, flat dimensions, seam allowance, and size tolerance you will hold in production?
- Which print method is included, how many colors are covered, and what setup or screen charges apply?
- What MOQ applies per size, per color, and per print version, and which spec changes would increase it?
- Can you separate the quote into fabric, cutting, sewing, printing, label, packing, and carton costs?
- What sample stages do you provide, and which approval is required before bulk material is booked?
- What are the standard inner pack and master carton quantities, dimensions, and gross weight targets?
- What lead time applies after final artwork and sample approval, and what parts of that lead time are fixed versus variable?
Quality-control points to confirm
- Fabric shade, hand feel, and GSM match the approved reference sample.
- Finished size, cord length, and seam allowance stay within the agreed tolerance.
- Stitching is straight, secure, and reinforced at the top channel and stress points.
- Print placement, opacity, and edge sharpness match the approved artwork position.
- Cord runs smoothly through the channel and the pouch closes evenly on both sides.
- Label type, placement, spelling, and care text are correct and readable.
- Carton count, barcode, and shipping marks match the packing instruction.
- No stains, oil marks, broken threads, holes, needle damage, or crushed corners are present.