Why heat transfer costs on drawstring pouches are easy to misread
Heat transfer pricing on drawstring pouches looks simple on paper because buyers often receive one line that says "print cost" or "logo charge." In reality, that number may include very different work depending on the fabric, the size of the design, the transfer type, the number of colors, and whether the factory is printing flat-cut pouches or finished bags with cords already inserted. If you compare quotes without separating those variables, the lowest line price can turn into the highest landed cost once setup, sampling, or rework is added.
For procurement teams, the key is to treat heat transfer as a process cost, not just a decoration cost. A 140 gsm cotton pouch with a simple one-color logo often presses differently from a 220 gsm canvas pouch with a larger brand mark, and both behave differently again from a polyester or blended pouch. The factory must control temperature, dwell time, pressure, and placement around seams and drawcord channels. Small spec changes can shift the labor time and reject rate enough to matter on a bulk order.
- Ask whether the quote is based on finished pouch size or flat panel size.
- Confirm if artwork setup, transfer film, and labor are separated or bundled.
- Check whether the factory priced a sample run or only the bulk run.
Start with the pouch spec, not the logo
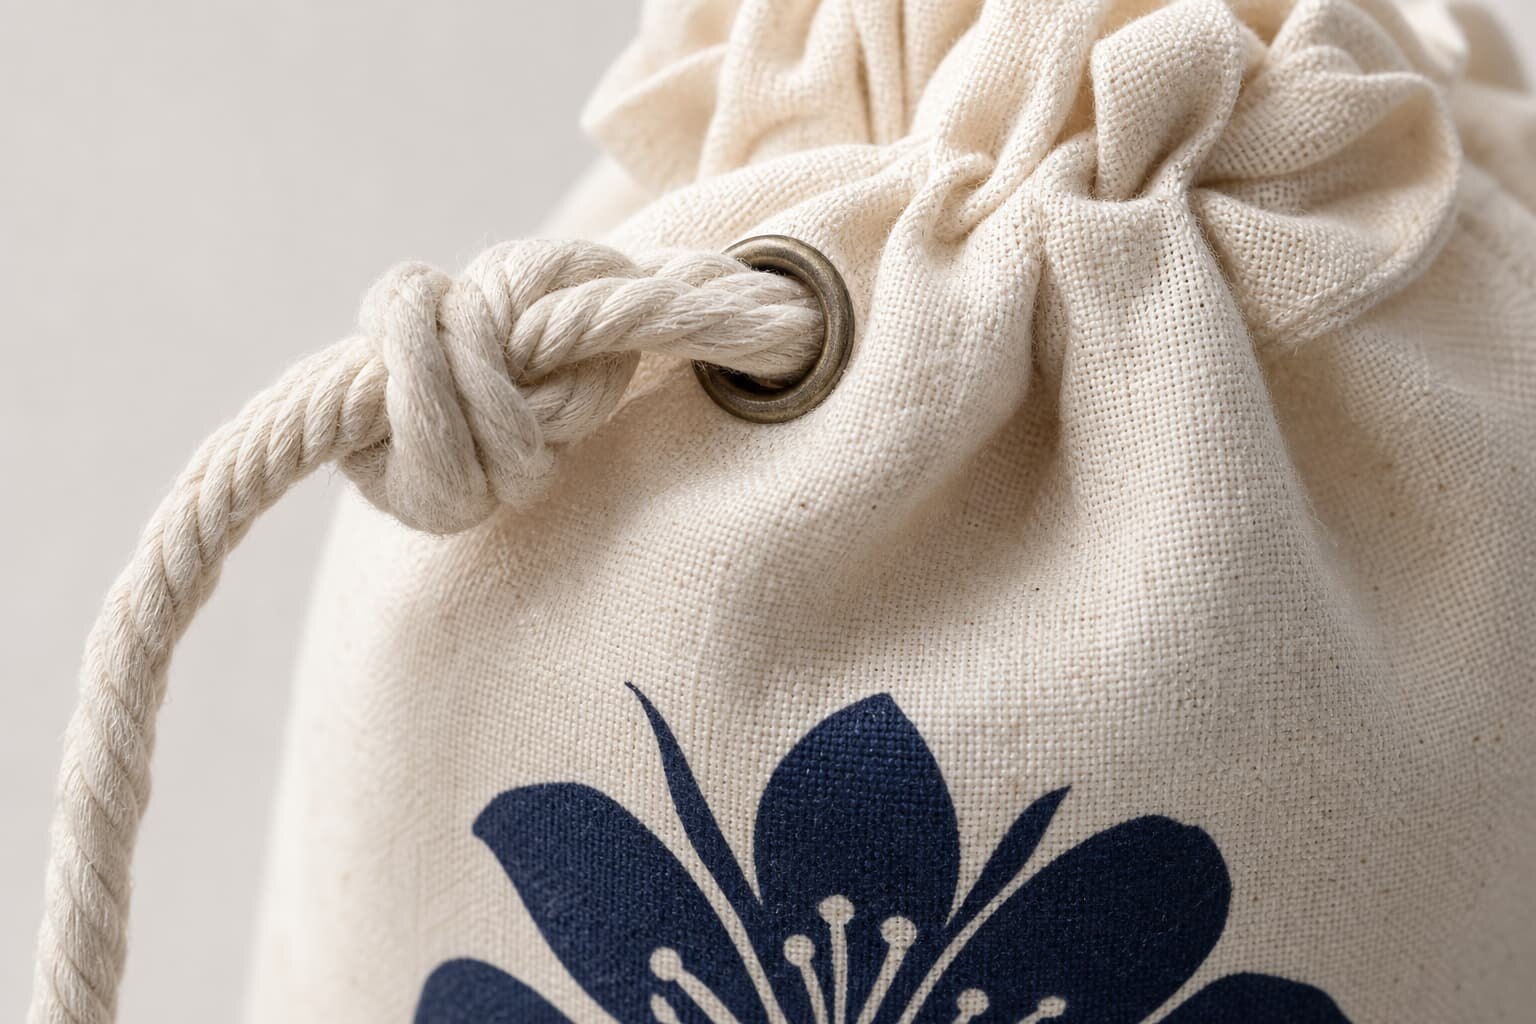
Before you ask for print cost, lock down the pouch construction. Buyers often send a logo first, then ask factories to "quote the pouch," but the fabric and build decide how the transfer behaves and what the factory can guarantee. For a standard drawstring pouch, the core variables are fabric type, GSM, size, cord material, seam allowance, and whether the pouch is lined or unlined. A small logo on a thin cotton pouch may be easy to print, but the same design on a densely woven canvas bag can require a different press setting and more careful placement.
Fabric weight matters because the pouch needs enough body to support the heat press without wrinkling, shifting, or letting the print sink into the weave. In buyer language, that means the factory should tell you the GSM range, not just say "cotton" or "canvas." If you are sourcing for retail packaging, premium gifting, or brand merchandise, 140-180 gsm is often a practical middle zone. Lighter pouches can save material cost, but they may wrinkle under heat and feel less premium after printing.
- Request the exact fabric composition and GSM range in writing.
- Confirm whether the pouch is bleached, natural, brushed, or pre-shrunk.
- Ask if the cord, seam thread, and fabric all tolerate the same press temperature.
Choose the transfer method that fits the order, not the trend
The cheapest-looking transfer method is not always the lowest-cost option for your order size. Screen-printed transfer film usually works well for simple logos, stable repeat orders, and buyers who want predictable unit cost on bulk volumes. Digital transfer can make more sense when the art changes often, the logo has gradients or fine detail, or the purchase quantity is too low to justify a larger setup. The real question is not which method is modern; it is which method gives the best balance of setup cost, appearance, and durability on your specific pouch fabric.
If a supplier offers several decoration choices, compare them on the same basis: setup cost, per-piece labor, achievable detail, hand feel, and risk of failure on the chosen GSM. Heat transfer may be preferred when embroidery would distort the pouch, when screen printing feels too heavy, or when a buyer needs a crisp logo edge on a small printable area. But buyers should still ask how the transfer performs after folding, packing, and warehouse handling, because a pouch that looks good straight off the press can still fail in transit if the film is too stiff or the surface prep is weak.
- Use screen-printed transfer for simple, repeatable brand marks.
- Use digital transfer when the logo has many colors or detailed edges.
- Avoid specifying a method before checking fabric compatibility.
How factories build the cost: setup, labor, and waste
A useful quote should show how the factory builds the number. At minimum, you want to know whether the price includes artwork cleanup, transfer production, press labor, pouch handling, QC time, and packing. Some factories bundle everything into one unit price, which is fine if the order is large and the specs are stable. Others separate setup from per-piece pricing, which is often better for buyers comparing multiple suppliers because it shows where the money is going. Without that split, a low per-piece number can hide a large one-time charge that only shows up after artwork approval.
MOQ logic matters here. If the transfer setup takes almost the same amount of work for 500 pieces as it does for 3,000 pieces, the unit cost should fall as volume rises. If it does not, ask why. Either the factory has a genuine capacity constraint, or the quote is padded to cover risk. Good buyers ask for tiered pricing across at least three quantities, such as trial, mid-volume, and bulk. That makes it easier to judge whether the supplier is pricing actual efficiency or just quoting a flat number with little production logic behind it.
- Ask for price breaks at three quantity tiers, not one headline number.
- Separate one-time setup charges from recurring per-piece charges.
- Check whether waste allowance is built into the transfer cost or charged later.
Use a product-specific cost comparison before you choose the spec
A comparison table is one of the fastest ways to prevent a weak RFQ. For drawstring pouches, the main cost levers are not just the logo method; they are fabric weight, print area, pouch size, and packing method. A small one-color mark on a standard cotton pouch is cheaper to run than a large full-color image placed across a thick canvas bag, even when the visible decoration looks similar in a sales deck. Buyers who compare only the decoration type often miss the cost difference created by the pouch itself.
If the pouch is used for retail, gift sets, cosmetics, accessories, or event kits, the design choice should reflect the use case. A dense, premium canvas pouch may justify a cleaner print but can drive up material and labor cost. A lighter pouch may lower the budget, but it might not pass a buyer's appearance standard after pressing. The goal is not to buy the fanciest pouch; it is to choose the simplest spec that still meets the brand's presentation and handling needs.
- Compare logo size against pouch size so the print does not dominate the bag.
- Check whether the pouch must stand upright in a retail tray or only travel in a carton.
- Choose the lightest fabric that still gives a flat, stable print surface.
Sampling is where most transfer problems show up early
A factory sample should do more than prove the logo can be seen. It should show whether the pouch fabric accepts heat transfer cleanly, whether the print edges stay sharp, and whether the cords, seams, and top channel survive the press without deformation. A buyer should ask for a pre-production sample or at least a press proof on the final fabric before bulk approval. If the factory only sends an art proof on paper, that is not enough to judge how the actual pouch will behave under heat.
Sampling is also the best place to catch avoidable rework. Ask the factory to show the sample after cooling, folding, and light rubbing. If the bag will be stored flat in cartons, the sample should be folded the way production cartons will fold it. If the pouch is for retail hanging, the sample should show where the print lands once the cord is drawn tight. You are not just approving a logo; you are approving how the bag survives the full production and packing sequence.
- Approve a physical sample on the final fabric, not only a digital proof.
- Inspect the sample after cooling, folding, and light rub testing.
- Make sure the print position is measured from fixed pouch points, not eyeballed.
Packing and labeling can change the landed cost more than buyers expect
Packing seems secondary until it changes the quote or causes receiving problems. Drawstring pouches are often bulk packed, polybagged in sets, or packed in fixed carton counts depending on the customer channel. Each choice affects labor, carton volume, and damage risk. A printed pouch that looks acceptable at the press table can still pick up scuffs if it is packed too tightly or if the print faces a rough carton wall. If your distributor or retailer expects clean inbound counting, the packing spec should be written as carefully as the print spec.
Labeling also matters. Buyers who need SKU labels, carton marks, barcode stickers, or country-of-origin data should ask whether these are included or treated as add-ons. A factory quote that ignores packing detail can understate the true cost and create a later dispute when the warehouse needs different carton packing. For importers, the easiest way to avoid this problem is to ask for the pack method, carton size, gross weight, net weight, and mark format in the first RFQ. That keeps production, shipping, and receiving aligned.
- State whether pouches are bulk packed, inner-bagged, or set packed.
- Confirm carton count by size and color before production starts.
- Ask if labels, barcodes, and carton marks are included in the unit price.
Lead time depends on artwork approval more than most buyers think
For heat transfer pouches, lead time is not just sewing time. The schedule usually includes artwork cleanup, transfer production, sample approval, bulk printing, final QC, packing, and carton booking. If the buyer changes the logo after sample approval, the clock restarts on the transfer side even if the sewing is already complete. That is why a clear approval path matters so much: the earlier the logo size, placement, and color count are locked, the less likely the order is to slip into the next production window.
Buyers should ask the factory to separate what happens in parallel and what happens in sequence. Some steps, such as pouch cutting and transfer plate preparation, can move together. Others, such as final press approval and bulk printing, cannot. If the supplier cannot explain the sequence clearly, you will have trouble forecasting launch dates or warehouse intake. A realistic lead time quote should show where the bottleneck is, whether it is transfer film preparation, sample sign-off, or a busy sewing line.
- Ask which steps can run in parallel and which require approval first.
- Build extra time into the schedule if the artwork is still being refined.
- Confirm whether the quoted lead time starts after deposit, sample sign-off, or both.
The most common mistakes buyers make on heat transfer pouches
The first mistake is requesting a price before the spec is fixed. When the fabric weight, pouch size, and print area are still open, factories either quote loosely or build in risk padding. The second mistake is approving a logo without specifying the acceptable print tolerance. On a small pouch, a few millimeters can move the art too close to the seam or drawcord channel. The third mistake is forgetting that a transfer can look clean at production time but still fail later if it is pressed too hot, packed too tightly, or folded against a hard edge.
Another common issue is comparing suppliers on unit price alone. One factory may include sample support, packing, and QC photos, while another quotes only the press operation. The cheaper quote can become the more expensive order once the missing items are added. Buyers should also be careful with oversized logos. Heat transfer on a drawstring pouch works best when the print area matches the pouch proportion; pushing the design too large often creates adhesion issues at the edges or wrinkles near the seam line.
- Do not request pricing before pouch GSM and size are finalized.
- Do not approve artwork without measured placement tolerances.
- Do not compare quotes unless setup, packing, and sample fees are visible.
How to write an RFQ that lets factories quote cleanly
A strong RFQ gives the factory enough detail to price the pouch as a production item, not as a guess. Include the pouch material, GSM, size, cord type, print method if already chosen, logo dimensions, colors, placement, target quantity, packing method, and destination market requirements. Add reference photos if you have them, but do not rely on images alone. Factories need measured data to decide whether the transfer fits the panel, whether the press can avoid seams, and whether the packing format matches your receiving plan.
It also helps to ask for quote data in a standard order. The best comparison format is usually: pouch unit price, print setup fee, transfer cost per piece, sample fee, packing cost, carton spec, lead time, and validity period. When every supplier answers the same way, you can compare real apples to apples. That is especially important for buyers who work with multiple brands or channels, because one product may need a premium hand feel while another needs a lower landed cost and faster replenishment.
- Include fabric, GSM, pouch size, print size, logo colors, and placement dimensions.
- Ask for itemized quote lines rather than a single bundled figure.
- Request the factory's acceptance criteria for print quality and packaging.
Specification comparison for buyers
| Spec decision | Recommended option | When it fits | Buyer risk to check |
|---|---|---|---|
| Fabric weight | 140-180 gsm cotton or canvas | Most retail, gift, and promotional pouches where the bag must hold shape under a pressed logo | Too-light fabric can ghost, pucker, or show press marks after heat transfer |
| Print method | Screen-printed transfer for simple logos | 1-3 spot colors with steady bulk volume and repeat orders | Separate setup charges can be hidden if the factory does not spell out artwork and film fees |
| Print method | Digital transfer for full-color graphics | Small orders, detailed art, gradients, or faster design changes | Hand feel can be thicker and some transfers may crack sooner if the pouch is folded tightly |
| Print placement | One-side center print with clear margin from seams and cord channel | Most standard retail and giveaway pouches | If the art sits too close to seams, heat pressure can distort the image or leave uneven edges |
| Packing spec | Bulk packed by size/color with carton labels and inner counting | Distribution orders, warehouse intake, and retailer receiving | Loose packing raises abrasion risk and creates count disputes during inbound inspection |
Buyer checklist before sampling
- Confirm pouch fabric, construction, and GSM before you ask for print pricing.
- Lock the artwork size, print colors, and print position with a measured mockup.
- Ask the factory to separate pouch cost, transfer setup, labor, and packing in the quote.
- Request sample photos or a pre-production sample showing actual print hand feel and placement.
- Verify carton pack count, label format, and whether pouches are polybagged or bulk packed.
- Ask how the factory tests adhesion, rub resistance, and print alignment on the chosen fabric.
Factory quote questions to send
- What fabric, GSM, and pouch size are you pricing, and does the quote change if the GSM changes by 20-30 grams?
- Is the transfer cost quoted per color, per design, per placement, or per piece, and what setup fees apply?
- What is the minimum order quantity for this exact pouch and print method?
- What sample fee applies for a physical pre-production sample, and is it refundable against bulk order?
- How do you handle seam clearance, cord-channel clearance, and print-position tolerance?
- What packing method is included, and are carton marks, barcode labels, or inner bags charged separately?
- What lead time is required for artwork confirmation, sample approval, bulk production, and packing?
Quality-control points to confirm
- Check fabric GSM, weave tightness, and surface smoothness before pressing any transfer.
- Measure print placement from the top edge, side seam, and drawcord channel on at least three samples.
- Inspect adhesion after a cool-down period so the transfer is not judged while still warm.
- Rub-test the print by hand and compare against the agreed acceptance sample.
- Confirm that the pouch opens, closes, and knots normally after printing without the cords binding or melting.
- Verify carton count, size breakdown, and label accuracy before shipment release.