Why corner reinforcement deserves its own buying spec
Most drawstring backpack claims do not start with the body panel. They start at the two lower corners, where the cord changes direction and concentrates load into a small stitched area. A bag can look acceptable in a showroom photo, carry the right logo, and still fail quickly because the reinforcement was treated as a minor trim detail instead of a functional construction point.
For buyers, the mistake is usually in the RFQ language. Many inquiries ask for size, fabric, print, and cord color, then leave the reinforcement to factory standard. That creates a quote comparison problem because one supplier may include a doubled patch, bartack, and cleaner cord channel, while another may quote only a folded corner seam. The price gap looks attractive until the first bulk complaint arrives.
The buying problem is not just durability. Corner construction also affects print placement, MOQ, sewing lead time, packing shape, and even how the bag hangs on retail display. If you want like-for-like quotes, the lower corners need to be specified with the same discipline as fabric and artwork.
- Common failure mode: cord pulls through fabric at the lower corner after repeated opening and closing
- Common quote trap: supplier writes "reinforced corner" without defining patch material, size, or stitch method
- Commercial impact: returns, rework, inconsistent retail quality, and misleading landed cost comparisons
Match reinforcement to the bag's real use case
The right reinforcement depends on what the bag is expected to carry and how long it is expected to last. A low-cost event bag carrying flyers for one day can use light fabric with a simple patch if the load is low. A school, sports, or retail bag used repeatedly needs a more stable corner structure because the cords are pulled hard, often with uneven force from one side.
Procurement teams often over-focus on the body fabric weight and under-focus on force concentration. A 210D polyester bag with a well-sized patch and bartack can outperform a heavier but poorly stitched bag. Likewise, a cotton canvas body may look strong but still tear if the cord exits through a single unsupported fold. Your spec should describe expected use, not just appearance.
- Promotional use: light contents, short campaign cycle, tighter cost target
- Distributor stock use: repeat reorders, more pressure for stable construction across batches
- Retail or school use: higher durability expectation, more returns risk if corners fail
- Recommended RFQ wording: include expected max contents such as shoes, light clothing, documents, or water bottle plus towel
Choose fabric weight with the corner load in mind
Fabric selection should support the reinforcement, not replace it. For polyester drawstring backpacks, common body options include 190T polyester, 210D polyester, 300D polyester, and 420D polyester. For cotton-based bags, buyers typically compare 6 oz, 8 oz, 10 oz, or 12 oz canvas, roughly in the 200 to 400 GSM range depending on weave and finishing. Nonwoven options around 80 to 150 GSM are also used for low-cost programs, but they need careful corner treatment because the material can split under point stress.
In most buyer situations, 210D polyester is the entry point for acceptable value, but only when reinforced well. Moving from 210D to 420D raises fabric cost and may improve body feel, yet it does not automatically solve lower-corner failure if the stitch path is weak. For cotton canvas, 8 oz is a common balance for everyday retail and promotions, while 10 oz to 12 oz works better when the bag is meant to feel more premium. Heavier fabric also changes sewing behavior, especially when multiple layers are folded into the corner.
- Typical bulk choices: 210D polyester, 300D polyester, 8 oz cotton canvas, 10 oz cotton canvas, 120-150 GSM nonwoven
- Use fabric specs in RFQ: material, GSM or oz weight, weave, coating if any, and color standard
- If using recycled polyester or blended fabric, ask whether reinforcement patch uses the same material or a conventional substitute
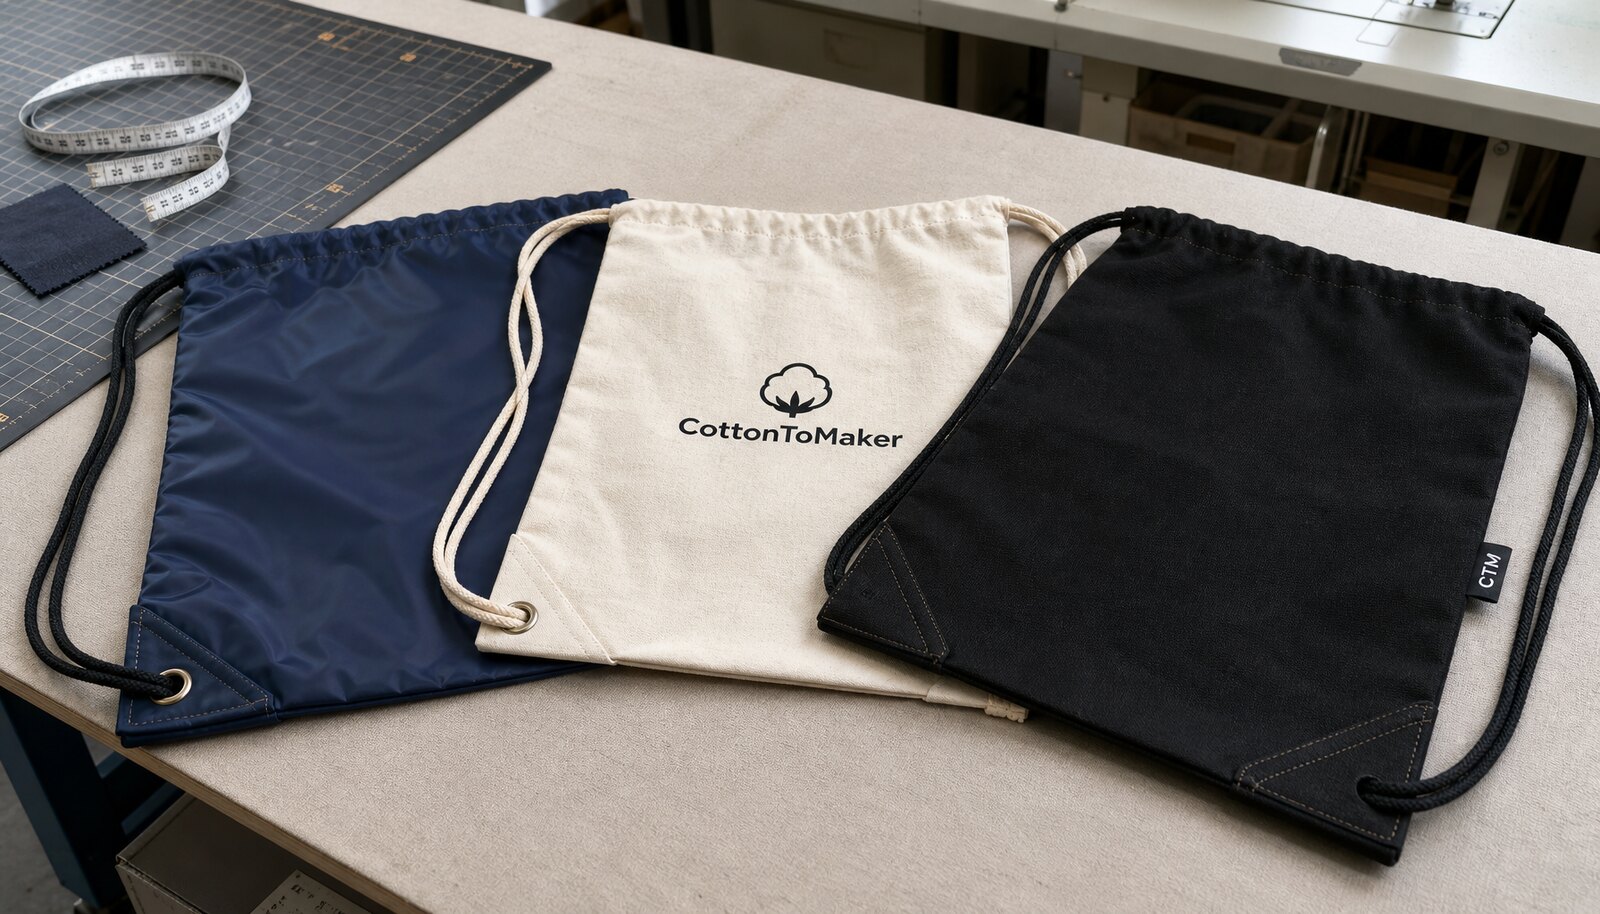
The four corner constructions buyers see most often
The simplest construction is a folded bottom corner where the cord passes through the seam allowance. It is cheap and fast, but it is the least predictable for repeated use. The next step is a same-fabric patch, usually added inside or outside the lower corner, which spreads the load better and adds very little visual complexity. For polyester styles, many factories move to a stronger 420D or 600D reinforcement patch even when the bag body is lighter.
A more robust option uses webbing or a dense patch combined with bartack stitching at the cord exit point. This is common on sports or school-oriented bags where tension is repeated many times. Some buyers also request metal eyelets for appearance, but eyelets should be seen as a finishing detail, not the reinforcement itself. Without proper backing, eyelets can become a clean-looking failure point.
- Folded seam only: lowest cost, suitable only for very light-duty use
- Double-layer same fabric patch: cleaner look and moderate durability improvement
- Heavier contrast or hidden patch: better stress distribution for 210D or nonwoven bodies
- Patch plus bartack or box stitch: preferred for repeated-use retail and distributor programs
- Eyelet with backing patch: appearance upgrade only when supported by proper construction
How reinforcement changes print planning and artwork approval
Many print issues blamed on the printer actually begin with late-stage sewing decisions. If the artwork extends too close to the lower corners, reinforcement stitching can cut through a logo, distort a fine line, or create a visible ridge under the print area. This matters most for screen printing on polyester and cotton, because the print field needs a stable, reasonably flat surface. Heat transfer can also be affected if the transfer sits partly over a raised seam or patch edge.
Buyers should lock a print safe zone early. A practical rule is to keep critical artwork at least 25 to 35 mm above the lower reinforcement stitch line, then confirm the exact distance on the pre-production sample. If the design absolutely needs a low print position, ask the supplier to show the final reinforcement pattern first. Do not approve print artwork from a flat digital layout that ignores the actual sewing geometry.
- Screen print works well on cotton canvas and many polyester constructions when the print field stays away from bulk seams
- Heat transfer can suit detailed logos, but corner build-up may affect adhesion and appearance
- Embroidery near lower corners adds additional needle perforation and should be evaluated carefully
- Required sample check: full front artwork plus close-up of lower corner after sewing and cord insertion
What a useful supplier quote should break out
A strong quote for drawstring backpacks should not hide reinforcement inside one total unit price. When the lower corner is a key performance point, ask the supplier to separate the quote into body fabric and cutting, printing, reinforcement material, reinforcement sewing labor, cord, eyelets if any, packing, and sample charges. This does not mean every supplier will give a detailed cost sheet, but serious factories can usually break out the major cost drivers well enough for comparison.
For example, if two offers use the same 210D polyester and one is meaningfully cheaper, the gap often comes from lighter cord, smaller patch size, fewer sewing operations, or simpler packing. Another useful quote view is percentage share rather than absolute cost. On many custom bags, fabric and cutting form the largest share, then printing, then sewing, then cord and accessories, with reinforcement adding a smaller but critical performance cost. That small saving is rarely worth a claim risk.
- Ask for EXW or FOB basis clearly; otherwise packing and inland charges may be hidden differently across suppliers
- Request quote notes for patch material, patch dimensions, and stitch method
- If the quote includes eyelets, ask whether tooling, eyelet finish color, and waste allowance are included
- Clarify sample charge policy for reinforcement revisions, because corner changes often require a new sample run
- Useful comparison line: standard corner construction versus upgraded reinforced corner on the same body fabric
MOQ logic: what really drives minimums on reinforced styles
Buyers are often told a bag MOQ is driven by fabric color or print, which is true only in part. Corner reinforcement can also create MOQ friction when it introduces extra components or special operations. A simple same-fabric patch cut from body material usually adds little MOQ pressure. A custom contrast patch, branded webbing, special eyelet finish, or molded cord tip can push the minimum upward because the factory needs separate trim purchasing or dedicated setup.
If you are managing a mixed-SKU launch, standardization helps. Keeping one patch shape, one cord diameter, and one reinforcement stitch method across several colors can let you spread components over the total order. This is often more effective than pushing the supplier for an unrealistically low MOQ on each colorway. For trial orders, ask whether a standard stock patch material can be used for the first run before moving to a custom match on repeat orders.
- Low MOQ friendly: body-matched patch, standard cord, no eyelet, one-color screen print
- Higher MOQ trigger: special patch fabric, custom webbing tab, metal accessory color matching, multiple print positions
- Ask if component MOQ applies per style, per color, or per purchase order total
- Check whether carton assortment rules create extra packing cost on small mixed orders
Sample approval: the checks buyers should not skip
A pre-production sample is not only for checking size and print color. It is your only easy chance to confirm how the corner is really built before bulk cutting starts. Request front, back, inside lower corner, and close-up images if physical courier timing is tight, but for new suppliers or new constructions, a physical sample is safer. You need to see layer thickness, stitch neatness, cord movement, and whether the bag sits correctly when loaded.
Use a simple acceptance routine instead of a casual visual review. Open and close the bag repeatedly, load it with a realistic weight, inspect whether the cord rubs sharply against the fabric edge, and check if left and right corners are symmetrical. Confirm that print stays visually flat and that stitching does not intrude into critical artwork. These checks are basic, but many approval failures happen because the buyer approved only the logo look.
- Measure patch width and height in millimeters against drawing or approved sample
- Inspect inside seam allowance and confirm no raw weak edge sits directly at the cord stress point
- Cycle the cords open and close several times and look for early abrasion fuzzing
- Check knot consistency and cord length balance on both sides
- If eyelets are used, inspect clinching from both face and inside view
Packing, carton planning, and lead time effects
Reinforced corners slightly change how drawstring backpacks should be folded and packed. When bags are stuffed randomly into cartons, the thicker corner build-up can press into the front panel and leave marks on print areas, especially on coated polyester or freshly cured ink. A better approach is to align bags flat, keep corners facing the same direction, and tuck cords consistently so they do not create pressure points. This sounds minor, but it matters for inbound warehouse handling and retailer presentation.
Lead time is also affected by reinforcement complexity. A standard same-fabric patch added to an established production line may have little impact. A new pattern, heavy patch, eyelet setting, or branded cord tip can add sample revision time and slow line balancing in bulk. Buyers should separate sample lead time from mass production lead time and ask whether reinforcement components are stocked or purchased specially. That answer often matters more than the generic factory claim of a short lead time.
- Packing spec should state units per polybag or bundle, units per carton, gross weight limit, and folding direction
- Ask if cartons will be packed flat or compressed; over-compression can mark the panel near reinforced corners
- Lead time checkpoints: artwork approval, sample approval, material booking, trim arrival, inline inspection, final packing
- For repeat orders, confirm whether the same patch die-cut or cutting template will be reused
Set acceptance criteria before the PO, not after complaints
Corner reinforcement is easy to argue about after delivery because the failure may not appear in a basic final visual inspection. The better method is to define acceptance criteria in the purchase order or quality appendix. This can be simple: approved construction drawing or sample reference, patch dimensions, stitch method, no skipped stitches, no exposed sharp eyelet edge, symmetric cord routing, and no stitching through restricted print area. The point is to convert vague quality expectations into observable checks.
If your organization uses third-party inspection, include reinforcement-specific points in the checklist rather than relying on a generic bag inspection form. If inspection is done by the supplier or an internal team, require corner close-up photos in the final QC report. That documentation helps settle disputes faster and keeps repeat orders consistent. Most factories can make a durable corner well; the problem is usually incomplete documentation, not technical inability.
- Reference one approved sample or one signed construction sheet as the mass standard
- Define left-right symmetry and allowed appearance variance at lower corners
- Record any agreed internal pull-test method in the QC file even if it is not a formal lab test
- Reject condition example: cord cuts into raw fabric edge or patch is visibly smaller than approved sample
- Approval condition example: print area remains clear of reinforcement stitches by the agreed margin
Specification comparison for buyers
| Spec decision | Recommended option | When it fits | Buyer risk to check |
|---|---|---|---|
| Main body fabric for promo use | 210D polyester or 140-150 GSM nonwoven with reinforcement patch | Low-cost campaigns, events, school promotions, short-term use | If body fabric is light, corner patch and bartack quality matter more than fabric alone |
| Main body fabric for retail or repeat use | 8 oz cotton canvas or 230-280 GSM polyester/canvas blend | Higher perceived value, longer use cycle, better print surface | Heavier fabric without patch reinforcement can still fail at the cord exit point |
| Corner reinforcement material | Same fabric doubled for cotton; 420D or 600D patch for polyester bodies | When appearance must stay clean and cost must stay controlled | Supplier may quote a patch but omit internal layer size or stitch density |
| Cord exit construction | Metal eyelet only for decorative use; sewn channel plus patch for load-bearing use | Retail bags where eyelet appearance matters | Eyelet alone does not stop fabric tearing if there is no backing patch |
| Reinforcement stitch type | Box stitch plus bartack at stress point | Sports, school, and distributor orders with repeated opening and closing | Straight stitch only is a common downgrade that passes visual check but fails in use |
| Print area near lower corners | Keep artwork at least 25-35 mm above patch stitch line | Screen print logos, slogans, or event graphics | Artwork can crack, distort, or be pierced by reinforcement stitching if layout is not locked early |
| MOQ strategy | Use standard patch shape and cord color to reduce MOQ pressure on custom options | Mixed-SKU programs and importer trial orders | Custom patch shape, custom eyelet finish, or special cord tips can trigger higher MOQ than the bag itself |
| Packing method | Flat pack in PE bag bundles, cords aligned, corner patch facing same direction | Container efficiency and easier inbound counting | Loose random folding can crease print over reinforced corners and slow retailer prep |
Buyer checklist before sampling
- State the intended use clearly: event giveaway, gym retail, school bag, or distributor stock item, because corner construction should follow load expectation.
- Specify the main fabric by material and weight, such as 210D polyester, 8 oz cotton canvas, or 140 GSM nonwoven, instead of saying only "standard material."
- Define the reinforcement method at the lower corners: extra patch material, patch size, stitch type, bartack requirement, and whether reinforcement is inside, outside, or both.
- Confirm whether the cord passes through a folded hem, eyelet, webbing tab, or patch hole, because each changes failure risk and sewing cost.
- Lock print placement with a measured artwork safe zone above the lower reinforcement area before sample approval.
- Ask for close-up sample photos of both lower corners from front and inside view, not just a full bag image.
- Check if left and right corners are mirrored consistently; asymmetric cord routing is a common bulk defect.
- Approve cord diameter, material, and knot method because thin cords can cut into fabric and accelerate corner tearing.
- Request quote separation for body fabric, print, reinforcement labor, cord, packing, and accessories so low quotes can be compared fairly.
- Add carton packing details to the PO, including units per polybag, units per export carton, gross weight limit, and whether cords should be tucked inside.
Factory quote questions to send
- What exact reinforcement construction are you quoting at the two lower corners, and can you provide a sketch or close-up sample photo?
- Is the corner patch made from the same fabric, a heavier fabric, webbing, or a hidden inner piece, and what is its size in millimeters?
- What stitch type is used at the reinforcement area: straight stitch, box stitch, cross stitch, bartack, or a combination?
- How many stitching passes are used where the cord exits the corner, and what is the target stitch density per inch or per centimeter?
- Does the quoted design include metal eyelets, and if yes, is there backing reinforcement behind the eyelet?
- What cord material and diameter are included in the quote, and do you recommend a different cord for heavier loads?
- How close can the logo print safely run to the reinforcement seam without print cracking or stitch penetration?
- What is the MOQ for this exact reinforcement construction, and what part of the MOQ is driven by fabric, print, eyelets, or custom cord parts?
- Will pre-production samples show the exact reinforcement and cord routing used in mass production, or only the general bag shape?
- How are the bags packed so the reinforced corners do not create pressure marks or distort the printed area in transit?
Quality-control points to confirm
- Measure corner patch size on random samples and confirm it matches approved spec on both left and right sides.
- Check inside and outside stitching at both lower corners for skipped stitches, loose thread ends, and missed bartacks.
- Confirm the cord exit area is smooth and does not cut or scrape the cord when pulled under tension.
- Verify eyelets, if used, are centered, fully clinched, and backed by reinforcement rather than attached to single-layer fabric only.
- Inspect print registration and cracking risk near the lower seam after several draw-open and close cycles.
- Review seam allowance at the corner because narrow allowance can pass final inspection but fail after first use.
- Compare carton-packed samples against approved folding method to make sure reinforced corners do not crease the front logo panel.
- Perform a simple pull test on production samples from each lot using a consistent internal method agreed with the factory and recorded in the QC report.