Why messenger bags become the launch SKU that creates quote drift
Custom messenger bags for brand launches look simple on the surface: one body, one strap, and one logo. In procurement, though, they are one of the easiest soft goods products to under-specify. Two factories can quote the same silhouette and still be quoting very different products because one is using lighter canvas, a thinner strap, a simpler closure, or a lower-cost print process. That is why launch buyers often end up comparing numbers that are not actually comparable.
The most common failure is not the silhouette itself; it is the missing spec discipline behind it. A messenger bag can be a basic event giveaway, a polished retail SKU, or a premium brand kit piece. Each of those levels needs different fabric weight, trim quality, internal finishing, and packing. If the RFQ only says “custom messenger bag with logo,” the factory is free to fill in the blanks, and the quote becomes a guess rather than a controlled buying tool.
For procurement teams, the commercial question is not “Can the supplier make the bag?” It is “Can the supplier make the same bag repeatedly, at the approved margin, without late surprises?” That means defining the use case first, then pricing the details. The launch agenda should decide the bag architecture, not the other way around.
- A launch SKU must be repeatable, not just visually attractive in one sample.
- The same messenger bag shape can sit in several cost bands depending on fabric, lining, strap build, and decoration.
- If the RFQ is vague, suppliers will quote different assumptions and the lowest price may not be the same product.
Start with the use case and channel economics, not the artwork
Before you ask for samples, define what the bag is for and how it will be sold or distributed. A bag used as an event giveaway has very different requirements from one sold in a retail assortment or bundled with higher-value merchandise. If the bag mainly needs to support brand visibility and light carry, you can simplify the interior and trim package. If it is meant to feel like a real everyday carry item, buyers should prioritize strap comfort, internal organization, and a cleaner finish on the inside.
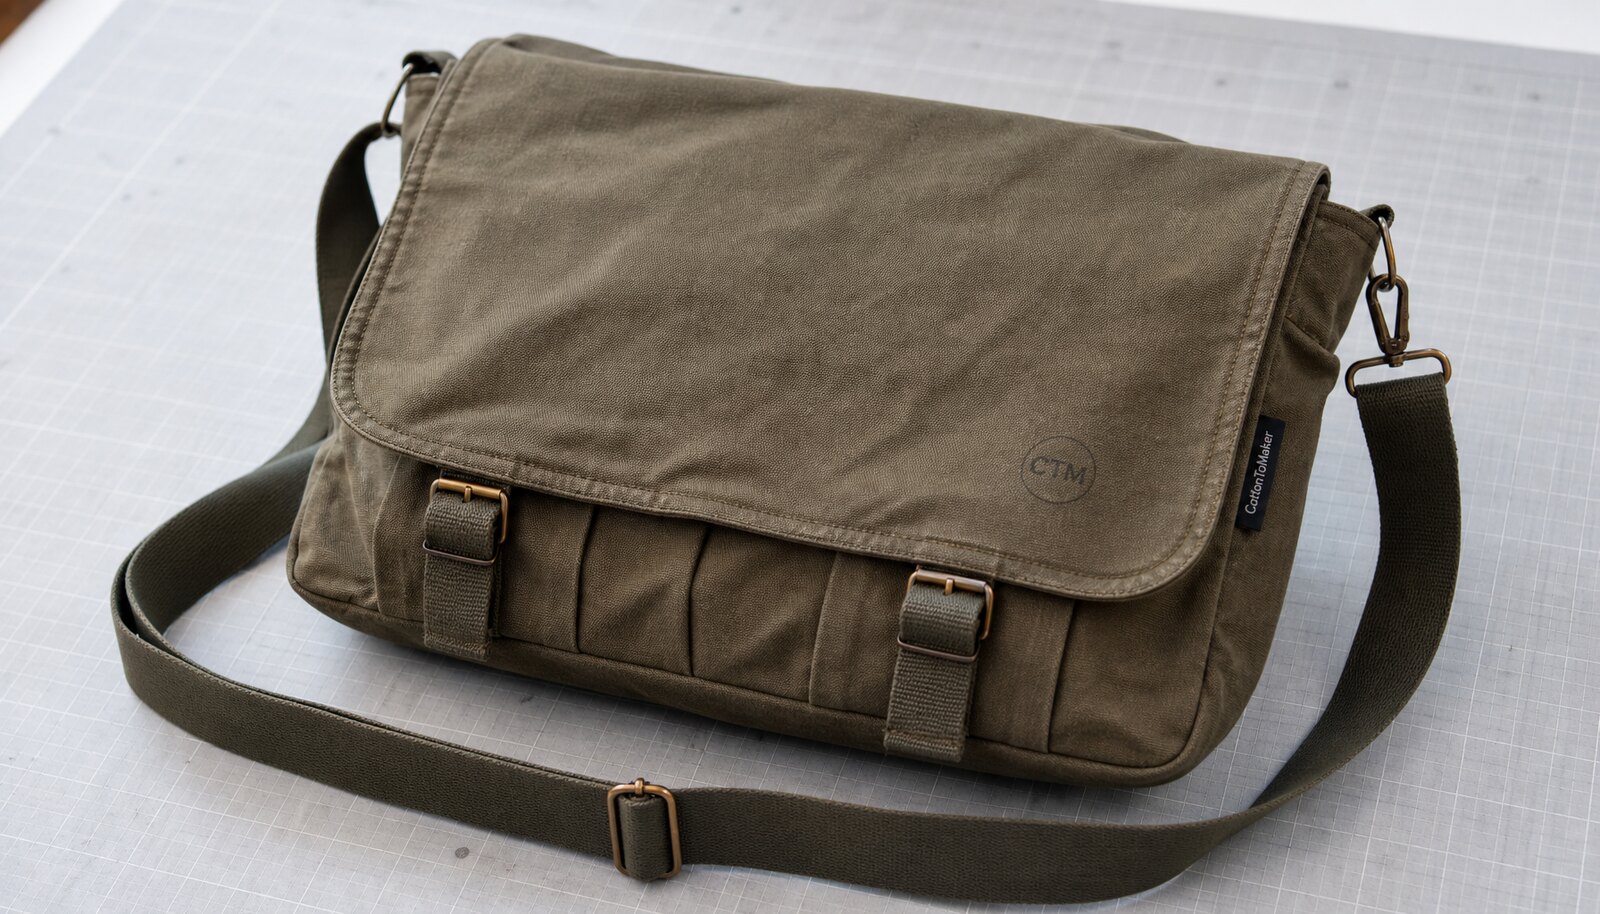
A useful procurement default for a launch-ready messenger bag is a medium size in the approximate 13–15 inch width range, with a front pocket, one internal slip pocket, and an adjustable webbing strap. From there, the channel determines the build. Retail-oriented launches usually benefit from a more structured body, better lining, and a zipper or secure flap closure. Promo or gift-with-purchase programs can accept a simpler body if the logo application and packaging still look intentional.
It also helps to think in margin terms. A heavier canvas or extra pocket may seem like a small upgrade, but it changes fabric yield, sewing time, and freight weight. If the bag is part of a launch where margin matters and velocity is still unknown, the safest route is usually a controlled mid-spec bag rather than the most feature-rich version the supplier offers. The goal is not to maximize the number of features; it is to land on the smallest feature set that still feels intentional for the brand.
- Launch giveaway: simpler body, lower fabric weight, one-color logo, minimal trim.
- Retail launch: better structure, stronger strap, cleaner internal finishing, and more precise packing.
- Premium collection: consider washed canvas, branded label, metal hardware, and a more refined closure system.
Fabric and construction decisions that move the quote more than buyers expect
Canvas weight is one of the fastest ways to change both the feel and the cost of a messenger bag. In sourcing discussions you will often see common buying bands such as 10 oz, 12 oz, 14 oz, and 16 oz canvas. Suppliers sometimes express this as ounces per square yard, while others reference GSM. As a rough cross-check, 10 oz canvas is often around 340 GSM, 12 oz around 400 GSM, 14 oz around 475–500 GSM, and 16 oz can exceed 540 GSM depending on weave and finishing. These figures are useful as comparisons, but they are not a substitute for a measured swatch or factory spec sheet because weave density, coating, and finishing can affect the hand feel and the final sewing behavior.
For custom messenger bags for brand launches, 14 oz is often a practical default when the bag needs to look retail-ready without becoming too heavy or expensive. It usually gives a better shape and more opaque print than very light canvas. That said, the buyer should avoid assuming heavier is always better. A heavier cloth can increase cost, make stitching more labor-intensive, and reduce comfort if the bag is meant for everyday carry. In some cases, a 12 oz bag with better construction will outperform a heavier bag that is poorly designed.
Construction details can matter as much as fabric. Lining improves interior presentation and can help the bag feel more complete, but it adds material and sewing steps. A zipper closure offers better spill protection than an open top, but it introduces hardware cost and another point where defects can appear. Reinforced strap ends and pocket corners are not glamorous line items, yet they are the difference between a launch bag that travels well and one that returns with complaints. Buyers should ask where the extra labor is going before they agree that a quote is “too high.”
- Confirm the supplier’s measured fabric weight, not just the nominal description.
- Heavier canvas usually improves shape and print presence, but it also raises cost and can reduce comfort.
- Lining, zipper choice, and reinforcement points change labor minutes and therefore the true landed price.
Print method decisions should follow artwork complexity and launch volume
Many buyers default to screen printing because it is familiar, economical at scale, and well suited to simple logos. That is often the right answer for a launch SKU with flat artwork, bold type, and one to three colors. On a medium or heavier canvas, screen print can produce strong visibility and a clean commercial look if the ink is properly matched to the fabric and the placement is controlled. It is also easier to compare between suppliers than many specialty decoration methods because the setup is more standardized.
However, screen print is not automatically the best option. If the logo contains fine detail, tonal effects, or small text, the buyer should test whether the chosen line thickness will survive on textured canvas. Embroidery can add perceived value and a premium tactile finish, but it can also pucker, especially on lighter or less stable cloth. Heat transfer can handle detail and short-run launches well, but buyers should validate edge durability, cracking risk, and whether the finish still looks premium after handling. Woven labels or sewn patches are often good supporting elements when the main logo needs a more subtle treatment.
The safest procurement approach is to choose the decoration method based on the artwork file and the fabric, not on habit. Ask the factory to advise on minimum line thickness, color count, and placement limitations before you approve a method. That prevents late-stage redesigns and avoids paying setup costs twice. If your artwork changes after sample approval, re-confirm whether the supplier will charge a second setup fee or treat the change as a new production cycle.
- Screen print: strong choice for simple logos and larger launches.
- Embroidery: useful for premium positioning, but only after checking fabric stability and placement.
- Heat transfer: useful for small runs and detail, but requires durability testing on the actual canvas.
- Woven labels or patches: useful when the main print area is constrained by fabric texture or brand style.
How to build a comparison table that actually supports procurement decisions
A useful comparison table should do more than list “good” and “better” options. Buyers need to see the tradeoffs across cost, risk, lead time, and retail positioning. For example, a 10–12 oz stock-base messenger bag may be ideal for a short-turn launch, but it may not support the same shelf impression as a 14 oz fully custom bag. Similarly, a zipper closure can make the bag feel more finished, but it adds a hardware dependency that may affect timing if the zipper tape or puller is custom-colored.
The right comparison should also account for MOQ behavior. A stock-base decorated bag can often reduce the entry threshold because the body is already developed. A fully custom pattern, by contrast, gives you control over dimensions, pockets, and reinforcement but usually needs more committed volume. The commercial question is not only unit cost; it is the balance between speed, control, and inventory exposure. If a supplier cannot explain which elements are stock and which are custom, the quote needs to be broken apart before it is used for decision-making.
When comparing quotes, make suppliers identify where the cost sits: fabric, trims, print, sewing complexity, or packing. Then ask them to show what happens if you change one variable, such as canvas weight or strap width. That single exercise often reveals whether the quote is genuinely flexible or only cheap because the spec has been simplified beyond what your launch can support. It also makes vendor selection more transparent when you are presenting options internally.
- Compare quotes on the same fabric weight, same closure, same logo method, and same packing standard.
- Ask which items drive the biggest cost swing: canvas, hardware, decoration, or labor.
- Use the table to evaluate both launch speed and repeat-order viability, not just the first order price.
- If the supplier cannot separate stock components from custom ones, do not treat the quote as final.
MOQ and sourcing route decisions should be tied to launch risk and repeat potential
MOQ is not just a factory rule; it is a reflection of how much the supplier must change to make your bag. A stock-base messenger bag with a custom print often supports lower MOQs because the body, fabric, and trims already exist in the supplier’s production flow. A fully custom bag usually requires new patterning, separate material sourcing, and a dedicated production plan, which increases the MOQ. If your launch is still being validated, the stock-base route is often the better commercial choice.
There are three common sourcing routes, and each has a different fit. Factory direct is best when the order size is meaningful, the spec is stable, and you want tight control over materials and workmanship. Trading companies can be useful for managing mixed programs or when you need one contact to coordinate several bag styles, but buyers should still verify the actual factory and the material source behind the price. Local decorators or regional suppliers can be useful for very small runs and urgent needs, yet they may have less control over fabric sourcing and construction consistency.
Regional sourcing can also matter. In practice, buyers often compare Chinese manufacturing for cost and scale, South or Southeast Asian factories for different lead-time and labor tradeoffs, or domestic decorators for speed and smaller quantities. The right route depends on your order size, expected reorder potential, target margin, and the amount of control you need over the final bag. A low MOQ is not automatically a better deal if it locks you into higher unit cost and limited customization later. Ask whether the supplier has a repeat-order path that preserves the same trim and print standard without a new setup charge.
- Factory direct: best for repeatable spec control and larger launch volumes.
- Trading company: useful for mixed programs, but verify the actual production source and fabric spec.
- Local decorator or domestic route: good for ultra-low quantities and speed, but usually less flexible on custom materials.
- If you expect reorders, choose a route that can scale without changing the look of the bag.
Price checkpoints that procurement teams should ask for before approving a PO
A quote becomes useful when it breaks the price into components. Buyers should ask for fabric cost, sewing and assembly, decoration setup, sample charges, packing, and any freight assumptions separately. If everything is rolled into one unit price, it becomes very difficult to understand where a quote is strong, where it is inflated, and where the supplier may later request an adjustment. That is especially important for launch programs because early quote decisions often determine the long-term margin profile of the SKU.
Sample charges deserve special attention. Some suppliers will charge for blank samples, printed strike-offs, and pre-production samples separately. Others may credit some of those costs against bulk if the order proceeds. Buyers should ask in writing whether any sample fees are refundable or deductible, and whether courier costs are included. The same applies to print setups and screen charges: a lower unit price can easily be offset by a high setup fee if the artwork is complex or if multiple logo positions are required.
Another useful checkpoint is quote validity. Canvas, hardware, and shipping rates can shift, and a quote that is valid for a week is not the same as one valid for 30 days. Procurement teams should also ask what happens if a custom color is not available on time, whether the factory can propose a substitute, and who approves the substitution. That one clause can prevent a later dispute over a launch-critical color match. Before issuing a PO, make sure the supplier can show a clean landed-cost calculation, not just an attractive ex-factory number.
- Request unit price, setup charges, sample charges, and packing extras separately.
- Ask whether blank, decorated, and pre-production samples are refundable or creditable.
- Confirm quote validity period and any assumptions around material availability or substitutions.
- Check whether the freight basis is EXW, FOB, or delivered so landed cost is comparable.
Sample approval should test function, appearance, and repeatability
A sample should not be approved just because it looks close to the target. For a launch bag, the sample is a production control tool. It must show that the supplier can repeat the fabric, print, stitching, closure behavior, and packing standard at scale. If the sample uses substitute fabric, temporary hardware, or a different lining, that needs to be documented clearly so no one mistakes it for the final production standard.
The best sample review is practical, not decorative. Check the bag with actual launch contents inside it. Confirm that the strap length works at both the shortest and longest adjustment points, that the front pocket opens and closes without pulling the body out of shape, and that the printed logo still reads cleanly from a customer viewing distance. If the bag is supposed to feel retail-ready, compare it under both daylight and indoor lighting because canvas shade and print tone can change visually under different light sources.
Buyers should also ask for a pre-production sample after the supplier has locked the final materials. This is where you verify the actual zipper, thread color, label placement, and packing method. If the factory wants to rush from approved artwork directly into mass production, slow down. Launch bags are usually not complex enough to need endless iterations, but they are important enough to deserve a final production reference before the full order starts. If the sample and the bulk order diverge, require the factory to explain the change in writing before cutting more units.
- Load the sample with the real items the customer will carry.
- Check strap range, pocket function, print clarity, and closure behavior under use.
- Treat the pre-production sample as the final production reference, not a design-only approval.
- Document every change between sample stage and bulk stage before signing off.
QC details buyers should put in writing before production starts
Quality control on messenger bags often stays too generic. A stronger procurement brief defines what counts as acceptable workmanship, not just that the goods should be “good quality.” For stitching, buyers should specify the load-bearing points first: strap ends, pocket corners, flap joins, and zipper areas. A visible seam with inconsistent stitch density may be acceptable on a very low-cost promo item, but it is not acceptable on a retail launch bag that is supposed to support repeat use. One practical benchmark many buyers use is around 7–10 stitches per inch on visible seams, with consistent bartacks at stress points, though the final target should be aligned with the factory and the intended retail grade.
Dimensional control matters because even a soft bag has to fit packaging and shelf assumptions. Set the acceptable tolerance for width, height, gusset depth, and strap length before the bulk run starts. For many soft goods programs, a tolerance band of roughly +/-0.5 cm to +/-1.0 cm is a reasonable discussion starting point, but the acceptable range depends on your channel and the function of the bag. A bag that is too small can look cheap; one that is too large may fail carton planning or retail planograms. Use the same logic for logo placement: the bag may be flexible, but the artwork needs to appear intentional, centered, and repeatable.
Buyers should also use an AQL-style inspection framework rather than relying on a simple yes/no pass. Define what counts as critical, major, and minor defects. Examples of critical or major defects include holes in the fabric, broken stitching on a load-bearing seam, missing parts, wrong logo artwork, or zipper failure. Minor issues may include small thread ends, slight packing marks, or cosmetic rub that does not affect function. Finally, require that cartons be dry, clean, and correctly labeled, and ask for carton dimensions and unit counts before freight booking so you can avoid receiving surprises in the warehouse.
- Define critical, major, and minor defects before bulk production.
- Set stitch expectations for visible seams and reinforce load-bearing points with bartacks.
- Write dimensional tolerance ranges into the spec sheet instead of relying on a verbal approval.
- Use AQL-style inspection or an equivalent documented standard for final inspection.
- Reject production that deviates on fabric weight, logo placement, hardware function, or carton condition.
Packing, carton design, and freight planning can protect margin
Packing is often treated as an afterthought, but it affects both damage risk and landed cost. Messenger bags with structured panels, metal hardware, or printed faces need packing that preserves shape and reduces rubbing. The most common baseline is one polybag per piece, but higher-value launch products may also need tissue, insert cards, size stickers, barcode labels, or separation sheets between units. If the bag is printed on the front panel, adding a layer between units can reduce scuffing during transit.
Carton design also affects freight efficiency. If a factory uses cartons that are too large, you pay for unnecessary volume. If cartons are too tight, the bag can arrive creased or crushed. Ask for carton dimensions, gross weight, and unit count by carton before production is finalized. That lets your freight forwarder calculate more accurately and helps your warehouse plan receiving. For launch programs, retail-ready carton marks or master carton labeling are especially helpful because they reduce handling friction after arrival.
The commercial point is simple: better packing can be cheaper than a last-minute quality claim. A clean, correctly labeled carton that protects the bag is usually worth more than a small savings on packing materials. Buyers should make packing part of the quote review instead of approving it only after the bags are finished.
- One polybag per piece is the basic clean standard for most launch orders.
- Use separation sheets or tissue if the print face or hardware risks rub marks.
- Request carton dimensions and net/gross weight early so freight and warehouse planning are accurate.
- Specify labeling requirements for retail, warehouse, or marketplace fulfillment before packing starts.
Specification comparison for buyers
| Spec decision | Recommended option | When it fits | Buyer tradeoffs and risk checkpoints |
|---|---|---|---|
| Fabric weight | 14 oz canvas / about 475–500 GSM | Retail launches, brand kits, and bags that need structure and a more substantial hand feel | Usually the best all-rounder, but confirm the supplier’s measured GSM and weave density, not just the nominal label. Ask whether the fabric is pre-shrunk or enzyme-washed, and request a swatch so your team can compare hand feel, opacity, and seam behavior before ordering bulk. |
| Lower-cost fabric route | 10–12 oz canvas / about 340–400 GSM | Promo launches, event giveaways, gift-with-purchase programs, and faster test orders | Lower price and freight weight, but softer shape, more visible wrinkles, and lower perceived value. Check whether the bag still stands upright enough for shelf display and whether print opacity is acceptable on the chosen color. Also confirm whether the lighter fabric needs extra reinforcement in the strap area. |
| Body structure | Single main compartment with front pocket and light lining | Launch programs that need a balanced mix of utility, packing efficiency, and cost control | Simpler construction supports faster quoting and usually easier MOQ management, but unlined or minimally lined bodies may show loose threads, print show-through, or less premium interior finishing. Ask for seam finishing details, pocket reinforcement, and whether the interior is bound or raw-finished. |
| Closure style | Zipper main closure with flap or magnetic front option | Retail and e-commerce launches where spill protection and perceived value matter | Zippers add hardware cost and another failure point; magnetic closures need proper backing and placement control. Confirm puller style, zipper gauge, tooth material, and whether the slider has a lock or anti-snag feature. If the launch is price-sensitive, compare the closure options on the same spec sheet. |
| Decoration method | Screen print for simple logos; embroidery or woven label for premium branding; heat transfer for short runs | One- to three-color art, launch kits, and SKU tests with constrained timelines | Each method has a different durability and visual profile. Screen print is efficient at volume, embroidery can pucker on unstable fabric, and transfers need testing for cracking, edge lift, and heat tolerance. Ask the factory to recommend minimum line thickness for your artwork before you approve the method. |
| Strap build | 38 mm webbing strap with bartacks and reinforced attachment points | Daily carry, notebook/tablet use, and higher-ticket retail positioning | Thin straps reduce comfort and increase return risk. Ask for strap width, stitch density at the attachment point, bartack length, and whether the join is backed with reinforcement tape or an additional fabric layer. Also check the adjustment range if the bag will be worn crossbody. |
| Lining and interior pockets | Polyester or poly-cotton lining with one slip pocket | Retail-facing programs where presentation and organization matter | Lining improves perceived quality and protects the inside, but adds labor and can complicate sewing tolerances. Confirm pocket size, placement, and whether the lining color matches your brand or is factory standard. If you plan inserts or collateral, test whether the pocket actually fits them. |
| Supplier route | Factory direct for repeatable control; trading company for mixed programs; local decorator for ultra-low quantities | Depends on order size, artwork complexity, and whether you need speed or tighter spec control | Compare the full cost stack, not just the unit price. Ask who actually makes the bag, where the canvas and trims come from, and whether sample charges are creditable against bulk. If the quote is unusually low, check whether the supplier has removed lining, reinforcement, or custom packing to reach it. |
| MOQ strategy | Stock-base bag with custom print for pilot launches; fully custom pattern for larger confirmed programs | Early-stage launches, regional tests, and phased rollouts | Stock-base keeps risk low, but limits color and design freedom. Fully custom lowers unit cost at scale, yet increases tooling, setup, and material commitments. Confirm whether mixed colors or artwork versions count toward one MOQ or separate MOQs, and whether reorders can hold the same spec without reset charges. |
Buyer checklist before sampling
- Finalize size, fabric weight, closure type, strap width, lining level, and logo placement before asking for quotes.
- Provide vector artwork, Pantone targets, minimum line thickness, and no-print zones near seams, zippers, and bartacks.
- State whether the order is stock-base decoration, semi-custom, or fully custom, because MOQ and lead time change sharply.
- Ask for a blank sample, printed strike-off, and pre-production sample with final materials before bulk approval.
- Request written packing specs: polybag type, insert card, barcode label, carton count, carton marks, and palletization if needed.
- Define acceptance criteria for stitch quality, print alignment, hardware finish, measurement tolerance, and carton condition before production starts.
- Confirm whether sample charges, mold fees, print setup, and packing extras are deductible from bulk or billed separately.
- Set a revised schedule that includes material reservation, sample approval, bulk production, final inspection, and shipping buffer.
- Ask the supplier what they will do if a fabric lot, zipper, or label color drifts from the approved sample during production.
Factory quote questions to send
- What exact canvas weight, weave count, and finish are you quoting, and can you provide a measured swatch or spec sheet?
- Is the unit price based on an existing stock messenger bag or a new pattern with custom dimensions, pockets, or reinforcement?
- What is the exact decoration method, how many colors are included, and what are the setup fees for each logo location?
- What is the MOQ per color, per artwork version, and per trim variation? Can the factory combine colors in one run without raising the unit price?
- What sample types are available first, what do they cost, and which sample charges are refundable or creditable against bulk?
- What are the lead times for blank sample, decorated sample, pre-production sample, and bulk shipment, assuming materials are in stock?
- Which trims are standard and which are optional upgrades, such as zipper gauge, puller type, lining, label, or strap width?
- What testing or QC standard do you use for stitch quality, print registration, hardware function, and carton drop or compression checks?
- What packing is included in the quoted price, and what are the added charges for insert cards, hangtags, barcode labels, or retail polybags?
- If any material is out of stock, what substitution process do you use, and who approves the substitution before production continues?
Quality-control points to confirm
- Fabric verification: check actual canvas weight against the approved spec, not just the supplier’s verbal description. If the order is specified at 14 oz, require the measured production cloth to stay within the agreed tolerance band and match the approved swatch in hand feel and opacity.
- Dimensions: set a tolerance for width, height, gusset, and strap length before bulk. A practical procurement target is often around +/-0.5 cm to +/-1.0 cm on soft goods dimensions, but confirm the acceptable range with your factory, packaging plan, and channel needs.
- Stitch quality: specify stitch density where it matters most. For load-bearing seams and strap attachment points, ask for even stitches and reinforcement bartacks; a common workmanship target is around 7–10 stitches per inch on visible seams, with no skipped stitches, broken thread, or loose chains.
- Bartacks and reinforcement: require secure bartacks at strap ends, pocket corners, and stress points. Reject any attachment point with fraying, uneven bar length, or visible pull-away from the base fabric.
- Print placement and registration: define placement from edge references and allowable shift. Small logos can be noticeably off-center on a messenger bag, so require a placement tolerance and reject major skew, blur, ghosting, or ink bleed beyond the approved sample.
- Hardware function: zippers must run smoothly through repeated open-close cycles, magnets should align consistently, and snaps should fasten without excessive force. Reject plating defects, burrs, missing teeth, or pullers that feel too light for the bag grade.
- AQL-style inspection: agree the inspection approach before shipment. For many soft goods programs, buyers use an AQL framework for critical, major, and minor defects; set clear thresholds with your supplier and third-party inspector instead of relying on a generic “passed QC” statement.
- Typical defect thresholds: classify holes, broken stitching, missing parts, and wrong artwork as critical or major defects; define how many units can be affected before the lot is rejected or reworked. Minor issues such as slight thread trim marks or small packaging scuffs should still be counted and documented.
- Visual consistency: compare several finished bags from the same lot under daylight and indoor light. Check whether canvas shade, print tone, strap color, and zipper tape stay consistent across the carton range.
- Packing and carton condition: cartons should be dry, clean, and correctly labeled, with no corner crush, print rub, or moisture damage. Confirm carton dimensions and unit count before freight booking so warehouse receiving does not become a cost issue later.