1. Start with the bag’s real job, not the material name
A strong custom jute tote specification does not begin with “natural jute tote, logo printed, 5,000 pieces.” That line gives a supplier too much room to decide the body weight, handle width, seam pattern, logo method, and packing style on your behalf. Sometimes the default is fine for a short event giveaway. For an apparel brand using the tote in stores, e-commerce kits, launch packaging, or loyalty programs, those defaults can quickly become quote surprises or quality disputes.
Begin with the job the bag must do. A tote holding one folded T-shirt has a different requirement from one carrying denim, shoes, sweaters, boxed accessories, or a multi-piece capsule set. A bag that must stand on a retail counter needs more structure than a soft insert packed inside an outbound carton. A reusable shopping tote needs comfortable handles and secure seam reinforcement. A one-day launch giveaway may simply need a clean one-color logo and predictable delivery.
Procurement teams should write the actual contents into the RFQ. Use plain language: two folded tees, one hoodie, accessory gift set, showroom sample kit, or retail purchase up to 3 kg. Then ask each supplier to confirm whether the proposed jute weight, gusset, handle construction, and stitching are suitable. This one detail makes quotes easier to compare because every factory is pricing against the same performance need, not guessing what “premium” or “durable” means.
- Retail carry bag: prioritize clean structure, clear logo alignment, handle comfort, and carton protection.
- Gift-with-purchase tote: prioritize perceived value, consistent appearance, and neat branding details.
- Trade show or event tote: prioritize unit cost, simple artwork, quick sampling, and reliable packing counts.
- E-commerce insert bag: prioritize flat packing, low dust, interior cleanliness, and accurate warehouse labels.
- Reusable shopping tote: prioritize load margin, reinforced handles, bottom seam strength, and abrasion resistance.
2. Compare jute constructions before choosing a look
Jute is not one single specification. Custom jute tote bags may use plain woven jute, laminated jute, jute-cotton blends, lined jute, or jute with a coating that changes structure and moisture resistance. Each build affects the bag’s hand feel, print surface, sewing behavior, foldability, and sustainability message. For eco apparel brands, this matters because shoppers notice whether a tote feels natural, heavily coated, rustic, polished, or promotional.
Plain woven jute gives the familiar low-gloss texture many brands want. It works well when a natural appearance is more important than perfect uniformity. Expect some fiber variation, slubs, shade movement, and possible shedding. Laminated jute creates a firmer panel and usually helps the tote hold a square retail shape. It can make printing more stable, especially on structured bags, but it may feel less natural and can complicate recycling or material-claim language. Lamination also needs inspection at folds and seams because peeling, cracking, or needle tearing can appear if the build is poorly matched to the design.
Blended jute can soften the hand feel or improve print smoothness, but the fiber mix should be stated accurately in your internal spec and any customer-facing copy. Lining is another choice with real consequences. An unlined tote is usually lower cost and keeps the natural interior visible. A cotton or nonwoven lining improves cleanliness and presentation for apparel kits, but it adds material, labor, and inspection steps. The right construction is not automatically the most natural or the most structured. It is the one that supports the use case, brand message, and inspection standard.
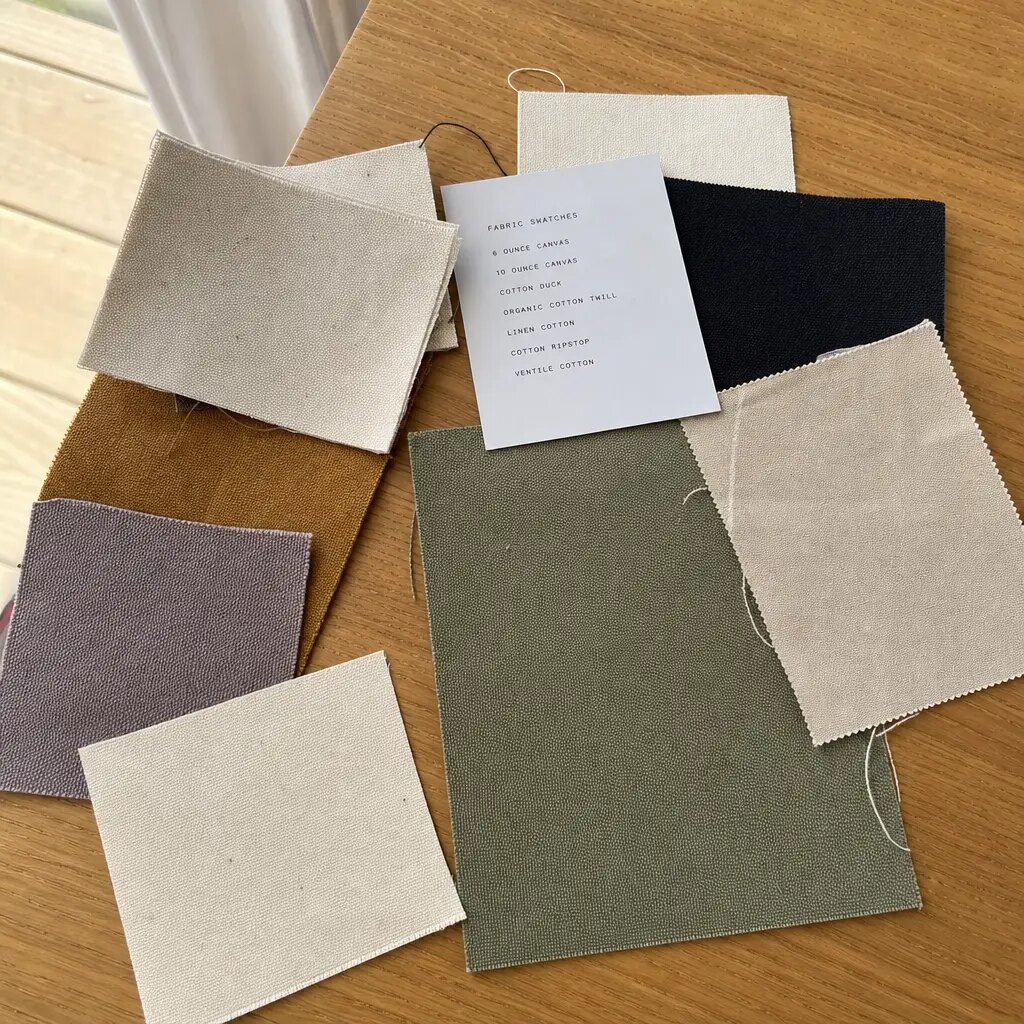
- Request physical swatches for every quoted construction; photos rarely show jute shade and texture accurately.
- Confirm whether lamination is inside, outside, or both sides, and whether it is matte or glossy.
- Fold the swatch at likely gusset points to check for cracking, whitening, or surface stress.
- If sustainability language matters, list body, lining, handle, coating, label, and thread materials separately.
- For premium programs, inspect the front logo panel carefully because knots, stains, and slubs are most visible there.
3. Use fabric weight and gusset design to control performance
Fabric weight is a major cost and performance driver in any custom jute tote bags material selection guide for eco apparel brands. A practical mid-weight range, often described around 12x12 oz to 14x14 oz equivalent, is a sensible starting point for many retail and apparel programs. It gives enough body for repeated use without making the bag overly stiff, expensive, or difficult to sew. A very light jute sample may look acceptable when empty, then sag or distort once filled. A very heavy jute can feel substantial, but it can also increase freight volume, create bulky seams, and reduce flexibility.
Avoid relying on supplier descriptions such as standard, heavy, export quality, or premium. Factories may use different terms for weight, yarn count, and weave density. One quote may be based on a lighter open weave while another uses denser fabric that looks similar in a photo. Ask for fabric weight or equivalent GSM, weave-density description, and a swatch from the quoted material family. Then test the bag with the intended contents. Filled-bag behavior is often more useful than flat swatch comparison.
Gusset design is just as important. A flat tote is cheaper and packs efficiently, but it does not hold folded apparel as neatly. A bottom gusset improves capacity and helps the bag sit better. Side and bottom gussets create a more retail-shopping-bag shape, but they use more fabric, require more sewing, and may increase carton dimensions. Match gusset depth to the product stack. A hoodie, denim pair, or shoe accessory set needs more base depth than a T-shirt or scarf. If the gusset is too shallow, the bag can look strained even when the fabric itself is strong enough.
- Request finished size and cut size when the design includes a gusset, because seam allowance affects capacity.
- Use actual garments, tissue, inserts, or boxed accessories for fit and load checks.
- For a structured retail look, consider laminated mid-weight jute with a bottom gusset before moving to much heavier fabric.
- For flat e-commerce inserts, lighter unlaminated jute may be acceptable if the bag is not expected to carry heavy loads.
- Set size tolerances for width, height, gusset, and handle drop in the purchase order.
4. Treat handles as a load-bearing component
Handles are often the first part of a jute tote to fail. The body panel may be strong enough, but a narrow handle, weak attachment, or rushed stitch pattern can make the bag uncomfortable or unreliable. Cotton webbing is common for apparel brands because it feels softer in the hand and gives a cleaner retail finish against natural jute. Jute webbing creates a more unified natural look, but it may feel rough under load. Rope handles, dyed cotton handles, and self-fabric handles are also possible, though each one changes cost, sampling time, and QC risk.
Handle width and drop length should match how the customer will carry the bag. A short hand-carry handle suits gift packaging and smaller retail purchases. A longer shoulder drop makes the tote more useful for shopping or daily reuse, but it adds material and can look awkward on a small body. Wider handles improve comfort, especially when customers carry sweaters, denim, or several items. Still, an oversized handle can look heavy and may need more careful sewing.
Do not leave the attachment method to assumption. A simple straight stitch may be acceptable on a light promotional tote. A repeated-use apparel bag should use stronger reinforcement such as box stitch, cross-stitch, bar-tack, or an internal patch. Ask for close-up photos of the handle end and approve the same construction on the pre-production sample. During review, fill the tote with the real contents and pull firmly by hand. It is not a formal lab test, but it quickly reveals twisting handles, opening stitches, and weak anchoring.
- State handle material, width, color, drop length, and attachment position in the RFQ.
- Use cotton webbing when comfort and retail polish matter more than a fully matching jute look.
- Use jute webbing when the natural visual story is the priority, but inspect abrasion and hand feel.
- Require reinforced stitching for repeated-use bags or heavier apparel purchases.
- Check whether dyed handles can bleed, crock, or transfer color onto natural jute or light garments during storage.
5. Match logo method to jute’s rough surface
Artwork that looks sharp on a PDF can behave very differently on jute. The weave is coarse, the background is not perfectly even, and loose fibers can interrupt fine lines. Screen printing is usually the most practical choice for simple apparel logos, one or two spot colors, and repeat orders. It can deliver a strong branded look at controlled cost, but small type may fill in and heavy ink coverage may feel stiff or crack after flexing.
Heat transfer and digital print can support gradients, photographic artwork, or multiple seasonal designs, but they should be tested on the actual material. On rough jute, transfer edges may look too artificial against the natural surface, and adhesion can vary depending on lamination. Digital print may need a smoother or coated surface to achieve acceptable clarity. Embroidery can feel premium on some bags, but on coarse jute it may distort the panel, require backing, and make small lettering difficult.
Many eco apparel brands do better with restrained branding: a woven side label, sewn cotton patch, or small printed mark rather than a large ink block. Whatever the method, approve it on the selected jute construction, not on a mockup. Set minimum line thickness, minimum text height, print area, placement tolerance, Pantone or closest available color, and acceptable color variance on natural fiber. If the artwork includes QR codes, legal marks, or small campaign text, request a strike-off and test readability before approving bulk.
- Screen print: best for bold logos, limited colors, repeat orders, and controlled setup cost.
- Heat transfer: useful for detailed artwork, but test edge lift, stiffness, and durability on the chosen jute.
- Digital print: useful for complex graphics or lower-volume variants, but may need a smoother surface.
- Woven or cotton label: good for minimalist apparel branding and avoids large ink coverage on textured fabric.
- Measure print placement from seams, top edge, bottom gusset, and handle center to reduce visual drift during inspection.
6. Build an RFQ that makes supplier quotes comparable
A low unit price means little if the quoted specifications are not the same. One supplier may price laminated mid-weight jute, cotton handles, a bottom gusset, and individual polybags. Another may price lighter plain jute, narrow handles, flat construction, and bulk packing. Both quotes may describe a “custom jute tote bag,” but they are not equivalent.
A procurement-ready RFQ should lock the main cost drivers: finished size, body construction, fabric weight, gusset, handle material, handle drop, reinforcement method, print method, print area, number of colors, lining, closure, label, packing, MOQ, sample process, inspection expectation, and delivery terms. Ask suppliers to separate unit price from setup charges, sample charges, screen charges, label surcharges, packing surcharges, freight estimates, and payment terms. This makes total order cost easier to see.
Supplier route also affects transparency. A direct factory can offer deeper control over construction and repeat production, but it requires clear technical communication. A trading company may simplify coordination across several categories, though the actual factory spec can be less visible. A local converter may help with urgent or small programs at a higher unit cost. None of these routes is automatically right or wrong. Match the route to the risk profile and the importance of repeatability.
- Send the same RFQ pack to every supplier: drawing, material target, artwork, packing, MOQ, sample needs, and delivery terms.
- Ask suppliers to identify any assumption they changed instead of quietly substituting a cheaper construction.
- Compare price breaks at realistic quantities so you can see whether setup, material, or labor is driving cost.
- Use production photos only as supporting evidence; final approval should rely on physical samples.
- Tie each quote to a dated spec version so revisions do not get confused with the original price.
7. Plan MOQ by variable, not only by total quantity
MOQ for custom jute tote bags is driven by more than the number of units. Material availability, handle color, printing screens, sewing efficiency, packing labels, and version count all influence the minimum. A single 5,000-piece order in one size, one body material, one handle, and one print is simpler than 5,000 pieces split across five artworks, two handle colors, and separate SKU labels. The total quantity may be the same. The factory workload is not.
Ask for MOQ by variable: per size, per body fabric, per handle color, per print version, per lining, and per packing style. This helps the brand decide whether assortment complexity is worth the cost. If regional teams want different languages or seasonal graphics, request the cost of the base bag plus the incremental charge for each artwork change. Sometimes the best solution is one shared bag body with small changes to the label or one-color print.
Price breaks are useful planning tools. Ask for the same spec at 1,000, 3,000, 5,000, and 10,000 pieces if those quantities are realistic. A steep drop between 1,000 and 3,000 pieces may show that setup and material booking are the main cost drivers. A smaller drop after 5,000 pieces may show that fabric and labor dominate. MOQ should support total landed value, not simply chase the lowest possible quantity.
- Define MOQ per size, colorway, artwork, handle material, and packing method.
- Avoid splitting small orders into too many versions unless the brand value is clear.
- Use one bag body across several campaigns when possible, then vary print or label details.
- Ask whether unused fabric or handle stock can be held for repeat orders and under what terms.
- Confirm whether sample charges are refundable, credited to bulk, or billed separately from MOQ pricing.
8. Use sampling to test the real production build
Sampling should protect the bulk order, not just help the design team visualize the tote. A good process starts with material swatches for jute construction, shade, lamination, and handle feel. Next comes a print strike-off on the selected material. Only after that should you approve a full pre-production sample using the actual body, handle, stitching, print, label, closure, lining, and packing method intended for bulk.
Be careful with sample shortcuts. A sales sample may use available fabric that is close to, but not identical to, the quoted bulk material. A hand-finished sample may look cleaner than normal line production. A mockup may use smoother fabric than the real jute. These shortcuts are not always dishonest; sometimes they are used to move a project quickly. The problem starts when a design sample is treated as a production approval sample.
When approving the pre-production sample, record measurable details: finished size, gusset, handle drop, fabric construction, shade reference, print size, logo position, stitch method, label placement, packing method, and natural variation accepted for bulk. Keep one signed approval sample with the buyer and one with the factory when possible. Bulk goods should be inspected against that sample and the written tolerance list, not against email photos taken under unknown lighting.
- Request material swatches before committing to the body construction.
- Approve print strike-offs on the real jute, especially for small type, dark logos, or multi-color artwork.
- Test the full sample with actual garments and packaging inserts, not with random weight only.
- Check the sample after carton compression if the bags will be shipped flat or tightly packed.
- Record approval comments in writing, including defects accepted in the sample that must not appear in bulk.
9. Define packing early because it changes cost and quality
Packing is often left until the end, yet it affects landed cost, warehouse handling, and customer presentation. Bulk carton packing is usually the lowest-cost option, but it can expose bags to dust, fiber transfer, compression, and counting errors. Individual polybags add material and labor cost, but they protect the tote surface and simplify retail or e-commerce handling. Inner bundles can be a middle option when the bag does not need consumer-facing packaging but still needs cleaner warehouse control.
Choose packing based on distribution. Retail stores may need store-ready carton counts and clear SKU labels. Multiple distribution centers may require specific carton marks and barcode formats. If the tote is sold or shipped individually, each unit may need a barcode sticker, hangtag, or insert. If it is used as garment packaging, the warehouse may need every bag packed flat in the same orientation. Put these requirements into the RFQ; changing packing after pricing often adds cost and delays.
Carton planning also connects back to material choice. A structured laminated gusset bag occupies more carton space than a soft flat tote. Heavier jute raises gross weight. Long handles may need careful folding to avoid creases or tangling. Ask for estimated carton dimensions, pieces per carton, gross weight, and packing photos during the sample stage. Because jute is a natural fiber, damp cartons and poor ventilation can create odor or mildew risk, so carton condition should be part of final inspection.
- Specify pieces per carton and inner packing method before comparing quotes.
- Use individual polybags when retail cleanliness, SKU separation, or e-commerce handling matters.
- Confirm barcode type, label size, label position, and whether labels go on bags, polybags, inner packs, or cartons.
- Ask for estimated carton dimensions and gross weight to support freight planning.
- Inspect cartons for odor, dampness, crushing, label accuracy, and count accuracy before shipment approval.
10. Put QC tolerances in the purchase order
Quality control for jute totes needs a mix of visual judgment and measurable tolerances. Natural jute will not look as uniform as synthetic fabric. Small slubs, slight shade movement, and visible fiber texture may be normal. Oil stains, mildew marks, large knots on the logo panel, peeling lamination, crooked handles, weak seams, and unreadable print should not be excused as “natural character.” The purchase order should clearly separate acceptable variation from defects that affect retail presentation or performance.
A practical inspection checklist covers size, fabric, stitching, handle strength, print, odor, packing, and sample-to-bulk consistency. Measure width, height, gusset, handle drop, and logo placement. Inspect handle ends, side seams, bottom seams, and gusset corners for skipped stitches, loose tails, broken thread, and weak back-tacks. Review print clarity, registration, color density, ink coverage, and cracking after light flexing. Reconcile carton counts, SKU labels, barcode readability, carton marks, and PO quantity.
Lead time needs the same discipline. Ask the supplier to separate sample making, approval waiting time, material booking, printing, sewing, packing, inspection, and export handover. A single promised ship date does not show where the risk sits. Jute fabric availability, handle material, artwork approval, print screens, and packing labels can all become bottlenecks. Request milestone updates tied to the production schedule so issues are caught while they can still be corrected.
- Set written tolerances for finished size, print position, handle drop, and visible front-panel defects.
- Use the approved pre-production sample as the reference for shade, texture, logo placement, handle feel, and finish.
- Inspect early production units before the full run is completed when the order is large or time-sensitive.
- Reject strong mildew, solvent, glue, oil, smoke, or damp-storage odor that remains after reasonable airing.
- Tie final payment or shipment release to inspection results when the order size and supplier relationship justify it.
Specification comparison for buyers
| Spec decision | Recommended option | When it fits | Buyer risk to check |
|---|---|---|---|
| Jute body construction | Plain woven jute for a rustic natural texture; laminated jute for stronger shape retention; jute-cotton blend only when the fiber mix is acceptable in brand and compliance wording | Retail apparel totes, gift-with-purchase bags, store launch packaging, showroom bags, and repeat-use shopping totes | Lamination can affect fold behavior, recyclability messaging, and seam stress; plain jute may show more shade variation, slubs, and fiber shedding |
| Fabric weight and density | Mid-weight jute in the common 12x12 oz to 14x14 oz equivalent range for many apparel programs | Folded garments, accessories, showroom kits, reusable retail carry bags, and moderate-load shopping bags | Too light can sag and distort the logo; too heavy can raise cost, bulk up seams, increase carton volume, and reduce flexibility |
| Bag structure | Flat tote for low-cost programs; bottom gusset for apparel capacity; side and bottom gusset for a shopping-bag shape with better stand-up | T-shirts, sweaters, denim, accessories, multi-item purchases, and product bundles | More gusset depth increases fabric consumption, sewing time, and carton space; weak bottom seams can fail before the body fabric does |
| Handle material | Cotton webbing for comfort and a clean retail finish; jute webbing for a fully natural visual story | Eco apparel brands expecting customers to reuse the bag beyond the first purchase | Narrow or rough handles reduce comfort; poor anchoring is a common failure point |
| Handle width and drop | Usually 25 to 38 mm webbing width, with the carry drop matched to hand-carry or shoulder-carry use | Gift packaging, retail shopping, loyalty merchandise, and everyday reuse totes | Too short limits usability; too long can drag on small bags, tangle in packing, or add unnecessary cost |
| Logo method | Screen print for 1 to 2 spot colors; heat transfer or digital print for complex artwork; woven or sewn label for restrained branding | Simple apparel logos, seasonal graphics, small-batch artwork changes, and minimalist premium programs | Heavy ink can crack on rough weave; fine type can fill in; labels require neat stitching and colorfast threads |
| Lining choice | Unlined for cost and natural texture; cotton or nonwoven lining when interior cleanliness or a premium finish matters | Garment packaging, influencer kits, accessory sets, and elevated retail presentation | Unlined bags may shed fibers; lining adds labor, inspection steps, and sustainability claim complexity |
| Closure option | Open top for most retail and promotional totes; zipper, snap, button, or tie only when product protection matters | Travel kits, gift sets, loose accessories, or e-commerce use where contents may fall out | Hardware can rust, break, or slow production; closures should be tested with the actual fill volume |
| MOQ approach | Quote by size, body material, print version, handle type, and packing method, not only by total quantity | Programs with regional artwork, store-specific SKUs, seasonal colors, or multiple apparel categories | A low total MOQ can still carry high setup charges if the order is split across too many variants |
Buyer checklist before sampling
- Define the end use first: retail carry bag, purchase-with-purchase item, gift packaging, trade show giveaway, e-commerce insert, or reusable shopping tote.
- Set the load target in kilograms or by actual apparel contents, then choose fabric weight, gusset depth, handle width, and stitching around that target.
- Confirm whether the quoted size is finished size or cut size, and request a dimension drawing showing width, height, gusset, handle drop, seam allowance, and logo placement.
- Specify the jute construction in writing: plain woven, laminated, blended, lined, unlined, matte lamination, glossy lamination, or internal coating.
- Ask for fabric weight or equivalent GSM, weave density, and acceptable shade variation so supplier quotes can be compared on the same basis.
- Choose handle material, width, drop length, reinforcement stitch, and attachment position before comparing unit prices.
- State the logo method, artwork colors, Pantone or closest available color, print area, placement tolerance, and minimum readable text size.
- Request a material swatch, print strike-off, and full pre-production sample made with actual bulk materials before authorizing production.
- Write QC tolerances into the purchase order: size tolerance, print position tolerance, stitch density, handle pull expectation, odor, stain limits, and carton quantity accuracy.
- Define packing in operational terms: pieces per carton, carton dimensions if needed, inner polybag requirement, barcode label format, SKU label placement, and master carton marks.
Factory quote questions to send
- What exact jute construction are you quoting: plain woven jute, laminated jute, blended jute, lined jute, or another build?
- What is the fabric weight or equivalent GSM, and how do you describe the weave density or yarn count?
- Is the quoted bag size the finished size after sewing, and what are the width, height, gusset, handle drop, and seam allowance?
- Which side of the jute is laminated, if any, and is the lamination matte, glossy, clear, colored, or water-resistant?
- What handle material, width, drop length, color, and reinforcement method are included in the unit price?
- What is the maximum recommended load for this construction, and how do you test or estimate handle and seam strength?
- Which logo method is included, how many colors are included, what print area is priced, and what setup charge applies per color or screen?
- Can you produce a print strike-off on the actual bulk jute before making the full pre-production sample?
- What is your MOQ per size, per body material, per handle color, per print version, and per packing style?
- How does the unit price change at 1,000, 3,000, 5,000, and 10,000 pieces for the same specification?
Quality-control points to confirm
- Size and shape: measure width, height, gusset, handle drop, and print position against the approved drawing, then verify the bag stands or folds as intended.
- Fabric weight and appearance: confirm bulk material matches the approved swatch for weight, weave openness, shade range, lamination finish, and visible fiber character.
- Stitch density and seam security: inspect side seams, bottom seams, handle ends, and gusset corners for skipped stitches, loose thread tails, broken thread, and weak back-tacks.
- Handle attachment: perform a practical pull check on sample units, inspect box stitch or cross-stitch consistency, and check whether reinforcement patches are correctly positioned.
- Print quality: check color density, edge clarity, registration, ink coverage over the jute texture, cracking after light flexing, and readability of small type.
- Print placement: measure from fixed landmarks such as top edge, side seam, bottom gusset, and handle center instead of judging placement visually.
- Lamination and coating: inspect for peeling, bubbles, cracking at folds, needle tearing near seams, glossy patches, and inconsistent surface finish.
- Interior cleanliness: check loose fibers, dust, lining stains, odor, and rough seams that could catch on folded apparel.
- Odor and contamination: reject cartons with strong mildew, solvent, glue, oil, smoke, or damp-storage smells after airing for a reasonable inspection period.
- Packing accuracy: verify pieces per carton, inner packing style, barcode readability, SKU label placement, carton marks, carton strength, and PO quantity reconciliation.