Start with the coffee roaster use case, not a generic pouch name
A custom cotton drawstring pouch can do several jobs for a coffee roaster. It might hold one 50 g or 100 g sample bag for a wholesale prospect. It might present a holiday gift set. It might sit inside a subscription box, carry brew cards at an event, or dress up a retail accessory bundle. Those uses sound similar, but they lead to different buying decisions. The sample pouch needs fast filling, a secure closure, and controlled cost. The gift pouch needs better opacity, neater sewing, cleaner branding, and packing that keeps the fabric presentable before assembly.
Begin the RFQ with a practical sentence, not only a product name. For example: "Natural cotton drawstring pouch for one sealed 100 g coffee sample bag and one brew card, reusable secondary packaging, one-color front logo, packed 100 pieces per inner bag." That single line gives the supplier the contents, brand role, reuse expectation, print level, and warehouse handling requirement. It also stops three suppliers from quoting three different products under the same description.
Clarify food-contact assumptions early. In many coffee programs, the cotton pouch is secondary packaging; roasted coffee remains inside a sealed primary coffee bag. In that situation, procurement should focus on cleanliness, odor, fiber shedding, stains, logo durability, and presentation. If roasted coffee, tea, or any food will touch the cotton directly, do not treat a standard promotional pouch as automatically suitable. Review the separate food-contact requirements and testing scope before sampling.
- For sample kits, prioritize usable size, opening width, easy filling, cord glide, and economical counted packing.
- For retail gifts, prioritize fabric hand feel, opacity, logo placement, seam appearance, and dust protection.
- For wholesale presentations, prioritize repeatable shade, reorder matching, carton labeling, and professional finish.
- For event giveaways, control cost while still defining minimum GSM, print quality, and defect limits.
- For direct food contact, request a separate compliance review rather than relying on a standard pouch quote.
Turn the contents into finished size, usable space, and tolerances
Size problems usually come from vague measurement language. A 10 x 15 cm pouch or a 5 x 7 inch pouch sounds clear, but it is only a nominal flat size. The usable space is smaller because of side seams, bottom seam allowance, fabric thickness, the drawcord channel, and the way the top gathers when closed. A pouch can pass a flat measurement check and still frustrate the packing team if the opening is narrow or the channel sits too low.
Measure the actual items before asking for price. A sealed sample bag may be thick at the seal or valve area. A brew card may need extra opening width so staff can insert it quickly without bent corners. A scoop, cupping spoon, filter pack, gift card, or retail accessory changes the pouch's height and thickness requirements. If the filled pouch must fit inside a subscription box, rigid gift carton, or shipping mailer, test the filled dimensions, not only the empty pouch.
Write the measurement method into the purchase specification. State whether height is measured to the top edge or only to the lower stitch line of the drawcord channel. State whether width is measured seam-to-seam on the finished flat pouch. For many small sewn cotton pouches, ±3-5 mm is a realistic finished-size tolerance; larger pouches may need ±5-8 mm unless the supplier confirms tighter control. If the pouch must fit a fixed insert or box cavity, confirm that tolerance before the PO is issued.
- Specify finished flat width and height, not only a catalog or marketing size.
- Specify usable internal height below the drawcord channel and usable opening width.
- Define channel height and minimum clearance between logo and drawcord channel.
- Confirm bottom style: flat sewn bottom, gusset, boxed bottom, or no gusset.
- Test with the actual coffee bag, insert card, scoop, filter pack, or accessory bundle.
- Keep one approved filled sample as the capacity reference for production and reorders.
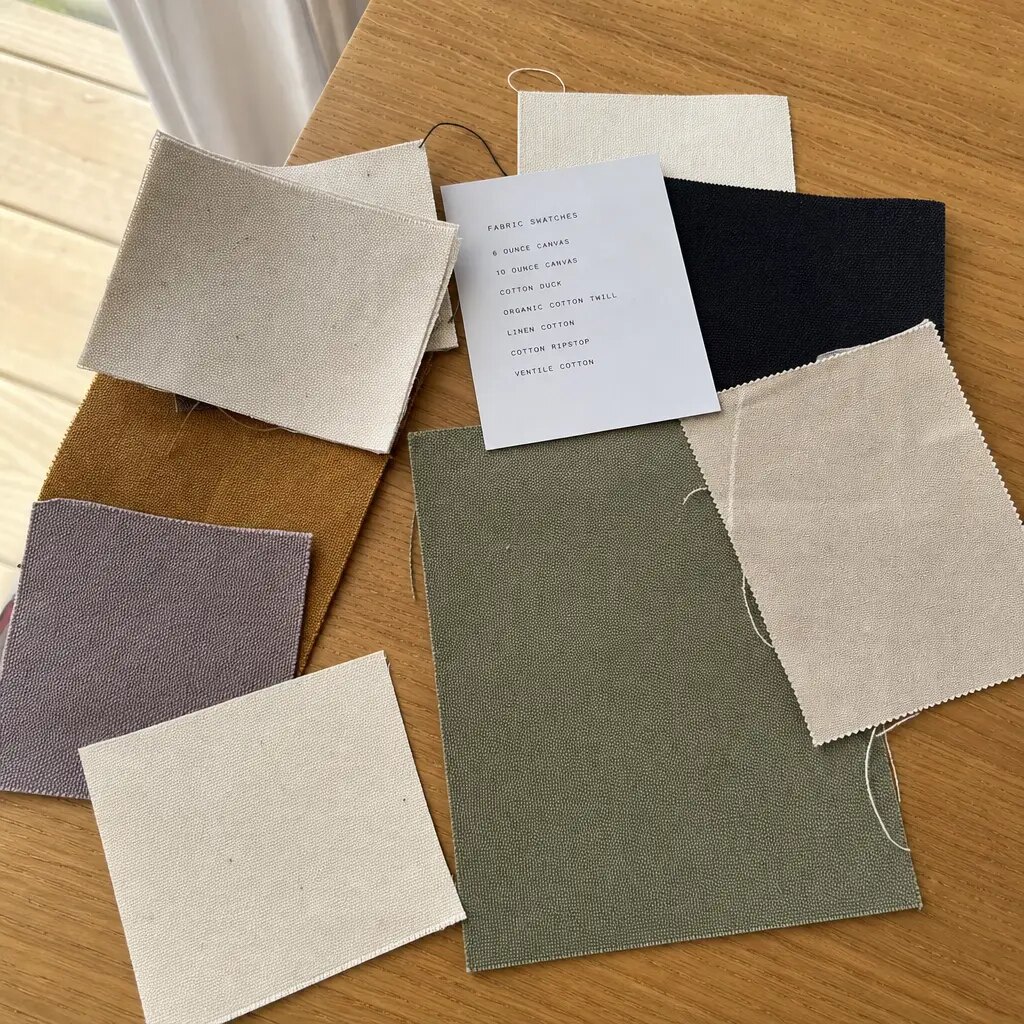
Select cotton fabric by GSM, finish, and agreed visual standard
For most coffee roaster secondary-packaging programs, 140-180 GSM cotton is a practical range. Around 140-160 GSM can work for lightweight sample pouches, event giveaways, and promotional inserts where the contents are light and the budget matters. Around 160-180 GSM usually gives stronger opacity, a more substantial hand feel, and a better customer-facing presentation for gift sets or reusable pouches. Heavier cloth can look premium, but it may make small pouches stiff and can increase carton weight and freight cost.
GSM is important, but it does not tell the whole fabric story. Two 160 GSM fabrics can differ in weave tightness, yarn quality, opacity, surface lint, and softness. Natural cotton often has slubs, seed flecks, and shade variation. Some coffee brands want that craft texture; others need a cleaner logo panel. Decide in advance what is acceptable, especially on the display side. A natural fleck approved in the swatch should not become a dispute later, while oil marks, mold, water stains, rust marks, holes, or strong odor should remain rejectable defects.
Finish affects both look and repeatability. Bleached cotton gives a cleaner print base but may show dirt more easily and still needs shade approval. Dyed cotton supports brand colors, yet dye lots can shift, so buyers should request a shade target and appropriate color fastness expectations. Washed or pre-shrunk cotton can improve softness and dimensional stability, but it can add cost and lead time. Keep the approved swatch with GSM, finish, color note, and item code so reorders are not treated as new interpretations.
- 140-160 GSM: efficient for lightweight coffee samples, event giveaways, and low-bulk inserts.
- 160-180 GSM: stronger hand feel and opacity for retail gifts, subscription kits, and reusable pouches.
- Natural cotton: define acceptable slubs, seed flecks, lint, and shade variation with a physical swatch.
- Bleached cotton: useful for cleaner graphics, but check shade, stains, and print contrast.
- Dyed cotton: request shade target, lot consistency, and color fastness expectations.
- Washed or pre-shrunk cotton: useful for softness and stability, but confirm cost, shrinkage range, and lead time.
Treat the drawcord as a working component, not a decoration
The drawcord system is often where a pouch feels either dependable or cheap. A cord can look acceptable in a quotation photo and still snag inside the channel, fray at the exits, pull out during kit assembly, or close unevenly. For a roaster using the pouch as part of a gift or reusable customer item, the cord is part of the brand experience. It deserves a written specification.
Cotton cord fits natural cotton branding and gives a soft, cohesive appearance. Depending on the yarn and end treatment, it may fray. Polyester cord often glides more smoothly and can resist fraying, though it may look less natural. For small pouches, a cord diameter of about 3-5 mm is common, but the right choice depends on the pouch scale and channel width. Too thin, and the cord feels weak or cuts into the channel. Too thick, and it can jam, distort the top edge, or create bulky packing.
Decide between single-draw and double-draw construction. Single-draw is simpler and can be more cost efficient. Double-draw usually feels more balanced and retail-ready because the pouch closes from both sides. During sample approval, do more than look at the front. Open and close the pouch repeatedly. Check whether the cord slides cleanly, whether the exits fray, whether knots stay secure, and whether the finished cord length is still practical after knotting.
- State cord material, diameter, color, length, and end treatment in the purchase specification.
- Define single-draw or double-draw closure; do not leave it to supplier assumption.
- Check channel width so the cord glides smoothly without excessive looseness.
- Specify knot style or end finish: raw, knotted, heat sealed, taped, capped, or other approved method.
- Inspect cord exits for tearing, fraying, weak stitching, and uneven closure.
- For reusable pouches, test repeated open-close cycles on the pre-production sample.
Lock down sewing construction before bulk production
Cotton drawstring pouches are simple products, but poor sewing makes them look careless quickly. Buyers should define the side seam, bottom seam, top channel fold, thread color, reinforcement points, and inside finishing. If a woven or printed side label is added, its location and stitch appearance should also be part of the approval record. A pouch with a good logo can still fail brand expectations if the seams are crooked, thread tails are messy, or the bottom corners pucker.
Ask the supplier for its normal stitch density, or provide a target range if your quality team uses one. In many soft-goods inspections, the practical focus is seam consistency, security, and the absence of skipped stitches rather than a universal stitch count. The seam should hold when the pouch is filled with the approved contents and handled normally. The top channel should be folded evenly so the pouch closes without twisting.
Pay attention to stress points. The cord exit area is pulled every time the pouch is opened. The bottom corners carry the weight of the sample bag or accessory bundle. If the pouch holds a scoop, spoon, or other item with edges, weak stitching is more likely to show. During inspection, a moderate manual pull at the side seam, bottom seam, and channel points can catch skipped stitches, weak backtacking, and open seams before shipment.
- Approve close-up photos of side seam, bottom seam, top channel, cord exits, and inside finish.
- State thread color and whether contrast stitching is intentional or unacceptable.
- Reject open seams, skipped stitches, unraveling thread, severe puckering, and needle holes in the logo area.
- Check bottom corners for weak stitching when the pouch is filled with actual contents.
- Define acceptable trimming standard for thread tails; loose thread bundles should not ship.
- If adding a sewn label, specify label material, position, stitch color, and placement tolerance.
Choose the logo method around cotton texture and artwork detail
Logo application is one of the main reasons quotes vary. Screen printing is usually the practical starting point for coffee roasters using one-to-three-color logos, simple icons, origin names, or seasonal marks. It can be economical at volume and repeatable when artwork, ink, fabric, and placement are controlled. The limitation is the cotton surface itself. Textured and absorbent fabric can soften edges, fill in fine lines, and reduce legibility on tiny text, halftones, QR codes, or distressed artwork.
Heat transfer can work for short runs, detailed art, or many colors, but it changes the fabric hand because the graphic sits more on the surface. Inspect the edges, stiffness, opacity, and cracking or peeling risk before approval. Embroidery can look premium for a small mark, but dense stitching may pucker 140-160 GSM fabric and can leave a rougher inside feel. If embroidery is selected, approve the stitch density, backing, thread color, and finished look on the actual pouch fabric.
Control logo placement with measurements, not with the word "centered" alone. Specify print width and height, centerline, distance from bottom seam, distance from side seams, and minimum distance below the drawcord channel. A tolerance such as centerline ±3 mm and vertical position ±5 mm may be practical for many pouch sizes, but it should be agreed with the factory. If the pouch will be photographed in a gift kit or presented to wholesale buyers, print drift becomes a brand issue, not a minor detail.
- Use screen print for simple solid-color logos and repeat programs with stable artwork.
- Use heat transfer only after confirming hand feel, edge appearance, opacity, and rub resistance.
- Use embroidery after testing puckering, backing, stitch density, and inside finish on the chosen GSM.
- Avoid QR codes, tiny text, and complex gradients unless the factory proves legibility on a production sample.
- Specify logo position by measurement from seams, bottom edge, and drawcord channel.
- Confirm setup fees, screens, films, transfer setup, digitizing, Pantone matching, and artwork revisions in the quote.
Build an RFQ sheet that makes supplier quotes comparable
A controlled RFQ sheet saves time and prevents false savings. If three suppliers quote "cotton drawstring pouch with logo," they may be pricing three different products: 120 GSM versus 180 GSM cotton, cotton cord versus polyester cord, screen print versus transfer, bulk packing versus inner poly bags, and different carton quantities. The lowest unit price may simply reflect the thinnest, least complete specification.
Include the item code, intended use, contents, finished size, usable size, fabric GSM and finish, fabric color, cord specification, closure type, seam construction, logo method, print size, print position, number of colors, artwork file, sample requirement, packing method, carton data, inspection expectation, and delivery terms. Ask suppliers to quote the same Incoterms and currency when possible. For landed cost, carton dimensions, gross weight, and CBM can matter as much as the unit price.
Ask which operations are handled in-house and which are outsourced. A factory may cut and sew internally but outsource dyeing, washing, printing, embroidery, or packing. Outsourcing is not automatically a problem, but it changes lead time and QC responsibility. The supplier on the purchase order should remain accountable for final quality, including print opacity, dye-lot consistency, trimming, counting, and packing.
- Compare the same GSM, fabric finish, pouch size, cord, print method, logo size, and packing format.
- Request MOQ by size, fabric color, cord color, artwork version, print method, and packing style.
- Ask for setup charges separately from unit price so reorders can be compared accurately.
- Request carton dimensions, pieces per carton, net weight, gross weight, and estimated CBM.
- Clarify in-house versus outsourced processes and who is responsible for final QC.
- Do not treat a quote as comparable until construction, packing, and setup details are complete.
Approve samples with records, not memory or photos alone
Photos help with layout, but they cannot confirm cotton thickness, hand feel, odor, cord glide, seam security, or print texture. For a first order, request a physical pre-production sample made with the intended bulk fabric, actual cord, actual sewing construction, and actual logo method. If timing forces photo approval for an early step, still keep a physical approved sample before mass production whenever order value and schedule allow.
Create a golden sample file. It should contain the approved pouch, fabric swatch, artwork file, print color reference, measurement sheet, cord specification, packing photo, carton mark reference, and buyer-approved defect notes. Keep one set with the buyer and one with the supplier. This record is valuable for seasonal reorders, single-origin launches, subscription tiers, and wholesale programs where small shade or placement changes can make a batch look inconsistent.
When an order includes multiple sizes, fabric colors, cord colors, or artwork versions, approve each combination separately unless the shared elements are clearly defined. A supplier may sew the pouch correctly but apply the wrong artwork size or mix seasonal versions in cartons. Use item codes that match the PO, carton labels, and packing list. One item code should not describe two different fabric weights, colors, or print placements.
- Measure sample width, height, opening width, channel height, usable height, and logo position.
- Fill the sample with real contents and confirm closure, appearance, and box fit if applicable.
- Open and close the pouch repeatedly to check cord glide and channel construction.
- Lightly rub the print to check obvious smearing, cracking, peeling, or color transfer risk.
- Record the approved packing format, inner quantity, carton quantity, and carton mark layout.
- Assign item codes for every size, fabric color, cord color, and artwork version.
Use a defect-classified quality inspection checklist
A strong inspection checklist separates fabric defects, functional defects, measurement defects, print defects, sewing defects, and packing defects. This makes the final decision less subjective. A small trimmable thread on the back is not the same as an open side seam. A natural cotton fleck that appears in the approved swatch is not the same as an oil stain across the logo. The inspection standard should match the pouch's use and the brand risk for the roaster.
For larger or launch-critical orders, buyers may use a recognized sampling approach such as ANSI/ASQ Z1.4 or ISO 2859-1. Agreed AQL levels such as critical 0, major 2.5, and minor 4.0 are common starting points in many consumer-goods inspections, but the right plan depends on order value, buyer policy, customer requirements, and product risk. The key is to define the plan before inspection begins.
Critical defects may include mold, strong chemical odor, sharp foreign objects, contamination, or any condition that makes the pouch unsafe or unsuitable to ship. Major defects usually include wrong size beyond tolerance, wrong artwork, severe logo misalignment, open seams, broken cords, blocked channels, obvious stains, print smearing, and incorrect packing count. Minor defects may include small thread tails, slight shade variation within the approved range, or cosmetic issues away from the display area that do not affect function.
- Measure samples from multiple cartons rather than only the top bundle of one carton.
- Inspect under normal lighting and check the logo area first for stains, lint, holes, and print defects.
- Pull seams moderately at side, bottom, and channel stress points to identify weak construction.
- Open and close the drawcord several times to find blocked channels, cord pull-out, or uneven closure.
- Verify artwork version, item code, size, color, count, and carton marks against the PO.
- Pre-classify defects as critical, major, or minor so the factory and inspector use the same standard.
Control packing, labeling, and warehouse handling cost
Packing is not an afterthought. Cotton pouches can collect dust, lint, and carton rub marks if they are packed loose without inner protection. They can also become mixed by size, color, or artwork if inner bundles are not labeled. For a coffee roaster assembling kits, disorganized packing creates receiving delays and extra labor even when the pouches themselves pass inspection.
Choose the packing method around the downstream workflow. Bulk packing may be suitable if a co-packer will immediately fill the pouches. Counted bundles in inner poly bags or paper bands can improve receiving accuracy and keep pouches cleaner. Individual retail bags, hangtags, barcodes, or insert cards may be needed for store-ready merchandise, but they add labor, material, carton volume, and cost. Decide this before comparing quotes so every supplier prices the same work.
Carton data belongs in the RFQ and the PO. Ask for pieces per carton, carton dimensions, net weight, gross weight, and estimated CBM. A lower unit price may lose its advantage if cartons are oversized or underfilled. Carton marks should show item code, size, fabric color, artwork version, quantity, carton number, PO number, and destination if needed. Avoid mixed cartons unless your receiving team wants them and the labels are unmistakable.
- Specify whether pouches are folded, stacked, banded, bulk packed, or packed in counted inner bags.
- Use inner labels when multiple sizes, colors, or artwork versions are ordered together.
- Add barcodes, hangtags, or retail poly bags only when the selling or warehouse workflow requires them.
- Request carton dimensions, gross weight, net weight, and CBM before confirming freight estimates.
- Avoid unmarked mixed cartons; they create receiving errors and assembly delays.
- Inspect carton condition, count accuracy, moisture damage, crushed edges, and marks before shipment release.
Specification comparison for buyers
| Spec decision | B2B buying recommendation | Typical measurable target | Buyer risk to check |
|---|---|---|---|
| Primary pouch use | Define one main use: coffee sample kit, retail gift pouch, subscription insert, event giveaway, or wholesale presentation | Write the use case, contents, expected reuse, and packing workflow in the RFQ | If the use case is vague, suppliers may quote different GSM, cord, print, and packing levels that cannot be compared |
| Fabric weight | Use 140-180 GSM cotton for most secondary-packaging coffee programs; go heavier only for structured premium gifts | Request declared GSM with an acceptable production tolerance, such as ±5% or the supplier's standard confirmed in writing | Too light may be transparent and weak; too heavy may make small pouches stiff and increase freight weight |
| Fabric finish | State natural, bleached, dyed, washed, or pre-shrunk cotton; approve a physical swatch | For natural cotton, define acceptable slubs, seed flecks, and shade variation; for dyed cloth, request color fastness and a shade target | Natural cotton variation may be mistaken for defects unless agreed; dyed lots may shift between reorders |
| Pouch dimensions | Specify finished flat width and height, usable internal height, opening width, channel height, and bottom style | Typical sewn-goods tolerance may be ±3-5 mm for small pouches or ±5-8 mm for larger pouches unless tighter capability is confirmed | A pouch can meet flat size but fail capacity because the drawcord channel and seams reduce usable space |
| Drawcord type | Specify cotton cord for a natural look or polyester cord for smoother glide; include diameter and length | Common small-pouch cord diameter is about 3-5 mm; cord length should be checked on the approved sample | Thin cord may cut into the channel or feel cheap; bulky cord may jam and distort the top opening |
| Closure construction | Choose single-draw for cost efficiency or double-draw for a more balanced retail feel | Check channel width, cord exit symmetry, and cord pull-out resistance during sample approval | Weak channel stitching, blocked channels, or frayed exits create functional complaints even when fabric looks acceptable |
| Logo method | Screen print simple one-to-three-color artwork; test heat transfer or embroidery before approval | Set print size, artwork file, Pantone or visual target, placement tolerance, and rub-test expectation | Fine text, QR codes, gradients, or dense embroidery can fail on textured cotton without a production test |
| Logo placement | Define position by measurement, not by 'centered' only | Example: centerline ±3 mm; distance from bottom seam ±5 mm; minimum 15-20 mm below drawcord channel if design allows | A technically good print may look off-brand if too close to seams, channel folds, or cord exits |
| Inspection standard | Separate critical, major, and minor defects before production | For larger orders, consider ANSI/ASQ Z1.4 or ISO 2859-1 sampling with agreed AQL levels such as critical 0, major 2.5, minor 4.0 when appropriate | Without defect classification, factories and inspectors may disagree over stains, loose threads, print drift, or natural cotton flecks |
Buyer checklist before sampling
- Write the pouch job in one sentence: exact contents, recipient, reuse expectation, and whether the pouch is secondary packaging only.
- Confirm target contents by physical measurement: coffee sample bag size, brew card, scoop, filter papers, cupping spoon, gift card, insert, or bundled kit.
- Specify finished flat width and height, usable internal height below the drawcord channel, opening width, channel height, bottom style, and measurement method.
- Set realistic size tolerance in writing, such as ±3-5 mm for small sewn pouches unless the supplier confirms tighter production capability.
- Specify fabric composition, weave, GSM, GSM tolerance, color, finish, and whether natural slubs, seed flecks, and shade variation are acceptable.
- Request a physical swatch or pre-production sample; do not approve cotton shade, opacity, hand feel, or print texture from digital photos alone.
- Define drawcord material, diameter, color, length, end treatment, knot style, single-draw or double-draw closure, and cord pull-out expectation.
- Specify side seam, bottom seam, top channel fold, stitch density target or supplier standard, reinforcement points, thread color, and inside finishing.
- State logo method, number of colors, Pantone or reference color, artwork file format, print size, placement measurements, and placement tolerance.
- Flag fine text, QR codes, halftones, gradients, thin lines, distressed artwork, or embroidery stitch density for production testing before approval.
Factory quote questions to send
- What exact cotton specification is quoted: composition, weave, GSM, color, finish, and expected GSM tolerance in bulk production?
- Is the fabric natural, bleached, dyed, washed, or pre-shrunk, and what shade tolerance, shrinkage range, or lot-to-lot variation should we expect?
- What are the finished flat dimensions, usable internal dimensions below the drawcord channel, opening width, channel height, and bottom construction?
- What dimensional tolerance do you normally hold after cutting, sewing, and pressing, and can you confirm tighter tolerance if the pouch must fit a fixed box insert?
- What drawcord is included: material, diameter, color, length, end finish, knot method, and single-draw or double-draw construction?
- How is the top channel made, how are cord exit points finished, and what reinforcement is used to prevent cord pull-out or seam opening?
- Which logo method is included in the quote, how many colors are included, what is the maximum safe print area, and what artwork details may need adjustment?
- Are screen charges, films, transfer setup, embroidery digitizing, Pantone matching, swatches, pre-production samples, or artwork revisions included or billed separately?
- Can you make a pre-production sample using the actual bulk fabric, actual cord, actual sewing construction, and actual print method before mass production?
- Which processes are in-house and which are outsourced, including dyeing, washing, printing, embroidery, cutting, sewing, trimming, inspection, and packing?
Quality-control points to confirm
- Fabric GSM is checked against the approved specification or agreed tolerance, with no noticeably thin lots mixed into the shipment.
- Fabric color, shade, and surface character match the approved swatch; natural slubs or seed flecks are accepted only within the buyer-approved range.
- Fabric is free from mold, strong odor, oil marks, rust marks, water stains, holes, tears, heavy lint contamination, or foreign material.
- Finished flat width, height, opening width, channel height, and usable internal height are measured across the sampled lot and remain within agreed tolerance.
- Pouch capacity is verified by filling with the approved coffee sample bag, card, scoop, or kit contents without seam strain or blocked closure.
- Side seams and bottom seams are secure, with no open seams, skipped stitches, unraveling thread, severe puckering, or needle damage in the display area.
- Top channel is evenly folded and stitched, with no blocked sections that stop the cord from sliding smoothly.
- Drawcord material, diameter, color, length, knot, and end treatment match the approved sample, and cords do not pull out during normal open-close testing.
- Cord exits are clean, symmetrical enough for even closure, and free from fraying, sharp edges, torn fabric, or weak stitching.
- Logo artwork version, print method, print color, opacity, edge sharpness, and print size match the approved pre-production sample.