Treat proofing as a buying control
A printed pouch proof should be more than a design preview. For event procurement, it is the point where the buyer turns a brand idea into production instructions the factory can repeat: finished pouch size, cotton weight, cord construction, print method, placement, color target, packing, and inspection standard.
A custom cotton drawstring pouches print proofing checklist for event planners needs to catch ordinary failure points before they become bulk defects. The logo may sit too close to the drawstring channel. The supplier may quote cut size while the buyer expects finished sewn size. A natural cotton shade may look warmer in bulk than in a digital mockup. Cartons may arrive mixed by sponsor version when the kitting team expected separated packs.
The approval file should be written, dated, and attached to the purchase order or production release. Marketing can approve brand appearance, event operations can approve kitting needs, and procurement can lock the cost and lead-time drivers. If the finished order has a shifted logo, weak cord, wrong pack count, or lighter fabric, the review should point back to an agreed standard.
- Use the proof as the production agreement for fabric, size, print, cord, and packing.
- Keep procurement, marketing, event operations, and the supplier working from one approval file.
- Freeze artwork, pouch specification, carton rules, and delivery date before bulk production starts.
- Retain the signed digital proof and, for higher-risk orders, a physical approval sample.
Start with pouch construction
Artwork should not be approved before the pouch itself is defined. Cotton drawstring pouches vary by finished dimensions, fabric composition, weave, GSM, shade, sewing allowance, cord type, and top-channel construction. A logo that looks balanced on a flat template can crowd the seam or drawstring channel once the pouch is sewn.
Finished size is the first procurement detail to settle. Ask whether quoted width and height are finished measurements after sewing or cut dimensions before sewing. Also measure opening width, because a pouch can meet height and width requirements while still being slow to load at an event packing table.
GSM should follow the contents and presentation goal. A 100 to 120 GSM natural cotton pouch can work for cards, badges, and light samples. A 120 to 140 GSM pouch is often a balanced B2B event kit spec. A 140 to 170 GSM pouch may suit heavier or premium inserts, but it can change carton weight, freight cost, and drawstring performance.
- Specify finished width, finished height, opening width, fabric composition, GSM range, and cord type.
- Test the pouch with actual event contents before approving final dimensions.
- Record whether sample and bulk will use the same fabric construction, shade range, and cord.
- Include top hem construction, side seam standard, knot style, and any reinforcement in the quote request.
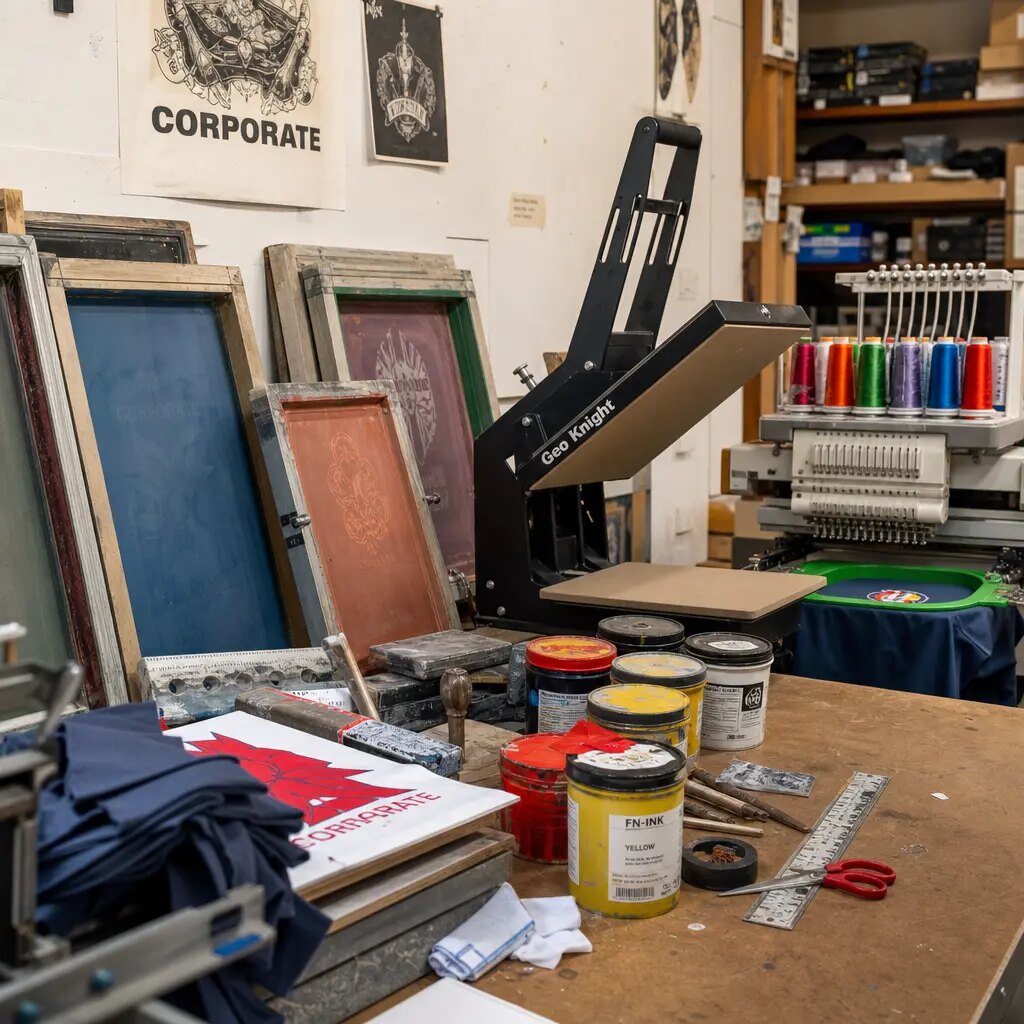
Match print method to artwork risk
Screen print is a strong default for cotton drawstring pouches with flat one-color or two-color logos. It gives clean coverage, especially for stable quantities and repeat programs. Before approval, ask about ink type, minimum line weight, small text limits, white underbase requirements, and registration tolerance for the selected fabric.
Multi-color screen print works best when the artwork uses solid spot colors with enough space between elements. Risk rises when sponsor logos are crowded, legal text is small, or several colors must align tightly. Each added color can add setup cost and another point of registration variation.
Digital transfer can be useful for gradients, photographs, low MOQs, or multiple event-name versions. The tradeoff is surface feel and edge behavior. Direct-to-fabric digital print may feel softer, but color strength on natural cotton can be more muted than a brand team expects. Woven labels are useful when fine detail or a premium side mark matters more than a large printed panel.
- Use screen print for flat logos, spot colors, repeat artwork, and stable order quantities.
- Use digital transfer for gradients, many colors, short runs, or variable event versions.
- Use direct-to-fabric digital print when softer hand feel is important and muted cotton color is acceptable.
- Use woven labels when fine detail, durability of a small mark, or premium presentation is the priority.
Build a manufacturable proof packet
A useful proof packet removes guesswork. Include vector artwork, color references, print size, measured placement, finished pouch dimensions, target GSM, cord details, packing rules, delivery deadline, destination, and inspection expectations. A screenshot or slide deck is not enough for a factory to manufacture from consistently.
Use production-ready files such as AI, EPS, PDF, or SVG. Outline fonts when font files are not supplied. If there are multiple sponsor, VIP, staff, or regional versions, name each file clearly and include a quantity list. File naming helps the supplier separate screens, transfers, labels, cartons, and packing lists.
Placement should be measured rather than implied by a mockup. State print width and height. Mark distance from the drawstring channel or top edge and from both side seams. Clarify whether the logo should be mathematically centered between seams or visually centered on the front panel, because soft sewn goods do not always hang perfectly square.
- Send vector artwork with outlined text and separated color information.
- Provide a measured placement sheet with logo size and distances from top, channel, and side seams.
- Include pouch size, GSM, cord, packing, destination, and deadline in the same brief.
- State the required proof type before the supplier quotes sampling time.
Set realistic tolerances
Quality expectations should be written before production starts. Without tolerances, a supplier may treat a few millimeters of movement as normal while the event team sees the same shift as a brand issue. The purchase order should define acceptable variation for finished size, print placement, print skew, color, stitching, cord function, carton count, and SKU separation.
Some suppliers may quote finished size tolerances around plus or minus 5 mm for standard sewn cotton pouches, but this is not universal. Very small pouches, tight insert fit, or premium programs may require a different standard. Print placement tolerances around plus or minus 3 to 5 mm can be practical on many pouch styles, but the buyer should use the supplier's stated capability, the decoration method, and the approved sample as the basis for approval.
Color tolerance also needs a physical reference. Pantone numbers help, but cotton is not coated paper. Natural cotton can make ink look warmer or less saturated. Dyed cotton introduces fabric shade variation. If color is important, approve a strike-off or full sample on production-intent fabric and define whether the target is exact or commercially acceptable on cotton.
- Write tolerances for finished size, placement, skew, color, stitching, cord movement, and carton count.
- Frame size and placement tolerances as supplier-dependent and tied to the approved sample.
- Use a physical swatch, Pantone guide, or approved previous item for color review where possible.
- Define critical, major, and minor defects before inspection begins.
Review samples in a fixed sequence
Sample review should be systematic. Start with measurements: finished width, finished height, opening width, print width, print height, cord length, and any inner-pack details. Measure the pouch relaxed and flat without stretching. If a deviation is accepted, record it so bulk inspection uses the same standard.
Next, inspect placement and alignment. Measure from the top edge or drawstring channel to the print. Compare left and right spacing from the side seams. Check whether the logo baseline runs parallel to the top edge and bottom seam. A logo can be centered by measurement and still look off if the fabric tapers or the seam pulls.
Then review the decoration and function. Look for ink pinholes, feathering, filled-in letters, broken lines, poor registration, visible transfer edges, cracking, peeling, uneven opacity, or color shift. Rub the print lightly, flex the fabric, open and close the pouch several times, and load the real event contents to test fit and presentation.
- Measure before judging appearance.
- Check top distance, side distance, centerline, print skew, and logo readability.
- Rub and flex the print to catch obvious cracking, bleed, peeling, or edge lift.
- Pack the intended contents to verify fit, closure, and logo behavior.
Quote by cost driver
A low unit price only helps when suppliers are quoting the same product. Cotton pouch pricing is shaped by finished size, GSM, fabric shade, cord type, sewing complexity, print method, color count, artwork versions, label requirements, packing, inspection, and freight terms. Ask for separated quote lines so revisions are easy to price.
MOQ should be broken down. One supplier may have one MOQ for stock natural cotton pouches, another for custom sewing, another for dyed cotton, another for screen printing, and another for woven labels. A quote that says MOQ 500 may not cover four sponsor versions with separate labels and carton sorting.
Freight terms belong in the first quote review. EXW, FOB, CIF, DAP, and DDP shift responsibility for export handling, main freight, insurance, duties, destination charges, and final delivery. For fixed event dates, landed cost and delivery reliability matter more than factory-door price.
- Request separate lines for blank pouch, setup, print, label, sample, packing, inspection, and freight.
- Clarify MOQ by size, color, print colors, artwork versions, labels, and packing method.
- Ask for quantity tiers and repeat-run pricing using the approved specification.
- Compare landed cost under the quoted Incoterm, not only unit cost.
Write inspection into the PO
Inspection does not need to be complicated, but it must be specific. For larger orders, buyers may use an AQL inspection plan with defined sampling and defect categories. If no third-party inspection is planned, the PO should still state factory photo requirements, measurement samples, and unacceptable defects.
Define defect severity in plain language. Critical defects can include wrong artwork, unusable size, sharp contamination, severe odor, moisture damage, or mold. Major defects can include unreadable logos, severe skew, open seams, broken cords, wrong carton mix, or print peeling. Minor defects may include small thread tails, slight slubs, or shade differences within the agreed tolerance.
First-piece approval is useful for printed pouches. Before bulk production continues, the supplier should provide photos or a sample of the first printed and sewn unit for each size, fabric color, artwork version, and decoration method. One approved pouch does not validate all sponsor versions.
- Define critical, major, and minor defects in the purchase order.
- Require first-piece approval by size, color, artwork version, and decoration method.
- Inspect measurements, print, seams, cord function, carton count, and SKU separation.
- Keep inspection photos and measurement records with the reorder file.
Pack for receiving and kitting
Packing affects how quickly the event team can count, sort, kit, and distribute the pouches. If 5,000 pieces arrive loose in mixed cartons when the kitting team needs bundles of 50 by sponsor version, the product may be technically correct but operationally difficult.
Direct-to-venue deliveries need clear carton labels with PO number, event name, SKU, artwork version, quantity, carton sequence, and gross weight. Warehouse deliveries may require barcodes, pallet marks, routing labels, or ASN details. Kitting operations may need inner packs of 25, 50, or 100 units.
Printed pouches can rub during transit, especially with heavy ink coverage or transfer decoration. Ask about fold direction, inner-bag quantities, carton compression, and whether interleaving is needed. Avoid individual plastic unless it reduces a defined risk such as moisture, scuffing, inventory control, or prepacked kit assembly.
- Match inner pack counts to kitting and distribution needs.
- Require carton marks with PO, SKU, artwork version, quantity, carton number, and destination.
- Separate sponsor, VIP, staff, and general attendee versions by carton where possible.
- Use protective packing only when it solves a specific handling or transit risk.
Protect the event timeline
Build the sourcing calendar backward from the required in-hand date. Include artwork preparation, supplier review, proof creation, sample transit, internal approval, revision time, bulk production, inspection, freight, customs when relevant, receiving, and kitting. A pouch that arrives the day before an event is late if the team needs three days to assemble kits.
Allow at least one correction round when the order is brand-sensitive. A proof may reveal that the logo needs to move lower, the ink is not opaque enough, the opening is tight around the contents, or the carton count does not match the kitting plan. Emergency orders should reduce complexity: stock natural cotton, standard size, one-color print or a suitable digital method, fewer artwork versions, and simple packing.
Set a no-change date for artwork, sponsor additions, quantity, packing, destination, and shipping method. Late changes may still be necessary, but they should be treated as procurement decisions because each can affect cost, proofing, and dispatch.
- Work backward from the in-hand date, including receiving and kitting time.
- Reserve one proof round and one correction round for brand-sensitive programs.
- Set a no-change date for artwork, quantity, packing, destination, and shipping method.
- Use one written standard across suppliers for multi-region event programs.
Specification comparison for buyers
| Pouch and print spec | Best fit | Proofing focus | Procurement risk to control |
|---|---|---|---|
| Natural cotton, 100-120 GSM, one-color screen print | Light event giveaways, badges, cards, simple sponsor items | Finished size, print opacity, logo spacing from drawstring channel | Thin fabric may show contents or feel too light for premium kits |
| Natural cotton, 120-140 GSM, one- or two-color screen print | Welcome kits, conference pouches, product launch packs | Fabric hand feel, print registration, shade match to sample | Bulk fabric construction may differ if the sample material is not specified |
| Natural cotton, 140-170 GSM, screen print or woven label | VIP packs, heavier inserts, retail-adjacent event merchandise | Cord strength, seam reinforcement, carton weight, closure action | Higher GSM can increase freight cost and may require a stronger top channel |
| Dyed cotton with light-color print | Brand color programs, staff kits, sponsor-specific versions | Fabric shade tolerance, white underbase, rub or crocking checks | Dye lots and light ink opacity can create visible variation |
| Multi-color screen print | Flat artwork with two to four solid spot colors | Registration, trapping, small text, setup cost by color | Late sponsor changes can require new separations and proofing |
| Digital transfer | Gradients, photographs, low MOQ trials, multiple event-name versions | Transfer edge visibility, cracking, rubbing, hand feel | Printed area may feel stiffer or show edges on soft cotton |
| Direct-to-fabric digital print | Artwork needing softer surface feel with moderate detail | Color strength on natural cotton, pretreatment, fine-edge sharpness | Colors may appear less saturated than screen or paper proofs |
| Front print plus woven side label | Premium recurring kits or brand systems with a secondary mark | Label placement, sewing durability, label MOQ, added lead time | Separate label sampling and sewing can affect schedule and cost |
Buyer checklist before sampling
- Define finished pouch width, finished height, opening width, fabric composition, target GSM range, and whether measurements are after sewing.
- List the actual event contents with item dimensions and weight, then test whether they fit without distorting the logo panel.
- Provide vector artwork with outlined text, Pantone or physical color references, final logo size, and a measured placement sheet.
- Name the decoration method: screen print, digital transfer, direct-to-fabric digital print, woven label, or combined process.
- State print side, position count, ink color count, underbase needs, sponsor version quantities, and whether artwork versions must ship separately.
- Select the proof level for the order risk: digital mockup, printed strike-off, full pre-production sample, or first-piece production approval.
- Approve production-intent fabric, cord, print method, and packing when the timeline allows a physical sample.
- Write supplier-specific tolerances for finished size, print placement, logo skew, color variation, seam defects, cord function, and carton count.
- Detail cord material, diameter, length, knot style, top hem construction, side seam standard, and any bottom reinforcement.
- Define acceptable natural cotton characteristics, including slubs, shade variation, loose thread limits, and required thread trimming.
Factory quote questions to send
- Is the quoted pouch size finished size after sewing or cut size before sewing?
- What fabric composition, weave, GSM range, and natural or dyed shade standard are included in the unit price?
- Will bulk production use the same fabric construction, cord, and shade range as the approved sample?
- What size, placement, and logo skew tolerances do you apply for this pouch style and decoration method?
- What cord material, cord diameter, cord length, knot style, and top channel construction are included?
- Where is decoration performed, and is it screen print, heat transfer, direct-to-fabric digital print, woven label, or another process?
- For screen print, what are the setup charges by color and position, and what minimum line weight works on this cotton fabric?
- For transfer or digital print, what checks are used for edge lift, cracking, rubbing, color bleed, opacity, and hand feel?
- What proof will be supplied before bulk production, and will it use production-intent fabric and cord?
- What is the MOQ by pouch size, fabric color, print color count, artwork version, woven label, and packing format?
Quality-control points to confirm
- Measure finished width, height, opening width, print dimensions, and cord length against the signed proof, not a catalog reference.
- Compare fabric hand feel, shade, weave, and GSM reference to the approved sample or agreed standard.
- Inspect logo centerline, top distance, side distance, baseline alignment, and visual balance on the sewn pouch.
- Check print skew against the pouch top edge, drawstring channel, and bottom seam rather than relying only on a quick visual review.
- Review small text, sponsor marks, registration, ink fill, negative space, and fine edges for readability on cotton.
- Compare color to the approved physical reference under consistent lighting, with supplier photos used only as supporting evidence.
- Rub and flex the printed area to look for cracking, peeling, feathering, ink bleed, weak opacity, or transfer edge lift.
- Inspect seam density, side seam alignment, top channel construction, bottom reinforcement, skipped stitches, thread tails, and open seams.
- Open and close the pouch several times to test cord movement, knot security, closure symmetry, and channel strength.
- Pack the intended event contents to verify fit, opening clearance, closing action, presentation, and logo distortion.