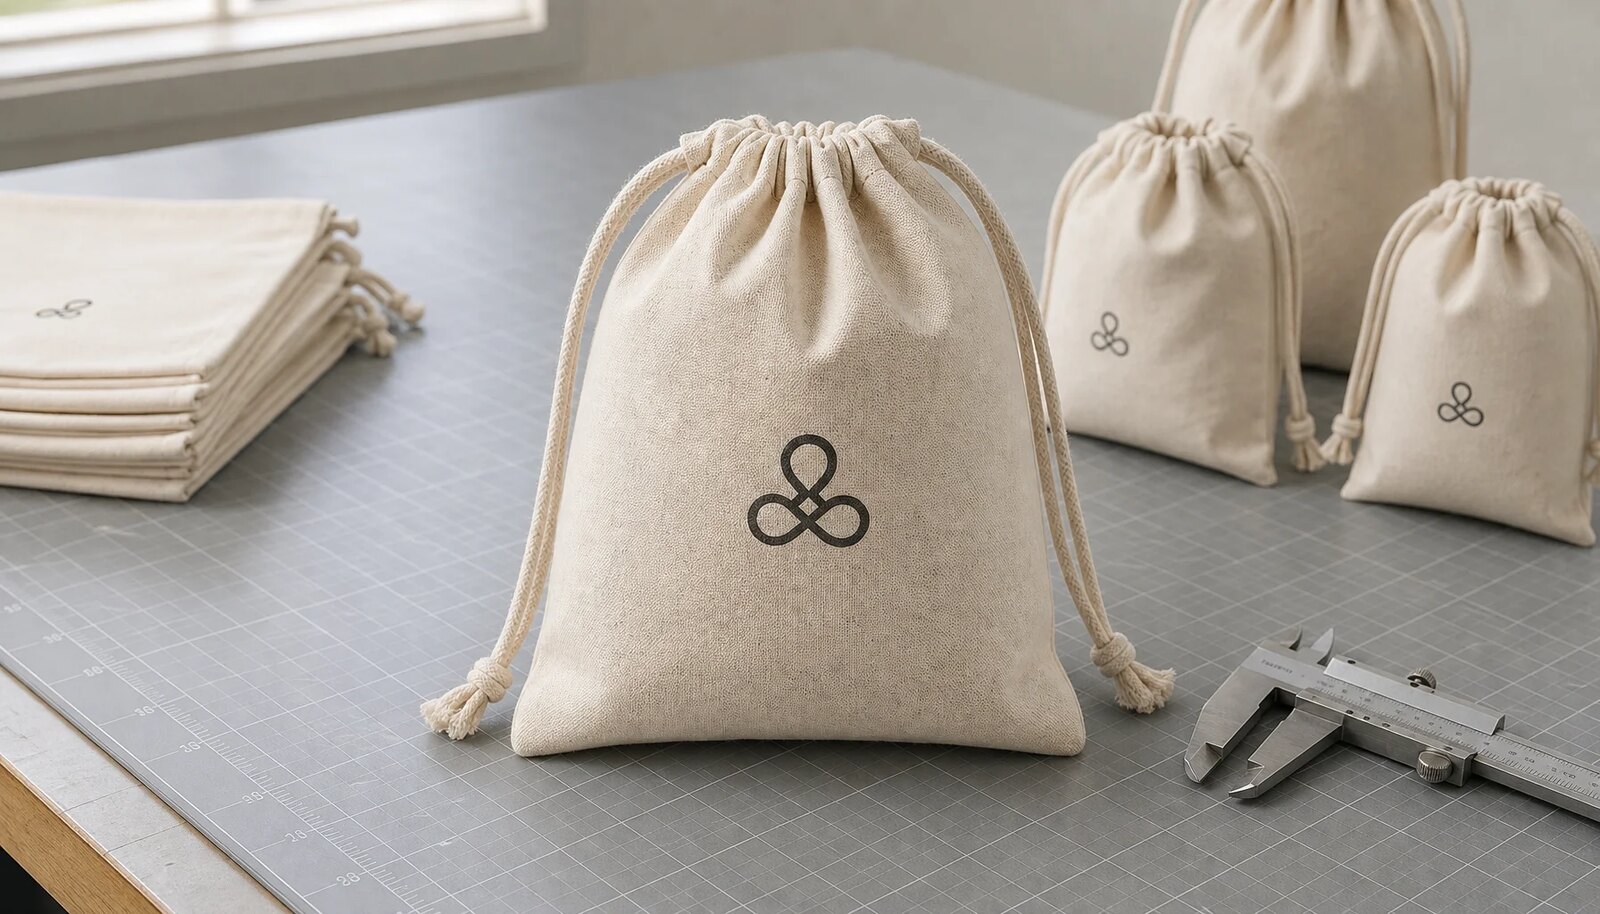
Start With The Finished Pouch, Not The Artwork
Print proofing for custom cotton drawstring pouches is a production control exercise first and a design exercise second. A logo can look sharp in a PDF and still fail when it lands on textured cotton, gets drawn through a cord channel, and is packed with a real production count. For farmers market vendors and the buyers who supply them, the pouch has a simple job, but that simplicity hides a lot of failure points. Fabric, stitching, cord tension, decoration, and carton packing all shape whether the order is usable.
That is why the first approval should be for the finished pouch, not the artwork alone. Buyers often start with a logo file and end with a product spec that is too vague to control. The result is predictable: the graphic is technically printed, but it sits too close to the seam, the bag measures smaller than expected, or the cord pulls unevenly once the pouch is filled. If the product is meant to support a brand at market checkout, those are not minor issues.
The practical move is to write down the build before the sample is signed off. Set finished dimensions, fabric weight, print location, cord style, packing count, and acceptance criteria in one place. Keep one retained sample on the buyer side and one on the factory side, and tie both to the same PO or batch number. That gives procurement a real reference if bulk output drifts later. It also reduces the chance that a future reorder is judged against memory instead of evidence.
- Approve the finished pouch, not only the art file.
- Treat sewing, cord tension, and print placement as one spec.
- Retain a reference sample on both sides before bulk starts.
Convert The Concept Into A Measurable Spec
A procurement-grade spec removes guesswork. State the finished width and height in millimeters, not as a size class or a loose description. If the quote is based on cut panel size rather than finished size after sewing, the buyer may compare prices that are not actually comparable. The same problem appears when one supplier measures before turning and another measures after finishing. A small bag can drift enough during sewing that the difference matters.
Fabric weight needs the same discipline. For natural cotton drawstring pouches, 6 to 8 oz, about 200 to 270 gsm, usually suits lighter promotional use, seed packets, and giveaway programs. 10 to 12 oz, about 340 to 400 gsm, is better when the pouch needs a fuller hand, a more durable feel, or a retail-ready appearance. Ask whether the supplier is quoting the raw cloth weight or the weight of the finished pouch build. Those are not always the same number.
The spec should also describe the print-safe zone. Include seam allowance, cord diameter, cord length, and the minimum distance from the top seam and side seam. A useful starting point is to keep the logo at least 10 to 15 mm below the top seam and 8 to 10 mm away from each side seam unless the art is intentionally placed closer. That margin matters because seam shift, channel formation, and cloth movement can push the final print into a bad position.
Cotton also moves under heat, humidity, and handling, even if the pouch is never washed. That is why a written finished size tolerance matters. For most small and medium pouches, plus or minus 5 mm is a reasonable working target, with any wider tolerance stated in advance. Buyers who need a pouch to fit a display tray, box insert, or pack-out process should tighten the spec further. The point is to make the allowance explicit, not to assume the factory will guess it correctly.
- Use finished dimensions, not cut panel dimensions.
- Write fabric weight in both oz and gsm when possible.
- Set a print-safe zone before artwork approval.
Choose Fabric Weight And Construction For The Use Case
Fabric weight is not just a cost lever. It changes how the pouch hangs, how the print reads, and how premium the item feels in the hand. Lighter cotton can work for low-cost market giveaways, but the weave texture will show more clearly and solid ink areas may look less even. Heavier cloth gives the printer a steadier surface and usually improves the perceived value of the finished pouch. For a buyer, that means the right fabric is the one that supports the intended use, not simply the cheapest one.
The artwork matters here too. A pouch with bold lettering and simple shapes is far easier to print cleanly than one with tiny text or thin decorative marks. On textured cotton, strokes below about 0.75 mm should be treated as high risk unless the supplier has already proven that print method on the same fabric. Ask the factory for the minimum text size and minimum line thickness they are willing to stand behind. If they cannot answer directly, they have not really proofed the design.
Construction choices affect usability just as much as print quality. A single cord is often fine for a basic pouch, while a double cord can balance the opening and reduce uneven hang. Ask for cord diameter, usually around 3 to 5 mm for small to medium bags, and confirm how the cord ends are secured. Channel width, knot security, and stitch consistency all influence whether the pouch opens smoothly or bunches at the top after repeated use.
It is also worth asking whether the cotton is raw, bleached, or pre-washed. Those options change shade consistency, ink absorption, and dimensional stability. Pre-washed fabric can reduce later movement, but it usually carries a higher cost. Raw cotton can be perfectly acceptable when the artwork is simple and the buyer is comfortable with a little more variation. The better question is not which option sounds best in theory. It is which option supports the product, the print, and the budget at the same time.
- 6 to 8 oz cotton fits lighter promotional use.
- 10 to 12 oz cotton fits more durable or retail-oriented programs.
- Confirm cord diameter, cord security, and channel width before approval.
Pick The Decoration Method That Fits The Artwork
For most custom cotton drawstring pouches, 1 to 2 color screen print is the safest decoration route. It handles bold logos, simple copy, and clear edges better than methods that depend on very fine pressure control or highly detailed reproduction. On cotton, the print has to sit on a textured surface, not a smooth film. That makes repeatability more valuable than graphic complexity. A buyer buying at scale should care about consistency first.
The main limitation is artwork detail. Gradients, photographic images, tiny legal copy, and hairline fonts can look acceptable on a screen and then lose clarity on fabric. Procurement should ask for the logo at actual print size on the finished pouch dimensions, not just inside a generic mockup. If the design uses two colors, ask for the allowable registration tolerance between screens. About 1.5 mm is a practical working limit for many programs, but the supplier should confirm what their line can hold on the selected cloth.
Placement is part of the decoration method, not a separate afterthought. The proof should show the logo relative to the top edge and the side seam in millimeters, with a clear centerline if the mark must appear centered. If the pouch uses a woven label, side label, or sewn patch instead of direct print, ask for each as a separate quote line. Those changes affect labor, lead time, visual weight, and sometimes the total carton count because they can change how the bag packs.
When a supplier says a design is too detailed, that is not just a sales objection. It is usually useful production information. The buyer can simplify the artwork, enlarge the mark, or shift to another decoration route before screens are made. Changing the design early is cheap. Discovering the limit after bulk has started is not.
- Use screen print for bold, low-color artwork.
- Treat gradients and tiny text as high-risk on textured cotton.
- Specify logo size and position in millimeters, not just in a mockup.
Write The Proofing Rules Before The First Sample
A digital proof is only the starting point. The real control comes from a written proofing rule set that tells the factory what the buyer is checking and what the buyer will reject. That should include print size, placement, color target, finished dimensions, and the visual boundaries of an acceptable result. If the sample is approved because it looks nice in a photo, the buyer has very little leverage when the bulk lot shifts a few millimeters or the ink density changes between runs.
Ask the supplier to show the logo at actual size on the final pouch dimensions. A centered graphic on a flat template can still end up wrong once the sides are sewn and the top channel is formed. Put the print reference in relation to the top edge and the side seam, and ask the factory to note any part of the artwork that sits near a fold, seam, or cord channel. If the pouch will be sold already filled, inspect the print again while the bag is loaded. Fill changes shape, and shape changes the way the brand mark reads.
Color should be handled as a production target, not as a vague promise. Cotton absorbs ink differently from paper or film, so the same color reference can appear darker or softer once it is printed on fabric. If color matters, ask for an ink drawdown, strike-off, or another physical print reference on the same cloth. A Pantone callout is still useful, but it should be treated as a target and not as a guarantee without a textile proof.
Once the proof is approved, avoid casual changes. Any change in fabric weight, print size, label position, cord style, or packing format should be treated as a spec revision. That matters because small products are easy to change informally. In production, informal changes are where most avoidable defects begin.
- Show the logo at actual print size on the final pouch dimensions.
- Use a physical print reference when color matters.
- Treat any post-approval change as a spec revision.
Build The Quote Around Setup, MOQ, And Reorder Costs
A useful quote for custom cotton drawstring pouches should show more than one unit price. The buyer needs to see setup charges, sample cost, print charges by color, label charges, and any bagging or carton-upcharge assumptions. If the supplier offers a single number and leaves the rest vague, procurement cannot compare bids fairly. A quote that looks low may simply be relying on lighter fabric, a smaller print area, or labor that reappears later in another line item.
MOQ matters because it changes how fixed cost is spread across the run. A 500-piece test order may be the right way to validate a new logo or a seasonal farmers market program, but the unit price should be expected to sit higher than a 3,000-piece order. Ask for tiered pricing at 500, 1,000, and 3,000 pieces using the same approved spec. If the price changes for any reason other than quantity, the supplier should explain why. That could mean extra screens, a different label, or a different packing format.
Reorder cost deserves special attention. Ask whether screens or print setups are retained, whether they can be reused, and whether the factory charges again on repeat orders. A production line that holds the setup for 6 to 12 months is more useful than one that treats every reorder as a fresh project. If the supplier cannot explain how repeat orders work, the first quote is incomplete. Procurement should think in program cost, not one-time order cost.
The cheap quote is only useful if the landed result is still usable. Compare offers on the same fabric weight, the same print method, the same number of colors, the same packing method, and the same delivery term. If one quote is lower because the carton count is higher, the print area is smaller, or the fabric is thinner, the bids are not equivalent. That hidden difference usually shows up later as margin loss or customer complaints.
- Ask for separate pricing on setup, print, labels, and packing.
- Compare 500, 1,000, and 3,000 piece tiers on the same spec.
- Confirm whether screens or setups are retained for reorder use.
Approve A Sample That Reflects Production, Not A Mockup
A pre-production sample only helps if it is made through the same route as the bulk order. A hand sample can be useful early in the process, but it does not prove how the final pouch will behave on the production line. The approved sample should use the final fabric, final print method, final cord, and final sewing process. If the supplier substitutes cloth or changes the print method for convenience, the sample becomes a design reference rather than a production control document.
The approval review should be physical and measured. Record the finished width and height after sewing, check logo location against the drawing, and inspect the front and back of the pouch in normal light. Open and close the cord at least 10 times to see whether the channel twists, snags, or bunches. If the pouch will carry product at market or retail, test it with a typical fill weight so the buyer can see how the print reads when the bag is actually in use. That simple step catches a lot of avoidable surprises.
The sample should also settle the color question. A screen render does not show how ink sits on cotton fibers. Ask for a retained sample, photos of the approved sample from both sides, and a note showing which fabric lot was used. If the production lot changes later, the factory and buyer can compare the new lot to the retained sample instead of arguing from memory. That is useful on seasonal orders, where the work often moves faster than the paperwork.
If the sample is not right, revise it before bulk starts. A small difference in placement, cord balance, or fabric density is much easier to fix before the full run than after cartons are packed. The goal of sample approval is to freeze the line, not to create a loose visual suggestion.
- Approve a sample made on the final production route.
- Measure the finished pouch, not just the flat panel.
- Retain photos and the physical sample as a production reference.
Set QC Tolerances And Defect Rules In Writing
Quality control becomes much stronger when the rules are written before production starts. The factory should know what counts as acceptable variation and what counts as a reject. For cotton drawstring pouches, that means finished size tolerance, print position tolerance, registration tolerance for multi-color work, stain limits, seam quality, and cord function. Vague instructions like good quality or nice finish do not support a real inspection decision.
A practical working set of tolerances is straightforward. Finished dimensions can stay within plus or minus 5 mm for most small and medium pouches. Print placement can stay within plus or minus 3 mm of the approved centerline and top-edge reference. Two-color registration can stay within about 1.5 mm. Cord length left to right can stay within plus or minus 10 mm. These are not universal laws, but they are concrete enough to build a supplier agreement around and clear enough to enforce at inspection.
The defect list should separate critical, major, and minor issues. Open seams, broken cords, misprinted logos, and obvious stains on the customer-facing side should be treated as rejectable defects. If the buyer uses AQL, the PO should state the exact standard, commonly 0 critical defects with 2.5 major and 4.0 minor, or an equivalent written rule. The point is not to force one industry standard on every order. It is to make the rejection basis objective so the supplier and buyer are working from the same page.
QC should also happen in stages. First pieces should be checked before the line runs too far. Mid-run checks catch print drift or seam problems before they multiply. Final carton inspection confirms count, packing, and label accuracy. If a supplier only checks at the end, the buyer is relying on rework instead of prevention. For a simple pouch program, that is a bad trade.
- Write tolerances in millimeters before bulk begins.
- Separate critical, major, and minor defects in the PO.
- Inspect first pieces, in-process output, and final cartons.
Pack, Label, And Ship Without Losing Control
Packing is part of proofing because it can hide or create problems. Bulk carton packing is usually the right choice for wholesale, distributor, and warehouse programs because it lowers labor cost and keeps the carton count easy to verify. Individual polybags make sense when the pouch needs retail presentation, barcode protection, or extra dust control. They are not automatically better. They are simply a different requirement with different cost, labor, and moisture risk.
Cotton absorbs humidity, so long transit routes deserve attention. If the shipment will travel by sea or sit in a humid warehouse, ask whether the carton needs a liner, desiccant, or another moisture-control step. Also ask for a fixed carton count that is easy to verify on receipt. A clean packing list is not enough if the cartons arrive with mixed styles or uncertain counts. The carton label should show style, size, color, quantity, PO number, and lot reference.
Ask for carton dimensions and gross weight before the shipment is released. That helps the buyer compare freight options and check warehouse receiving limits. If the cartons are too large or too heavy, handling costs rise and damage risk can increase. For fulfillment or retail distribution, confirm whether the receiving center needs pallet height limits, barcode placement, or master carton labeling. Those sound like operational details, but they determine whether the goods can be received without delay.
Packing should not be treated as an afterthought. A pouch that is printed correctly but packed badly still fails the buying program. The goal is to receive cartons that count correctly, store cleanly, and move to the next step without repacking.
- Use bulk carton packing unless retail presentation requires individual bagging.
- Confirm carton size, gross weight, and label content before dispatch.
- Add moisture protection if the route is long or humid.
Turn The Approval Set Into A Reusable RFQ
The best outcome of proofing is not just a successful first order. It is a reusable RFQ that can be sent to the next supplier, buyer, or season without rebuilding the spec from scratch. Attach the approved sample photos, measured dimensions, print placement diagram, packing plan, and defect rules to the request for quote. That gives the supplier one target and gives procurement one clean basis for comparing bids.
The RFQ should name the exact material and build. If the pouch is 100% cotton, 8 oz, with a single cord, one-color screen print, and bulk packing of 100 pieces per carton, then all of that should be written into the request. If any supplier proposes a change, ask them to state the difference in writing and explain the cost or performance impact. That keeps substitutions visible instead of accidental.
When comparing offers, look at landed cost and compliance risk, not just ex-factory price. Freight, packing labor, print setup, carton efficiency, and rework risk all affect the final result. A cheaper quote is only useful if it comes from the same material and process assumptions. If the supplier cannot reproduce the approved sample on the next run, the lower price is not a real savings.
A good RFQ becomes the control document for reorder, audit, and supplier switching. Once the pouch spec is stable, the buyer can buy the same product again without re-solving every detail. That is what turns a one-time pouch project into a repeatable supply program.
- Attach the approved sample photos and measured spec to the RFQ.
- Require written disclosure for any proposed substitution.
- Compare landed cost, not just ex-factory price.
Specification comparison for buyers
| Spec decision | Recommended option | When it fits | Buyer risk to check |
|---|---|---|---|
| Supplier route | Direct factory with in-house sewing and printing, plus one retained pre-production sample from the same line | Best when you need one accountable source and repeatable reorders | A broker can approve a hand sample that the bulk line cannot match |
| Fabric weight | 6 to 8 oz cotton, about 200 to 270 gsm, for lighter promotional use; 10 to 12 oz, about 340 to 400 gsm, for a fuller retail feel | Choose by fill weight, reuse rate, and perceived value | Weight may be quoted on raw cloth instead of the finished pouch |
| Print method | 1 to 2 color screen print on natural cotton | Works for bold logos, simple copy, and clear edges | Gradients, tiny text, and hairline strokes can fill in on textured weave |
| Finished size tolerance | Plus or minus 5 mm on width and height for most small and medium pouches | Useful when the bag must fit a display tray, carton, or insert | Some quotes use cut size, not finished size after sewing |
| Placement tolerance | Plus or minus 3 mm from the approved centerline and top-edge reference | Fits buyer programs where logo position must look centered after sewing | Seam shift can move the artwork into the cord channel or too close to the edge |
| Packing method | Bulk carton by fixed count, with individual polybags only if retail presentation or barcode control requires it | Best for distributor, wholesale, and warehouse programs | Polybagging adds labor, cost, and moisture or scuff risk |
| MOQ strategy | Tiered pricing at 500, 1,000, and 3,000 pieces with the same setup where possible | Useful for test orders and controlled scale-up | Every artwork tweak can trigger a new screen or setup fee |
| Quality standard | Written critical defect list with 0 critical defects and an agreed AQL or equivalent major/minor limit | Best for repeat wholesale programs with stable specs | Without a written defect standard, rejection disputes become subjective |
| Lead time plan | 15 to 25 days after artwork lock and sample approval for stock fabric, one-color print, and bulk packing | Fits seasonal selling windows when the spec is frozen early | Late artwork or material substitutions reset the clock |
Buyer checklist before sampling
- Confirm finished pouch width and height in millimeters, plus fabric weight in gsm or ounces, weave type, and any pre-wash or shrinkage allowance.
- Set seam allowance, cord diameter, cord length, and whether the pouch uses a single cord or double cord before artwork approval.
- Approve a vector artwork file with exact print size, placement in millimeters from the top edge and side seam, and the target color reference.
- Require a pre-production sample made with final fabric, final cord, final print method, and final packing method.
- Ask for tiered pricing at 500, 1,000, and 3,000 pieces, with setup, screen, sampling, label, and bagging charges shown separately.
- Request the supplier's written tolerance for print position, finished size, and color variation.
- Verify carton count, carton dimensions, gross weight, and whether inner polybags, tissue, or moisture protection are needed.
- Set defect limits for print misregistration, broken stitches, loose thread tails, stains, cord failure, and mixed counts.
- Lock delivery term, factory location, and target ship window before releasing the PO.
- Keep one retained sample on the buyer side and one on the factory side, both tied to the batch or PO number.
Factory quote questions to send
- Is the pouch made from 100% cotton, what exact fabric weight will you use, and is that weight based on the cloth or the finished pouch?
- What finished size tolerance can you guarantee after sewing, and how will you measure it?
- What is the minimum line thickness and minimum text size your print process can hold on this fabric?
- Is the logo printed in house, or is any part of the decoration outsourced?
- If there is an outsourced step, who owns final proof approval and who carries the risk of a mistake?
- What screen or setup fees apply per color, and do those fees repeat on reorder?
- What is the MOQ at each price tier, and what other items change the unit price besides quantity?
- Can you make the pre-production sample with final fabric, final cord, final print position, and final carton pack?
- What inspection standard do you use, and will you accept a written defect list with critical, major, and minor items?
- What carton count, carton dimensions, and gross weight do you recommend for this pouch size?
Quality-control points to confirm
- Finished pouch width and height should stay within plus or minus 5 mm for most small and medium pouches, unless a wider tolerance is written into the PO.
- Print placement should stay within plus or minus 3 mm of the approved centerline and top-edge reference.
- Two-color registration should stay within 1.5 mm unless the artwork is intentionally loose or distressed.
- Loose thread tails should be trimmed to 5 mm or less on the customer-facing side.
- Open seams, skipped stitches, or seam breaks longer than 3 mm should be treated as rejectable defects.
- Cord length left to right should match within plus or minus 10 mm, and the cord should open and close the bag smoothly for at least 10 cycles without snagging.
- No visible oil, rust, dye, or handling stains should appear within 25 mm of the logo or other customer-facing print area.
- Solid print areas should not show obvious pinholes, streaking, or uneven coverage at arm's length under normal light.
- Carton count should match the packing list exactly, with no mixed styles unless the buyer approved mixed packing in writing.
- If the buyer uses AQL, the PO should state the exact standard, commonly 0 critical defects, 2.5 major, and 4.0 minor, or an equivalent written rule.