Start With Product Load, Not Fabric Names
A good fabric-weight decision starts with the product, not with a pouch catalog label. Words such as light, medium, heavy, rustic, and premium sound useful in a showroom, but they do not give a procurement team much protection during quoting, sampling, or inspection. Custom cotton drawstring pouches for craft fairs have a simple job: hold the item, close without strain, display the logo, survive vendor handling, and arrive ready to pack or sell. The pouch has to perform when filled, not only look neat when flat.
Different contents stress the fabric in different ways. Jewelry cards, seed packets, and tea samples mainly need a clean front panel, low lint, and a controlled unit cost. Soap bars need better opacity and enough body so corners, wrappers, and surface oils do not dominate the presentation. Candle tins and small ceramics put pressure on the bottom seam and side seams. Multi-item kits need more internal height because the top must gather closed after several pieces are loaded. A flat pouch can pass a quick visual check and still fail the real booth-use test.
For B2B buying, group the order by product load before requesting a final price. 4 oz cotton, around 135 GSM, is a practical starting point for lightweight goods and event giveaways. 5 oz to 6 oz cotton, around 170 to 200 GSM, is the safer middle range for most retail craft fair packaging. 8 oz cotton canvas, around 270 GSM, should be treated more like a reusable pouch or merchandise item because it changes sewing bulk, drawcord closure, carton weight, and freight cost.
- Use 4 oz/about 135 GSM for jewelry cards, wax melts, tea samples, seed packets, botanicals, and lightweight inserts.
- Use 5 oz to 6 oz/about 170 to 200 GSM for soap bars, candle tins, cosmetics, boxed accessories, small ceramics, and premium retail craft packaging.
- Use 8 oz/about 270 GSM for maker kits, refill programs, branded merchandise, heavier contents, or pouches expected to be reused.
- Do not approve a quote that says only thin cotton, medium cotton, thick cotton, or canvas without the GSM, oz, fabric type, and tolerance.
- For hard-edged or dense products, require a filled-pouch test before bulk approval, even when the flat size drawing appears correct.
Use GSM, Oz, and Tolerance Together
GSM means grams per square meter. It is one of the most useful ways to compare cotton pouch fabric, but it is not the whole specification. Ounces are also common in cotton pouch and bag trading, and buyers often see both terms in supplier quotes. The complication is that suppliers may use different conventions when describing cotton fabric. A quoted 6 oz pouch from one mill may not feel exactly like a quoted 6 oz pouch from another if the weave, yarn, finishing, washing, or moisture level differs.
A stronger B2B spec combines fabric weight, construction, finish, and tolerance in one line. For example: natural plain weave cotton, 6 oz/about 200 GSM, with GSM tolerance of plus or minus 5 percent. That sentence gives the factory something measurable and gives the buyer something to inspect against. If no tolerance is written, the supplier may follow its normal mill practice. That may be fine for a low-cost giveaway. It may not be acceptable for retail packaging where hand feel and opacity affect brand presentation.
Higher GSM usually improves opacity, structure, print stability, and perceived value. It also increases material cost, sewing resistance, carton gross weight, and sometimes lead time. Heavy canvas can be the wrong answer for a small pouch because the folded channel becomes bulky and the cord may not gather neatly. The best fabric is not automatically the heaviest one. It is the lightest fabric that still performs reliably for the product, artwork, event handling, and brand position.
- Ask for the exact GSM and oz conversion used in the quote, not only the trade name of the fabric.
- Use about 135 GSM for many 4 oz lightweight cotton pouches, about 170 to 200 GSM for 5 oz to 6 oz retail pouches, and about 270 GSM for many 8 oz canvas pouches.
- State a fabric-weight tolerance, often plus or minus 5 percent for controlled retail packaging, if consistency matters to the program.
- Confirm whether GSM is checked by mill report, roll label, or cut-sample weight calculation during incoming material inspection.
- Compare GSM together with opacity, hand feel, print result, closure function, and carton weight before selecting the final spec.
Specify Usable Space, Not Only Flat Size
Finished pouch size is not the same as usable product space. The drawcord channel consumes height. Side seams consume width. The gathered top needs allowance above the product. A 100 x 150 mm pouch does not provide 100 x 150 mm of usable internal space. If the product sits too high, the cord may not close fully, the mouth may flare open, and the printed logo may be pulled too close to the gathered channel.
RFQs should separate product dimensions from pouch dimensions. Include the product width, height, depth, and weight, then describe the desired fit. A snug soap pouch needs less extra space than a gift pouch that should look soft and full. A round candle tin needs enough width for loading and removal. A ceramic ornament may need more body fabric to reduce pressure on the bottom seam. A kit with several pieces may need a larger opening for packing efficiency, even if the final closed shape could be smaller.
For craft fair assortments, one shared pouch size can simplify MOQ, packing, and stock allocation. It only works if it fits the full product range. Test the largest product for closure and seam strain. Then test the smallest product for presentation, because it may sink too low and look undersized. Sometimes two shared sizes are better than one universal size. That small increase in SKU count can reduce event risk without creating a complicated production plan.
- State finished flat size as width x total height, then separately state minimum usable internal height below the drawcord channel.
- Provide product width, height, depth, weight, and shape, and note whether the product is boxed, wrapped, oily, fragile, sharp-edged, or round.
- Allow extra height above the product so the drawcord can close without exposing the item or distorting the printed face.
- For heavier fabrics, allow more channel space because folded canvas and cord bulk reduce usable height.
- Request photos or a short video showing product insertion, drawcord closure, filled front view, and side seam stress before approval.
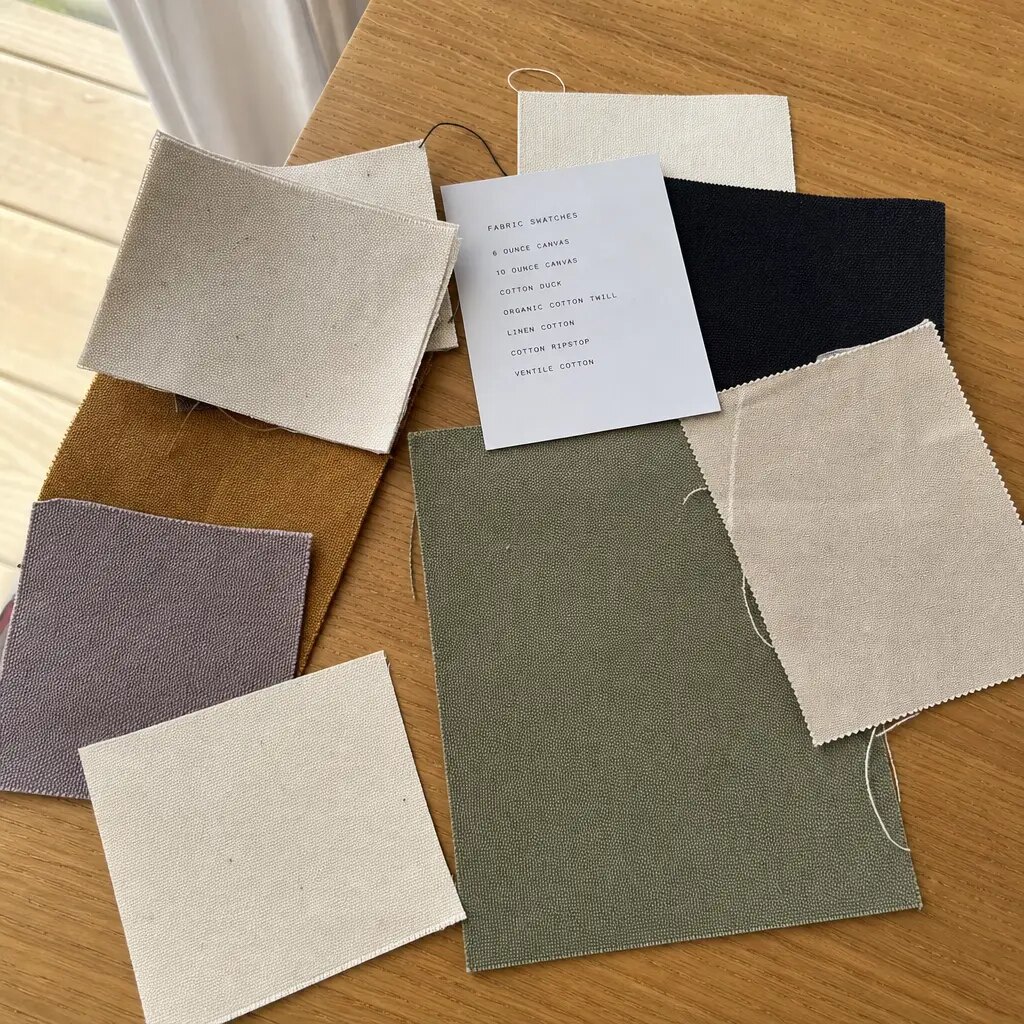
Choose Cotton Type and Finish Deliberately
Fabric weight does not define the whole pouch. Cotton type, weave, color, and finishing change the look, print result, cost, and inspection standard. Natural unbleached cotton is common for craft fair packaging because it supports a handmade, low-intervention, or rustic presentation. It can show seed flecks, slubs, and small shade variation. Those features may be acceptable, but they need limits. An approved reference sample is useful; a written defect standard is better.
Bleached cotton gives a cleaner background for bright artwork and small text, but it changes the brand character and may add processing cost. Dyed cotton can create a stronger seasonal or brand-specific look, yet it brings extra approval steps such as lab dips, shade-lot control, dyeing MOQ, and possible colorfastness checks. Organic or recycled cotton may matter to the buyer’s sustainability claim. Procurement teams should separate a material description from formal documentation. If certificates, transaction records, or chain-of-custody documents are required, ask for them early and confirm whether they are included in the price.
Weave and finish also affect printability. A smoother plain weave generally holds fine screen print lines better than a coarse open weave. Textured canvas can feel more substantial, but small logo text may break across the yarn texture. Washed or brushed finishes may feel softer and more relaxed, though they can shed more lint. If the pouch will touch soaps, candles, jewelry cards, textiles, or cosmetics, check lint, odor, and surface cleanliness during sample approval rather than waiting for final inspection.
- Define cotton as natural, bleached, dyed, organic, recycled, or conventional, and state what documentation is required with the shipment.
- Set a written standard for acceptable seed flecks, slubs, and shade variation versus unacceptable stains, oil marks, dark contamination, or mildew odor.
- Use smoother plain weave cotton for small text, fine lines, and clean logo edges; use textured canvas when hand feel and reuse are more important than fine detail.
- Ask whether dyed fabric requires lab dip approval, shade tolerance, colorfastness checks, and a separate fabric MOQ.
- Inspect samples for lint shedding, odor, surface cleanliness, and shade consistency if the pouch touches retail products directly.
Match Print Method to Fabric Weight
Screen printing is usually the most predictable option for custom cotton drawstring pouches when the artwork uses one to three solid colors. It controls cost well at bulk quantities and can deliver strong opacity on natural or dyed cotton. Still, screen printing is not automatic. Fabric texture, ink coverage, and artwork detail all matter. Thin 4 oz cotton may distort under pressure or feel stiff if the ink block is large. Coarse 8 oz canvas can interrupt fine lines because the ink sits on a more uneven surface.
Heat transfer and digital printing can help with gradients, illustrations, many colors, or short assorted craft fair runs. They are useful tools, not shortcuts. Transfers may show a visible edge, plastic hand feel, or adhesion risk if the fabric texture is unsuitable. Digital print may look softer or less bright on unbleached cotton. Heat and pressure can also affect small sewn pouches, especially when the fabric is light or the channel and seams create uneven surfaces.
The safest process is to approve a strike-off on the exact fabric weight, fabric color, pouch size, and print method planned for bulk production. Ask the supplier to state the maximum recommended print area, minimum safe line width, minimum text height, and placement tolerance. For small pouches, be careful with artwork near the drawcord channel. Once the pouch is filled and gathered, the top area changes shape and can visually distort a logo that looked centered on the flat sample.
- Use screen print for repeat logos, one to three solid colors, stable artwork, and larger bulk runs.
- Consider heat transfer or digital print for gradients, illustrated artwork, many maker logos, or short assorted runs, but test hand feel and durability.
- Ask the supplier for minimum safe text height and line width; small text around 1.5 mm to 2 mm may be risky depending on weave and method.
- Avoid very large heavy ink blocks on 4 oz cotton because they can stiffen the pouch face and show wrinkles or handling marks.
- Approve print opacity, edge sharpness, curing, rub resistance, placement, and appearance on a filled pouch before bulk production.
Build MOQ Around Real Production Variables
MOQ is not only a sales rule. It reflects fabric purchasing, dyeing, cutting efficiency, print setup, sewing changeover, packing labor, and SKU control. A buyer may describe an order as 2,000 pouches. The factory may see three sizes, two fabric colors, five printed designs, two cord colors, and several packing labels. Operationally, that is not one clean run. It is a group of small runs that share a deadline.
The easiest way to reduce MOQ pressure is to reduce changing variables. Keep the pouch size, fabric weight, fabric color, drawcord, and packing method the same wherever possible. Then split artwork only where the supplier confirms it is economical. If every maker design needs a different fabric color, cord color, hangtag, barcode, and bundle rule, the shared order loses the efficiency that was supposed to lower cost.
For event organizers, distributors, and brand groups, ask for a price ladder instead of one fixed MOQ answer. Pricing at 500, 1,000, 3,000, and 5,000 pieces can reveal whether it is smarter to consolidate pouch sizes, reduce print colors, or change packing. Screen fees, transfer setup charges, sample costs, and carton-label charges should be shown separately. That keeps unit-price comparisons clean and prevents hidden setup costs from appearing after the artwork is approved.
- Clarify whether MOQ applies per total order, pouch size, fabric weight, fabric color, cord color, print design, print color, or packed SKU.
- Standardize the pouch body and cord first, then vary the printed logo only where the supplier confirms it is economical.
- Expect separate setup charges for multiple screens, ink changes, transfer sheets, short print runs, special labels, and SKU-specific packing.
- Request price breaks at realistic quantities such as 500, 1,000, 3,000, and 5,000 pieces with setup fees separated from unit price.
- Compare the landed cost of fewer standardized SKUs against many highly customized low-quantity SKUs before finalizing the assortment.
Control Cost Without Weakening the Pouch
Fabric weight is visible in the quote, but it is only one cost driver. Cotton grade, fabric color, finish, print method, cord type, sewing efficiency, packing format, inspection level, carton count, and incoterm can all change the landed cost. A low unit price may exclude screen charges, sample freight, barcode labels, testing, palletization, inland freight, or export handling. It may also assume looser tolerances or a lighter fabric than the buyer intended.
Quote comparison has to be done on a controlled specification. A 4 oz natural cotton pouch packed loose in large cartons is not comparable with a 6 oz dyed cotton pouch individually polybagged with barcode labels. A one-color screen print is not comparable with a four-color transfer. EXW, FOB, and delivered quotes cannot be compared until freight, export charges, and local handling are separated.
Good cost control removes variables that do not improve performance. Moving from 8 oz canvas to 6 oz cotton may be sensible if the product still closes cleanly and feels retail-ready. Reducing print colors can save setup cost without changing pouch function. Standardizing cord color can simplify production and inspection. Cutting the pouch too close to the product, removing needed inner bundles, or accepting fabric that feels too thin can create booth problems that cost more than the original unit-price saving.
- Higher GSM increases fabric consumption cost, sewing bulk, carton gross weight, and sometimes production time.
- Dyed, bleached, organic, recycled, or certified cotton can add material cost, approval steps, shade control, and documentation charges.
- Individual polybags improve cleanliness and scanning but add labor, material, carton volume, and sustainability concerns.
- Multiple small artwork runs often raise cost per piece because setup cost is spread over fewer units.
- Quote hangtags, barcode stickers, kraft bands, testing, certificates, pallets, and special carton marks as separate line items.
Approve Samples That Represent Bulk Production
A sample should lock the real specification. It should not merely show a logo on a similar pouch. The pre-production sample needs to prove fabric weight, cotton color, hand feel, opacity, pouch size, usable height, drawcord function, stitch quality, print method, print size, print position, and packing result. If the supplier sends a showroom blank, substitute cord, or sample-room print method, the buyer has not approved the actual production item.
Handle the sample the way vendors will handle it. Insert the real product or a dimensionally accurate dummy. Pull the cord closed several times. Put the filled pouch in a carton or tote, then check the appearance after normal handling. Confirm whether the logo remains readable when the top gathers. Check whether lint transfers to candles, soaps, textiles, or jewelry cards. If booth teams need to load hundreds of units, make sure the mouth opens easily and the cord does not catch.
Approval should be measurable, not casual. Keep one sealed reference sample with the buyer and one matching sample with the factory. Record width, total height, channel height, usable height, cord length, print size, and print position. Written approval should say either approved as final or approved with specific corrections. An email that says the sample looks good is weak control if the buyer still expects changes before bulk production.
- Approve a pre-production sample made with bulk fabric, bulk cord, production sewing, production print method, and intended packing.
- Measure and record finished width, total height, channel height, usable internal height, cord length, print size, and print location.
- Reject sample approval based only on a digital mockup, showroom pouch, substitute fabric, substitute cord, or non-production printing method.
- Test product insertion, closure, reopening, presentation, lint transfer, and logo visibility after repeated handling.
- Keep photo records and correction notes with the purchase order so the factory, inspector, and buyer use the same reference.
Set Inspection Tolerances Before Cutting
Cotton drawstring pouches are simple products, but small defects become obvious when the pouch is retail packaging. Common issues include uneven size, crooked openings, loose threads, missing cords, weak knots, ink smudges, print drift, stains, oil marks, open seams, and mixed shade lots. Natural cotton may include seed flecks and slubs. That does not mean contamination, mildew odor, or heavy dark marks should pass inspection.
Define defect categories and the sampling plan before production starts. Many buyers use critical, major, and minor defect classifications with an agreed AQL level. Critical defects may include unsafe contamination, sharp foreign matter, severe mildew, or banned-material issues. Major defects may include open seams, missing cords, wrong artwork, unreadable logo, wrong fabric weight, severe shade mismatch, heavy stains, or size outside tolerance. Minor defects may include small loose threads or natural slub variation within the approved limit.
Measurement checks should come from multiple cartons and bundles, not the top layer of one carton. For many small cotton pouches, a finished-size tolerance around plus or minus 5 mm is workable. Tight product fits may need a stricter standard, but only if the factory confirms feasibility before cutting. Print placement tolerance is often around plus or minus 3 mm to 5 mm depending on pouch size and print method. Drawcord function should be tested through repeated opening and closing, not by a quick visual glance.
- Write AQL level, defect categories, measurement tolerances, and rework rules before bulk production starts.
- Treat oil stains, mildew odor, missing cords, open seams, wrong artwork, unreadable logos, and severe size errors as major or critical defects.
- Measure samples across multiple cartons, print designs, and production bundles to detect cutting, sewing, or packing variation.
- Inspect channel ends for fraying, rough stitching, loose back-tacking, and areas where the cord catches or pulls unevenly.
- Check print curing, rub resistance, opacity, placement, edge quality, transfer adhesion, and ink transfer before shipment release.
Plan Packing for Event Readiness
Packing is a procurement specification, not an afterthought. Craft fair vendors, distributors, and brand teams need to count inventory quickly, keep pouches clean, avoid deep creases, and allocate stock across booths or sellers. Flat bulk packing is economical, but carton quantity should match fabric weight and pouch size. Heavy 8 oz canvas packed too tightly can arrive with pressure marks or stubborn folds. Lightweight cotton packed loosely can shift and collect carton dust.
Inner packing should follow the distribution plan. Bundles of 25 or 50 pieces make stock counting and event allocation faster. Individual polybags may be justified for barcode scanning, store distribution, resale cleanliness, or dusty warehouse routes, but they add material, labor, volume, and sustainability concerns. Kraft bands can reduce loose handling and help counting with less plastic, though they still add a packing step and cost.
Carton planning belongs in the quote stage. Ask for pieces per carton, inner bundle count, carton dimensions, carton gross weight, carton marks, and whether cartons will be palletized. If cartons are too heavy, event teams may struggle with handling. If cartons are too large, freight and storage become inefficient. If carton marks do not show SKU, color, print design, and quantity, distributors may lose time sorting before the fair.
- Use bulk flat packing for low-cost event distribution when vendors will load products before the fair.
- Use inner bundles of 25 or 50 pieces when multiple sellers, booths, or locations need fast counting and allocation.
- Use individual packing only when cleanliness, barcode scanning, retail routing, or resale presentation justifies the extra cost and volume.
- Set practical carton gross weight limits for warehouse, courier, event, and booth handling teams.
- Confirm carton dimensions, pieces per carton, bundle format, carton marks, and SKU separation before freight booking.
Specification comparison for buyers
| Spec decision | Recommended option | When it fits | Buyer risk to check |
|---|---|---|---|
| Lightweight products and giveaways | 4 oz cotton, about 135 GSM, plain weave | Jewelry cards, wax melts, tea samples, seed packets, soap minis, and low-cost event inserts under light handling | May look semi-transparent around dark, oily, or sharp-edged contents; ask for GSM tolerance, opacity check, and filled-pouch photos before approval |
| Most retail craft fair packaging | 5 oz to 6 oz cotton, about 170 to 200 GSM | Soap bars, candle tins, cosmetics, boxed accessories, small ceramics, and reusable-looking brand packaging | Costs and carton weight rise versus 4 oz; confirm closure, seam bulk, and finished-size tolerance after sewing |
| Premium or reusable pouch programs | 8 oz cotton canvas, about 270 GSM | Maker kits, refill programs, branded merchandise, heavier items, and pouches expected to be reused | Small pouches can feel stiff at the channel; inspect seam bulk, drawcord pull, carton compression, and gross weight |
| Natural cotton appearance | Unbleached cotton with written slub, seed fleck, and shade limits | Rustic, handmade, eco-positioned, or neutral craft fair presentation | Natural character must not hide oil marks, mildew odor, dark contamination, excessive lint, or mixed shade lots |
| Finished size control | Flat finished measurement with usable height below channel | Any order where the product must close cleanly, especially soaps, tins, boxed goods, and gift sets | A 100 x 150 mm pouch is not 100 x 150 mm usable space; specify channel height, seam allowance, and size tolerance |
| Simple one-color branding | Screen print on approved bulk fabric | Stable logos, solid colors, repeat orders, larger quantities, and predictable cost per piece | Fine lines can fill on textured cotton; large ink blocks can stiffen 4 oz fabric; approve strike-off and rub test |
| Multi-color or illustrated branding | Heat transfer or digital print after fabric-specific testing | Gradients, detailed artwork, many maker logos, short assorted runs, or seasonal designs | Check edge lift, hand feel, heat marks, wash/rub resistance, color brightness, and adhesion on the actual pouch fabric |
| Mixed craft fair assortments | Standardize pouch body, fabric color, cord, and packing; split artwork only if economical | Event organizers, distributors, and brand groups buying several maker designs | MOQ may apply per size, color, artwork, print color, or SKU; separate setup fees can erase shared-order savings |
| Event-ready packing | Flat packed in inner bundles of 25 or 50 pieces unless individual packing is required | Booth setup, stock allocation, distributor counting, and fast pre-event loading | Over-compression can crease 6 oz to 8 oz cotton; carton marks and bundle counts must match SKU allocation plan |
Buyer checklist before sampling
- Classify the product going inside each pouch by shape, weight, edge pressure, and handling: jewelry card, soap bar, candle tin, ceramic ornament, sample kit, refill pack, or resale merchandise.
- Specify fabric weight in both oz and GSM, for example 4 oz/about 135 GSM, 5 oz to 6 oz/about 170 to 200 GSM, or 8 oz/about 270 GSM, and state the allowed GSM tolerance.
- Define cotton type and finish: natural unbleached, bleached, dyed, recycled, organic, conventional, brushed, washed, calendered, or plain weave, plus any certification documents required.
- Provide product dimensions and finished pouch dimensions separately, including width, total height, channel height, minimum usable height below the drawcord channel, and required closure coverage.
- Confirm construction details: seam type, seam allowance target, channel fold height, drawcord material, cord diameter, cord color, cord length, knot style, back-tacking, and tolerance for loose threads.
- Send artwork as vector files where possible, with print size in millimeters, Pantone or CMYK references, print position from top and side seam, and minimum line width or text height.
- Ask the supplier to recommend the safest print method for the selected fabric and artwork, not only the lowest unit cost, especially for fine lines, dark fabric, heavy ink coverage, or multi-color artwork.
- Request a pre-production sample made with bulk fabric, bulk cord, production sewing, production print method, approved artwork size, intended folding or bundling, and final packing method.
- Set written acceptance criteria for GSM, finished size, print position, drawcord function, seam strength, stains, odor, lint, shade variation, slubs, carton marks, and packing count.
- Compare quotes using the same pouch size, GSM, fabric color, cord, print method, artwork count, packing method, MOQ rule, sample cost, setup fees, incoterm, and excluded-fee list.
Factory quote questions to send
- What exact fabric weight will be used in oz and GSM, and what bulk tolerance do you apply, such as plus or minus 5 percent or another mill standard?
- Is the cotton natural greige, unbleached, bleached, dyed, recycled, organic, or conventional, and does the quoted price include certification paperwork or only a material description?
- What weave and finish are included, and how do you define acceptable seed flecks, slubs, lint, shade variation, oil marks, stains, or surface imperfections?
- What are the finished pouch size tolerances for width, total height, channel height, and usable height below the drawcord channel after sewing and pressing?
- What drawcord material, color, diameter, length, knot style, and channel construction are included, and what pull-function check is used during production?
- Which print method is included, what is the maximum safe print area, what is the smallest safe text height, and what artwork limitations apply to this fabric weight and weave?
- Does the MOQ apply per total order, per pouch size, per fabric weight, per fabric color, per cord color, per print design, per print color, or per packed SKU?
- Will the pre-production sample use the same fabric lot quality, cord, ink, print screen or transfer, sewing construction, finishing, and packing method as bulk production?
- What are the quoted tolerances for print placement, print color, finished measurements, fabric shade, and carton quantity, and how will deviations be handled before shipment?
- How many pieces are packed per inner bundle and export carton, and what are the expected carton dimensions, gross weight, carton marks, and pallet requirements if any?
Quality-control points to confirm
- Verify fabric GSM through a cut sample weight check, fabric roll record, or mill report, and compare against the purchase-order tolerance before cutting or early in production.
- Measure finished pouches flat at opening width, body width, total height, channel height, and usable height below channel, using samples from multiple cartons and production bundles.
- Use a written finished-size tolerance, commonly around plus or minus 5 mm for many small cotton pouches, with tighter control only when product fit requires it and the factory agrees.
- Check drawcords for smooth pulling, equal length, secure knots, no missing cords, no severe fraying, and no catching at channel ends after repeated open-close cycles.
- Inspect side seams, bottom seams, and channel stitching for straightness, skipped stitches, burst seams, loose back-tacking, raw fraying, needle damage, and loose seam tails.
- Check print placement against the approved sample, commonly within plus or minus 3 mm to 5 mm depending on size and process, unless a different tolerance is written.
- Inspect print quality for opacity, clean edges, curing, smudging, ghosting, pinholes, ink transfer, heavy bleeding, cracking, transfer edge lift, and readability of small text.
- Inspect natural cotton for unacceptable oil stains, mildew smell, dark contamination, uneven bleaching, foreign fibers, excessive lint, shade-lot mixing, and slubs outside the approved reference.
- Perform filled-pouch fit testing with the actual product or a dimensionally accurate dummy, then close the cord and check top coverage, seam strain, and logo distortion.
- Verify packing by inner bundle count, carton count, SKU separation, carton marks, carton gross weight, moisture protection, dust protection, and crease risk before shipment release.