Start With the Real Booth Use
A custom cotton drawstring pouch for a trade show is not a generic giveaway. It is a small packaging system that has to hold a real item, travel through a warehouse, be opened and closed on the booth floor, and still look acceptable when a buyer takes it home. That is why durability should be tied to the contents, the handling path, and the presentation standard the exhibitor expects. If those three inputs are vague, the pouch spec will be vague too.
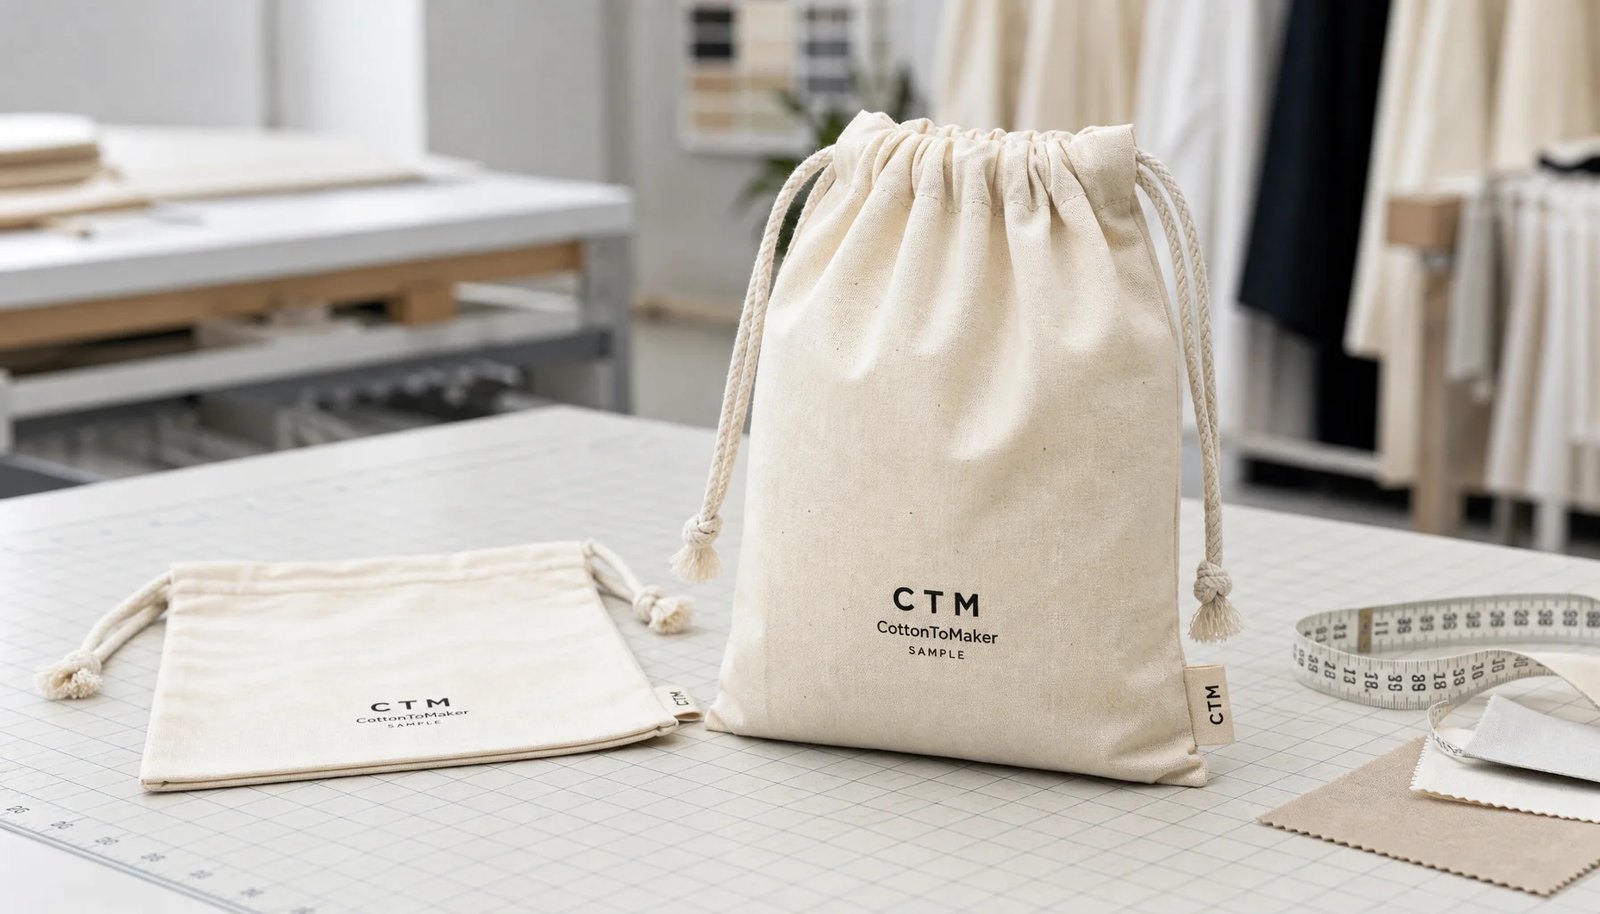
Procurement teams should start with the use case, not with the pouch itself. A pouch for folded brochures and badges has a different failure mode than a pouch carrying a glass vial, cables, accessories, cosmetics, or a retail bundle. The more clearly the team defines filled weight, item dimensions, handling frequency, and whether the pouch will be reused after the event, the more accurate the supplier quote becomes and the fewer surprises appear at sample approval.
- List the exact item or items that will go into the pouch, not just a generic category.
- Record filled weight, length, width, and depth of the insert before requesting quotes.
- Note whether the pouch is hand-carried, packed into a kit, or handed out loose at the booth.
- State whether the pouch must look premium enough for reuse after the event.
- Identify any sensitivity requirements, such as lint control for cosmetics or scratch protection for hardware.
Turn the Use Case Into a Written Spec
The most reliable way to compare suppliers is to turn the use case into a written specification. A good spec does more than name a size and a logo. It defines finished dimensions, fabric weight, cord type, print method, seam construction, packing format, and the acceptable tolerance for each critical feature. That gives the buyer a consistent basis for comparison instead of forcing every quote to be interpreted from scratch.
For trade show programs, the written spec should also define the acceptance conditions. If the pouch has to fit a brochure stack, a sample bottle, or a multi-item kit, say so explicitly. If the pouch must close smoothly with one hand at a busy booth, that should also be written down. When those requirements are not stated, suppliers often quote the lowest-cost version that meets the outline drawing but not the real application. A one-page spec can save far more time than a round of clarification emails later.
- State finished size, not just cut size, and include tolerance by pouch size.
- Define target fabric weight in oz or GSM so suppliers do not substitute a thinner cloth.
- Specify logo size, print position, and the number of print colors in writing.
- Describe the packing format: flat, folded, bundled, bagged, or inserted into another kit.
- Include an approval standard for odor, lint, stains, seam appearance, and cord function.
Choose Fabric Weight and Weave for the Risk
Fabric weight is one of the first places where a low quote can hide a durability problem. Cotton pouches are commonly offered in light promotional grades and heavier reusable grades, and those choices change both handling and freight. A 3 oz or 4 oz cotton pouch may be suitable for a very light paper insert, but it can feel thin, show contents, and crease easily. For many exhibitor uses, 5 oz to 8 oz cotton is a more practical starting range.
Weight alone is not enough. The weave, fiber quality, surface finish, and shrinkage behavior matter as well. A lightly woven fabric can look acceptable in a sample photo but become see-through or unstable once printed and filled. If the program needs a premium natural look, the buyer should also ask whether the cloth is pre-shrunk, whether it is greige or bleached, and whether the fabric lot can be repeated for a reorder without a visible shade shift. Reorder consistency matters when the event runs over multiple shows or regions.
- Use 5 oz to 6 oz cotton for most light to medium trade show inserts.
- Move to 6 oz to 8 oz cotton when the pouch carries samples, accessories, or repeated-use content.
- Ask whether the cloth is pre-shrunk or whether size change after washing or humidity exposure is expected.
- Check opacity by placing the real insert inside the sample and viewing it under normal booth lighting.
- If the pouch will be dyed or branded to match a color system, ask about shade variation between fabric lots.
Specify Sewing, Seams, and the Top Channel
Durability usually fails at the stress points, not in the middle of the panel. For drawstring pouches, the top channel, side seams, and cord exit points take the most abuse. A factory that quotes only a general cotton pouch may use a basic construction that looks fine when empty but frays after repeated opening, closing, and carrying. That is why the sewing details need to be written into the spec and confirmed in the sample.
A practical buyer spec should call out the seam type, stitch density, seam allowance, and how the top channel is formed. If the pouch is intended for heavier inserts, the buyer should also ask about reinforced stitching near the cord openings and whether the factory trims loose threads inside the seam. These details do not sound dramatic, but they are often the difference between a pouch that survives a single handout cycle and one that can be reused after the event. They also affect how clean the pouch looks when a buyer inspects it outside the booth.
- Ask for 8 to 10 stitches per inch unless the design calls for a different standard.
- Confirm whether the side seams are overlocked, double-stitched, or finished with a cleaner premium seam.
- Make sure the top channel is wide enough for the cord to move freely without tearing the fabric.
- Check that the cord exit points do not have skipped stitches, pulled threads, or uneven folding.
- If the insert is heavy, ask whether the factory reinforces the top corners or channel ends.
Match Cord, Closure, and Packing to Booth Handling
The cord is easy to overlook, but it affects both function and appearance. A cord that is too thin can cut into the channel and feel cheap. A cord that is too thick can jam, distort the top fold, or make closing the pouch slow at the booth. Cotton cord often suits natural-brand programs because the material looks coherent with the pouch body, while polyester cord may offer a different feel, smoother operation, or more stable supply. The right choice depends on the brand position and the packing workflow.
The closure style matters as well. A two-cord closure usually closes more evenly and feels more familiar to end users, but it adds labor. A one-cord design can reduce cost or simplify small pouches, but it may not seal as tightly or open as smoothly when the pouch is full. Packing should be designed around how the team will receive, count, and store the pouches. Flat packing in counted bundles is usually the cleanest option, but the buyer should confirm bundle size, carton count, and whether the factory will compress the cartons enough to wrinkle the printed area.
- Match cord diameter to the channel width and test closure speed with the real insert.
- Ask whether the cord ends are knotted, heat-sealed, metal-free, or finished with a simple stopper.
- Use two cords when the pouch will be opened and closed often or when a tighter closure matters.
- Keep printed panels flat in the carton so the logo does not crease across thick ink areas.
- Confirm pieces per inner bundle and pieces per carton before final freight planning.
Pick the Decoration Method That Will Survive Handling
Decoration needs to survive booth handling, not just pass an artwork proof. For cotton drawstring pouches, screen printing is often the most stable choice for one-color or two-color logos because it gives strong coverage and predictable cost on larger runs. Heat transfer can handle more complex artwork, but it needs to be tested for edge lifting, cracking, and hand feel on the exact fabric that will be used in bulk. Embroidery can look premium on heavier cloth, but it may pucker light fabric or make small text unreadable.
The buyer should choose the decoration method based on both brand requirements and inspection risk. For example, a QR code must remain scannable after printing and light rubbing. A large solid logo must not make the pouch front stiff or sticky. A multi-color design should still remain aligned after curing and folding. The safest approach is to test the artwork on the actual pouch material and then set a written acceptance rule for print position, registration, and rub resistance. If the artwork contains fine type, the approved sample should be checked at normal reading distance, not only through a prepress file.
- Use screen print for simple logos, sponsor marks, and most one-color event graphics.
- Use heat transfer only when the artwork truly needs gradients, fine detail, or multiple colors.
- Test QR codes after curing and after light rubbing if the pouch will be used for registration or marketing capture.
- Check whether heavy ink coverage makes the pouch front stiff or changes how it folds.
- If embroidery is chosen, confirm fabric support, thread density, and reverse-side comfort.
Build a Durability Test That Mirrors Real Use
A pouch can look perfect until it meets the actual booth workflow. A practical durability test should mimic how the product will be handled: filled, closed, carried, opened, stacked, and reused. That means the approved sample should be tested with the real insert or a weight that closely matches it, not with an empty pouch. It also means testing the cord channel and seams after repeated use, because many failures appear only after friction and loading begin.
For many exhibitor programs, a simple test routine is enough to expose weak construction. Open and close the pouch repeatedly, carry it by the cord, drop it from table height, and inspect the print and seams afterward. If the content is heavier or the pouch is meant to be reused, increase the cycle count and run a slightly heavier load than the expected fill weight. The goal is not to over-engineer the pouch; the goal is to make sure the factory understands the actual duty cycle and cannot substitute a lighter construction without detection. A controlled durability test is also the fastest way to settle internal debates between price and quality.
- Test with the real item or a realistic equivalent weight before bulk approval.
- Run 30 to 50 open-close cycles for a basic giveaway and more for reusable packaging.
- Carry the filled pouch by the cord for a short period to check channel wear and cord comfort.
- Inspect for seam slippage, cord tearing, loose threads, print cracking, and ink transfer after handling.
- Record pass or fail criteria before the test so approval is not based on subjective judgment alone.
Approve Samples and Lock the Reference Standard
Sample approval should lock the reference standard, not just confirm that a pouch exists. The sample should reflect the actual fabric, cord, print method, construction, and packing format that will be used in production. If the factory sends a visual mockup made from sample-room materials, that may be useful for layout review, but it should not be treated as final approval for bulk production. A pre-production sample built from production materials is the better control point.
The buyer should also approve the sample in the packed condition whenever possible. A pouch that looks right on a table can behave differently once bundled, boxed, or inserted into a kit. Keep one signed sample on the buyer side and one at the factory, and mark the approved details clearly: size, fabric, cord, logo position, print color, and packing format. If any of those elements change later, the supplier should provide a revised sample or written confirmation before continuing. This avoids the common problem where the artwork is correct but the production article is not the same article that was approved.
- Approve actual fabric, actual cord, actual print method, and actual size together.
- Measure the finished pouch after sewing and pressing, not before.
- Photograph the approved sample front, back, inside seam, and closed condition.
- Retain a buyer-side reference sample for shipment inspection and reorder comparison.
- Require re-approval if the supplier changes fabric lot, cord type, print method, or packing format.
Ask Quote Questions That Reveal Hidden Cost
A quote for custom cotton drawstring pouches should explain what is included and what is not. Unit price alone does not tell the buyer whether the pouch is truly comparable. Fabric sourcing, dyeing, print setup, sewing labor, label attachment, sample charges, carton dimensions, and freight weight can all move the landed cost materially. If a supplier cannot state the exact fabric weight, cord type, and packing method, the quote should be treated as provisional.
Good procurement questions also reduce the chance of a false low price. For example, a supplier may quote a low unit cost on natural cotton but assume a light fabric, a smaller logo, a looser tolerance, or bulk packing that is harder to count. Asking for the carton dimensions, gross weight, and inspection standard is not overkill. It is how buyers compare apples to apples and avoid discovering that the lowest quote is only low because the supplier omitted the expensive parts of the job. That is especially important when trade show dates leave little room for a second round of sourcing.
- Ask which material assumptions are driving the price: fabric, cord, print, label, or packing.
- Request separate lines for sample cost, setup cost, and bulk unit price.
- Confirm whether the factory is quoting stock fabric or new fabric procurement.
- Ask for carton dimensions and gross weight before you compare freight options.
- Require the same spec wording across suppliers so quotes can be compared directly.
Set QC, Cartons, and Delivery Controls Before Release
Final quality control should be planned before production starts, not after the cartons are sealed. The buyer needs an agreed standard for critical defects, major defects, and minor defects, along with the inspection points that matter most to the program. For cotton drawstring pouches, those points usually include size, print placement, seam integrity, cord function, stains, loose threads, and carton labeling. If the order is tied to a fixed show date, the inspection plan should also include a decision point for rework or expedite shipping.
Carton and label control are part of quality control because they protect the pouch after sewing is finished. Cartons should be strong enough for export or warehouse handling, labeled with the PO or SKU the receiving team expects, and packed in a count that matches the internal kit plan. Build the schedule backward from the booth setup date, then add time for sample approval, production, inspection, transit, customs, and receiving. When the deadline is fixed, the safer move is often to simplify the pouch spec rather than compress the calendar and hope for the best. If the order is large, the buyer should also request a carton photo before dispatch so the receiving team knows what is coming.
- Define acceptable defect limits for stains, print shift, skipped stitches, and broken cords.
- Inspect against the approved sample and the written spec, not only against a visual impression.
- Check carton counts, carton labels, and bundle labels before release.
- Keep enough schedule buffer for sample revision, reprint, or seam rework.
- Simplify the spec early if the event date cannot move and lead time is tight.
Specification comparison for buyers
| Spec decision | Recommended option | When it fits | Buyer risk to check |
|---|---|---|---|
| Fabric weight | 5 oz to 8 oz cotton, roughly 170-270 GSM depending on weave | Trade show inserts such as brochures, badges, small samples, cables, cosmetics, or light retail gifts | Very light 3 oz cotton can feel cheap and may show contents; heavy canvas raises freight and can make small pouches bulky |
| Pouch construction | Double-fold top channel with locked side seams and 8-10 stitches per inch | Repeated opening and closing during exhibitions, sample handouts, and post-show reuse | Loose stitch density or unfinished inner seams can fray after cord friction and handling |
| Drawcord choice | Cotton cord or polyester cord sized to pouch opening; knots or metal-free cord ends for simple packing | Natural branding programs, cosmetics kits, jewelry, lifestyle gifts, and event merchandise | Thin cord cuts into fabric channel; oversized cord jams and slows packing at the booth |
| Print method | Screen print for solid logos; heat transfer only when artwork has gradients or many colors | Most exhibitor logos, sponsor marks, QR codes, and one- or two-color brand graphics | Under-cured ink can crack or transfer; thick ink on light cotton can make the pouch front stiff |
| Size tolerance | State finished size with +/-5 mm for small pouches and +/-10 mm for larger pouches | Orders where inserts must fit cartons, sample kits, or retail display trays | Quoting only nominal size can create unusable stock if brochures or product samples barely fit |
| Load test | Test at 1.5-2 times intended filled weight for short handling cycles | Pouches carrying product samples, small hardware, personal care sets, or bottle accessories | A pouch that passes empty visual inspection may fail once the cord channel carries real load |
| Packing method | Flat packed in export cartons with inner polybag bundles or paper bands as required | Trade show warehouses, kit assembly centers, and distributors counting units before events | Over-compressed cartons can crease printed panels and make natural cotton look dirty or wrinkled |
| Sample route | Pre-production sample using actual fabric, cord, stitching, size, print, and packing label | Orders above a few thousand pieces or any order tied to a fixed exhibition date | Photo approval alone misses hand feel, cord friction, seam strength, odor, and carton fit |
Buyer checklist before sampling
- Define the exact insert weight and dimensions before choosing fabric GSM or pouch size.
- Specify finished size, not only cut size, and include realistic tolerance by pouch size.
- Choose fabric weight by required durability and freight cost, not by the cheapest quote line.
- Match cord diameter to the channel width so the pouch closes smoothly after printing and pressing.
- Approve a physical pre-production sample with actual logo, cord, seam, label, and packing method.
- Run a quick fill test using the real trade show item, brochure, sample bottle, cable, or accessory kit.
- Inspect seam slippage, cord channel wear, loose threads, print cracking, ink transfer, and fabric stains.
- State acceptable defect levels for print position, size variance, dirty marks, skipped stitches, and broken cords.
- Confirm whether units ship flat, folded, bundled, or inserted into other kits before the supplier quotes cartons.
- Build the timeline backward from booth setup date, including sample approval, production, inspection, vessel or air transit, and warehouse receiving.
Factory quote questions to send
- What cotton fabric weight, GSM range, weave, and shrinkage expectation are included in this quote?
- Is the price based on greige, natural, bleached, dyed, or organic cotton fabric, and is there a color lot risk?
- What finished pouch size tolerance will you hold after sewing and pressing?
- What cord material, cord diameter, cord color, and closure method are included?
- Which print method is quoted, how many colors are included, and what curing or wash-rub test can you provide?
- Is the quoted MOQ driven by fabric purchasing, dyeing, printing setup, sewing line efficiency, or carton consolidation?
- Will the pre-production sample use bulk fabric and bulk cord, or only available sample-room substitutes?
- How many pieces per carton, what carton dimensions, and what estimated gross weight are used for freight planning?
- What inspection standard do you recommend for stitching, print placement, size tolerance, stains, and cord function?
- What is the production lead time after artwork approval and deposit, and where are the main schedule risks?
Quality-control points to confirm
- Fabric weight verified by GSM or oz specification against approved sample.
- Finished pouch size measured flat after sewing, pressing, and drawcord insertion.
- Seam strength checked by manual pull and filled-load handling test.
- Cord channel inspected for smooth closing, no skipped stitches, and no fabric tearing.
- Print adhesion tested by rub, tape pull, bending, and light scratch depending on ink type.
- Logo placement measured from top and side reference points, not judged only by eye.
- Fabric surface checked for oil marks, weaving slubs outside agreed tolerance, stains, and color variation.
- Packing inspected for correct bundle count, carton strength, label accuracy, and no excessive compression.