Put Carton Planning Into the First RFQ
Custom cotton drawstring pouches look simple on a spec sheet, but trade show orders usually break after production, not during sewing. The common failures are operational: cartons are too heavy for booth staff, inner bundles do not match the restock plan, similar artwork versions get mixed, carton labels are too vague for receiving, or freight was priced from rough packing assumptions that were never updated. For procurement buyers, carton planning belongs in the RFQ because it affects unit price, sewing efficiency, inspection scope, freight, and event delivery.
The carton is part of the product when the buyer is shipping to an expo, hotel, advance warehouse, distributor, or booth contractor. It controls how the order is counted, stored, moved, and restocked. A pouch can be sewn correctly and still create cost if the show decorator cannot identify the destination, the warehouse has to open every carton to separate versions, or the hotel receiving desk rejects a carton because the label does not match the paperwork. Packing data should be treated as a commercial requirement, not as a warehouse afterthought.
A good RFQ connects the pouch to the event plan. It should tell the supplier what the pouch will hold, how many versions are needed, where each quantity ships, how the booth team will replenish stock, and what carton limits must be respected. That lets the factory quote fabric, printing, sewing, inner packing, carton material, and freight assumptions in one coherent structure.
- List the intended use: booth giveaway, sample pouch, VIP kit, sales meeting kit, retail presentation, or reusable merchandise bag.
- Break quantity down by artwork version, pouch size, language, sponsor mark, region, and destination instead of giving only one total.
- State the required in-hand date and the actual receiving window for the warehouse, venue, hotel, or event contractor.
- Set carton rules early: maximum gross weight, preferred inner bundle count, required label fields, and whether cartons ship loose or palletized.
- Ask for estimated carton dimensions, pieces per carton, net weight, gross weight, and CBM in the quotation, with final data confirmed after packing trial.
Define the Event Workflow, Not Just the Product
A trade show pouch is not one generic product. The spec should start from the job it has to do. A mass giveaway pouch needs low handling cost, easy counting, and acceptable print visibility. A sample pouch needs reliable closure and enough room for the sample not to force the seams. A VIP kit pouch can justify heavier cotton, more careful finishing, and better carton presentation because the product supports a higher-value brand interaction.
The most useful sourcing question is simple: what will go inside, who will handle it, and how often will it be opened and closed? A pouch for a one-time handout does not need the same cord strength or seam reinforcement as a pouch that will be reused after the event. Likewise, a pouch that carries a boxed product needs different size logic than one that holds flat literature or a folded T-shirt. The use case should drive the dimensions, print area, and carton plan before the supplier starts quoting assumptions.
If the order has multiple uses in one program, split the specs. Do not force one pouch to handle every scenario if that creates oversized freight, loose fit, or poor presentation. It is often better to quote two sizes, or one size with two pack methods, than to accept a compromise that creates operational waste at the venue.
- State the use case in one sentence in the RFQ, not just the product name.
- Provide the actual insert dimensions and weight, including any box or wrapper that stays inside the pouch.
- Clarify whether the pouch must close fully, partially, or only contain the item during transport.
- List who handles the pouch after packing: warehouse staff, booth staff, distributors, or attendees.
- If the program has more than one use case, quote them as separate line items instead of blending them into one average spec.
Choose Fabric Weight With Freight and Hand Feel in Mind
Fabric weight shapes the entire order. A 5 oz or 6 oz cotton pouch, roughly 150-170 GSM, usually works for trade show giveaways because it balances cost, printability, and carton efficiency. It is generally suitable for light samples, cosmetics, pins, cables, badge kits, and accessory packs where large quantities may ship to more than one destination. An 8 oz cotton canvas pouch, roughly 220-240 GSM, feels more substantial and supports premium positioning, but it also increases fabric cost, folded bulk, carton weight, and sometimes carton count.
Buyers often approve fabric by touch alone, then discover the freight difference later. A small increase in GSM multiplied across 5,000, 10,000, or 20,000 pieces can change pieces per carton and total CBM enough to matter. More fabric also means thicker folded stacks, and the drawcord adds more bulk inside the carton. The question is not which fabric feels best in isolation. The better question is which fabric supports the event purpose at the lowest acceptable landed cost and handling risk.
Natural cotton is common for eco-positioned merchandise, but natural shade can vary by lot and can shift how colors print. Bleached cotton creates a cleaner base for bright artwork, while dyed cotton requires closer review for shade consistency, colorfastness, shrinkage, and MOQ. If brand color accuracy matters, approve the actual fabric base and print strike-off before bulk production.
- Use 5 oz or 6 oz cotton when the pouch needs to stay light, cost-controlled, and easy to pack in volume.
- Use 8 oz canvas when the pouch supports a premium kit, heavier contents, or repeated reuse.
- Ask the supplier to show estimated pieces per carton and carton gross weight at each fabric weight.
- Check whether lighter cotton becomes semi-transparent under dark ink or dense print coverage.
- Confirm whether the drawcord is cotton, polyester, stock color, or dyed to match the pouch.
Lock Finished Size to the Actual Insert
A drawstring pouch should be sized from the object it carries, not from a catalog image or a past order that had different contents. Finished flat dimensions do not equal usable internal space. Seam allowance, the drawcord channel, fabric thickness, and closure behavior all reduce the space available for a box, bottle, sample kit, or literature pack. A pouch listed as 150 x 200 mm may not close comfortably around a product that is 200 mm tall because the drawcord needs room above the item to gather and tie.
For procurement, oversizing and undersizing both create cost. Oversizing uses more cotton, may require a larger print area, increases folded bulk, and can reduce pieces per carton. Undersizing is worse operationally because the pouch may not close, the logo may distort over the contents, or booth staff may stop using the pouch because packing takes too long. If the pouch is for pre-kitted giveaways, test the actual kit or a dummy insert before the final pattern is approved.
The RFQ should define the finished size after sewing and the measurement method. Width and height should be measured flat, after pressing if pressing is part of production. For thicker contents, a gusseted construction or a larger flat pattern can be more reliable than forcing a flat pouch to wrap around a rigid object. Print placement also depends on size: logos placed too close to the channel can disappear when the cord is pulled.
- Provide product dimensions, product weight, and whether the pouch must close fully with contents inside.
- State finished size in mm after sewing, not only fabric cut size or approximate catalog size.
- Define an agreed tolerance, such as +/-5 mm on small pouches or +/-10 mm on larger ones when commercially reasonable.
- Specify drawcord channel depth and the minimum clearance between the logo and the channel seam.
- For boxed or thick contents, ask the factory to test fit with a real sample or dimensional dummy before bulk cutting.
- Confirm whether the pouch is measured before or after washing, pressing, or any shrinkage-control process.
Specify Print Method, Placement, and Cure Requirements
Printing is not only a visual decision; it changes packing risk. Screen printing is usually the practical choice for one-color or two-color trade show logos because it is repeatable, efficient, and straightforward to inspect when Pantone references and print size are clear. The buyer should provide vector artwork, print dimensions in mm, placement from pouch edges, and no-print zones near seams, gussets, or the drawcord channel. If the logo must remain visible when the pouch is closed, that should be tested during sample review.
Heat transfer and digital print are useful for gradients, photographic elements, multi-color artwork, or low-volume versioning, but they require more careful physical approval. Buyers should check the transfer edge, hand feel, flexibility, heat marks on natural cotton, color sharpness on the fabric texture, and adhesion after bending. A digital proof cannot show how a transfer feels, how ink sits on cotton fibers, or whether the printed panel marks under carton pressure.
Packing timing matters. If printed pouches are stacked or compressed before the ink is fully cured, the result can be set-off, blocking, scuffing, or pressure marks. Heavy ink coverage raises this risk, especially on rush orders. Buyers should ask how curing is controlled, whether separators are needed, and whether the first packed carton will be opened to check print condition after normal compression.
- For screen print, define number of colors, Pantone codes, print size, print location, and underbase requirement for dark fabric.
- For heat transfer, approve edge finish, flexibility, hand feel, and appearance after folding or light stretching.
- For digital print, review the result on the actual cotton fabric, not only on coated paper or a screen proof.
- Require print strike-off approval before bulk printing when brand color, fine detail, or sponsor marks are important.
- Confirm curing time before packing and ask inspection to check set-off or pressure marks inside packed bundles.
- Use tissue separation only when the print method requires it, because it adds cost, volume, and unpacking labor.
Understand MOQ by Component, Not Just Total Quantity
MOQ for custom cotton drawstring pouches is usually driven by several components at once: fabric purchasing, dye lot, cord color, screen setup, sewing line efficiency, packing method, and carton labeling. A natural cotton pouch with standard cord, one size, and one-color screen print is simpler to quote than a dyed pouch with custom cord, four sizes, six artwork versions, and destination-specific packing. When buyers understand which component creates the MOQ, they can adjust the right variable instead of pushing only on total quantity.
Trade show programs often need versioning for sponsors, regions, languages, product categories, or VIP groups. A 10,000-piece order may look attractive until it becomes ten versions of 1,000 pieces with separate print setups, separate carton marks, and separate receiving destinations. The supplier may still accept the total quantity, but setup costs, sorting risk, inspection time, and packing labor increase. Procurement should show the order matrix early so the quote reflects the real work.
If the order quantity is below the ideal MOQ, there are practical options. Keep the pouch size and fabric standard, reduce the number of print versions, choose stock cord colors, combine destinations at factory level and separate later at a domestic warehouse, or accept a setup charge. What should not happen is hiding version complexity until after the unit price is agreed; that almost always leads to late price changes or rushed packing decisions.
- Lowest complexity: natural cotton, standard cord, one pouch size, one artwork version, bulk counted packing.
- Moderate complexity: one pouch size with several one-color prints, separated by inner bundle and carton mark.
- Higher complexity: dyed fabric, custom cord color, multiple pouch sizes, retail packing, individual barcodes, or split shipments.
- Ask whether MOQ applies separately to fabric dye lot, cord color, print setup, pouch size, and carton label version.
- For low quantities, compare the cost of setup charges against simplifying artwork versions or using stock materials.
- Require the quote to show any cost difference between one-destination packing and multi-destination packing.
Plan Inner Packs for Booth Replenishment
Inner packing should match how the pouches will be used on site. For a high-volume giveaway, bundles of 100 are often the easiest format: booth staff can pull one bundle at a time, track daily usage, and restock a drawer or bin quickly. For VIP meetings, sample kits, or regional sales teams, bundles of 25 or 50 may reduce counting errors and make allocation easier. Loose bulk may reduce factory handling, but it often pushes the counting burden onto event staff at the worst possible moment.
The best bundle quantity depends on the operating plan. If the booth expects to distribute 500 pouches per day, cartons holding five bundles of 100 are simple to reconcile. If ten sales representatives each need 50 pouches for meetings, inner bundles of 50 may be better even if the outer carton quantity is larger. If artwork versions look similar, inner bands or labels should identify the version so staff do not need to open every pouch to find the right design.
Packing material choices also matter. Individual polybags are usually unnecessary for high-volume giveaways unless dust control, retail presentation, or pre-kit assembly requires them. They add material cost, carton volume, and booth unpacking time. Paper bands, recyclable inner bags, or buyer-approved LDPE bags may be more practical. The RFQ should specify any sustainability or packaging compliance requirement rather than leaving the factory to choose.
- Use bundles of 100 for high-volume booth giveaways and simple daily restocking.
- Use bundles of 50 for sales-team allocation, smaller booth storage, or moderate daily usage.
- Use bundles of 25 for VIP kits, meeting kits, or controlled distribution where counting accuracy matters more than packing speed.
- Label inner bundles when artwork versions, languages, sponsor marks, or destinations are similar.
- Avoid individual polybags unless the pouch needs retail presentation, dust protection, barcoding, or kit-line handling.
- Ask for photos of folded pouch orientation, bundle method, inner label, and carton loading pattern before mass packing continues.
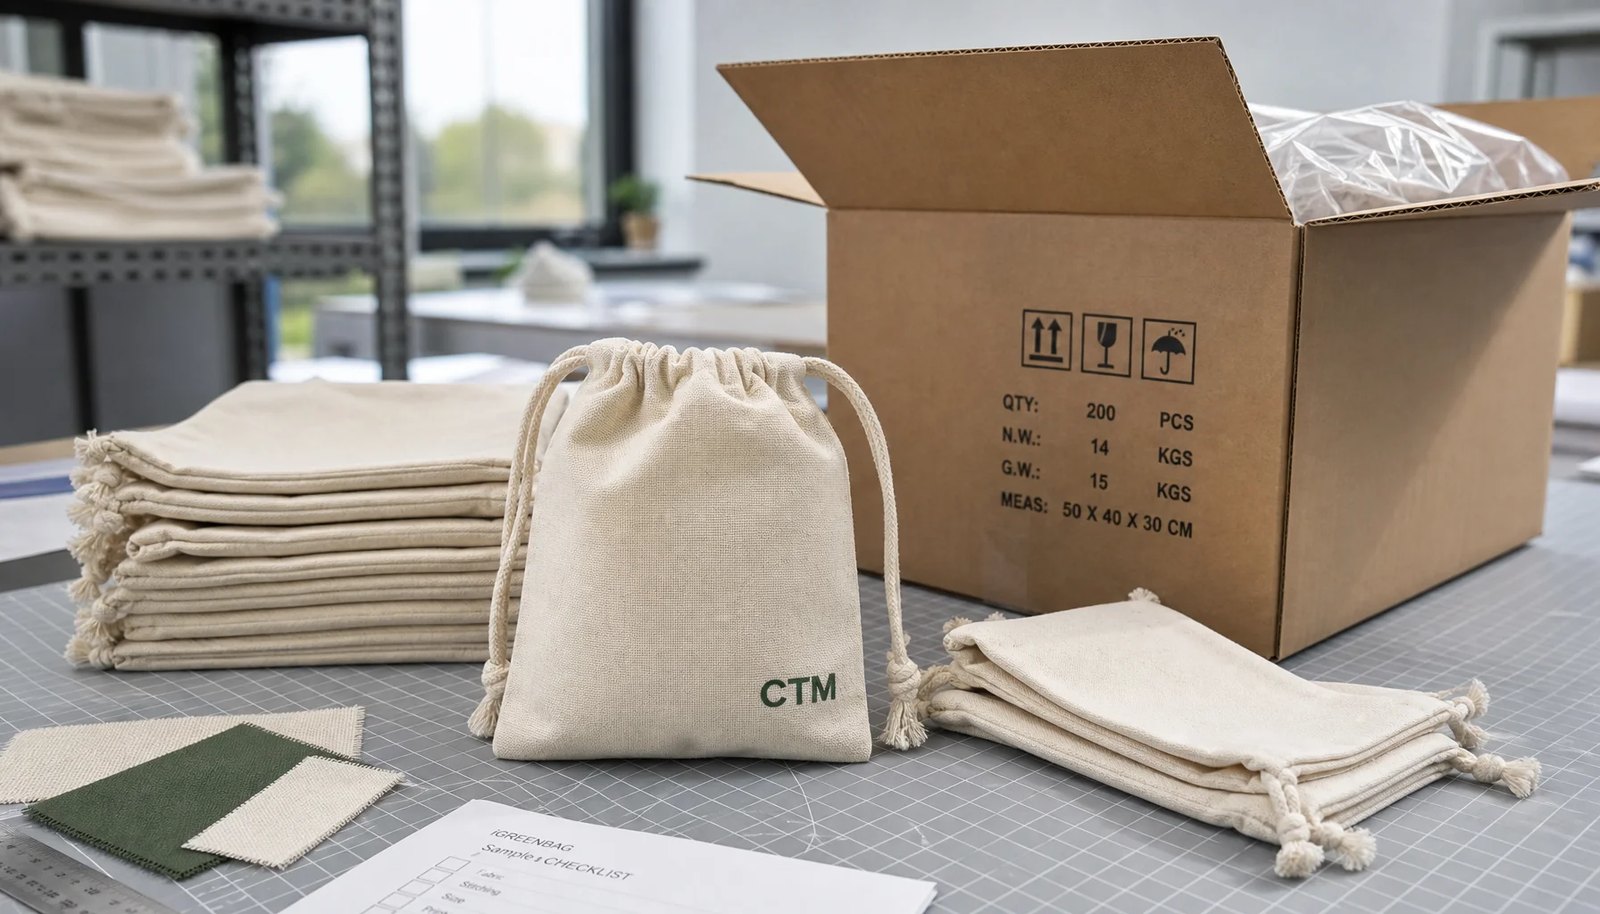
Get Carton Weight, Dimensions, and Stack Rules Right
Freight planning needs real carton data. A reliable quote should include estimated pieces per carton, carton dimensions, net weight, gross weight, and total CBM. Those numbers can be estimates at RFQ stage, but they should be updated after sample packing or the first mass production carton. Cotton pouch packing depends on finished size, GSM, pressing method, drawcord diameter, print method, inner bundle format, and whether the pouch is folded or laid flat. Guesswork can lead to freight re-rating, warehouse receiving disputes, or cartons that are impractical to handle at the venue.
For trade show exhibitors, the most compressed carton is not always the best carton. A carton designed only to minimize CBM may be too heavy for manual handling, may crush lower cartons during stacking, or may make pouches more prone to print pressure marks. Very large cartons can be awkward for couriers, hotel receiving desks, and booth setup teams. Many buyers target a 12-15 kg gross weight, then allow the factory to adjust carton quantity and dimensions to stay within that range. An absolute ceiling around 18 kg is usually safer for manual handling unless the shipment is palletized.
Carton strength should match the journey. Shipments that move from factory to forwarder to warehouse to advance warehouse to booth may be handled many times. Export cartons should be clean, dry, square, properly sealed, and strong enough for stacking. If cartons will be palletized, confirm pallet configuration, carton orientation, pallet height, stretch wrap, and whether carton marks remain visible. If cartons ship loose by courier, handleability and label placement become even more important.
- Request estimated carton dimensions, pieces per carton, gross weight, net weight, and CBM with the first quotation.
- Require final carton data after the first packed carton, before freight documents and receiving paperwork are finalized.
- Set a maximum carton gross weight that your warehouse, event contractor, or booth team can handle safely.
- Confirm carton flute, wall strength, tape method, and whether edge crushing or moisture exposure is a concern during transit.
- Decide whether cartons ship loose, palletized, couriered, or consolidated with other event materials.
- Use simple carton numbering, such as 1 of 40 through 40 of 40, or separate sequences by SKU and destination.
Write Carton Marks and Packing Lists That Receiving Can Use
Carton marks are not decoration. For trade shows, they are handling instructions that help warehouses, forwarders, show decorators, hotels, and booth teams identify the right goods quickly. A label that says cotton pouch is not enough when several versions exist. The carton should show what the item is, which artwork version it contains, how many pieces are inside, where it goes, and how it connects to the packing list.
The most useful carton label fields are item code, pouch description, finished size, artwork version, quantity, carton number, gross weight, net weight, destination, and buyer reference. For event shipments, add booth number, event name, advance warehouse reference, distributor code, or receiving appointment reference when required. The exact fields should come from the receiving party before packing starts. Late labels are a common reason for repacking, relabeling, or cartons being held at the wrong location.
Carton marks should match the commercial invoice and packing list. If the packing list uses item code CTM-PCH-NAT-01, the carton should not use a casual description such as natural logo bag. This is especially important for multi-destination orders because receiving teams may not know the product visually. Buyers should approve a carton mark template as part of pre-production approval, then verify real carton photos before shipment release.
- Use item codes and artwork version codes instead of relying on visual descriptions.
- Show quantity per carton, carton sequence, gross weight, net weight, and destination on every carton.
- Add booth number, event name, hotel reference, advance warehouse code, or distributor reference when the receiving party requires it.
- Keep label wording consistent with the packing list, commercial invoice, purchase order, and freight booking.
- For split shipments, use destination-specific labels and separate carton number sequences where possible.
- Ask final inspection to photograph representative carton marks and verify them against the packing list before pickup.
Build QC and Approval Gates Before Shipment
For cotton drawstring pouches, quality control should be staged, not left to a final carton check. The first gate is the sample. The buyer should approve fabric, print strike-off, cord, and finished size together because the combination matters more than any single component. The second gate is the pre-production sample or pre-production pack, where the factory confirms how the pouches fold, how they sit in bundles, and whether the carton target still works after the real packing method is used.
The next gate is the first carton. This is where procurement buyers catch the problems that are hard to see in a loose sample: set-off from fresh ink, inaccurate bundle count, carton weakness, wrong label wording, or a packed carton that exceeds the handling target. If the first carton fails, the factory should stop and correct the pack method before the full order is sealed. That is cheaper than sorting damaged or mispacked cartons after freight booking.
Final QC should be boring and consistent. Inspectors should confirm fabric GSM, color, print position, seam quality, drawcord function, bundle count, carton marks, and packed carton weights against the approved spec. When the order has multiple versions, random checks should include version separation and label matching. Buyers should ask for photos or video of the packed condition, not only the finished pouch, because trade show problems usually appear in the carton, not on the sewing table.
- Approve fabric swatch, print strike-off, and finished sample before bulk cutting or mass printing begins.
- Ask for a pre-production packing sample that shows folded orientation, bundle count, and carton fill pattern.
- Require first-carton inspection before the supplier seals the full shipment.
- Check pack condition for ink transfer, pressure marks, blocking, edge lift, and loose cords after compression.
- Verify the exact mix of artwork versions, destinations, and carton numbers against the packing list.
- Hold shipment release until carton weight, label text, and packed quantity all match the approved order record.
Specification comparison for buyers
| Spec decision | Recommended option | When it fits | Buyer risk to check |
|---|---|---|---|
| Fabric weight for standard trade show giveaway pouch | 5 oz or 6 oz cotton, about 150-170 GSM, with a written finished-size tolerance in the RFQ | Light samples, cosmetics, pins, cables, badge kits, literature sets, and booth giveaways where freight volume matters | Very light cotton can look thin under dark ink; confirm opacity, fold memory, and whether the print bleeds through to the back panel |
| Fabric weight for premium kit pouch | 8 oz cotton canvas, about 220-240 GSM, with reinforced seams and a confirmed hand feel sample | VIP kits, retail-style presentation, heavier samples, small electronics, or reusable event packaging | Heavier fabric reduces pieces per carton and can raise CBM or pallet count; compare landed cost, not only unit price |
| Pouch size definition | Finished size measured flat after sewing, with width, height, drawcord channel depth, and print area shown in mm | Orders that must close around a product, sample box, bottle, accessory set, or handout pack | Catalog dimensions often ignore seam allowance and channel depth, so usable internal space is smaller than the headline size |
| Print method for simple branding | 1-2 color screen print with Pantone references, print size, print position, and cure method confirmed | Logos, event names, sponsor marks, and repeat orders where cost control and color consistency matter | Ink that is not fully cured can block or transfer in cartons; require a rub check after packing pressure is simulated |
| Print method for multicolor artwork | Heat transfer or digital print on approved cotton, verified by a physical sample, not only a digital proof | Gradients, fine detail, low-volume variations, or artwork with more than two colors | Edge lift, hand feel, wash resistance, and heat marks must be approved before mass production |
| Drawcord material | Cotton cord for a natural look; polyester cord when color consistency and smoother pull are priorities | Cotton fits eco-positioned merchandise; polyester fits brighter brand colors or frequent opening and closing | Cord diameter, knot size, and channel size affect carton bulk and closure reliability |
| Inner packing method | Bundles of 25, 50, or 100 with paper bands, buyer-approved bags, or labeled inner packs | Event giveaways, daily booth replenishment, distributor splits, and multi-destination shipments | Loose bulk saves factory time but adds counting work at the venue; choose the bundle count around how staff will restock |
| Export carton size | Cartons designed to stay around 12-15 kg gross when possible, with a practical upper limit around 18 kg | Courier shipments, hotel receiving, convention centers, forwarder handling, and booth setup teams | A carton optimized only for CBM can be too heavy or awkward to move by hand |
| Carton marking plan | Item code, pouch size, print version, quantity, carton number, gross and net weight, destination, and booth or show reference | Multi-SKU events, regional distributors, split deliveries, sponsor versions, or multilingual programs | Poor marks cause lost cartons, duplicate receiving, and repacking; the carton label must match the packing list exactly |
Buyer checklist before sampling
- Define the pouch role before choosing specs: mass giveaway, sample packaging, VIP kit, sales meeting kit, retail gift-with-purchase, or reusable product bag.
- State finished pouch size after sewing, not fabric cut size, and define how width, height, drawcord channel depth, and print area will be measured.
- Provide actual contents dimensions and weight, then confirm whether the pouch must close fully with the product inside.
- Specify cotton fabric weight in GSM or oz, weave or canvas preference, fabric color, drawcord material, drawcord color, and whether pre-shrunk fabric is required.
- Provide vector artwork and list print size, print location from pouch edges, Pantone colors, number of print colors, and no-print zones near seams or the channel.
- Separate quantity by artwork version, destination, show date, and required delivery window instead of sending only one total quantity.
- Decide inner bundle count based on booth operation: 25 for controlled kit preparation, 50 for smaller teams, 100 for high-volume giveaway replenishment, or a custom daily allocation.
- Set maximum carton gross weight and any carton dimension preference before the supplier quotes freight or books export packing materials.
- Ask for estimated pieces per carton, carton dimensions, gross weight, net weight, and CBM at quote stage, then require final packed-carton data before shipment.
- Require a packed pre-production sample, first-carton photos, or a carton packing trial video before mass packing continues.
Factory quote questions to send
- What fabric GSM, cotton construction, and finishing are included in the quoted unit price, and is the fabric natural, bleached, dyed, washed, or pre-shrunk?
- What finished pouch size tolerance can you hold after sewing and pressing, especially at the width, height, drawcord channel, and bottom seam?
- Which print method are you quoting, what is the maximum print area, and how many colors are included before extra setup or transfer charges apply?
- Can you quote the same pouch at two fabric weights so we can compare unit cost, pieces per carton, gross weight, CBM, and landed cost?
- What MOQ applies separately to pouch size, fabric color, cord color, print version, packing method, and carton label version?
- How many pieces will be packed per inner bundle and per export carton, and what are the estimated carton dimensions, net weight, gross weight, and CBM?
- Can you provide a packed pre-production sample, first-carton packing photos, or a carton packing trial video before mass production packing continues?
- What carton strength, flute type, wall construction, tape method, and sealing pattern will be used for export packing?
- How will mixed artwork versions, sponsor versions, language versions, or multiple booth destinations be separated, counted, marked, and listed on the packing list?
- What production lead time starts after artwork approval, sample approval, deposit, material arrival, or confirmed packing instructions?
Quality-control points to confirm
- Fabric GSM should match the approved standard within the agreed tolerance, commonly +/-5%, unless the buyer accepts a wider tolerance in writing.
- Fabric color and hand feel should match the approved swatch, with separate review for natural cotton shade variation, dyed fabric lots, and any washed finish.
- Finished size should be measured flat after sewing, with width, height, drawcord channel depth, bottom seam behavior, and print position recorded against the approved sample.
- Pouch fit should be checked with the actual product or a same-size dummy insert when the pouch must close around contents for a kit or giveaway.
- Print color should be checked against approved Pantone references or a signed sample under consistent light, not only from phone photos or screen proofs.
- Print adhesion should pass a dry rub check and, when relevant, a tape pull, light scratch, or simple hand wash check before cartons are sealed.
- Packed printed panels should be reviewed for set-off, pressure marks, blocking, transfer edge lift, and ink cracking after normal carton compression.
- Drawcord should pull smoothly without tearing the channel seam, slipping out, creating uneven closure, or leaving excessive loose thread at knots.
- Seams should have no open stitches, skipped stitches, obvious puckering, raw fabric exposure, or loose threads longer than the accepted trimming standard.
- Inner bundle counts should be verified by bundle count and random bundle opening, especially when the same pouch has multiple artwork versions.