Define The Buying Job Before The Bag Spec
A custom cotton drawstring backpack for a coffee roaster may be a retail merchandise item, a cafe launch giveaway, a subscription insert, a trade show handout, or a distributor kit. Those jobs look similar in a flat product photo, but they need different purchasing controls. A giveaway can tolerate a lighter fabric and simpler packing. A retail item needs better hand feel, cleaner stitching, more predictable color, and a proof that protects the brand mark on shelf. Before asking for price, define where the bag will be used, who will handle it, what it will carry, and whether the buyer will judge it as packaging, merchandise, or a reusable product.
For procurement teams, this first decision prevents vague quotes. A supplier cannot responsibly quote the same way for 1,000 event bags filled with postcards and 10,000 retail bags carrying two coffee packs and a tasting card. The fill weight affects fabric, cord, seam reinforcement, and carton count. The channel affects whether you need individual polybags, hangtags, barcode labels, or distributor carton marks. The launch date affects whether a physical pre-production sample is essential or whether a print strike-off plus first-article approval is enough.
A good brief also reduces internal rework. Coffee roaster teams often have marketing, retail, operations, and wholesale stakeholders commenting on the same bag. If the procurement brief names the bag purpose, fill items, brand priority, packing route, and approval owner, the supplier can build a proof that answers manufacturing questions instead of producing a pretty mockup that still leaves the real risks untouched.
- State the bag purpose: retail merchandise, event giveaway, distributor kit, subscription insert, or cafe launch item.
- List the actual fill items, approximate loaded weight, and whether the bag must stand up to repeated carrying.
- Name the sales channel because retail, wholesale, and event packing create different requirements.
- Identify the final approval owner before the first proof is circulated.
- Separate must-have brand requirements from preferences so the factory knows what cannot move.
Start The Proof With Artwork Rules
Coffee roaster artwork often contains more detail than cotton screen printing can safely hold. Logos may include small origin names, roast notes, badges, fine lines, distressed textures, or hand-lettered marks. On a drawstring backpack, that detail competes with the fabric texture, cord tunnel, top fold, side seams, and the natural movement of the panel. A digital mockup on a perfectly flat rectangle can make the artwork look cleaner than it will be on a sewn cotton bag. The proofing job is to turn brand art into production art without letting anyone guess.
Freeze the artwork before pricing. Confirm the exact logo version, print size, print location, ink count, and bag color. If the order has more than one artwork version, such as one logo for retail stores and another for a seasonal coffee release, quote each version separately. Mixing artwork versions under one vague line item creates MOQ confusion and screen charge disputes later. If the artwork includes gradients, tiny type, or distressed texture, ask the factory to recommend a production-safe version before screen setup starts.
The proof should show real measurements. Ask for the artwork position measured from the top fold, side seam, and bottom edge of the finished bag. It should also show the cord tunnel and any no-print area. For most cotton drawstring backpacks, the logo belongs below the tunnel with enough clearance that the gathered top does not distort the mark when the bag is closed. If the art is centered only on the flat panel and ignores the way the top bunches, the finished bag can look crowded even when the measurement is technically correct.
- Lock file format, final logo version, print size, ink count, and bag color before sampling.
- Set minimum text height and minimum line weight for cotton fabric, especially for origin names or roast notes.
- Require a measured proof with top fold, side seam, bottom edge, cord tunnel, and no-print area shown.
- Convert gradients, distressed art, and small secondary copy into production-safe artwork before screen making.
- Quote each artwork version separately so MOQ, setup, and inspection remain clear.
Choose Fabric That Supports The Print
Fabric weight is one of the largest drivers of perceived quality on custom cotton drawstring backpacks. Many procurement buyers see 120 GSM, 140 GSM, 160 GSM, and 180 GSM quoted as if they are interchangeable. They are not. A lighter bag may work for a short event giveaway, but it can feel thin, show contents, wrinkle more easily, and distort around the seams. For coffee roaster programs that will sit near retail coffee bags, equipment, or gift sets, 160-180 GSM is usually the more practical range because it gives the bag better body and gives the print a more stable surface.
The fabric decision also affects ink coverage. Natural cotton is generally more forgiving for first orders because the base color is lighter and the surface tends to preserve logo contrast. Dyed cotton can look excellent, especially for premium merchandise, but it needs a tighter proof. Ink color may shift against the fabric shade, and small type can become harder to read. A black, forest green, or deep burgundy bag may require a different ink formula, underbase, or simplified artwork to maintain contrast. Procurement should ask the supplier to prove the ink on the actual fabric, not only on a generic cotton swatch.
Ask how the fabric is prepared before printing and sewing. Pre-shrunk cotton, piece-dyed fabric, bleached fabric, and natural cotton all behave differently. Shrinkage matters even when the buyer does not expect consumers to wash the bag, because fabric movement can affect final dimensions during finishing. Shade variation matters when the order is split across multiple batches or when the same bag will reorder later. The supplier should state GSM, weave, fabric color, shrinkage expectation, and shade tolerance in the quote or spec sheet.
- Use 160-180 GSM for most retail-ready coffee roaster backpacks and reusable merchandise.
- Consider 140 GSM only for lighter promotional programs where hand feel is less critical.
- Use natural cotton when print legibility and first-order proofing margin matter most.
- Test dyed cotton with the final ink color before bulk approval, especially for dark bags.
- Ask for GSM, weave, fabric preparation, shrinkage expectation, and shade standard in writing.
Select The Print Method Around The Logo
Screen printing is usually the safest and most economical method for simple coffee roaster logos on cotton drawstring backpacks. It works well for bold marks, one or two ink colors, solid typography, and repeat orders where the same artwork returns. The key is to design within its strengths. Clean shapes, adequate line weight, and strong contrast tend to print consistently. Fine serif type, small tasting notes, soft shadows, and complex gradients create more proofing risk because ink can fill in or lose edge definition on woven cotton.
If the brand team wants a complex graphic, the buyer has several choices. The artwork can be simplified into a flat-color version. A gradient can be converted into a controlled halftone if the supplier can hold the dot structure on the chosen fabric. A multi-color design can be reduced to one or two colors for better cost and consistency. Heat transfer or digital methods may be suggested for detailed artwork, but those options need their own durability, hand feel, and wash or rub checks. Do not switch methods only because a digital mockup looks closer to the original artwork.
Color matching also needs practical limits. Pantone references help, but cotton fabric, ink opacity, and fabric color all affect the final appearance. For a roaster using kraft, cream, black, or muted brand colors, ask the supplier whether the quoted ink system can hold the desired contrast. If the logo must match packaging, compare the printed bag to the packaging under daylight-equivalent light. A proofing checklist should define acceptable color variation instead of leaving final judgment to a warehouse photo.
- Use screen print for bold one-color or two-color coffee roaster logos.
- Simplify small roast notes, fine lines, and distressed textures before screen setup.
- Ask for halftone limits before approving gradients or shaded graphics.
- Compare printed color under consistent light against the approved sample or brand standard.
- Do not approve a print method until hand feel, durability, and artwork detail are checked together.
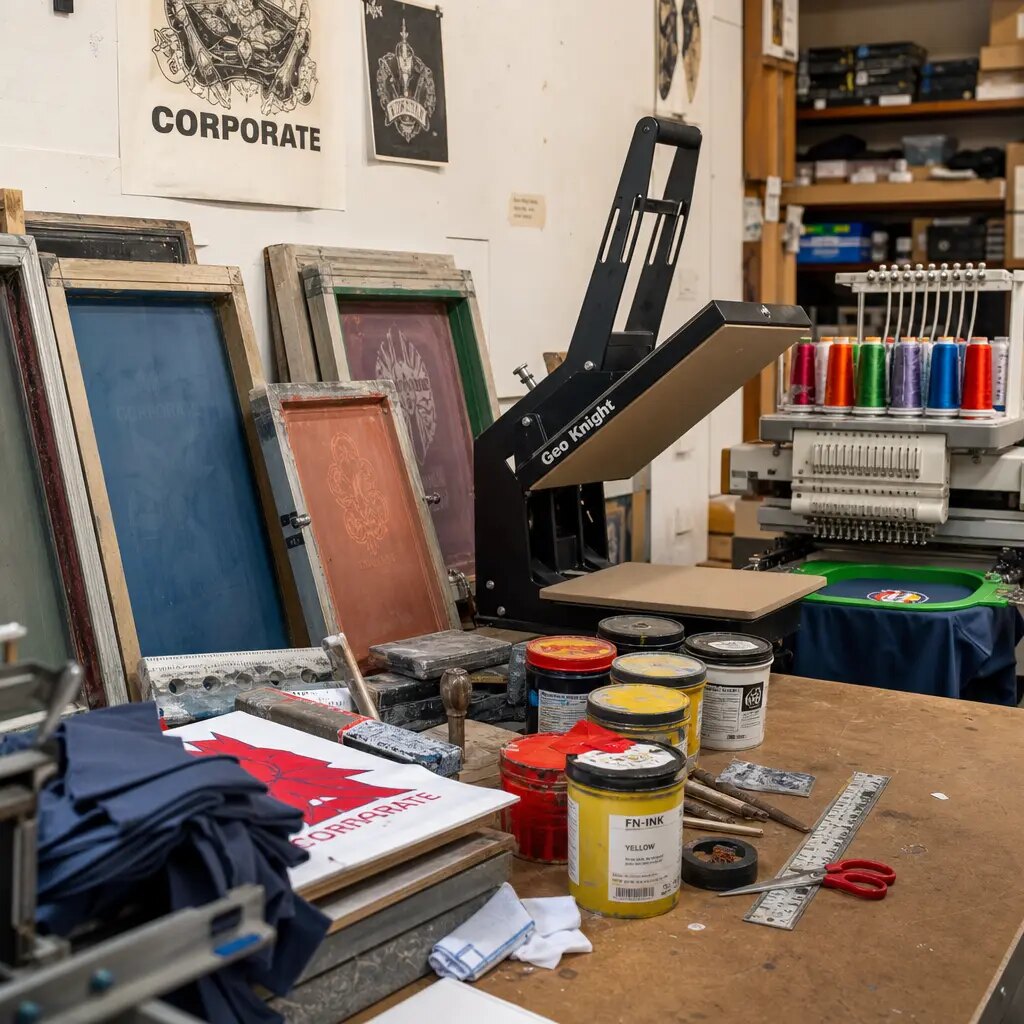
Make The Proof A Control Document
A proof is not just a picture for approval. For procurement, it is a manufacturing control document. It should identify the bag size, fabric color, print method, artwork file name, ink references, print dimensions, placement measurements, tunnel clearance, and approval date. It should also show the front panel in the correct proportions, not a stretched mockup. When a dispute happens, the proof becomes the reference that determines whether the supplier followed instructions or whether the buyer approved an incomplete spec.
Placement references are especially important on drawstring backpacks. The print should be measured from consistent physical points: top fold, side seam, bottom edge, and sometimes the center line. If the proof only says centered on front, the factory may center the art on the flat cut panel, the sewn body, or the visible area below the tunnel. Each interpretation can produce a different result. Ask the proof to show the logo box and clearance from the cord tunnel so the top gathering does not crowd the artwork when the bag is closed.
Add rejection rules to the proofing checklist. State that the print will be rejected if it is outside placement tolerance, if small type closes up, if color is materially off the approved sample, if ink transfers after curing, or if the logo is distorted by seam pull. These rules are not hostile; they help the factory know what to control. A proof that only says approved gives the supplier less guidance than one that says approved against specific tolerances and inspection points.
- Include bag size, artwork file name, print dimensions, ink reference, print method, fabric color, and approval date.
- Measure placement from top fold, side seam, bottom edge, and cord tunnel clearance.
- Show the no-print zone around the drawstring channel and seam areas.
- Write rejection criteria for placement drift, illegible type, color mismatch, ink transfer, and distortion.
- Save the approved proof and sample reference as the inspection standard for bulk production.
Approve Samples On Final Materials
A pre-production sample is valuable only when it represents the bulk order. A sample made with substitute fabric, temporary cord, different sewing thread, generic ink, or a placeholder label can hide the real production risk. For a new coffee roaster program, request a sample made from final fabric, final GSM, final bag color, final cord, final reinforcement, final artwork, and final ink. If the supplier cannot provide that before bulk, ask what element is different and what risk remains. Approving a sample with exceptions should be a deliberate procurement decision, not a casual email reply.
Inspect the sample as a product, not as a flat print. Load it with the actual items it will carry, such as coffee pouches, tins, tasting cards, sample packs, or event materials. Check whether the bag closes smoothly, whether the cords feel comfortable, whether the printed logo still looks balanced when the top gathers, and whether the lower corners show stress. A bag that looks fine empty may pull oddly when filled. A reusable merchandise item should be judged in the way a customer will actually use it.
Do a simple print check before approval. Rub the logo with a clean dry cloth after the supplier says the ink is cured. Fold the printed area once in a normal packing fold and check for cracking or obvious dull marks. Compare the print color and opacity to the proof target. Look at the reverse side for show-through if the fabric is light or the ink is heavy. These checks are not a substitute for lab testing, but they catch many practical issues before the order becomes bulk inventory.
- Approve only a sample built with final fabric, cord, thread, label, ink, artwork, and packing fold.
- Load the sample with real coffee products or event materials to test shape, closure, and stress points.
- Check logo balance when the drawstring top is gathered, not only when the bag lies flat.
- Use a dry rub and normal fold check to catch weak curing, transfer, or cracking risk.
- Record every approved sample detail so bulk inspection is not based on memory.
Compare Supplier Routes And Accountability
The supplier route affects proofing control as much as price. A direct factory with in-house sewing and printing can be efficient because one production team controls fabric cutting, sewing, print placement, curing, packing, and rework. That route is often useful when the bag construction and print quality both matter. It also simplifies the approval chain: one supplier receives the proof, makes the sample, prints the bulk, and owns the final result.
A trading company or sourcing agent can still be useful when the program has multiple products, multiple bag styles, or a procurement team that wants one commercial contact. The risk is opacity. If sewing is done in one factory and printing in another, the quote should disclose that. The buyer should know who checks the first article, who controls the approved sample, and who pays for rework if the print is outside tolerance. Without that clarity, a print error can turn into a responsibility argument after the delivery date is already under pressure.
Local decorators can help with urgent domestic runs, small replenishments, or last-minute event needs. They may be less competitive for larger custom-sewn orders or export packing, but speed and proximity can matter. Compare supplier routes by total risk, not only unit price. For coffee roasters, the cost of a late or visibly wrong bag can be higher than a small unit-price difference, especially when the program is tied to a launch, retail allocation, or seasonal campaign.
- Use direct factory sourcing when you need one owner for construction, print, proofing, and bulk release.
- Use a trading company only when subcontracted sewing and printing responsibilities are disclosed.
- Use local decoration mainly for rush replenishment, small domestic runs, or event recovery plans.
- Ask who owns rework if printing is outsourced or the bulk fails the approved sample.
- Choose the route before final proofing because MOQ, lead time, and sample control depend on it.
Build Quotes Around Real Cost Drivers
A useful quote for custom cotton drawstring backpacks should do more than state a unit price. It should define finished size, GSM, fabric color, print method, print colors, setup charges, sample cost, proof revision cost, packing format, carton count, inspection assumptions, and freight terms. If the quote is all-in but vague, the buyer cannot tell whether the supplier is including the same work as another bidder. A cheaper quote may simply omit the pre-production sample, carton marks, screen fees, or packing detail needed for the actual channel.
MOQ should be tied to the variables that create setup cost. Bag color, fabric weight, artwork version, print color count, and size can each change the minimum. A one-color logo on natural cotton may be efficient at a lower quantity than a two-color logo on dyed cotton with a separate artwork version for each store. Procurement should ask for MOQ by color, size, and artwork version, then decide whether to consolidate versions or accept the added setup. This is where a clean art plan saves real money.
Ask suppliers to show what changes at different quantity breaks. The unit price may fall as setup cost spreads across more bags, but freight, carton cube, and storage cost can change the landed number. For coffee roasters, overbuying merchandise that sits in a warehouse is not always better than paying a slightly higher unit price for a cleaner quantity. Compare quotes at the expected order quantity, the reorder quantity, and the quantity needed for any launch allocation.
- Request line-item pricing for bag body, print setup, sample, revisions, labels, packing, inspection, and freight assumptions.
- Ask MOQ by bag color, size, GSM, artwork version, and print color count.
- Compare one-color and two-color versions before approving the final artwork route.
- Check price breaks against storage, cash flow, and realistic reorder needs.
- Reject quotes that do not state what is excluded.
Set QC Tolerances Before Bulk Starts
Quality control becomes much easier when tolerances are agreed before production. The buyer and supplier should define the acceptable band for finished width, finished height, print size, print placement, cord length, and carton count. For example, the print should be measured from the same top fold and side seam references used in the proof. Body dimensions should be measured after sewing, not only from cut panels. Cord length should be checked in pairs so the bag opens and closes evenly.
Print inspection should look at more than color. Check ink coverage, opacity, edge sharpness, registration, pinholes, ghosting, and mesh marks. For small coffee roaster type, inspect legibility at normal viewing distance rather than relying only on magnified photos. Use daylight-equivalent light where possible because warehouse lighting can hide shade differences. If the order uses dyed fabric, compare the fabric shade itself against the approved sample before focusing on the print.
Construction inspection matters because the bag will be carried, not just displayed. Check cord tunnels, side seams, bottom corners, bar tacks, eyelets, thread trimming, labels, and any reinforced points. Pull gently on cords and stress points to detect weak stitching. Open and close the bag several times. A beautiful print on a poorly sewn bag still creates a customer complaint. The inspection plan should include both appearance and function so the final product meets the roaster's brand expectations.
- Define tolerances for body width, body height, print placement, print size, cord length, and carton quantity.
- Measure print position from the same references shown on the approved proof.
- Inspect ink coverage, edge sharpness, registration, rub resistance, and fold behavior.
- Check seams, tunnels, reinforcement, labels, thread trimming, and drawstring function.
- Use the approved sample as the physical standard for final inspection.
Control Packing, Cartons, And Moisture Risk
Packing is often treated as an afterthought, but it can change cost, delivery condition, and warehouse handling. Bulk packing is usually efficient for wholesale and distributor orders, but the buyer still needs to specify fold method, inner count, master carton count, carton marks, SKU separation, and whether polybags are required. Individual polybags can protect retail presentation and simplify pick-and-pack operations, but they add material, labor, cube, and waste. Use them only when the sales channel needs them.
Cotton bags should be packed only after the print is properly cured, dry, and cool. If printed bags are stacked too soon, ink can offset onto the next bag, block, scuff, or create dull marks. Moisture is another concern, especially with natural cotton and long transit. Ask how the factory controls humidity, whether cartons include liner bags or desiccants when appropriate, and how long printed goods rest before carton closing. These process details are small compared with the total order value, but they have a large effect on arrival quality.
Carton data should be available before freight booking. Drawstring backpacks are light, so freight cost can be driven by cube rather than weight. A vague carton plan makes landed cost harder to estimate and can create receiving surprises. Request carton dimensions, net weight, gross weight, pack count, carton marks, and total carton quantity before the goods are ready. If the order includes multiple artwork versions, carton labels must prevent mixing at the warehouse or distributor.
- Specify fold style, inner count, master carton count, carton marks, SKU separation, and polybag rules.
- Use individual polybags only when retail, distributor, or pick-and-pack handling requires them.
- Require printed bags to be cured, dry, and cool before stacking and carton closing.
- Ask about moisture protection for natural cotton and long transit routes.
- Confirm carton dimensions, net weight, gross weight, pack count, and total cube before freight booking.
Specification comparison for buyers
| Spec decision | Recommended option | When it fits | Buyer risk to check |
|---|---|---|---|
| Supplier route | Direct factory with in-house sewing and printing, or disclosed subcontracted printing | You need one accountable owner for construction, print proofing, bulk release, and rework decisions | Verify who actually prints, who approves the first article, and who pays if bulk does not match the approved sample. |
| Fabric weight | 160-180 GSM cotton for most retail-ready programs | Coffee roaster merch, tasting kits, sample bundles, reusable event bags, and distributor gifts | Below 140 GSM can feel thin, show contents, distort at seams, and make ink coverage look uneven. |
| Fabric color | Natural cotton for first orders; dyed cotton only after shade and ink tests | Natural brand palettes, single-color logos, and programs where print legibility matters most | Dyed fabric can shift ink appearance, reduce contrast, and vary between lots if shade control is weak. |
| Print method | 1-2 color screen print for bold logos; confirm halftone limits before approving gradients | Roaster logos, simple origin graphics, event marks, and repeat orders | Fine type, small roast notes, distressed logos, and gradients may fill in, break up, or lose registration. |
| Proof type | Measured digital proof plus physical strike-off or pre-production sample on final materials | New artwork, first supplier order, dyed fabric, tight brand standards, or launch-tied deliveries | Flat mockups can hide tunnel clearance, seam drift, print scale, and ink behavior on woven cotton. |
| Bag size | Finished body around 38 x 45 cm, adjusted to actual fill items | Retail bags, sample packs, boxed coffee sets, tins, postcards, cupping spoons, or event collateral | Changing body height can push the logo too close to the cord tunnel or make loaded bags look unbalanced. |
| Cord and reinforcement | Cotton cord with clean tunnel, bar-tacked stress points, and reinforced lower corners if load requires it | Reusable bags carried at markets, cafes, trade shows, and customer events | Thin cord, weak stitching, or rough eyelets become comfort and durability issues after repeated use. |
| Packing route | Bulk packed with defined count, carton marks, moisture protection, and individual polybag only if required | Wholesale, distributor, warehouse, and export programs | Unspecified packing can create carton count errors, print scuffing, moisture marks, or unexpected freight cube. |
| Quote structure | Line-item pricing for bag, print setup, sample, revisions, packing, inspection, and freight assumptions | Procurement teams comparing suppliers, regions, or production routes | All-in quotes can hide screen charges, re-proof fees, label costs, carton overages, and unclear handoff points. |
Buyer checklist before sampling
- Freeze the final logo file, bag color, placement, print size, and number of ink colors before requesting supplier quotes.
- Request the proof on actual finished bag dimensions, with measurements from the top fold, side seam, bottom edge, and cord tunnel.
- Specify finished size, fabric GSM, weave, cotton type, fabric color, shrinkage expectation, and whether fabric is pre-shrunk, dyed, or natural.
- Set minimum line weight, minimum text height, and gradient or halftone rules before the screen is made.
- Require a pre-production sample made with final fabric, final cord, final reinforcement, final label or tag, final ink, and final packing fold.
- Check the sample with real fill items such as coffee bags, tins, tasting cards, merch inserts, or event collateral.
- Approve tolerances in writing for body width, body height, print placement, print color, cord length, stitching, and carton count.
- Confirm MOQ by bag color, fabric weight, size, artwork version, and print color count, not only a generic program MOQ.
- Separate unit bag cost, screen or plate setup, sample fee, artwork revision fee, packing cost, inspection cost, and freight assumptions in every quote.
- Ask whether printing is in-house or outsourced, and name the party responsible for rework if the bulk print fails the approved proof.
Factory quote questions to send
- What finished bag size, GSM, weave, cotton type, fabric color, and shrinkage expectation are included in this quote?
- Is the quoted fabric greige, natural, bleached, piece dyed, or yarn dyed, and can you provide a shade standard for bulk approval?
- Which print method will you use for this artwork, and what minimum line weight and minimum text size do you recommend on this fabric?
- Are screen setup, plate cost, ink matching, artwork cleanup, strike-off, and one proof revision included or charged separately?
- Can you provide a measured proof on the actual blank bag layout with the top fold, cord tunnel, side seams, bottom edge, and print safe area marked?
- Will the sample use the same fabric, cord, sewing thread, reinforcement, ink, label, fold, and packing method as the bulk order?
- What is the MOQ by bag color, size, GSM, print version, and number of ink colors for this exact specification?
- What tolerance will you hold for finished width, finished height, print placement, print size, cord length, and carton quantity?
- Who performs the printing, and if it is subcontracted, who owns final print approval and rework responsibility?
- What rub, fold, cure, shade, stitching, and carton-count checks are performed before shipment?
Quality-control points to confirm
- Finished bag body dimensions should stay within the agreed tolerance, with width and height measured from the same reference points on every inspected piece.
- Print placement should be measured from the top fold, side seam, and bottom edge, not judged only by visual centering.
- Ink coverage should be even across the logo field, with no pinholes, ghosting, heavy flooding, skipped areas, or visible mesh marks.
- Logo edges, small type, and linework should remain legible after a dry rub test and should not crack after the first normal fold.
- Print color should match the approved sample or color standard under daylight-equivalent light, with dyed fabric checked for contrast loss.
- Cord tunnels should be straight and open smoothly, with no blocked channels, puckering, broken stitches, or rough edges that catch the cord.
- Cord length should be symmetrical left to right, and the draw action should open and close without snagging, twisting, or pulling seams out of shape.
- Lower corners, eyelets, bar tacks, and side seams should show no skipped stitches, loose threads, needle cuts, or pulled reinforcement.
- Fabric shade, hand feel, and thickness should match the approved pre-production sample, especially when bulk fabric comes from a new lot.
- Labels, hangtags, side tabs, or retailer marks should be in the approved location, orientation, and stitching style.