Start With the Event Use Case
Trade show portfolios get handled hard. They move from storage to the booth, from the booth to meeting rooms, and often into carry-on luggage after the event. That means the first sourcing decision is not the logo placement or the zipper color. It is the actual job the portfolio must do. A folder that only carries a few sheets has a very different construction from one that needs to hold a tablet, brochures, contracts, and a notebook without bulging at the zipper line.
For a custom canvas zipper portfolio, write the use case before you request quotes. State the target size, the document format, the maximum load, how long the item will stay in service, and whether it is a giveaway, a sales tool, or a premium meeting folder. If the portfolio is going into a conference kit, define whether it must travel flat, whether it can be folded once, and whether the front panel has to stay clean after repeated handling. Those details matter more than generic words such as premium or durable.
- Define what the portfolio must fit, not just the outside size.
- Note whether the item is a giveaway, an internal sales tool, or a client-facing meeting folder.
- Tell the factory how often the zipper and seams will be opened during normal use.
- Decide whether the portfolio must look presentable after one event or survive a season of recurring shows.
Choose the Size and Structure Before You Price It
The shape of the portfolio changes the whole build. A slim document sleeve is one thing. A zipped portfolio with gusset depth, inside dividers, and a tablet pocket is another. Once you add pockets or a thicker closure line, the factory may need a different pattern, different seam allowance, and a different zipper length. If the spec is vague, the sample will absorb the guesswork and the bulk run will carry the cost of that uncertainty.
Write the finished dimensions, the internal usable space, and the maximum closed thickness in the RFQ. Buyers often forget the last one, but it matters because a portfolio that closes cleanly over 12-15 mm of paper behaves very differently from one that has to close over a notebook, brochure stack, and pens. If you expect the item to sit on a meeting table, ask the supplier to show how flat the body lies when empty and how much it bows when filled. A portfolio that looks neat in an open-flat mockup can turn awkward as soon as the zipper is loaded.
- State finished dimensions and usable internal space, not just the outside size.
- Give a realistic fill thickness so the zipper and panel shape are engineered correctly.
- Specify the pocket layout early if the item needs cards, brochures, or a tablet sleeve.
- Ask the supplier to confirm whether the pattern changes when you add gussets or internal dividers.
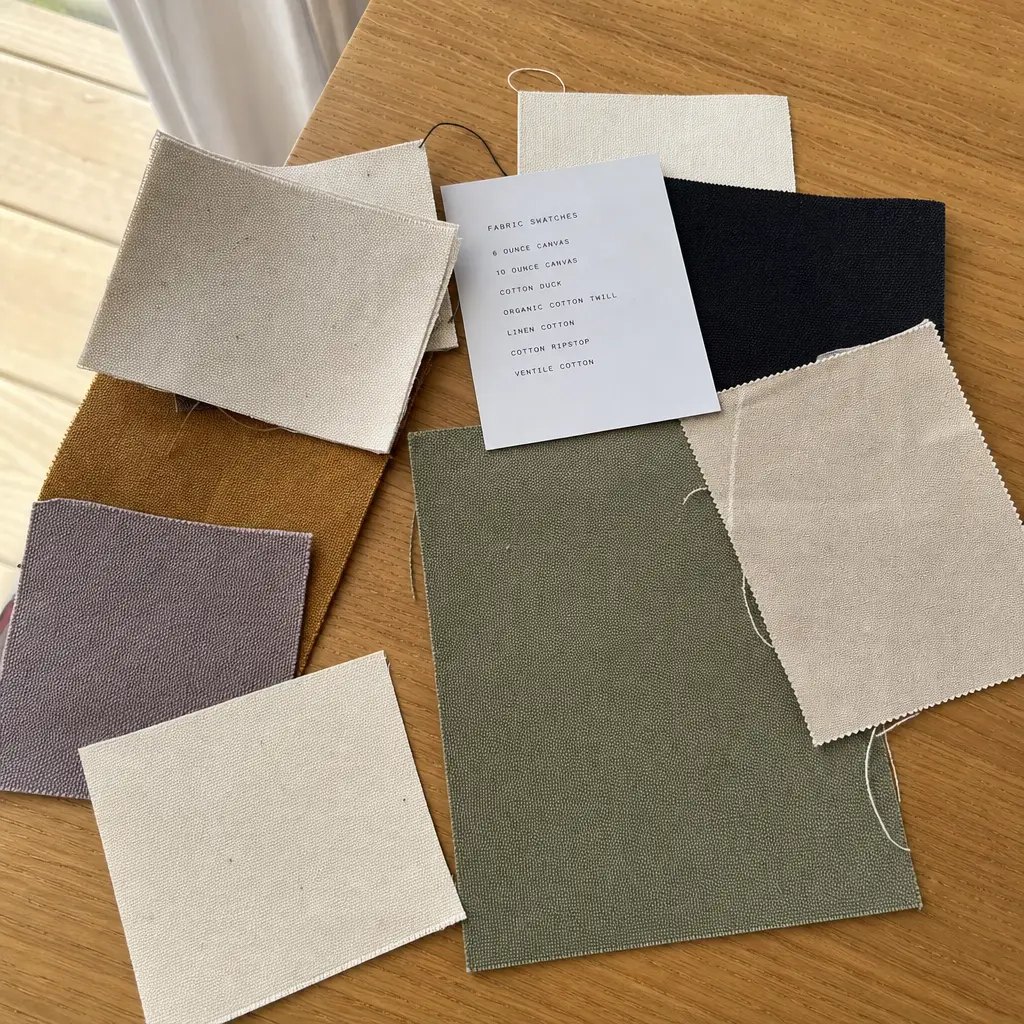
Choose the Canvas Weight and Finish That Match the Job
Canvas weight is one of the biggest cost and quality drivers. For most custom canvas zipper portfolios, a finished fabric around 12 oz / 400 gsm can work for light document use, but 14-16 oz / 470-540 gsm is usually a better base for buyers who want a firmer hand and better resistance to creasing at events. If the portfolio is meant to look polished on a meeting table, the heavier canvas gives the piece more structure and helps the zipper opening hold its shape.
Do not compare a supplier's raw yarn story with another supplier's finished gsm. Ask for the actual production fabric after any wash, coating, or finishing step. If the order includes a dark logo on a light body, a slightly heavier canvas also helps reduce show-through and uneven print laydown. If the team wants a softer feel, a lined construction can offset a lighter outer canvas, but the buyer should still verify whether the finished bag keeps its shape when packed with papers. Ask whether the fabric is washed, coated, bonded, or calendared, because those steps change hand feel, appearance, and final dimensions.
- Use 12 oz / 400 gsm for simpler, lower-cost document carriers.
- Use 14-16 oz / 470-540 gsm for premium trade show or client-meeting use.
- Ask whether the finished fabric will shrink after finishing, and build that into the size spec.
- Confirm whether the fabric is washed, coated, bonded, or calendared, because those steps change hand feel and dimensions.
- If the brand wants a stiffer profile, ask for a lined or reinforced body rather than relying on heavier canvas alone.
Lock the Zipper, Puller, and Reinforcement Details
On a portfolio, the zipper is not decoration. It is the part that gets touched the most and the part that fails first when the spec is weak. A #5 nylon coil zipper is usually the practical baseline because it runs smoothly, suits standard portfolio sizes, and is easier to color-match than heavier hardware. For oversized formats or heavier contents, a #8 coil may be justified, but it should be selected for function rather than appearance alone.
The puller, tape color, end stop, and stitch finish need the same attention. A clean zipper line with bar-tacks at stress points, no uneven tape feed, and no loose thread tails at the ends will do more for perceived quality than a fancy puller with weak construction behind it. For trade show use, the sample should open and close repeatedly without snagging, and the zipper should sit flat when the portfolio is packed. If the zipper wobbles on the sample, the defect usually becomes more obvious after bulk production because the fabric relaxes differently across multiple lots. Ask the supplier which zipper coil material is standard, what finish the puller uses, and whether the end-stop style changes if you move from one size to another.
- Match zipper tape color to the body fabric or to a deliberate contrast, not a near-miss shade.
- Ask whether the puller is zinc alloy, steel, nylon, or plated hardware, and what finish will be used.
- Insist on bar-tacks or equivalent reinforcement where the zipper ends and load points carry stress.
- Reject samples where the zipper coil or teeth wander, snag, or bow under light pressure.
- Confirm the zipper length on the pattern, not only the nominal hardware size.
Match the Decoration Method to the Artwork Risk
The print method should follow the logo, not the other way around. Screen print is usually the best fit for simple artwork, larger runs, and buyers who need a crisp front panel at a controlled cost. It also scales well when the same artwork will repeat across a sales team or across several event regions. Embroidery can look more premium, but it raises the risk of puckering on lighter canvas and works best when the mark is bold, the fill area is controlled, and the stitch count is not so dense that it distorts the panel.
A woven patch or sewn label is often the safest option for small text or detailed marks, because it keeps fine detail readable without relying on thick ink or tight needle density. For trade show buyers, the biggest failure is often not color shift but readability. Thin fonts, long taglines, and delicate line work can disappear when the logo is sized too small for the fabric surface. Before production, define the minimum line thickness, the exact placement, the approved color references, and whether any artwork sits near a seam, zipper, or pocket edge. If the artwork has a large filled area, make sure the canvas can carry that coverage without cracking at the fold line. If the artwork is likely to repeat across future orders, ask the factory to store the approved print file and the color standard so the next run starts from the same reference.
- Use screen print for flat, simple logos and repeat orders.
- Use embroidery only when the logo size and stitch count make sense for canvas.
- Use woven or sewn labels when the brand mark has fine text or needs a durable, low-risk finish.
- Ask the supplier to confirm the minimum readable text size before artwork is finalized.
- Avoid placing critical text across seams, zipper teeth, or high-flex fold lines.
Build the RFQ So Quotes Are Actually Comparable
MOQ is rarely one simple number. It depends on fabric dye lots, print screens, zipper tape color, lining stock, and whether the factory has to buy custom pulls or special packaging. A supplier may quote a lower minimum for a blank portfolio and a much higher minimum once you add custom printing, multiple colorways, or inside pockets. That is normal, but the logic should be visible in the quote so the buyer can see what changes the threshold.
Ask for MOQ by colorway and by artwork version, not just by style. If the order needs several event teams or language versions, find out whether mixed cartons are allowed and whether the factory can combine them on one cutting run. A clean quote should also separate sample fee, tooling fee, unit price at quantity tiers, packing charges, and any surcharge for custom zipper pulls or extra lining. That is the only way to compare offers fairly. A good procurement comparison starts with identical finished specs and ends with a landed-cost view, not a single unit price that leaves out the hidden work. If a supplier will not state what is excluded, assume the quote is incomplete until proven otherwise.
- Request MOQ per color, per logo version, and per packing variation.
- Separate setup charges from unit price so the true repeat cost is visible.
- Ask whether mixed-artwork cartons are permitted without increasing the defect risk.
- Request price breaks at realistic quantities such as 300, 500, 1,000, and 3,000 pieces.
- Make the supplier spell out which options are standard and which ones trigger a surcharge.
Approve the Sample Like a Production Run
A sales sample is not enough for this product. The sample should use the final canvas weight, the final zipper, the final print or embroidery method, and the final lining or pocket structure. If the factory swaps parts for the sample, the approval is not useful because the bulk run will behave differently. For a portfolio that will sit on a trade show table all day, the sample also needs to show how the piece looks after opening, closing, and packing a realistic load.
Inspect more than one sample piece when possible. Look at dimension consistency, logo placement, zipper alignment, seam finish, and how the corners sit when the portfolio is full. A good sample should also include the final packing method. If the item arrives in a way that crushes the zipper line or leaves a hard fold mark across the logo, that is a packing problem that belongs in the sample approval, not the shipping complaint. Buyers should mark the sample, sign it, and keep one retained reference in case the factory later argues about what was approved. If the artwork or packing has multiple versions, keep each approved version labeled separately so the production line cannot confuse them.
- Approve only a sample built with production materials.
- Review the sample with real inserts, not just an empty shell.
- Treat packing as part of the sample, because transit damage often starts there.
- Keep a signed reference sample, measured spec sheet, and approved artwork file together.
- Mark the approved zipper position, pocket layout, and logo placement directly on the retained sample.
Set Inspection Limits Before Bulk Starts
Quality inspection should not be improvised after production is finished. Set the defect list before cutting starts. For this category, major defects usually include broken zippers, open seams, wrong size, wrong logo, missing components, severe stain, and any issue that prevents the portfolio from being used at the show. Minor defects are the lighter cosmetic issues: stray thread, small creases, slight shading differences within the agreed range, or small packing marks that do not affect function.
A common baseline is AQL 2.5 for major defects and 4.0 for minor defects, but some retail or brand programs need tighter controls. If a third-party inspector is involved, give them the approved sample, the measurement points, the acceptable tolerance range, and the exact carton labels before they enter the factory. The fewer assumptions in the inspection sheet, the less room there is for argument after the goods are packed. If the portfolio has multiple colorways, the inspection form should also state whether color consistency is judged against a master swatch or against the first-approved bulk lot. Ask the factory to record any rework in writing so you can see whether a defect was isolated or recurring.
- Define major and minor defects before bulk production starts.
- Use measured tolerances for size, print position, and zipper alignment.
- Require defect photos or written evidence if the factory proposes a rework plan.
- Confirm whether the inspection is full check, random check, or inline check, because the defect coverage changes materially.
- State which cosmetic marks are acceptable and which ones are automatic rejects.
Pack for Booth Use, Not Just Warehouse Storage
Packing has to protect the shape, not only the count. Individual polybags keep the canvas clean, but the carton method matters just as much. If portfolios are shipped flat, they should be folded in a way that avoids a hard crease across the logo or zipper track. If the item includes paper inserts, a notebook, or a tablet sleeve, add a simple inner support so the corners do not collapse in transit. For humid routes, a silica gel packet can help, but it should not be used as a substitute for proper carton strength.
Trade show shipments also need clearer marks than everyday retail. Each carton should show style, color, count, and ship-to details that make sense to the forwarder or booth receiver. If there are multiple event teams, the cartons should be labeled in a way that avoids on-site sorting errors. Packing is where many otherwise decent orders lose margin, because buyers end up paying for damage, repacking, or late handling at the venue. If the supplier can provide carton dimensions and gross weight early, the logistics team can estimate cube, pallet count, and receiving labor before the goods leave the factory. Ask for photos of the packed master carton before shipment if the event window is tight or the goods are moving through multiple hands.
- Specify individual packing, inner support, and master carton count.
- Keep the logo face protected from fold pressure and carton compression.
- Use shipping marks that match the event logistics plan, not just the factory warehouse system.
- Ask for carton dimensions and gross weight before freight booking is confirmed.
- If venue delivery is required, align carton labels with the booth contractor's receiving format.
Work the Schedule Backward From the Show Date
The show date should drive the whole schedule. A practical planning window is often 7-10 days for a production sample, 3-5 days for sample revisions, and roughly 25-35 days for bulk after sample approval, depending on fabric stock, decoration method, and order size. That is only a working range, not a promise. If the order needs custom pulls, new dye lots, extra pockets, or special packaging, the lead time should stretch accordingly.
Back-scheduling also protects against the hidden delays that matter most: artwork corrections, color matching, and packing approvals. If the shipment has to move through sea freight, the approval window needs to be even earlier because the cargo can be perfect and still miss the booth if the logistics step is late. Buyers who lock art, spec, and packing first usually avoid the most expensive rush orders. The simplest rule is to treat the shipping date as the last safe date, not the preferred date, and to keep an internal buffer for the final inspection report and any rework. Build in time for receiving hours, venue blackout dates, and any warehouse transfer before the event team takes possession of the cartons.
- Build time for sample approval, revisions, bulk production, freight, and event receiving.
- Add buffer for artwork changes, custom components, and inspection rework.
- Treat the shipping date as the last safe date, not the preferred date.
- If the shipment is venue-delivered, confirm the receiving window and labeling rules before production starts.
- Do not lock the freight booking until artwork and sample approval are both final.
Specification comparison for buyers
| Spec decision | Recommended option | When it fits | Buyer risk to check |
|---|---|---|---|
| Supplier route | Direct cut-and-sew factory with in-house printing or embroidery | Repeat programs, tighter artwork control, and buyers who need one party accountable for sewing, decoration, inspection, and packing | Hidden subcontracting can blur defect ownership, weaken schedule control, and make rework slower |
| Canvas weight | 14-16 oz / about 470-540 gsm finished canvas | Portfolios carried all day, used as meeting folders, or expected to hold brochures, notepads, and a slim tablet without sagging | Too-light canvas can sag and show print distortion; too-heavy fabric can make the zipper opening stiff and hard to close |
| Zipper size | #5 nylon coil for standard portfolios, #8 coil for oversized or heavier-load formats | Most document portfolios and presentation folders with regular opening and closing during the event | Undersized zippers snag, bow, or separate under load; oversized zippers can look bulky if the body spec is too light |
| Decoration method | Screen print for simple logos and medium-to-high volume, woven patch or sewn label for fine text, embroidery only for bold marks | Flat brand marks with one to three colors and a clean front panel | Fine lettering can fill in, ink can crack at folds, and embroidery can pucker the canvas if the stitch count is too dense |
| Construction build | Lined body with reinforced corners, zipper end bar-tacks, and controlled seam allowance | Premium client meetings, sales kits, or any portfolio handled repeatedly during a show | Extra layers raise cost and lead time, so the pattern must be approved before bulk and measured against the signed sample |
| Sample route | Production sample made with final fabric, zipper, lining, artwork, and packing method | New supplier, first custom run, or any order with tight brand color requirements | Sales samples often hide weak construction, substitute materials, or packing that would not survive shipping |
| Inspection route | Third-party final inspection or a strict buyer-led QC sheet with measured tolerances | Retail-facing programs, launch orders, or shipments that must land before a fixed event date | Factory self-check alone can miss cosmetic issues, carton count errors, or mixed-SKU packing mistakes |
| Quote basis | FOB or EXW with full packing data, carton size, component spec, and allowed substitutions stated in writing | When comparing multiple suppliers or planning your own freight | Vague quotes can hide setup fees, packing charges, or freight surprises that change the landed cost materially |
Buyer checklist before sampling
- Confirm the finished size and the real load: A4, US letter, brochures, contracts, notebook, business cards, or a slim tablet.
- State the maximum thickness the portfolio must close over without stressing the zipper teeth or bowing the front panel.
- Set the canvas weight, lining choice, seam allowance, zipper size, zipper tape color, and puller finish before asking for pricing.
- Provide vector artwork, Pantone references, logo placement, and minimum line thickness for print or embroidery.
- Specify whether the logo must stay centered on the front panel or align to a pocket seam, zipper line, or handle axis.
- State the target MOQ by colorway and by artwork version, and say whether mixed cartons or mixed packing are acceptable.
- Request a production sample, not a sales sample, using the final fabric, zipper, lining, decoration, and packing method.
- Ask for a quote that separates sample cost, tooling, unit price tiers, packing, and freight basis.
- Define packing rules: individual polybag, silica gel if needed, carton count, shipping marks, and whether inserts or stiffeners are required.
- Share the event date, ship-to window, receiving hours, and whether freight must route through a forwarder, booth contractor, or direct venue delivery.
Factory quote questions to send
- What finished canvas gsm will you use, and is that measured before or after washing, coating, or other finishing?
- What tolerance will you hold on fabric weight, finished size, and zipper length across the bulk run?
- Which zipper size, tape width, tape color, puller finish, and end-stop style are included in the price?
- Is the zipper coil nylon, molded plastic, or metal, and do you have a standard pull test or cycle test for it?
- What decoration method is priced, and how many colors, stitch counts, or print screens are included before a surcharge applies?
- What is the minimum line thickness or minimum text height you recommend for the selected decoration method?
- What is the MOQ per colorway, per artwork version, and per construction option such as pocket layout or handle style?
- Can mixed colors or mixed artwork share one cutting run, and if so, what is the minimum split quantity for each version?
- What is the sample fee, tooling fee, and revision charge if the first sample needs correction?
- Will the sample fee be credited back against bulk, and what conditions must be met for that credit to apply?
Quality-control points to confirm
- Approved canvas weight should match the submitted swatch and stay within the agreed production tolerance from the reference sample.
- Finished size should stay within plus or minus 5 mm for small dimensions and plus or minus 10 mm for larger dimensions unless the buyer spec is tighter.
- Zipper should open and close smoothly through at least 20 repeated cycles on a sample unit without snagging, separating, or forcing the puller.
- Zipper tape should lie flat with no twist, wave, or visible bowing, and the puller should sit straight when the portfolio is closed.
- Stitching at corners, zipper ends, and handle attachment points should show no skipped stitches, loose thread tails, or open seams.
- Bar-tacks or equivalent reinforcement should be visible at the load points specified in the approved sample.
- Logo placement should remain within plus or minus 3 mm on the primary axis and plus or minus 5 mm on the secondary axis unless the art proof says otherwise.
- Print color should match the signed-off reference under the agreed viewing light, and registration should not show unintended overlap or gap.
- Embroidery should not pucker the body fabric, and the stitch density should not distort the panel shape or pull the zipper line out of square.
- Edges, binding, lining, and pockets should lie flat with no severe puckering, twisting, or seam distortion that would affect use.