Start With the Event Failure Mode
A custom canvas zipper portfolio for trade show exhibitors is not just a printed pouch. It works as a document carrier during booth setup, buyer meetings, press briefings, badge pickup, distributor visits, and post-show follow-up. It may be opened repeatedly by staff who are moving quickly, stacked under cartons, packed with inserts by a fulfillment team, and handed to visitors who will judge the brand by the way it feels. A neat approval photo does not prove that the zipper runs smoothly, the pocket fits the kit, or the logo survives carton pressure.
Procurement should begin with the failure modes that would cause problems at the show. Common issues include a slider jamming at a corner, zipper tape pulling away from the body fabric, paper corners curling in a shallow pocket, front-panel print cracking on a fold, natural canvas arriving with visible oil marks, logo versions mixed in one carton, and cartons too heavy for venue handling. These are not small design preferences. They affect on-site labor, brand presentation, and the buyer’s ability to use the goods on deadline.
The RFQ should describe the actual job the portfolio must do. A one-show giveaway holding ten sheets can be built differently from a reusable sales kit carrying catalogs, order forms, badges, pens, swatch cards, and a small charger. If the load is vague, one supplier may quote a light flat sleeve while another quotes a reinforced portfolio with interlining and stronger zipper ends. Both may call the item a canvas zipper portfolio, but the durability and cost will not be comparable.
- Define the portfolio as a giveaway, reusable sales tool, press kit, staff folder, distributor kit, or premium gift.
- List unacceptable event-day failures such as stuck zipper, popped pocket seam, dirty canvas, cracked logo, bent corners, or wrong carton labels.
- State the actual contents by size, count, thickness, and weight instead of using general wording such as documents only.
- Ask suppliers to list every assumption that affects price, durability, MOQ, and lead time.
- Use the failure list as the basis for sampling, testing, inspection, and packing approval.
Turn Use Conditions Into Measurable Specs
Durability gets easier to control when the event use becomes a specification. Start with paper format and usable internal dimensions. Letter paper, A4 paper, catalogs, order sheets, contracts, laminated cards, and voucher packs all need clearance. A portfolio sized only by outside dimension may look right on a table but fail in use because seam allowance, binding, interlining, or zipper tape reduces the working space inside. For procurement files, record both the finished outside size and the minimum usable internal size.
Loaded thickness matters just as much as length and width. A portfolio that closes easily with ten sheets may bow or jam when filled with a 12 mm catalog pack, badge, pen, and business cards. Samples should be tested with the real insert stack, not loose blank paper. If a warehouse team or booth staff will assemble kits quickly, allow hand clearance so inserts slide in without force. Tight pockets look tidy in a drawing but slow down packing and create torn seams.
Sewn canvas goods also need realistic tolerances. A flat portfolio will not hold the same precision as molded plastic, but it should still be controlled. For many custom canvas zipper portfolios, ±5 mm for main flat dimensions is a practical starting point unless a fulfillment fixture, exact insert, or retail display needs tighter control. Logo placement may require ±3-5 mm from a fixed edge. Write these numbers into the purchase specification before the sample is approved, not after a shipment is disputed.
- Specify outside dimensions, usable internal dimensions, pocket depth, zipper opening length, and loaded thickness in millimeters.
- Define the zipper path as straight, L-shape, or three-sided, and identify the minimum opening needed for fast kit loading.
- Set finished-size, pocket-opening, zipper-position, and logo-placement tolerances before approving the sample.
- Confirm whether the product must lie flat on a counter, stand slightly structured, or remain soft and foldable.
- Record the reference insert pack used for testing and keep it with the approved sample record.
Choose Canvas by Weight, Finish, and Risk
Canvas weight drives hand feel, durability, sewing stability, and freight cost. For reusable trade show portfolios, 12 oz to 16 oz cotton canvas, roughly 380-540 GSM depending on weave and finish, is a strong starting range. A 10 oz to 12 oz canvas may be acceptable for low-cost, light-document programs, but it can wrinkle, stretch, or feel weak around zipper seams when the portfolio is filled. A 16 oz to 18 oz canvas can look premium, yet it brings thicker corners, harder sewing, more needle stress, and heavier cartons.
Ounce weight is useful, but it is not enough on its own. Suppliers may use different weave constructions, finishing routes, and conversion assumptions. A quoted 12 oz canvas from one mill may not behave like another supplier’s 12 oz canvas. Ask for measured GSM from bulk fabric, plus an agreed tolerance range. Weave density, yarn quality, washing, coating, and calendaring can change stiffness, shrinkage, odor, print behavior, and the way the zipper seam sits.
Finish choice changes the QC plan. Natural cotton canvas can show seed flecks, slubs, and mild shade variation; that can be acceptable if the visual standard is agreed before cutting. Dyed canvas supports brand color but adds lab dip approval, bulk shade review, crocking checks, and zipper tape matching questions. Washed canvas feels softer but may shrink or twist if not controlled. Coated canvas may resist dirt, but it can affect ink adhesion and reduce the expected cotton hand feel.
- Use 10 oz to 12 oz canvas for light, cost-sensitive event handouts only after loaded zipper testing.
- Use 12 oz to 16 oz canvas for most reusable exhibitor portfolios, distributor folders, and sales kits.
- Use heavier canvas only when the sample proves corners, zipper travel, and carton weight remain acceptable.
- For natural canvas, approve a realistic standard for seed flecks, slubs, shade range, and minor weave character.
- For dyed canvas, require lab dip approval, bulk shade comparison, and dry rub or crocking review before cutting.
Specify the Zipper Like a Working Part
The zipper is the working mechanism of the portfolio. It should not be treated as a generic trim line. For most canvas zipper portfolios, a No.5 nylon coil zipper is a practical choice because it bends around sewn corners better than metal teeth and is strong enough for paper-based loads. Metal zippers can create a more premium look, but they are stiffer, heavier, and more likely to mark nearby fabric or printed inserts during packing.
A clear zipper specification includes type, size, tape color, tape width if relevant, slider material, puller shape, finish, end stops, zipper path, and reinforcement. Even a good zipper can fail if the corner radius is too tight, the tape is sewn unevenly, the seam allowance wanders, or the slider is forced into a weak stop. L-shape and three-sided openings need special attention because every corner becomes a potential catch point.
Testing should cover empty and loaded use. Empty cycling checks basic assembly. Loaded cycling shows whether the body distorts when the intended contents are inside. A practical approval check is to fill the portfolio to the agreed thickness, open and close the zipper through the entire path repeatedly, and inspect the tape, slider, stops, stitching, and corner shape. Reject catching, separation, loose stops, sharp pullers, excessive waviness, and any closure that needs force.
- Specify No.5 nylon coil zipper unless brand appearance, load, or design requires another zipper type.
- Require reinforced zipper ends using backtack, bartack, folded tabs, binding, or another approved construction.
- Avoid sharp square zipper turns on L-shape or three-sided openings; use a radius the sample proves can run smoothly.
- Test zipper movement on the actual loaded insert pack, not only on an empty showroom sample.
- Document zipper failures with photos and identify whether the issue is component grade, sewing path, corner radius, or loading.
Engineer Seams, Pockets, and Small Features
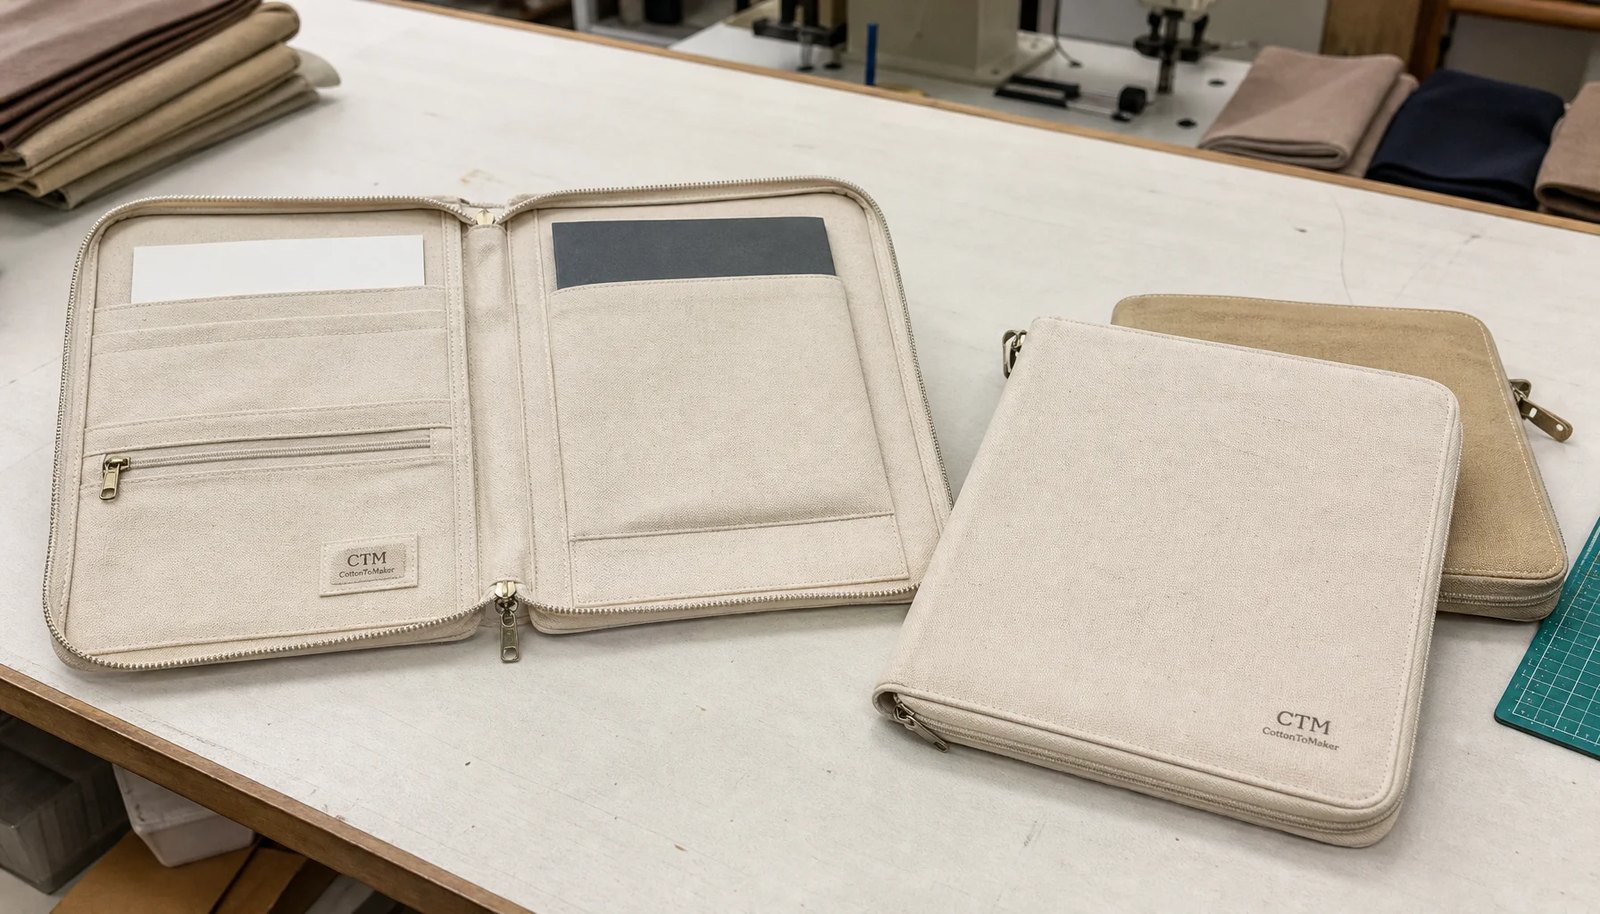
The interior layout is where a simple portfolio can become expensive and failure-prone. A main document compartment, one pen loop, and one card or badge pocket are enough for many trade show programs. Every added divider, mesh pocket, elastic loop, tablet sleeve, and hidden compartment adds material pieces, sewing operations, needle holes, inspection points, and room for dimensional drift. More features can help the end user, but only when the load and purpose are clear.
Each pocket needs a defined job. A business card pocket should be tested with the intended card count. A badge pocket should match the event badge size and allow quick assembly without tearing. A pen loop should fit the pen diameter and should not press into the front logo during carton stacking. A tablet sleeve should not be included unless the RFQ states tablet dimensions, weight, padding requirement, and protection expectation. A canvas document portfolio is not automatically an electronics case.
Stress points need deliberate reinforcement. Pocket mouths, zipper ends, label corners, binding joins, and pen loops get pulled repeatedly. Lockstitch seams with balanced thread tension are common, but reinforcement should be named in the spec and visible in the sample. Stitch density should be consistent, with no skipped stitches, loose thread tension, needle cuts, or broken stitches at thick corners. Do not assume reinforcement is included because the product looks sturdy in a photo.
- Define the load for each pocket by sheet count, card count, badge size, pen diameter, or sample thickness.
- Start with one main compartment before adding dividers that increase sewing time and defect risk.
- Use backtack or bartack at pocket mouths, zipper stops, pen loops, and label or patch corners where needed.
- Check that internal features do not block zipper travel, distort panels, or mark the front logo in packed cartons.
- Reject samples with loose thread tension, skipped stitches, needle cuts, weak pocket openings, or inconsistent seam allowance.
Select Decoration for Durability, Not Just Look
Trade show portfolios carry the brand, so decoration failure is immediately visible. Screen printing is usually suitable for solid logos, limited colors, and cost-controlled promotional orders. Heat transfer can reproduce fine detail and multi-color artwork, but it needs stronger checks for edge lift, cracking, abrasion, and transfer marks. Woven labels or sewn patches can reduce ink-transfer risk and support repeat programs, although they add sewing steps and need secure corners.
Logo placement should respect construction. Printing too close to zipper curves, seams, binding, pocket ridges, and hard fold points increases the risk of cracking, rubbing, and registration problems. A centered front-panel logo with enough clearance from seam allowance is often safer than a larger logo that runs into stress zones. Also consider the packed condition: the logo may touch another printed panel, a zipper slider, a dark fabric surface, or an insert card for days or weeks before the event.
Decoration approval should use final production conditions. A sample made with substitute canvas, temporary ink, a smaller logo, or different curing is not enough for durability approval. The pre-production sample should use final artwork, final logo size, final color method, final curing process, and final packing. QC should check color, edge sharpness, placement, curing, dry rub, light scratch, folding response, and packed-stack transfer before bulk printing continues.
- Use screen print for bold solid logos when cost control and repeatability matter.
- Use heat transfer for detailed graphics only after edge-lift, fold, rub, and packing-transfer checks.
- Use woven labels or patches when durable repeat branding is more important than a large printed surface.
- Keep decoration outside seam allowances, zipper bend zones, pocket ridges, and high-pressure carton contact points.
- Require a signed print standard with logo size, color reference, placement tolerance, and acceptable defect limits.
Approve Samples Under Real Bulk Conditions
A development sample is helpful for confirming size, layout, and design direction, but it is not always proof of production durability. Factories may use available canvas, substitute zipper, temporary thread, or hand-finished construction to make the first sample quickly. Keep the layout sample separate from the pre-production sample. Durability approval should be based on a sample made with bulk canvas, bulk zipper, final thread, approved interlining, actual pocket layout, final decoration, and intended packing.
Sample review should be measured, not judged by general feel. Check outside size, usable internal size, logo placement, zipper opening, pocket depth, and unit weight. Load the sample with the real insert pack, cycle the zipper, pull pocket mouths, inspect reinforcement, perform dry rub on the decoration, and pack it under expected pressure. If the buyer requests changes that affect construction, such as heavier canvas, a different zipper path, an added pocket, a new logo position, or a foam insert, review a revised sample before bulk cutting.
Physical standards reduce arguments. One approved sample should stay with the factory, and one should stay with the buyer, sourcing office, or inspection team. If there are several colors, logo versions, or material combinations, keep standards for each meaningful variation. A sealed sample should be labeled with date, version, PO number, material, zipper, decoration, approved tolerances, and packing method.
- Use a layout sample to confirm size and pocket arrangement, then a pre-production sample for durability approval.
- Do not approve bulk cutting if the sample uses substitute canvas, zipper, thread, lining, or decoration.
- Record measured dimensions, loaded thickness, sample weight, zipper result, seam result, print result, and packing result.
- Seal the approved sample and keep matching references at factory and buyer side.
- Require a revised approval if any change affects load, zipper movement, logo durability, or carton packing.
Run a Practical Durability Test Checklist
Durability testing for custom canvas zipper portfolios does not need to become an expensive laboratory program for every promotional order. It does need to catch predictable failures before the shipment leaves the factory. The core checks are zipper cycling, loaded closure, seam stress, pocket function, print rub, fold response, corner compression, packing recovery, and carton handling. These checks can be performed on the pre-production sample and repeated on random units during inline or final inspection.
A practical zipper cycle test moves the slider through the full path, including corners, start points, and end stops. Buyers can set a cycle count that fits the order value and reuse expectation. For many event portfolios, 50-100 full open-close cycles on approval samples is a useful commercial screen. Reusable staff kits, heavier loads, or premium gifts may justify higher counts. The key is to define the count, load condition, and failure criteria before production starts.
Loaded closure testing often reveals problems that empty testing misses. Fill the portfolio to the agreed thickness and confirm that the zipper closes without forcing, the panel does not bow excessively, and document corners do not curl. Seam stress checks should focus on pocket mouths, zipper ends, pen loops, label corners, and binding joins. Decoration checks should include dry rub with a clean white cloth, light scratch by hand, and folded or packed-stack review. A failed test should trigger corrective action, not just a note in the report.
- Zipper cycling: test the full zipper path empty and loaded, including corners, slider start, and end stop.
- Loaded closure: use the agreed insert pack and reject closure that requires force or distorts the panels.
- Seam stress: pull pocket mouths, pen loops, labels, and zipper ends by hand to confirm reinforcement holds.
- Print durability: check dry rub, light scratch, folding response, edge lift, cracking, and packed-stack transfer.
- Packing recovery: store packed samples under realistic pressure and inspect creases, zipper impressions, and logo marks.
- Failure reporting: record sample ID, photos, defect type, probable cause, and required corrective action before shipment.
Make Supplier Quotes Comparable
Quote variation is common because suppliers interpret the same product name differently. One quote may include 12 oz canvas, a basic zipper, one print, and bulk packing. Another may include 16 oz canvas, interlining, a better slider, reinforced ends, inner protection, and detailed inspection. Without a common RFQ sheet, the lowest price may simply be the least durable construction.
Separate must-have requirements from optional upgrades. Must-have items usually include size, usable internal capacity, canvas weight range, zipper specification, decoration method, minimum reinforcement, packing method, and inspection standard. Optional upgrades may include custom dyed fabric, color-matched zipper tape, custom puller, foam padding, multiple dividers, retail insert card, individual packaging, and tighter tolerance. This structure lets suppliers quote a base version and priced alternatives without hiding substitutions.
Landed cost belongs in the comparison. Canvas portfolios can become freight-heavy, especially with heavy fabric, foam, board inserts, individual packaging, or low packing density. Ask for pieces per carton, carton size, net weight, gross weight, and estimated cubic volume before accepting a quote. If the event deadline requires air freight, carton cube and weight can outweigh a small ex-factory unit price difference.
- Require every supplier to quote the same spec sheet and identify any deviation line by line.
- Ask for canvas GSM, zipper grade, seam reinforcement, decoration process, packing method, and inspection support in the quote.
- Request carton dimensions, pieces per carton, net weight, gross weight, and packing density for landed-cost comparison.
- Price optional upgrades separately so procurement can see which features drive cost and MOQ.
- Check the cheapest quote against the approved construction before accepting value engineering.
Control Packing, Cartons, and Final Inspection
Packing is part of durability because the product can be damaged before the exhibitor opens the carton. Canvas zipper portfolios are vulnerable to compression marks, moisture staining, zipper impressions, bent corners, print transfer, and dirt. Natural canvas shows oil and handling marks quickly. Dark logos can transfer to light panels. Zipper sliders can press into neighboring units when cartons are overpacked.
The packing plan should match the decoration and the event handling route. Bulk flat packing may be efficient for internal assembly, but large prints, heat transfers, light-colored canvas, or premium presentation may need tissue, paper interleaving, or protective sheets. A board insert can improve flatness but adds weight and cube. Individual polybags protect against moisture and handling marks, while paper-based options may fit buyers trying to reduce plastic. Test the chosen method with the actual finished product, not a blank sample.
Final inspection should verify function, appearance, dimensions, packing, and carton accuracy. AQL inspection can be used for visual and dimensional defects, while functional tests should include zipper movement and loaded closure on sampled units. Carton marks should show PO, item, color, logo version, quantity, destination, and any event or fulfillment label required. For trade show orders, mixed cartons and missing labels can create serious on-site problems even when the product itself is acceptable.
- Use interleaving when printed surfaces, light canvas, heat transfers, or zipper sliders may mark adjacent units.
- Limit carton weight to a practical handling level and avoid compression that bends corners or crushes sliders.
- Confirm moisture protection for sea freight, humid storage, or long warehouse dwell time.
- Inspect carton marks, color segregation, logo version, quantity, and packing list accuracy before shipment.
- Keep a retained production sample and final inspection report for dispute resolution and repeat-order improvement.
Specification comparison for buyers
| Spec decision | Recommended B2B starting point | When it fits | Buyer risk to verify |
|---|---|---|---|
| Canvas body fabric | 12 oz to 16 oz cotton canvas, typically about 380-540 GSM depending on weave, finishing, and supplier conversion method | Reusable exhibitor document kits, distributor folders, sales meeting portfolios, press packs, and branded handout sets | Do not accept ounce weight alone; request measured GSM from bulk fabric and agree shade, shrinkage, odor, slub, and stain standards before cutting |
| Budget canvas option | 10 oz to 12 oz canvas, typically about 300-380 GSM, with simplified pockets and a standard zipper | One-show giveaways, light brochure packs, and campaigns where unit cost matters more than long reuse | May wrinkle, twist, or feel weak around zipper seams when overfilled; test with actual insert thickness before approval |
| Heavy canvas option | 16 oz to 18 oz canvas, often above 540 GSM depending on weave, with adjusted needle, seam allowance, and corner radius | Premium flat portfolios where stiffness, hand feel, and perceived value matter and freight budget allows higher weight | Bulkier corners can make zipper turns rough, increase needle damage, raise carton weight, and create compression marks |
| Zipper system | No.5 nylon coil zipper with stable tape, smooth slider, non-sharp puller, reinforced ends, and corner radius suitable for the opening path | Most custom canvas zipper portfolios for trade shows because coil zipper bends better around sewn corners than rigid metal teeth | Low-grade sliders can pass a photo sample and fail in cycling; test empty and loaded samples through the full zipper path |
| Zipper opening design | Straight top opening for lower cost; L-shape or three-sided opening only when booth staff need wider access | Straight opening suits document handouts; L-shape suits presentation folders; three-sided opening suits lay-flat kit access | Longer zipper length adds cost, sewing time, corner failure points, and tolerance risk; define minimum usable opening |
| Interlining or padding | Light nonwoven interlining, thin foam, or stiffener only where flatness, hand feel, or document protection is required | Premium exhibitor gifts, sales kits, or portfolios displayed on booth tables | Too much structure can distort panels, block zipper travel, cause print unevenness, and increase carton cube |
| Logo decoration | Screen print for solid logos; heat transfer for fine detail; woven label or sewn patch for repeat branding with lower ink-transfer risk | Brand programs needing visible identity without metal plates, molded parts, or high tooling cost | Large decoration near zipper curves, seams, folds, or packed pressure points can crack, lift, rub off, or transfer between units |
| Internal layout | One main document compartment plus pen loop and card or badge pocket before adding multiple dividers | Brochure sets, lead forms, vouchers, press sheets, badges, and light sales inserts | Every extra pocket adds seam failure points, labor minutes, dimensional variation, and inspection time; define the load for each pocket |
| Finished tolerances | Main flat dimensions commonly ±5 mm unless the insert requires tighter control; logo placement commonly ±3-5 mm from fixed reference edges | Sewn canvas products where repeatable fit matters but molded-product precision is not realistic | If tolerances are not written, suppliers may judge by appearance only; confirm usable internal size, not only outside size |
Buyer checklist before sampling
- Define the loaded use case in measurable terms: paper size, sheet count, catalog thickness in millimeters, pen diameter, badge size, card count, swatch card size, and whether any tablet or charger is allowed.
- Specify finished outside size, usable internal size, pocket depth, zipper opening length, corner radius, seam allowance, logo position, and whether the portfolio must lie flat when opened on a booth counter.
- State canvas weight by ounce and approximate GSM, and identify whether fabric is natural, bleached, dyed, washed, coated, organic cotton, recycled cotton blend, or color-matched to a brand reference.
- Require bulk fabric verification before cutting: GSM measurement, shade comparison, shrinkage result if washing or heat finishing is used, odor check, slub or stain standard, and crocking or rub-risk review for dyed fabric.
- Define the zipper system, not just the word zipper: type, size, tape color, slider material, puller style, finish, zipper path, end stop method, reinforcement, and acceptable force or smoothness standard.
- Set realistic sewn-goods tolerances, such as ±5 mm for main flat dimensions unless tighter fit is required, and ±3-5 mm for logo placement from fixed edges if print alignment is brand-critical.
- Keep the logo away from seam allowances, zipper bends, pocket ridges, hard fold lines, and pressure points from sliders or carton stacking unless the decoration passes fold, rub, and packing-transfer checks.
- Request a pre-production sample made with bulk canvas, bulk zipper, final thread, final interlining, final pocket layout, final logo size and method, and the intended packing method.
- Approve durability using loaded tests: zipper cycling across the full path, closure with agreed insert thickness, pocket pull checks, seam reinforcement review, print dry rub, light scratch, and packed-stack recovery.
- Confirm that the quote includes inner packing, interleaving if needed, carton grade, carton marks, moisture protection, palletization if required, barcode or fulfillment labels, and pre-shipment inspection support.
Factory quote questions to send
- What exact canvas construction is included: ounce weight, measured GSM range, weave, yarn count if available, finish, shrinkage expectation, shade tolerance, and whether fabric is stock or custom dyed?
- For natural canvas, what visual standard applies for cotton seed flecks, slubs, nep, shade variation, stains, and oil marks, and can you provide a cutting-panel defect limit before production?
- For dyed canvas, what are the lab dip lead time, bulk fabric MOQ, approved color reference, accepted shade tolerance, colorfastness checks, and zipper tape matching options?
- Which zipper type, size, tape width, slider material, puller type, finish, tape color, end stop method, and reinforcement stitching are included in the base quote?
- How many zipper open-close cycles do you test on approval samples and random production units, and is the test performed empty, loaded to the agreed thickness, or both?
- What finished-size tolerance, logo placement tolerance, pocket opening tolerance, and zipper length tolerance will you accept in the order specification?
- Which seam construction is quoted: stitch type, stitches per inch or centimeter, thread type, seam allowance, backtack or bartack locations, binding method, and reinforcement at zipper ends and pocket mouths?
- Which decoration method is quoted, what is the maximum logo size and color count, and what controls are used for curing, dry rub, folding, edge lift, abrasion, and print transfer during packing?
- Does the quoted price include interlining, foam, stiffener, binding, pen loop, card pocket, badge pocket, woven label, patch, hangtag, insert card, barcode label, or individual bag shown in the drawing?
- What are the sample costs and lead times for layout sample and pre-production sample, and what change requests will trigger a new sample before bulk cutting?
Quality-control points to confirm
- Bulk canvas GSM should be measured from cuttable fabric using a defined sampling method and compared with the approved range; supplier catalog ounce weight should not be the only evidence.
- Fabric inspection should cover shade bands, slubs, stains, oil marks, holes, weaving defects, odor, skew, coating inconsistency, crocking risk for dyed fabric, and shrinkage behavior if heat or washing is involved.
- Finished outside dimensions and usable internal dimensions should be checked against the spec; ±5 mm is a common starting point for flat sewn canvas dimensions unless the buyer writes a tighter requirement.
- Logo placement should be measured from fixed edges or seams, not judged by eye; common promotional tolerance is often ±3-5 mm depending on logo size and panel construction.
- Zipper should open and close through the full path without catching, skipped coil, loose stops, slider pull-off, wavy tape, broken stitching, sharp puller edges, or panel distortion under the agreed loaded condition.
- Zipper ends, pocket mouths, pen loops, labels, binding joins, and any handle or tab should have backtack, bartack, folded reinforcement, binding, or another approved reinforcement method.
- Main seams should show consistent stitch density, balanced thread tension, secure lockstitch formation, clean trimming, no broken stitches, no needle cuts, and no skipped stitches at thick corners.
- Internal pockets should accept the stated document or accessory load without curling paper corners, blocking zipper travel, straining seams, distorting panels, or creating unusable openings.
- Print or transfer should pass agreed dry rub, light scratch, fold, and packed-stack checks; there should be no heavy color transfer, edge lift, cracking, smearing, or visible curing contamination.
- Finished goods should be clean, odor-controlled, and free from loose threads, chalk marks, ink spots, lint contamination, needle holes outside seams, panel twisting, and visible color migration.