Why Craft Fair Portfolios Need Bag-Level QC
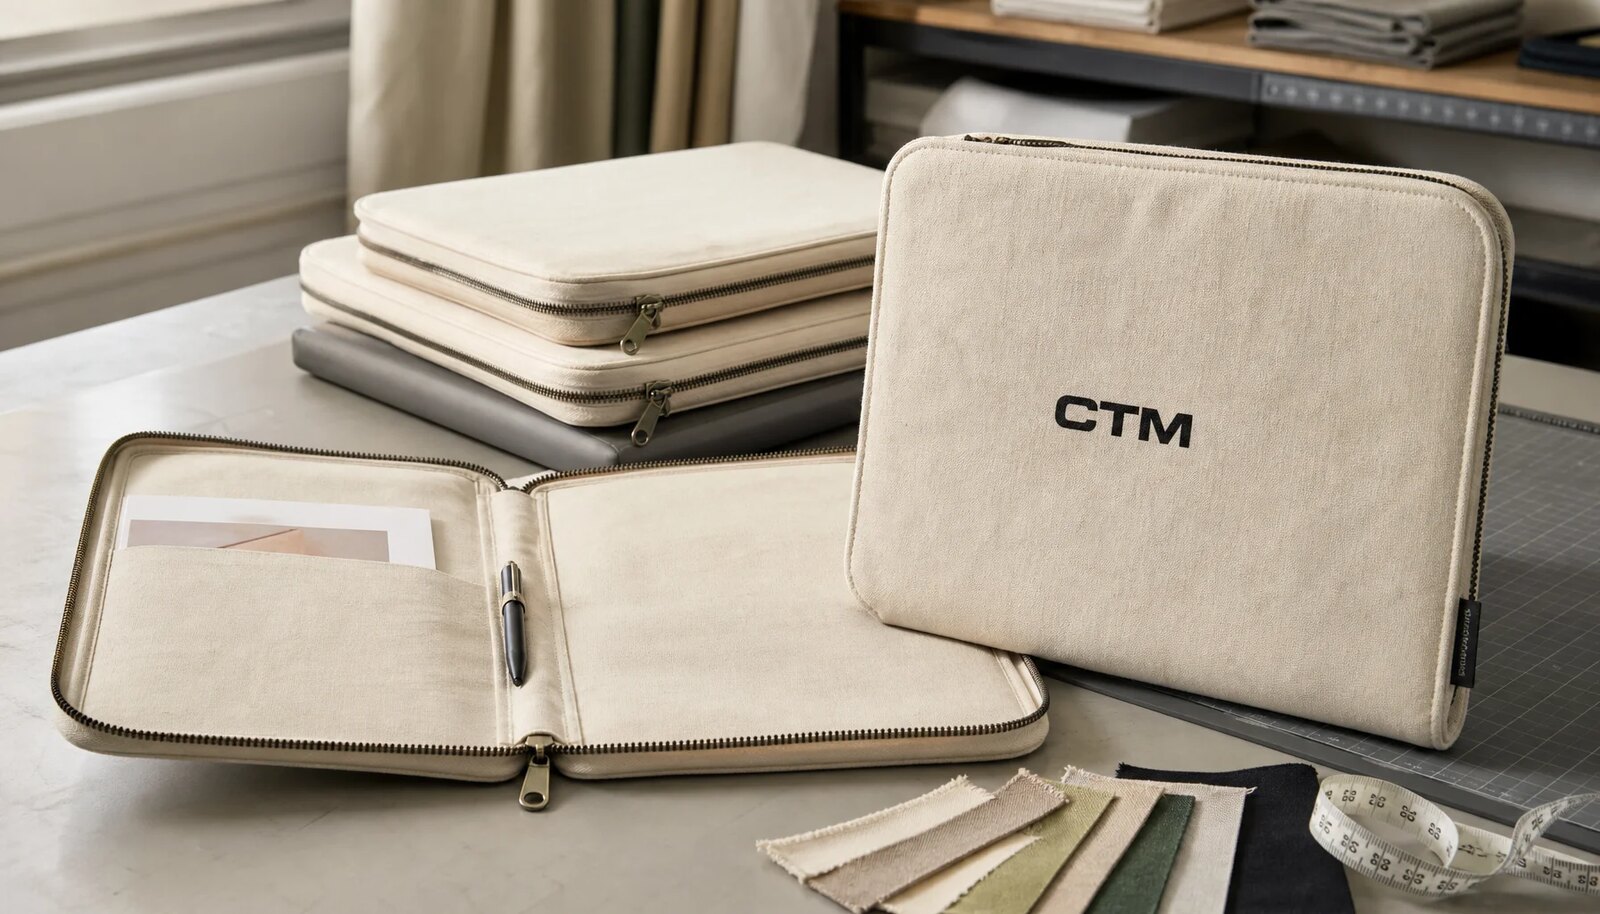
Canvas zipper portfolios look simple in product photos, but in use they behave more like small business bags than flat promotional folders. Craft fair sellers open them repeatedly for order forms, line sheets, stickers, receipts, badges, pens, price lists, catalogs, and sometimes a lightweight tablet. Organizers may use them for exhibitor welcome kits or sponsor packs. Retail buyers may resell them as branded stationery accessories. Each use case adds handling, stacking, packing, and zipper stress.
The procurement risk is not whether one attractive sample can be made. A sample maker can hand-select fabric, press corners, smooth the zipper path, and trim threads carefully. Bulk production has to repeat the same pattern, stitch tension, logo placement, pocket alignment, zipper curve, and carton loading across hundreds or thousands of units. Weak specifications show up as zipper catching, front-panel dents, print transfer, crooked pockets, shade mismatch, or portfolios that arrive warped.
A stronger brief ties construction choices to the event environment. A portfolio for a one-day giveaway can be lighter than a retail item expected to survive multiple fair seasons. A portfolio that only holds a schedule needs less structure than one carrying wholesale catalogs. Buyers get better quotes when they describe expected contents, branding goals, packing requirements, and inspection checks instead of asking only for a low unit price.
- Most common failure points: zipper ends, top corners, pocket mouths, print surface, lining near the zipper path, and packed carton pressure marks.
- Best buying approach: treat the item as a functional zipper business bag, not a disposable canvas pouch.
- Useful first step: list the real contents the portfolio must hold before choosing fabric weight, pocket layout, or reinforcement.
- Procurement warning: do not approve production from a beauty sample if the fabric, zipper, logo process, or packing will change later.
Canvas and Structure: Choose by Use Case
Canvas specifications need more precision than the single word canvas. Suppliers may use different fabric weights, yarn constructions, finishes, and shrinkage controls while quoting the same product name. For buyer communication, oz and GSM are useful references, but they should not replace signed swatches and approved samples. Fabric weight ranges in quotations are commercial descriptors, not universal performance guarantees.
A light 8-10 oz canvas can work for lower-cost document sleeves or giveaways where freight and budget matter most. It may crease faster and feel less structured when loaded. A midweight canvas around 12 oz is often a practical starting point for repeated event handling because it gives better table presence without making zipper curves too bulky. Heavier 14-16 oz canvas can feel premium, but it needs better pattern control and may create wavy seams or higher carton weight.
Structure also depends on lining, binding, and inserts. A lined 10 oz portfolio with reinforced pocket edges can outperform a heavier unlined version with raw interior seams. Board or PP inserts help the item stay flat, but they create new QC needs: protected corners, controlled carton pressure, and a packing plan that avoids permanent bending. If the product is expected to protect electronics, make the requirement explicit; a flat canvas organizer should not be sold as impact protection unless padding and testing support that claim.
- Economy build: 8-10 oz canvas, simple zipper, limited pockets, suitable for paper-only use and tighter freight targets.
- Balanced build: midweight canvas, reinforced seams, clean zipper path, optional lining, suitable for most craft fair merchandise and organizer kits.
- Premium build: heavier canvas, lining, structured insert, upgraded label or zipper, suitable for retail programs with higher presentation standards.
- Specification detail: include finish, color, shrinkage expectation, approved swatch, and acceptable natural flecks or slubs.
- Buyer decision: choose structure by expected contents, not by fabric weight alone.
Zipper Selection and Practical Durability Checks
The zipper is the first functional component users touch, so it deserves more attention than many RFQs give it. A practical zipper specification includes type, size, tape color, slider finish, puller style, stop construction, and end reinforcement. A note that says black zipper or silver puller is not enough for fair quote comparison.
No.5 nylon coil is a common choice for canvas portfolios because it bends around corners more easily than many metal zippers and is usually cost-effective for bulk sewn goods. That does not make it automatically the safest option in every design. A straight-edge portfolio with premium positioning may justify a metal zipper if the buyer accepts extra weight, possible surface marking, and tighter sewing control. Resin zippers are less typical unless the design intentionally wants a larger casual look.
Manual cycling is a practical screening check, not a certified lifetime test. During sample review, opening and closing the zipper 50 times can reveal early issues: catching lining, poor slider quality, tape distortion, sharp corner resistance, or weak zipper stops. If failures appear at the same location, the problem is usually patterning, seam allowance, zipper radius, or operator method rather than random bad luck. Bulk inspection should repeat the check on sampled units and record defect locations.
- Specify zipper size and type: nylon coil, metal, or resin, with tape color and slider finish confirmed in the PO.
- Control the zipper path: corners need enough radius and seam clearance to prevent repeated catching.
- Reinforce ends: use bar tacks, box stitches, stops, or another approved method to prevent tape pullout.
- Screen for early failure: cycle sample and inspection pieces by hand, noting catching, tooth separation, slider lock, or tape distortion.
- Compare suppliers carefully: a lower price may reflect cheaper sliders or weaker zipper tape rather than sewing efficiency.
Logo Wear: Test the Branding, Not Just the Color
For craft fair portfolios, the logo is part of the product’s saleability. It is touched, stacked, rubbed against other portfolios, and pressed inside cartons. A clean artwork proof does not prove that the finished logo will survive packing and event handling.
Screen printing is usually efficient for bold one- or two-color marks on canvas, but durability depends on ink selection, fabric texture, curing, and placement. Fine lines may break over a coarse weave. Heat transfer can reproduce gradients and detailed graphics, but the film edge, hand feel, and adhesion must be reviewed on the actual canvas body. Embroidery can look premium on small logos, yet dense stitching may distort a flat panel or create an uneven reverse side. Woven labels are useful for repeat retail programs because they keep branding consistent and avoid ink cracking.
Logo approval should include placement tolerance and wear checks. Rub the cured print dry and lightly damp. Fold the portfolio through normal use lines. Pack one printed unit against another and inspect for transfer. If the logo sits too close to the zipper, puller, or corner seam, it may wear faster or be harder to print consistently. Swatch prints are helpful for color, but finished samples reveal seam pressure and packing effects.
- Screen print: strong default for solid logos, simple artwork, and cost-sensitive bulk programs.
- Heat transfer: useful for gradients or small detail, but check edge lift, bubbling, cracking, and film feel.
- Woven label: good for multi-season retail orders and consistent brand appearance across batches.
- Embroidery caution: review panel distortion and reverse-side finish before approving it on a flat portfolio.
- Placement control: set logo distance from seam, zipper, and edge with a realistic tolerance, often plus or minus 3-5 mm depending on design.
Interior Layout: Function Without Hidden Defects
Interior features drive more cost and defects than many buyers expect. A large document sleeve needs a reinforced opening. Card pockets require consistent slot width. A pen loop must hold shape after repeated use. A tablet pocket needs padding if the buyer expects protection. Each added feature means more cutting, stitching, alignment, and inspection.
The right layout depends on the event workflow. A craft fair organizer may need maps, badges, schedules, sponsor flyers, and check-in documents. A maker brand may need line sheets, order forms, samples, business cards, and pens. A retail program may prioritize lining, clean seams, hangtag placement, and giftable presentation. A simple interior can be the best first order if the buyer wants predictable quality and controlled cost.
Inspect the inside as carefully as the front panel. Users open these portfolios in front of customers and buyers. Loose threads, puckered lining, rough binding, crooked pockets, or fabric caught in the zipper path make the product feel cheap even when the exterior looks acceptable. Ask for inside photos during sampling and in-line production, especially when the portfolio has multiple pockets or lining layers.
- Basic version: one compartment and zipper closure for light documents and lower sewing risk.
- Event kit version: document sleeve, pen loop, and small card or badge pocket.
- Wholesale version: large sleeve for line sheets, smaller pocket for cards or receipts, and enough zipper clearance for loaded papers.
- Retail version: lining, bound seams, clean pocket finishing, label placement, and stronger individual presentation.
- Cost control: remove decorative pockets before reducing zipper or seam quality.
Quote Comparison: Look Beyond Unit Price
Supplier quotes often vary because they are not quoting the same product. One factory may include lined pockets, stronger zipper tape, individual bags, and export cartons. Another may quote stock fabric, no lining, a simpler zipper, and bulk packing. The ex-factory unit price alone does not show which offer will deliver saleable goods.
Break the product into layers when comparing suppliers: base canvas body, zipper, interior construction, logo, reinforcement, individual packing, master carton, labels, and freight data. Then ask for quantity breaks using the same assumptions. If dyed canvas, custom zipper pullers, woven labels, printed sleeves, or barcodes are optional, price them separately. This makes it clear which feature changes MOQ, cost, and lead time.
MOQ should also be questioned. Sewing capacity may allow 300 pieces, while dyed fabric, custom zipper tape, custom pullers, or printed packaging may require higher minimums. A very low MOQ may simply mean stock fabric and standard accessories. That can be acceptable, but it should be an intentional decision rather than a hidden substitution.
- Compare equal builds: same canvas, same zipper, same pockets, same logo method, same packing, and same inspection expectation.
- Ask for cost layers: unit price, setup, sample, tooling, label, packing, carton, inspection, and freight estimate.
- Check MOQ source: fabric, dye lot, zipper, puller, label, packaging, or production scheduling.
- Request freight data: carton dimensions, gross weight, pieces per carton, and packing orientation.
- Judge landed saleable cost: include rework risk, inspection cost, carton cube, and event delivery deadline.
Sample Approval: Turn Comments Into Acceptance Criteria
A useful sample proves construction, not just appearance. If the first sample uses substitute fabric or available trims, label it as a construction sample. It can confirm size, pocket logic, and general appearance, but it should not release bulk cutting. The pre-production sample should use production fabric, zipper, logo process, lining, reinforcement, and packing method.
Acceptance criteria need to be written before the supplier starts bulk work. Include finished size, internal clearance, zipper smoothness, pocket capacity, logo placement, shade standard, seam appearance, and packing fit. Test with real contents: line sheets, order forms, pens, stickers, badge cards, catalogs, or a dummy tablet if relevant. A portfolio that lies flat when empty can distort when loaded.
Sample feedback should be photographic and measurable. Instead of saying the zipper feels bad, note that the slider catches at the upper right corner after repeated opening. Instead of saying the print is weak, document rubbing, transfer, or cracking. Good comments help the factory correct patterns, sewing guides, ink curing, or packing before the order becomes expensive to fix.
- Approve materials: fabric swatch, zipper, lining, logo method, insert, and packing should match the bulk plan.
- Measure tolerance: many sewn canvas portfolios use plus or minus 5 mm for size, unless the design requires tighter agreement.
- Test contents: load the actual document set or sales kit before approving pocket size and zipper clearance.
- Check branding: review color, placement, rub resistance, folding behavior, and packing transfer.
- Confirm carton fit: inspect at least one packed carton or carton mockup before full packing begins.
Durability Checklist for Production and Inspection
Durability checks for this product should reflect craft fair use, not luggage abuse. The portfolio is opened, closed, stacked, displayed, packed, and carried with documents. The most useful checks target early zipper failure, seam weakness, corner wear, pocket stress, print transfer, and carton damage.
Factories can perform practical in-line checks if the buyer defines them early. Pull pieces during sewing to inspect zipper ends and pocket seams. Check printed pieces after curing and before individual packing. Open random finished pieces to review lining, thread trimming, and zipper path. Inspect packed cartons before the full order is sealed. The goal is not to create a complicated lab program; it is to catch repeatable defects while they are still fixable.
For third-party inspection, add product-specific checks to the general AQL plan. Visual inspection alone can miss weak zipper ends, poor print curing, and pockets that tear when loaded. AQL 2.5 for major defects and 4.0 for minor defects is a common starting point for consumer soft goods, but the buyer should define which defects are major for this product. For example, zipper failure, wrong logo, severe shade mismatch, open seams, and bent inserts usually deserve stricter treatment than a small loose thread.
- Zipper cycle: open and close sampled pieces repeatedly, recording catching, separation, slider lock, tape distortion, and failure location.
- Seam pull: check zipper ends, bottom corners, pocket openings, pen loop ends, and any wrist loop or tab.
- Pocket load: insert intended contents and remove them several times to check seam distortion and pocket mouth strength.
- Print wear: run dry rub and light damp rub after curing, then inspect for transfer, smearing, fading, or cracking.
- Corner abrasion: rub exposed corners against plain carton material to reveal early whitening, broken binding, or board exposure.
- Carton compression: inspect packed units for zipper impressions, bent inserts, print transfer, and distorted corners.
Packing for Flat, Saleable Arrival
Packing is a quality-control decision, not just a shipping detail. Canvas zipper portfolios are usually packed flat, but over-tight cartons can create zipper marks, puller dents, bent inserts, and warped corners. Loose cartons can let products shift and abrade printed panels. The correct method balances surface protection, carton cube, warehouse handling, and retail presentation.
Individual OPP bags are common because they reduce dust and print rubbing. Paper sleeves, kraft belly bands, or plastic-reduced systems may fit craft market positioning, but they should be tested for abrasion and moisture exposure. Printed paper surfaces can rub against screen print during transit, and unbagged natural canvas can pick up dust or carton fibers.
Review the first packed carton before full packing starts. Confirm pieces per carton, orientation, puller position, inner bundle pressure, label placement, carton marks, and gross weight. For structured portfolios, inspect whether the insert bends at corners. For printed portfolios, inspect whether zipper parts or neighboring units mark the logo panel. Include carton dimensions and gross weight in the final quote so freight estimates are based on actual packing.
- Standard packing: one piece per bag, flat orientation, controlled inner bundles, and export carton sized to avoid compression marks.
- Plastic-reduced option: paper sleeve or belly band, with added checks for print rub, dust, and moisture exposure.
- Puller control: position zipper pullers so they do not press into printed front panels during stacking.
- Carton control: keep gross weight manageable for warehouse handling and confirm pieces per carton before freight booking.
- Retail data: provide barcode, SKU label, hangtag, price label, carton mark, inner quantity, and pallet rules before packing files are finalized.
Lead Time, Schedule Risk, and Final Buying Notes
Lead time should be counted from the real production trigger, not the inquiry date. For most custom orders, the clock starts after deposit, artwork approval, sample approval, and material booking. Stock natural canvas with a simple screen print can move faster than dyed fabric, custom zipper pullers, printed lining, or retail sleeves. The more custom materials involved, the more approval points the schedule needs.
Approval delay is the most common avoidable risk. Artwork may need resizing because it sits too close to the zipper. A lab dip may need revision because cotton canvas absorbs color differently from smoother synthetic fabrics. A first sample may reveal that the pocket opening is weak or the zipper curve is too tight. Build time for one corrected sample when the project includes new construction, dyed canvas, upgraded branding, or special packing.
For craft fair programs, late delivery can cost more than a small unit-price saving. Compare suppliers by their ability to provide clear materials, realistic dates, inspection cooperation, and packing data. A slightly higher quote with production-ready details may be safer than a cheaper quote that leaves zipper grade, fabric weight, and packing vague. The strongest purchase order combines a clear spec, approved sample, durability checks, and carton requirements before bulk cutting begins.
- Schedule drivers: artwork approval, fabric booking, lab dip approval, accessory production, print curing, and packing files.
- Freight drivers: canvas weight, insert thickness, carton cube, individual packing, and pallet rules.
- Risk buffer: allow time for one corrected sample on new designs or custom-material orders.
- Final control: book inspection before balance payment and before goods are released to the forwarder.
- Buying principle: protect saleable arrival and event deadline, not only the ex-factory unit price.
Specification comparison for buyers
| Sourcing option | Best fit | What to compare between suppliers | Main procurement risk |
|---|---|---|---|
| Stock natural canvas with one-color screen print | Fast craft fair orders, exhibitor packets, maker market merchandise, first production runs | Actual canvas weight, zipper grade, print curing method, sample timing, included packing, carton dimensions | Lowest quote may use lighter fabric, weak slider, raw inside seams, or very tight carton packing |
| Dyed canvas with matched brand color | Brand programs, museum shops, retail resale, coordinated event merchandise | Lab dip process, dye-lot minimum, shade tolerance, shrinkage control, colorfastness checks, added lead time | Small orders can be forced into available fabric shades unless color approval and bulk lot controls are clear |
| Lined portfolio with internal pockets | Wholesale sales kits, order-form organizers, sponsor packs, buyer meeting folders | Lining denier, pocket reinforcement, seam finishing, pocket capacity, thread trimming, inside inspection photos | Extra pockets increase sewing defects: crooked openings, torn pocket mouths, zipper interference, and uneven bulk |
| Structured portfolio with board or PP insert | Retail display, premium gift sets, portfolios that must stay flat on tables | Insert material, thickness, corner protection, carton compression plan, gross weight, bend resistance | Over-compressed cartons can bend inserts and create zipper or puller impressions on the front panel |
| Upgraded branding package | Repeat retail programs or higher-ticket promotional sets | Woven label vs screen print vs heat transfer, placement tolerance, color standard, rub or peel checks, label MOQ | Branding choices may add setup fees, material minimums, approval time, and failure points if tested only on flat swatches |
| Custom zipper puller or metal zipper | Premium presentation, gift programs, buyers wanting a stronger accessory detail | Tooling fee, puller MOQ, slider finish, pull strength, zipper tape quality, corner sewing quality | Accessory MOQ and sample time may exceed the sewing MOQ; metal parts can mark canvas during packing |
| Plastic-reduced retail packing | Eco-positioned craft market programs, stores avoiding individual polybags | Paper sleeve type, belly band material, barcode location, print rub risk, moisture protection, packing labor | Paper packing can abrade printed panels or expose canvas to moisture if transit conditions are not considered |
Buyer checklist before sampling
- Define the finished portfolio size with tolerance, internal clearance, zipper opening shape, and whether it must fit A4, letter-size documents, catalogs, or a tablet dummy.
- Specify canvas by weight, finish, color, and approval method; use both oz and GSM as buyer references, but approve bulk fabric by swatch or production sample.
- State whether the body fabric is natural, bleached, dyed, washed, laminated, coated, or pre-shrunk, and note acceptable cotton flecks, slubs, hand feel, odor, and shade movement.
- Choose zipper type, size, tape color, slider finish, puller style, end reinforcement, and smoothness expectation before comparing quotes.
- List all interior features, including lining, document sleeve, card pocket, receipt pocket, pen loop, board insert, PP sheet, foam, or tablet sleeve.
- Match the logo method to the artwork: screen print for solid marks, heat transfer for gradients, woven label for repeat retail programs, and embroidery only after checking panel distortion.
- Set measurable tolerances for finished dimensions, logo placement, pocket placement, zipper length, seam allowance, shade variation, and packing quantity.
- Approve a pre-production sample made with production fabric, zipper, logo process, interior layout, reinforcement, and intended packing method.
- Use practical checks for zipper cycling, seam pull, pocket load, corner abrasion, print rub, colorfastness where relevant, and carton compression; identify whether checks are factory in-line, final inspection, or buyer sample review.
- Separate unit price from setup charge, sample cost, tooling, label cost, packing cost, inspection cost, carton cost, freight estimate, and any MOQ tied to dyed fabric or accessories.
Factory quote questions to send
- What exact canvas will be used: oz, GSM, finish, color, shrinkage expectation, fabric source, and whether it is stock fabric or newly produced for this order?
- If the canvas is dyed, what is the lab dip process, minimum dye lot, shade tolerance, and expected lead time before cutting can begin?
- Which zipper is included in the quote: nylon coil, metal, or resin; what size, tape color, slider finish, puller type, and zipper-end reinforcement are planned?
- What internal construction is included: lining, pocket count, pocket reinforcement, binding, board insert, PP sheet, foam, elastic loop, or other organizer features?
- Which logo method is included, how many colors are covered, what is the maximum print area, and how will curing, adhesion, rub, or peel performance be checked?
- What drives the MOQ: sewing line, fabric order, dye lot, zipper tape color, custom puller, woven label, printed sleeve, carton quantity, or another material minimum?
- Will the approval sample use production fabric and trims, or is the first sample only for construction review? How many days are needed for first sample and corrected sample?
- What tolerances do you normally hold for finished size, logo position, zipper placement, pocket placement, seam allowance, fabric shade, and carton quantity?
- What packing is included: individual bag, paper sleeve, belly band, hangtag, barcode label, inner bundle, silica gel, master carton, palletization, or carton drop/stacking check?
- How is lead time counted: after deposit, artwork approval, material booking, sample approval, receipt of packaging files, or all of these conditions?
Quality-control points to confirm
- Check finished size against the approved sample and PO tolerance; plus or minus 5 mm is a common practical target for many sewn canvas portfolios, but structured designs may need a tighter agreed standard.
- Verify canvas weight against the approved specification using the supplier’s fabric record and compare bulk shade under consistent lighting against the signed swatch or production sample.
- Cycle the zipper by hand during sample review and random final inspection; 50 open-close cycles is a practical screening check for early catching, slider failure, tape distortion, and poor corner sewing, not a laboratory lifetime claim.
- Inspect zipper ends for bar tacks, box stitches, end stops, or equivalent securing; loose tape ends and weak stops are high-risk failure points.
- Apply a moderate seam pull by hand at zipper ends, pocket mouths, bottom corners, pen loops, and any wrist loop; reject thread breakage, seam opening, or fabric tearing.
- Review screen print after curing with dry rub and light damp rub checks; watch for smearing, heavy fading, cracking, or ink transfer to packing surfaces.
- For heat transfers, check edge lifting, bubbling, cloudy film, poor adhesion over canvas texture, and cracking after normal folding around the portfolio body.
- Load interior pockets with the intended documents, cards, pens, or dummy contents; check pocket mouth strength, seam distortion, and zipper clearance after insertion and removal.
- Rub exposed corners and binding lightly against plain carton material to reveal early whitening, broken stitches, board exposure, or sharp reinforcement edges.
- Open packed cartons before full shipment release to check flatness, zipper puller impressions, bent inserts, print transfer, wrong carton counts, and barcode or carton-mark errors.