Why roasters should inspect bottle carriers differently from tote bags
Coffee roasters buy custom canvas wine carriers for more than wine. The same format can support bottled cold brew, coffee concentrates, coffee liqueur collaborations, cascara drinks, syrups, holiday gift sets, café merchandise, wholesale promotions, and corporate gifting. In each case, the bag becomes part of the product experience. It may sit beside retail coffee bags, mugs, brewing kits, and gift boxes. If the carrier twists, collapses, smells musty, or carries a crooked logo, the bottle may be fine but the brand presentation is not.
A bottle carrier also behaves differently from a tote. A tote spreads flexible contents across a wider base. A canvas wine carrier holds a hard, narrow, heavy object. Stress concentrates at the bottom gusset, side seams, divider, top edge, and handle attachments. Many defects stay hidden while the carrier is flat on an inspection table. Add a filled bottle and the front panel curves, the base rounds out, the handle pulls unevenly, or the logo suddenly appears too low.
That is why a useful custom canvas wine carriers quality inspection checklist for coffee roasters must include loaded fit. Fabric, print, and sewing checks still matter, but they are not enough. The carrier must be inspected with the actual bottle or a realistic dummy matching height, diameter, and filled weight. For two-bottle styles, both bottles must be loaded at the same time. Guesswork is not a substitute for a physical fit test.
Procurement teams can prevent most disputes by turning brand expectations into measurable requirements. Instead of asking for a “premium canvas wine bag,” specify canvas weight, fiber content, bottle dimensions, finished measurements, handle construction, stitch requirements, print placement tolerance, packing method, and inspection standard. A clear specification helps the factory quote accurately. It also gives the inspector something objective to check before shipment.
- Treat the carrier as reusable branded packaging, not a disposable commodity sleeve
- Inspect the sample and final goods with the real bottle or an accurate weighted dummy
- Put GSM, dimensions, stitch details, logo tolerances, and packing method in writing
- Use one approved master sample for production, inspection, and reorders
- Check cartons and packing because compression damage often appears after the sewing line
Start the RFQ with the bottle, then build the carrier around it
The first RFQ question is not “What size bag do you make?” It is “What bottle are we carrying?” Coffee bottle programs often use shapes that do not match a standard wine bottle. Bottled cold brew can be shorter and wider. Syrups may use slim bottles with tall caps. Coffee liqueur collaborations may involve wine-style glass, swing-top closures, wax seals, neck tags, or gift ribbons. If the supplier assumes a common 750 ml wine pattern, the quote may arrive quickly, but the production fit can be wrong.
Send the bottle data early: overall height, base diameter, widest body diameter, neck diameter, cap or closure diameter, shoulder shape, filled weight, and any label, sleeve, hangtag, wax, ribbon, or wrap that changes clearance. If the neck should remain visible, state how much. If the canvas should cover the main bottle label for a clean gift look, state that too. These details affect the pattern, not just the decoration.
For two-bottle carriers, be even more precise. Decide whether the bottles may touch, must be separated by a canvas divider, or need a padded divider. State divider height, divider thickness, distance between bottle centers if important, and whether both necks should stay parallel when the carrier is lifted. A two-bottle version is not simply a wider single-bottle bag. Weight distribution, sidewall bowing, divider pull, and handle balance all need testing.
Small differences show up fast. A bottom gusset that is 10 mm too narrow can pull the bottle into a lean. A body height that is too tall can hide the neck and make the gift look unfinished. A short handle drop may feel awkward; an overly long handle can swing heavily and strain the top seam. Approve the sample loaded, photographed from front, side, and base, and measured against the written specification.
- Provide bottle height, base diameter, widest diameter, neck or cap diameter, shoulder shape, and filled weight
- State visibility requirements for the neck, closure, label, hangtag, wax seal, or gift ribbon
- Use a real bottle or matched dummy bottle for sampling, PPS approval, and inspection
- For two-bottle designs, define divider height, divider position, and bottle spacing
- Do not approve a pattern that only looks correct when empty
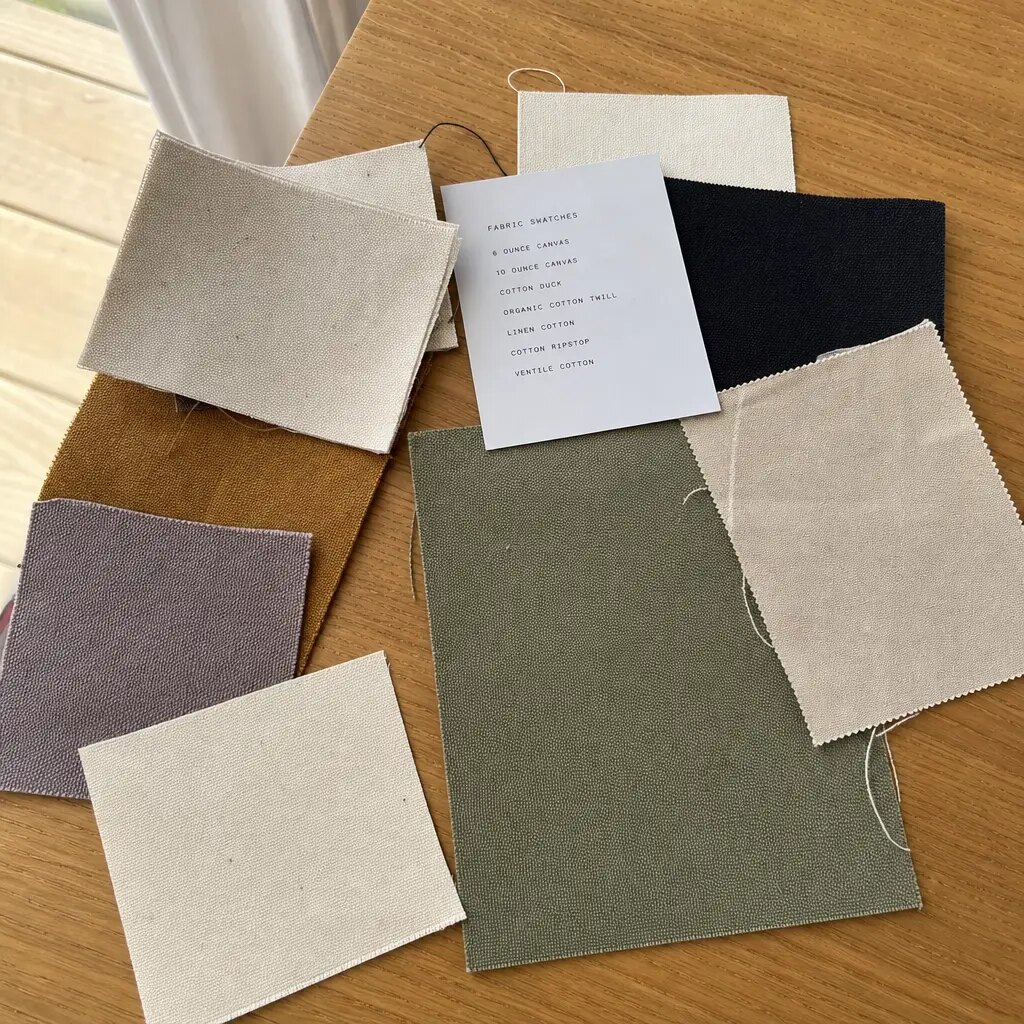
Specify canvas in terms a factory and inspector can both verify
Canvas weight affects structure, sewing, print quality, freight cost, and the customer’s first impression. For most premium single-bottle carrier programs, 12 oz to 14 oz canvas, typically about 340 to 400 GSM finished weight, is a practical starting range. It gives more body than lighter promotional fabric and usually supports a reusable gift positioning. Lighter 8 oz to 10 oz canvas can work for budget campaigns, but expect softer sides and consider reinforcement at the handles and base.
Do not rely only on ounce weight. Suppliers may describe fabric weight differently, and the finished weight can change after dyeing, washing, coating, or other finishing. A stronger purchasing line reads: “12 oz cotton canvas, approximately 340 GSM finished weight after finishing, tolerance +/-5%, natural unbleached shade as approved swatch.” If the supplier wants to substitute another canvas, require written approval before sampling or bulk cutting.
Fiber content deserves the same clarity. 100% cotton canvas is common for roaster-friendly natural texture and straightforward screen printing. Recycled cotton blends may support a sustainability brief, but they can show more shade variation, neps, or uneven surface depending on the yarn source. Cotton-poly canvas may improve dimensional stability or reduce cost, while also changing hand feel and print behavior. If organic cotton is required, state the certification and documentation expectation in the RFQ and purchase order.
Natural canvas is not supposed to look perfectly synthetic. Seed specks, small slubs, and minor texture differences may be acceptable if they match the approved swatch and do not weaken fabric or disrupt the logo area. Stains, mildew, oil marks, color contamination, broken yarns, strong odor, and severe loom defects are different issues and should be classified as defects. This distinction keeps inspection realistic without lowering the standard for retail presentation.
- State both nominal ounce weight and finished GSM
- Agree where and when GSM is measured, especially after dyeing, washing, or finishing
- Write fiber content into the purchase order and prohibit unapproved substitution
- Approve natural canvas shade and slub level with a physical swatch, not only photos
- Separate acceptable cotton texture from stains, mildew, odor, contamination, and fabric damage
Engineer seams, gussets, handles, and base for loaded use
A canvas bottle carrier usually fails at predictable points: bottom gusset, base seam, side seams, handle attachments, top opening, divider, and closure tabs. The construction should be planned around the filled bottle weight and the way the carrier will be used. For many 750 ml bottles, a bottom gusset around 100 to 120 mm may be suitable, but the correct value depends on the actual bottle diameter and the desired fit. Wider cold brew bottles or squat syrup bottles may need a different base.
Handle design is one of the most important cost and quality decisions. Self-fabric folded handles look integrated and can feel premium, but they must be folded evenly, sewn with balanced tension, and reinforced. Cotton webbing handles can be strong and efficient, yet they require decisions on width, color, hand feel, shrinkage, and insertion depth. The specification should identify handle width, handle length, handle drop, insertion depth, stitch pattern, bartack or box-X reinforcement, thread color, and stitch density.
A practical stitch-density target for medium-heavy canvas is often around 8 to 10 stitches per inch, though the final setting should match the fabric and machine setup. Too few stitches can reduce seam strength. Too many can perforate heavy canvas, create puckering, or weaken stress points. The approved sample should show the intended balance, and final inspection should check skipped stitches, broken thread, loose lock-off, needle cutting, and uneven seam allowance.
Base structure matters when the carrier will be displayed, gifted, or repeatedly handled. Options include a second canvas base layer, a stitched-in bottom reinforcement, a removable PE board, or a bound base insert. A removable board should fit snugly without sharp corners and should not shift during carrying. A stitched base can improve stability, but it must not create hard pressure points against the bottle. Always check the base while loaded, not just when flat.
- Match gusset depth to the actual bottle diameter and desired shelf appearance
- Specify handle width, handle drop, handle insertion depth, and reinforcement method
- Use box-X stitching, bartacks, or another approved reinforcement at handle stress points
- Check stitch density, thread tension, lock-off, and seam allowance against the master sample
- Add base reinforcement when standing stability or premium gift presentation matters
Choose logo decoration for canvas texture, not just artwork style
Most coffee roaster bottle-carrier artwork is fairly simple: a café logo, seasonal mark, origin illustration, limited-release message, or one-color slogan. Screen printing is usually the most efficient route for one or two spot colors on canvas. It can be repeatable and cost-effective when artwork, ink reference, mesh, print size, and placement are controlled. Still, canvas is textured. Fine lines can fill in, small text can blur, and ink opacity can vary across heavy slubs.
For screen print, ask the factory to confirm minimum line thickness, minimum readable text size, registration tolerance for multi-color designs, and expected ink opacity on the selected fabric. A dark print on natural canvas behaves differently from white ink on black canvas. Dyed canvas can also change the final appearance. Approve a physical strike-off on the actual fabric whenever brand color matters.
Heat transfer can handle detailed or multi-color graphics, but it needs extra caution on rough canvas. Possible issues include a visible film edge, plastic hand feel, cracking at folds, edge lifting, weak adhesion over slubs, and marks after tight packing. Do not approve heat transfer from a digital mockup. Test dry rub, light scratch where suitable, edge adhesion, folding, and appearance after compression.
Woven labels, cotton labels, faux leather patches, and embroidered patches can suit premium or understated roaster branding. They reduce the risk of direct printing on a textured surface, but they add their own inspection points: label position, stitch alignment, patch edge finish, fraying, color consistency, and whether the label sits flat once the bottle is inside.
Placement needs both measurement control and visual approval. A logo may be centered on the flat panel but look low, curved, or slightly skewed when the bottle is inserted. Define the measurement point, such as distance from the top edge and side seam, and set a tolerance, often +/-3 mm to +/-5 mm depending on artwork and factory capability. Include a loaded front-view photo in the approved sample record.
- Use screen print for many simple one-color or two-color roaster logos
- Test heat transfer on production canvas before bulk approval
- Define minimum line thickness, small-text limits, opacity, and registration tolerance
- Measure logo placement from fixed seams or the top edge
- Judge final branding with the bottle inserted as well as with the carrier flat
Approve samples in stages so bulk production has fewer surprises
A good sample route is not complicated, but it should be sequential. Start with a technical drawing and measurement sheet. Approve a fabric swatch. Review a blank fit sample. Check a print strike-off. Then approve a printed pre-production sample. If the packing method is important, add a packing sample. This path takes more discipline than approving a digital mockup, but it catches the defects that digital artwork cannot show.
The blank fit sample should be tested with the actual bottle or a realistic dummy. Insert the bottle naturally, place the carrier on a flat surface, lift it several times, and check whether the side seams twist. Confirm that the top opening is not too tight, the base opens fully, the bottle does not press sharply against a seam, and the handle drop feels practical. For two-bottle styles, load both bottles and check balance.
The printed pre-production sample should use production fabric, final decoration method, correct ink or transfer color, final trim, actual handles, closures, labels, and representative packing. This sample becomes the master for final inspection. Mark it clearly as approved. Photograph the front, back, sides, base, handles, inside construction, label, closure, and loaded view. Keep a measurement record with tolerances.
Packing samples are especially useful for gift programs, dark canvas, heat transfers, and carriers with base inserts. Ask the factory to pack a small quantity exactly as planned: fold direction, inner count, interleaving, polybag or no polybag, carton liner, carton label, and carton weight. Open the sample after compression. Look for deep creases, print transfer, lint, dust, bent inserts, or crushed gussets.
Whenever a sample changes, update the specification. A verbal “please make the handle stronger” is not enough. Record the new handle width, insertion depth, reinforcement stitch, or thread change. Revisions that are not captured in the PO or spec sheet can disappear when production moves from sampling to the bulk sewing line.
- Approve drawing, fabric swatch, blank fit sample, strike-off, PPS, and packing sample when possible
- Load-test the blank sample before finalizing decoration placement
- Use production fabric and final decoration for the pre-production sample
- Create a clearly identified master sample with photos and measurements
- Update the written specification whenever a sample change is approved
Use AQL sampling, but add bottle-specific functional checks
Final inspection should be more than a quick visual scan. Classify defects by severity before the goods are produced. Critical defects include safety or contamination issues such as sharp foreign objects, mildew, severe chemical odor, broken hardware with sharp edges, or structural failure that could drop a bottle. Major defects include wrong dimensions affecting fit, open seams, weak handles, wrong canvas weight, wrong color, severe print misplacement, closure failure, and bottle-fit failure. Minor defects are small cosmetic issues within the approved standard that do not affect use.
Many importers use AQL sampling for lot acceptance. The exact AQL levels should be selected by the buyer, but the checklist must go beyond generic soft-goods inspection. A canvas bottle carrier needs loaded checks: insert the bottle, verify standing stability, lift by the handles, close any closure, inspect loaded logo position, and check the base shape. If the design has a divider, test the full intended bottle count.
Handle testing should be written into the QC plan. At minimum, the test load should equal the intended filled bottle weight. If the buyer wants a safety margin, define the higher load and duration before production. Do not leave the inspector to invent a method on site. The report should note seam tearing, thread breakage, handle elongation, bartack failure, panel distortion, or any sound of stitches popping under load.
Dimension checks also need a consistent method because canvas moves. Lay the carrier flat naturally and smooth it lightly without pulling. Measure width, height, side gusset, bottom gusset, opening width, handle drop, handle length, divider position, base insert, and print placement. If goods are tightly packed, allow short relaxation before measurement, but record severe compression as a packing defect.
The inspection report should include sample size, carton numbers, defect counts, clear photos, and final disposition. For major defects, photos should show the full item and close-up evidence. For fit problems, include loaded front, side, and base views. A report that says “not good” is hard to act on. A report that shows bottle lean, measured gusset depth, and carton location gives the factory a path to sort or rework.
- Define critical, major, and minor defects before inspection
- Use AQL sampling plus bottle-fit, standing, closure, and loaded-carry checks
- State handle load-test method, load, duration, and pass/fail criteria
- Measure soft canvas consistently without stretching it into tolerance
- Require photos and carton references for major defects and fit failures
Control packing because it changes received quality
Packing is part of the product specification. Canvas wine carriers are often packed flat to reduce freight cost, but aggressive compression can create deep creases, bent base inserts, distorted gussets, print transfer, dust marks, and abrasion. These issues may not appear at the sewing table. They show up after bundling, carton stacking, container movement, and warehouse storage.
Define unit packing first. Options include no individual packing, a paper band, tissue wrap, individual polybag, verified alternative packaging, or retail sleeve. If your packaging policy avoids polybags, specify how the carrier will stay clean. Natural canvas absorbs dirt easily. Black canvas shows lint, rub marks, and dust. Printed faces may need tissue or interleaf if the artwork is vulnerable to abrasion.
Then define inner and export packing. State inner bundle count, fold direction, whether handles are tucked or left flat, whether base inserts are packed inside each carrier, carton liner, carton size, carton ply, carton marking, and maximum gross weight. A carton that is too large allows shifting and edge crush. A carton that is too tight may permanently crease the product or damage transfers.
Packing also affects landed cost. A support card, lower carton count, stronger carton, or interleaf increases ex-factory cost, but it may reduce destination rework and retail rejection. Bulk packing may be acceptable for café staff who will unpack and merchandise the carriers manually. Corporate gifts, distributor-ready units, or retail gift kits may need cleaner individual presentation. Compare supplier prices only after packing assumptions are the same.
- Specify unit, inner, and export packing in the RFQ and PO
- Protect printed surfaces from rubbing, ink transfer, lint, and compression
- Set inner count, carton size, carton ply, carton marking, and maximum gross weight
- Inspect top, middle, and bottom carton layers because compression can vary
- Compare unit prices only after normalizing the packing method
Plan lead time around approvals, fabric route, and inspection buffer
Lead time is more than sewing days. The real timeline includes artwork preparation, technical drawing, fabric sourcing, swatch or lab dip approval, sample making, print strike-off, pre-production sample approval, bulk cutting, sewing, decoration, trimming, final inspection, packing, and export release. If a quote gives one lead-time number, ask what it assumes and what is excluded.
Stock natural canvas usually carries less timing and shade risk than custom dyed canvas. Custom dyeing requires lab dip approval, bulk dyeing, finishing, shade evaluation, and sometimes a minimum fabric quantity above the order requirement. Washed canvas, special coatings, or custom color matching can add further risk. For seasonal coffee launches and holiday gifting, a few days lost in approvals can turn into missed delivery dates or expensive freight upgrades.
Artwork can create schedule risk too. Screen print files may need vector cleanup, trapping, line-weight adjustment, or color separation. Heat transfer artwork may require decisions on background shape, film finish, and edge treatment. Procurement should identify who approves artwork, fabric shade, and pre-production samples, then set a deadline for each approval.
Build in final inspection and rework time. A schedule that assumes perfect production is not a procurement plan. If inspection finds major defects, the factory may need to sort, rework, remake, or repack goods before shipment. Reinspection may also be needed. Leave room for that possibility, especially for event dates, corporate gift launches, distributor commitments, or peak-season coffee promotions.
- Break lead time into sample, material, production, decoration, inspection, packing, and export stages
- Use stock natural canvas when speed and shade stability matter most
- Allow extra time for custom dyeing, washed finishes, special coatings, and complex artwork
- Set decision deadlines for swatch, strike-off, and PPS approval
- Reserve time for inspection failure, sorting, rework, and reinspection
Compare suppliers by inspectable specification, not headline piece price
A low unit price is useful only when the specification is the same. Canvas wine carrier cost is driven by fabric GSM, fiber content, body size, gusset, handle construction, stitch complexity, divider, base insert, print method, number of colors, label, closure, packing, carton quality, sample stages, and inspection requirements. If one supplier quotes 10 oz canvas with bulk packing and another quotes 14 oz canvas with a base insert and interleaf, those are not equivalent offers.
MOQ also changes the best sourcing route. Low-MOQ orders often work best with stock natural canvas, one shared body pattern, one-color screen print, standard handle construction, and simple packing. Custom dyed fabric, several handle colors, special closures, and multiple artwork versions can push the supplier into higher minimums or material surcharges. At higher volumes, upgrades such as woven labels, stitched base inserts, reinforced dividers, and retail-ready packing may become easier to justify.
Ask for price tiers using identical specifications at 500, 1000, 3000, and 5000 pieces. Separate one-time costs from repeat-order costs: sample fee, screen charge, label setup, artwork preparation, packing development, and courier cost. If the roaster expects seasonal reorders, retained patterns, screens, swatches, and master samples are valuable because they reduce variation and shorten future approvals.
The best quote is the one you can inspect. A complete supplier offer should restate the fabric, dimensions, tolerances, handle reinforcement, print method, packing, sample stages, lead time, MOQ, and QC expectations. If the quotation is vague, the buyer may be saving money only by accepting hidden risk. Push vague lines into clear specifications before you compare prices or issue the purchase order.
- Normalize GSM, fiber content, construction, print, trim, and packing before comparing prices
- Request volume tiers using the same specification at each quantity
- Separate setup charges from repeat-order unit pricing
- Use stock materials and shared patterns to reduce low-MOQ pressure
- Choose suppliers that quote details you can sample, approve, and inspect
Specification comparison for buyers
| Spec decision | Recommended option | When it fits | Buyer risk to check |
|---|---|---|---|
| Bottle data before pattern | Provide the actual bottle or a weighted dummy with height, base diameter, widest diameter, neck or cap diameter, shoulder shape, label thickness, and filled weight | Required for bottled cold brew, wine, coffee liqueur, syrups, cascara drinks, and gift packs using nonstandard bottle shapes | A supplier may quote from a generic 750 ml wine pattern, then deliver poor fit, bottle lean, tight closures, distorted logo placement, or an unstable base |
| Canvas weight | 12 oz to 14 oz canvas, typically about 340-400 GSM finished weight, with an agreed tolerance such as +/-5% | Premium single-bottle carriers, café retail merchandise, corporate gifting, and reusable branded presentation | Below 10 oz often collapses around glass; inconsistent GSM changes hand feel, print opacity, seam strength, and perceived value |
| Finished dimensions | Specify width, height, side gusset, bottom gusset, top opening, handle drop, divider width, and base insert size in mm or cm with tolerance | Useful for comparing factories, controlling reorders, and keeping seasonal programs consistent | Canvas stretches during measurement; without a written method, buyer and supplier may disagree on whether goods are in tolerance |
| Gusset and base structure | Bottom gusset matched to bottle diameter, often 100-120 mm for many 750 ml bottles, adjusted to the actual bottle; optional stitched base layer or fitted PE board | Needed when the carrier must stand neatly on retail shelves, gift tables, or café counters while loaded | Flat bodies, undersized gussets, loose inserts, and weak base seams cause bottle tilt, rounded bases, pressure points, and poor display stability |
| Handle construction | Self-fabric folded handles or cotton webbing handles with box-X stitching, bartacks, or another approved reinforcement method | Loaded glass bottles, event gifting, café merchandise, distributor programs, and repeated handling | Short insertion depth, no reinforcement, uneven handle drop, skipped stitches, or poor lock-off can lead to tearing during loaded carry tests |
| Thread and stitch control | Balanced lockstitch; common target range 8-10 stitches per inch unless buyer and factory agree otherwise | Stabilizes seams on medium-heavy canvas without unnecessary puckering or needle damage | Too few stitches reduce seam strength; too many can needle-cut heavy canvas, pucker panels, or weaken stress points |
| Logo method | Screen print for 1-2 spot colors; woven label or sewn patch for small premium marks; heat transfer only after adhesion and rub testing | Screen print suits many roaster logos on natural canvas; labels work well for understated reusable packaging | Fine lines, small text, weak ink opacity, transfer edge lifting, and placement judged only on empty bags are common approval gaps |
| Print placement tolerance | Define logo size, color standard, measurement point, and tolerance, often +/-3 mm to +/-5 mm depending on artwork and factory capability | Important for front-facing retail display, holiday packs, and corporate gifting where branding must look centered after bottle insertion | A logo can pass while flat but appear low, skewed, curved, or stretched when the carrier is loaded |
| Closure style | Open-top for fast retail use; button loop, tie, snap, or strap only after bottle neck and cap fit are confirmed | Open-top suits visible-neck presentation; closures suit premium gifting, events, and takeaway programs | Closure tabs can twist the front panel, rub against caps, fail around wider bottles, or sit off-center if based only on drawings |
Buyer checklist before sampling
- Confirm the exact product to be carried before requesting price: bottle height, base diameter, maximum body diameter, neck or cap diameter, shoulder shape, filled weight, label thickness, hangtag or neck tag, and whether the neck must remain visible.
- Provide either the real bottle or a dummy bottle matching production dimensions and filled weight. For dummy bottles, state material, weight tolerance, and whether the bottle should simulate filled glass handling.
- State the target canvas in both ounce and GSM terms, for example 12 oz cotton canvas at about 340 GSM finished weight, with tolerance such as +/-5% after dyeing, washing, or finishing.
- Specify fiber content without ambiguity: 100% cotton canvas, recycled cotton blend with stated percentage, cotton-poly canvas, organic cotton if certified supply is required, or custom dyed cotton canvas. Do not allow substitution without written approval.
- Define finished dimensions in millimeters or centimeters: body width, body height, side gusset, bottom gusset, top opening, handle length, handle drop, handle width, seam allowance, divider height, divider position, and base insert size if used.
- Set dimensional tolerances by item. A typical soft-goods starting point may be +/-5 mm for small dimensions and +/-10 mm for larger body dimensions, but tighter tolerances may be needed for logo placement or closure alignment.
- Attach production-scale artwork and specify print method, logo width and height, Pantone or ink reference, print position from seams or top edge, and whether placement is judged empty, loaded, or both.
- Define acceptable print tolerances: placement tolerance, registration tolerance for multi-color art, minimum line thickness, minimum text height, opacity requirement, and whether natural slubs inside the print area are acceptable.
- Approve fabric color and surface character through a physical swatch, not only a photo. For dyed canvas, request lab dip or bulk cutting approval and define shade tolerance against the approved standard.
- List reinforcement requirements: folded top hem, seam binding, overlock or raw-edge control, box-X stitching, bartack locations, stitch density, thread color, handle insertion depth, reinforced base seam, stitched insert, or divider construction.
Factory quote questions to send
- What exact canvas are you quoting: fiber content, weave, yarn count if available, nominal ounce weight, finished GSM, and tolerance after dyeing, washing, or finishing?
- Is the fabric stock greige or natural canvas, stock dyed canvas, newly woven canvas, or custom dyed canvas? What MOQ, shade risk, and lead time apply to each option?
- Can you quote the same carrier in natural canvas, black canvas, and one custom dyed color using identical dimensions, handles, print area, reinforcement, and packing so we can compare real cost impact?
- What is the MOQ for one size and one logo without material surcharge? Please provide price tiers at 500, 1000, 3000, and 5000 pieces using the same specification.
- Are sample charges, screen charges, label setup, artwork separation, courier cost, and packing development included or separate? Which charges apply again on reorders?
- What bottle dimensions do you need to confirm the pattern? Can your sampling team test with our physical bottle or a dummy bottle matching the same height, diameter, and filled weight?
- What bottom gusset and side gusset do you recommend for our bottle diameter? Will the carrier stand upright when loaded, and can you show photos of the loaded sample from front, side, and base?
- How are the handles built: self-fabric folded handles, cotton webbing, or handles inserted into side seams? What handle width, handle drop, insertion depth, stitch pattern, bartack count, and stitch density are included?
- What thread type and approximate stitch density are included? How do you control skipped stitches, thread tension, and lock-off at handle and gusset stress points?
- What print method do you recommend for this artwork on the selected canvas? What are your minimum line thickness, minimum text size, registration tolerance, print opacity expectation, and placement tolerance?
Quality-control points to confirm
- Confirm fabric against the approved standard before cutting and again on finished goods if needed. Check finished GSM within the agreed tolerance, shade against approved swatch or lab dip, fabric hand feel, surface character, odor, stains, broken yarns, and contamination.
- Measure finished dimensions using a consistent method: lay the carrier flat naturally without stretching, smooth panels lightly by hand, and measure body width, height, gusset, opening width, handle length, handle drop, divider location, base insert, and print placement.
- Use agreed dimensional tolerances. As a starting point, many soft-goods buyers use +/-5 mm for handles, print placement, and smaller features and +/-10 mm for larger body dimensions, but the PO should state final tolerances by measurement point.
- Perform bottle-fit testing with the actual filled bottle or a dummy bottle matching approved dimensions and weight. The bottle should insert smoothly, sit flat, avoid severe lean, and not force the seams, closure, or front logo out of position.
- Inspect base performance while loaded. Check whether the bottom gusset opens evenly, base insert sits flat, corners are not sharp, seams are not overloaded, and the carrier can stand for display without unacceptable tipping.
- Check seam construction against the master sample: no skipped stitches, loose lock-off, broken thread, open seams, exposed raw edges, severe puckering, needle cutting, uneven seam allowance, or poor alignment at gusset joins.
- Inspect handle reinforcement closely. Verify box-X or bartack location, stitch density, thread tension, symmetry, handle insertion depth, handle drop, and comfort. Perform a loaded lift or pull test using the agreed load and duration.
- For functional load checks, use a test load at least equal to the intended filled bottle weight, and where the buyer requires safety margin, define a higher agreed test load in the QC plan rather than leaving it to factory judgment.
- Check print quality on finished carriers: placement, centering, height from top edge, distance from side seams, color match, opacity, registration, pinholes, ghosting, smudging, ink bleed, cracking, transfer edge lift, and distortion after bottle insertion.
- Perform print durability checks appropriate to the method: dry rub for screen print, light scratch where suitable, tape or adhesion check for transfers or patches, and inspection after folding or packing compression.