Why museum retail totes need a tighter spec than ordinary promo bags
A museum tote is doing three jobs at once. It has to fit the retail assortment, support the institution's brand standards, and still work as a durable everyday bag once a visitor takes it home. That mix is why a standard promotional-bag brief is not enough. A museum buyer usually needs a bag that can sit next to books, exhibition catalogues, postcards, and premium gifts without looking temporary or disposable.
The sourcing risk is that a loose brief invites quote drift. One supplier may assume a thin, bulk-packed giveaway bag; another may quote a heavier tote with cleaner print and reinforced handles. Both can call it a canvas tote, but they do not represent the same product or the same margin profile. Procurement should treat the tote as a retail item, not as a logo transfer with fabric attached.
The best starting point is to define the retail job the bag must do. Is it a launch item tied to a new exhibition, an evergreen museum shop staple, or a premium gift-store product with a higher ticket price? Each of those has a different build, a different quality bar, and a different supply-risk profile.
- Define the tote as a retail SKU, not a generic promotional item.
- State the target retail price band before asking for a quote.
- Use the launch context to guide quality, packaging, and reorder planning.
- Keep the specification stable enough that different suppliers can quote the same product.
Choose the base bag around shelf presence, not just unit cost
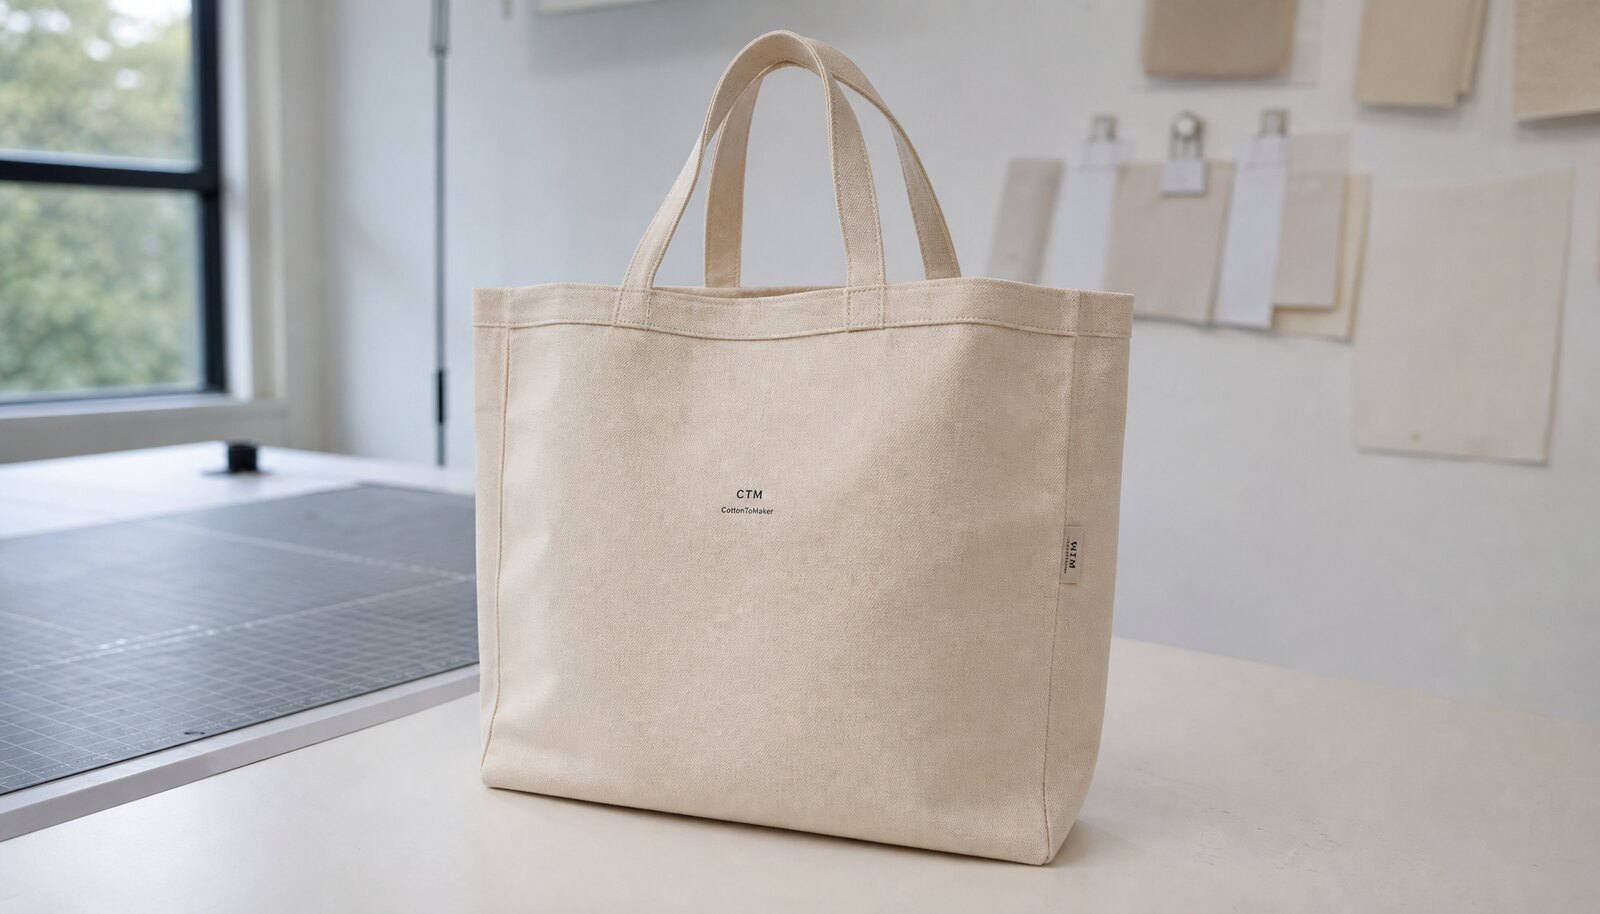
For most museum retail launches, the right starting point is a bag that holds its shape well, prints cleanly, and feels substantial in the hand without becoming expensive to ship. A midweight canvas body usually gives the best balance of cost, appearance, and performance. If the fabric is too light, the print can look flat and the bag can lose shape quickly on shelf. If it is too heavy, the tote may feel premium but cross into a price point that does not fit the shop's planned assortment.
Handle construction is as important as the body fabric. Museum shoppers often carry books, exhibition guides, or a mix of smaller purchases, so the attachment points need reinforcement. A tote that looks good on a sample table but starts to twist or fray in store use creates a faster replacement cycle and damages confidence in the supplier. For the same reason, it is worth deciding early whether the handle should be cotton web, matching canvas, or another approved material that fits the institution's visual language.
Structure should be chosen with retail presentation in mind. A simple open-top tote is usually the most efficient choice for volume programs, while lining, pockets, or a closure belong in a premium line where the store can support a higher price and more complex packing. The mistake to avoid is adding features because they sound better in a specification sheet rather than because they improve sales or usability.
- Use a midweight body as the default starting point unless the store has a premium price target.
- Reinforce handle stress points with stitching that is built for actual load, not just appearance.
- Treat lining, pockets, and closures as deliberate commercial choices, not automatic upgrades.
- Ask the supplier how each construction choice affects labor, carton count, and bulk repeatability.
Choose decoration based on artwork, licensing, and repeat orders
Most museum logos, exhibition marks, and simple heritage graphics are best suited to screen print. The method is predictable, opaque on canvas, and usually economical when the artwork uses one to three spot colors. For procurement, the advantage is repeatability: once the screens and placement are approved, future orders can be run against the same spec with less variation than a more complex decoration process.
More complex artwork needs a different conversation. If the design uses gradients, many colors, or photographic detail, a transfer method may be the practical option for the first launch run. That can work, but the buyer should ask how the finish will look after handling and whether the supplier is quoting the same result on the actual canvas weight selected for production. A sample on a lighter stock or a different weave can create false confidence.
Museum work often adds a licensing or brand-approval step that general retail buyers do not have to manage. If the tote uses exhibit artwork, a partner logo, or a protected mark, procurement should map the approval flow before the quote is awarded. The goal is to avoid a situation where the factory has priced and sampled a design that cannot be released because the final art owner has not signed off.
- Use screen print for clean, repeatable artwork with limited colors.
- Use a transfer method only when the art or quantity justifies it, and test it on the final canvas spec.
- Confirm who owns artwork approval before any print setup costs are incurred.
- Keep licensed marks, exhibition assets, and museum identity assets clearly separated in the artwork file set.
Build the approval flow before the RFQ goes out
Museum retail launches usually involve more stakeholders than a standard consumer product order. Brand teams, licensing partners, retail managers, and exhibition stakeholders may all need a chance to review the tote. If the approval path is not written down, the factory can be asked to quote and sample a product that is not yet legally or visually cleared. That creates delay, and it can also create avoidable cost if artwork changes after sample production.
A practical approval flow should define three things. First, who approves the visuals. Second, who approves the physical sample. Third, who signs off on any exception, such as a color shift, tag change, or substitute trim. The more expensive the tote is intended to be, the more valuable that discipline becomes, because premium lines are usually less forgiving of late changes.
This is especially important when a museum wants different versions of the same tote for multiple exhibitions or locations. The base bag may stay the same, but each artwork version can have its own approval trail. Procurement should insist that the supplier label each version clearly so the final bulk production does not mix art files, packing labels, or carton markings.
- Write down the art approver, sample approver, and final release approver.
- Confirm whether licensing review happens before or after sample creation.
- Label every artwork version with a unique internal code.
- Do not start bulk production until the final version is approved in writing.
Use assortment and MOQ strategy to protect sell-through
Museum launches often have a narrow commercial window. A tote tied to an exhibition opening can sell well early and then slow down once the event passes. That means the first order should be sized for real demand, not optimism. If the assortment is too broad, money gets tied up across several designs that all carry separate setup costs. If the assortment is too narrow, the store can miss opportunities to convert visitors with different interests or price points.
The easiest way to keep MOQ under control is to standardize the bag body and vary only the artwork or small branding elements. That lets the factory reuse the same sewing and packing setup while giving the museum multiple sales stories. If a museum wants one tote for the permanent collection shop and another for a temporary exhibit, the buyer should ask whether the same body spec can carry both graphics. That is usually the commercial sweet spot for a first run.
Sell-through planning matters as much as manufacturing. A tote that is bought as a checkout add-on will need a different quantity plan than a tote meant to anchor a display table. Procurement should ask the retail team how the bag will be merchandised, where it will sit in the store, and whether the tote is expected to act as a traffic driver, a souvenir, or a higher-margin gift item. That answers the question of whether the opening order should favor breadth, depth, or a mix of both.
- Keep the body spec identical across most SKUs.
- Use art variation to create assortment without multiplying production setups.
- Match opening order quantity to the merchandising role, not just to expected venue attendance.
- Set a reorder threshold before launch so best-selling designs can be replenished in time.
What a procurement-ready quote should actually include
A useful quote is one that can be compared line by line. The buyer should be able to see the bag construction, print method, setup cost, sample cost, packaging format, carton spec, and shipping basis without having to ask follow-up questions for basic data. If the supplier only gives a single unit price, the quote is incomplete for procurement because it hides the real cost drivers behind the number.
The packing line is where tote pricing often gets distorted. Bulk flat packing, individual polybags, hangtags, inserts, and barcode labels all affect labor and carton efficiency. That is not a problem if the supplier discloses it, but it becomes a problem if one quote includes it and another does not. To compare bids fairly, the museum needs a shared quote structure that forces every supplier to price the same assumptions.
A procurement-ready quote should also state whether the supplier can support a reorder later. For museum retail, reorder continuity is valuable because the tote may become a permanent SKU if the launch goes well. If the quote does not include an item code, a production reference, and a record of the approved build, the buyer loses leverage when it is time to order again.
- Ask for separate lines for sample, bulk unit price, setup, packaging, and carton costs.
- Compare quotes only after the same packing and shipping basis is applied.
- Request a production reference code that can be reused for future orders.
- Avoid quotes that hide special charges behind vague terms like standard packing or normal print.
Use the sample to test retail reality, not just artwork
A sample is not only a visual proof. It is the point where procurement checks whether the bag can survive store use, fit the intended merchandise, and still look good after handling. The sample should be reviewed in hand, under light, and with realistic weight inside it. If the tote feels unstable or the handles sit awkwardly when loaded, that issue is more important than whether the print looks perfect in a photo.
Measurement discipline matters here. The approved sample should become the reference for finished dimensions, handle drop, seam alignment, and print position. If the factory supplies a sample that is materially different from the planned bulk build, the buyer should treat it as a development step, not as a release candidate. The point is to prevent a quiet substitution from slipping into mass production because the sample was never measured against the actual spec.
It also helps to review how the sample behaves when folded, stacked, or hung. Museum retail presentation often depends on clean shelf edges and easy replenishment. A bag that needs special handling to look neat on display may be acceptable for a premium SKU, but it is a poor fit for a high-volume counter item. The sample should answer that commercial question before the order is approved.
- Measure the sample against the approved spec, not just against the eye test.
- Load the tote with realistic merchandise weight during review.
- Confirm the sample reflects the final fabric, trim, and packing method.
- Treat any material substitution as a written change that requires re-approval.
QC should focus on the failure points buyers actually see
The most useful quality control plan is one that follows the way the tote can fail in market. For museum bags, that usually means print issues, handle issues, seam issues, and packing issues. Print problems are visible at the shelf. Handle and seam failures show up after purchase. Packing problems show up in the warehouse and during store replenishment. A good QC list covers all four before the first bulk lot is released.
The supplier should be asked to hold the bulk production against the approved sample and the signed spec sheet. If the factory proposes a different fabric lot, a changed handle material, or a modified print process, the buyer should require sign-off before shipment. That discipline matters more than demanding a single universal tolerance number, because the right acceptable variation depends on the design, price point, and retail expectation.
For procurement teams, the key is to write acceptance criteria in practical language. Rather than asking for a vague notion of good quality, define what must match the sample and what changes require a review. That makes inspection faster and reduces back-and-forth after cartons arrive.
- Inspect print registration, opacity, and edge quality against the approved sample.
- Check handle attachment points, seam integrity, and stress areas for visible weakness.
- Reject unexpected changes in fabric weight, weave, or trim unless they were approved in writing.
- Confirm the cartons are labeled and packed so the store or warehouse can receive them without relabeling.
Plan packing and merchandising together
Museums sell tote bags in different ways. Some are stacked near the register, some are hung on peg walls, and some are folded into a gift display with books or apparel. That matters because the pack-out should support the selling method. A tote that is packed purely for freight efficiency may arrive in great condition but need time-consuming refolding before it can be displayed. A tote packed for shelf presentation may look better in-store but cost more to move.
This is where procurement should coordinate with the retail team. If the tote is expected to be a checkout add-on, bulk flat packing is usually efficient. If the tote is meant to be a visual merchandising item, then a hangtag, size sticker, or specific fold may be worth the extra labor. The important point is to choose the presentation rule before quoting so the supplier does not build the wrong pack format into the price.
Carton configuration also affects replenishment. A museum shop may not need every carton to be identical if the launch contains multiple artwork versions, but the carton labels should make it easy to identify the design without opening each box. For a launch with several SKUs, clear carton markings save time in the stockroom and reduce the chance of the wrong design reaching the floor.
- Decide whether the tote is a stack item, peg item, or counter item before packing is finalized.
- Specify fold style, polybag use, and tag placement only if the store really needs them.
- Make carton labels readable enough that warehouse staff can pull the right SKU quickly.
- Ask the supplier to show how the pack plan affects carton count and freight volume.
Reorder strategy is part of the first order, not an afterthought
Museum retail launches are often judged by the first month, but a tote that performs well needs a continuation plan. If the bag sells through quickly, the museum should be able to reorder the same approved spec without rebuilding the product from scratch. That is why procurement should insist on a complete spec record, approved artwork files, and a supplier reference code before the first run is closed out.
A good reorder strategy protects continuity in three ways. It keeps the body construction stable, it keeps the artwork file traceable, and it keeps the packing format consistent enough for the store to receive stock without extra handling. If any of those three drift, the second order can become a different product in practice, even if the SKU name stays the same.
Procurement should also decide what signals trigger a reorder. In a museum setting, that might be sell-through at the register, inventory weeks on hand, or an exhibition calendar milestone. The right trigger depends on whether the tote is an evergreen shop item or a limited-time launch tied to a temporary exhibition. Either way, the reorder decision should be made before the first stockout creates urgency.
- Keep the approved spec file, artwork file, and packing record together for future orders.
- Use a defined reorder trigger based on sell-through or inventory cover.
- Verify the supplier can reproduce the same build later without reopening all development work.
- Treat a strong launch tote as a candidate for a long-term line, not only a one-time event SKU.
Specification comparison for buyers
| Spec decision | Best default for museum retail | When to choose it | Tradeoff / buyer risk |
|---|---|---|---|
| Sourcing route | Direct factory quote with one development sample and a separate bulk price | You need control over fabric, print, packing, and the ability to reorder the same tote later | Factory quotes can look simple on paper but still vary by handling of approvals, packing, and carton density |
| Base fabric weight | 12 oz canvas for most launch SKUs | The tote needs enough body for clean branding and everyday carry without feeling overly heavy | Lighter canvas can print well but may feel less durable; heavier canvas improves shelf presence but raises cost and freight |
| Premium fabric weight | 14 oz canvas when the tote is a signature retail item | The museum wants a more collectible hand feel, stronger drape, or a higher ticket price | Heavier fabric increases sewing effort, carton weight, and total landed cost |
| Handle construction | Reinforced box-X or equivalent load-bearing handle attachment | The tote will carry books, catalogues, or gift-shop purchases | Simple stitching is cheaper but can become the first failure point in retail use |
| Handle material | Cotton web handle for a clean, durable standard build | You want consistent production and broad compatibility with logo printing | Self-fabric handles can look more premium, but they add material use and can change the bag's visual balance |
| Decoration method | Screen print for simple museum identity art and repeat orders | The design uses one to three spot colors and needs strong opacity on canvas | Screen setup is less flexible if the artwork changes late; verify color count, screen count, and setup fees |
| Decoration method alternative | Heat transfer or digital transfer for complex or short-run artwork | The design includes gradients, many colors, or a limited launch run | Transfer methods can be useful, but edge quality and long-term adhesion must be checked on real fabric |
| Bag structure | Unlined open-top tote for entry-level or volume retail | Price sensitivity matters more than premium feel, or the bag is a general-purpose shop staple | Unlined construction is efficient, but it limits internal organization and can feel simpler on shelf |
| Premium structure | Lined tote or zipper closure for a higher-priced line | The tote is positioned as a gift item, not just a utility bag | Added lining and closures raise labor, inspection time, and carton volume |
Buyer checklist before sampling
- Confirm the approval owner before quoting: museum retail, brand team, licensing partner, or exhibition curator if applicable.
- Lock the base spec before RFQ: canvas weight, bag size, handle length, handle material, seam reinforcement, and lining or closure choice.
- Approve one final artwork file with print size, placement, color references, and any licensed brand usage rules.
- Decide whether the tote will be sold as a shelf item, peg item, checkout add-on, or gift-with-purchase so packing and presentation match the retail path.
- Ask for a pre-production sample that uses the final fabric, print method, handle material, and construction method, not a similar substitute.
- Set written acceptance criteria for shade, print registration, stitch quality, odor, and carton count before bulk release.
- Request carton dimensions, gross weight, and pack count so freight and warehouse handling can be estimated correctly.
- Build a reorder trigger based on sell-through, not gut feel, so you can place a repeat order before stockouts affect the museum launch.
Factory quote questions to send
- Who is the final artwork and brand approval owner, and what written sign-off do you need before bulk production starts?
- What exact canvas GSM, weave style, and finishing treatment are you quoting for the body and handles?
- Which construction details are included in the price: boxed corners, handle reinforcement, lining, closure, inside pocket, or none of the above?
- What print method will you use, how many colors are included, and what setup or screen charges apply per version?
- Can you separate sample cost, bulk unit price, print setup, packaging, hangtag, insert card, and master carton charges?
- What is the MOQ per artwork version, and can multiple designs share the same base body to reduce setup cost?
- What are the approved tolerances for finished size, handle length, print placement, and shade consistency?
- What is the current lead time from artwork approval to sample, and from sample approval to bulk ready date? State the current production calendar, not a generic estimate.
- How will the bags be packed for shipment: bulk flat, individually polybagged, retail tagged, or mixed?
- What carton count, carton dimensions, and gross weight are you quoting, and can you confirm the pack plan will stay the same in bulk?
Quality-control points to confirm
- Approve the sample only after it matches the agreed fabric weight, weave feel, and general body structure, not just the look of the print.
- Check that handle attachment uses reinforced stitching at every stress point and that both handles are aligned evenly on the bag body.
- Verify print placement against the approved artwork file and sample, including distance from seam, hem, and centerline.
- Inspect the print for opacity, registration, clean edges, and any ink bleed through the weave that would weaken shelf presentation.
- Measure finished dimensions against the approved spec and confirm the bag still folds and packs as expected.
- Check stitching along side seams, bottom seams, and gusset areas for skipped stitches, loose threads, or uneven tension.
- Confirm the fabric shade is consistent within the lot and that any change from the approved sample is disclosed before shipment.
- Review odor, dust, lint, or visible staining so the bags arrive suitable for retail display without rework.
- Count cartons against the PO and confirm the outer labels show SKU, color, quantity, and buyer reference clearly.
- If the order includes hangtags, inserts, or barcodes, verify placement and legibility before the shipment is released.