Start With the Studio Buying Scenario
A custom canvas messenger bag for a wellness studio is not just a generic promotional bag with a logo. It may become a retail product, an instructor accessory, a member welcome gift, a retreat pack, or an item that a distributor resells to many studios. Each scenario changes the correct fabric, construction, packaging, and acceptable price. A retail bag needs stronger shelf appeal and cleaner finishing than a short-term event handout. A staff bag must survive repeated daily use. A member kit bag may need to hit a tight budget while still protecting the studio’s brand perception.
Before requesting prices, define who will receive the bag, how long it should last, what it will carry, and how it will be presented. Wellness customers often associate natural canvas with calm, clean, and eco-conscious branding, but they also notice stains, crooked prints, weak straps, and cheap hardware quickly. Procurement buyers should write the use case into the RFQ so suppliers quote the right product instead of guessing from a reference photo.
This step also prevents overbuilding. Not every wellness studio program needs a laptop-ready messenger bag with padding, zipper, custom metal hardware, and multiple pockets. If the bag is mainly for a retreat welcome kit, a simpler construction with good canvas, reliable print, and clean packing may be better. If the bag will be sold in a boutique area for a premium price, details such as edge binding, strap width, inside pocket shape, and hangtag presentation deserve more attention.
- For retail merchandise, specify cleaner canvas, straighter panels, hangtag or barcode needs, individual packing, and tighter visual QC.
- For member welcome kits, prioritize unit cost, consistent logo placement, carton allocation, and easy packing with other welcome items.
- For instructor or staff bags, reinforce strap attachments, bottom corners, flap joins, and closures because the bag will be used repeatedly.
- For retreat or event gifts, lock the delivery date first and avoid custom dyed fabric unless sampling and dyeing time are realistic.
- For distributor resale, standardize SKU names, carton marks, reorder specs, and component availability across multiple orders.
Translate Use Into a Factory-Ready Specification
A supplier cannot quote accurately from a lifestyle photo and a sentence that says “canvas messenger bag with logo.” The RFQ should translate the studio’s use case into measurable product details. Finished width, height, gusset, flap depth, strap width, strap length range, pocket size, closure type, and logo placement should be stated clearly. The more complete the specification, the easier it is to compare suppliers on real value instead of vague promises.
Finished dimensions matter more than pattern dimensions. Buyers should specify the measurements after sewing, pressing, and packing. A 1 cm difference in gusset can change capacity, appearance, and carton volume. A flap that is too short may expose the inner opening; a flap that is too long may crease awkwardly when the bag is filled. If the bag must carry a yoga towel, tablet, notebook, water bottle, or folded apparel, list those contents in the RFQ and test the sample with the same items.
The specification should also describe the desired structure. A soft unlined canvas bag may fit a relaxed wellness aesthetic, while a lightly structured bag may look better for retail display. Adding lining, padding, or stiffener improves shape but increases labor, material cost, shipping volume, and sometimes makes the bag less natural-looking. Buyers should choose structure intentionally rather than accepting whatever construction the supplier normally makes.
- State finished width, height, gusset, flap depth, strap width, strap drop, and adjustable strap length range.
- List the intended contents by size and weight, including towel, notebook, tablet, product samples, apparel, or water bottle.
- Define whether the bag should be unlined, lined, lightly structured, padded, foldable, or display-ready.
- Mark logo placement from fixed edges, not from a photo mockup that may not match the final pattern.
- Add a simple construction sketch if possible, even if the supplier later creates the formal technical drawing.
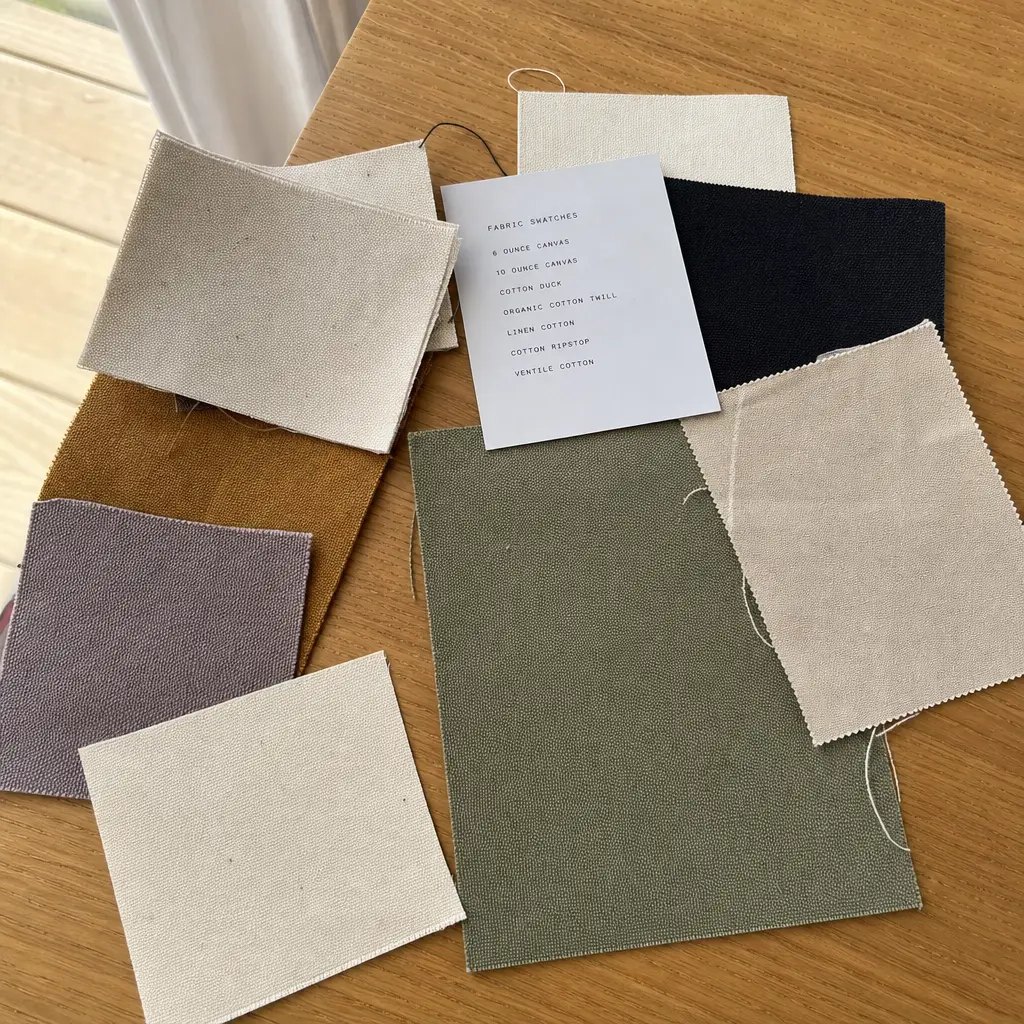
Choose Canvas Weight, Color, and Finish Carefully
Canvas weight is one of the most common points of confusion in wholesale messenger bag sourcing. Many buyers ask for 12 oz because it sounds standard, while others choose 16 oz because heavier sounds more premium. In practice, the right choice depends on weave, finishing, bag size, structure, print area, and freight sensitivity. A tightly woven 12 oz canvas can feel better than a loosely woven heavier fabric. A 16 oz canvas may look premium but can make the flap bulky and harder to sew neatly around corners.
For procurement, specify both ounces and GSM. Cotton canvas weight terminology varies by supplier and market, but GSM gives a clearer comparison. A practical range for wellness studio messenger bags is usually 12 oz to 14 oz for member kits, light retail, and general studio use, and 14 oz to 16 oz for higher-value retail merchandise or bags expected to carry heavier daily items. Very light canvas may lower cost but can wrinkle, sag, and show less shelf presence.
Color and finish are just as important as weight. Natural canvas has a warm, organic look but may show seed flecks and shade variation. Bleached canvas gives a cleaner print surface but can feel less rustic. Stock dyed black, beige, olive, or navy can be efficient for lower MOQs. Custom PMS dyeing provides stronger brand control, but it usually requires lab dips, higher fabric minimums, additional time, and dye-lot management. Washed canvas can feel soft and premium, but buyers should confirm shrinkage, shade variation, and whether the print is applied before or after washing.
- Use 10 oz to 12 oz only for light promotional use where structure and long wear are less important.
- Use 12 oz to 14 oz for balanced wholesale studio programs, welcome kits, and practical retail pricing.
- Use 14 oz to 16 oz for stronger shelf presence, repeated use, and higher perceived value.
- Specify natural, bleached, stock dyed, custom dyed, pigment dyed, or washed canvas because each affects MOQ and lead time.
- Request swatches from the same fabric quality and finishing route planned for bulk production.
Design Construction Around Load Points
Canvas messenger bags usually fail at predictable points: strap joins, side seams, bottom corners, flap attachment, closure backing, and pocket edges. These areas carry stress every time the user loads the bag, adjusts the strap, or opens the flap. A low quote may save money by reducing seam allowance, skipping bartacks, using narrow webbing, or omitting backing behind snaps. Those savings are difficult to see in a front-facing product image, but they affect returns, complaints, and brand perception.
The RFQ should describe reinforcement instead of using general terms such as “durable” or “good quality.” Strap ends can be secured with box stitching, X stitching, bartacks, or reinforced tabs. Bottom corners can be strengthened with an extra panel or heavier seam construction. Magnetic snaps should have backing washers or reinforcement patches so the canvas does not tear. If the bag has a zipper under the flap, the zipper tape must be sewn straight and positioned so it does not catch loose fibers or distort the opening.
Strap selection also affects user experience. Cotton webbing matches the natural canvas look and feels appropriate for wellness brands, but it can shrink, soften, twist, or stretch depending on quality. Polyester webbing may be more dimensionally stable and abrasion-resistant, though it can look less natural. A 38 mm strap can be sufficient for light use; a 50 mm strap feels more substantial and comfortable for heavier contents. Hardware should match the strap width exactly and hold adjustment under realistic load.
- Require bartacks, reinforced box stitching, or equivalent reinforcement at all strap attachment points.
- Use backing patches or washers behind magnetic snaps, rivets, and other pressure points.
- Specify strap width, fiber, color, thickness, adjuster type, and whether the strap is removable or fixed.
- Check that seam allowance, stitch density, and edge finishing are consistent on visible panels.
- Avoid decorative heavy hardware on soft canvas if it pulls the flap out of shape or raises freight cost.
Match Branding Method to Artwork and Wear
Wellness studio branding often uses soft colors, simple typography, circular marks, line art, or short slogans. These designs are usually ideal for screen printing on canvas. Screen printing is efficient at wholesale quantities and works well for one to three solid colors. However, the buyer must control artwork size, placement, ink curing, and the fabric surface. A large print over a flap fold may crack, and fine lines can disappear into coarse canvas if the artwork is not adjusted.
Heat transfer can reproduce gradients, photographs, and complex color artwork, but it may create a different surface feel from the rest of the cotton bag. It can also age differently from screen print, especially on areas that flex or rub. Embroidery can make a small logo feel premium, but large embroidery on a canvas flap may pucker or become too expensive. Woven side labels are useful when the front logo should stay minimal or when the same brand label will be used across tote bags, pouches, aprons, and messenger bags.
A strong RFQ includes vector artwork, print dimensions, color references, location measurements, and acceptable tolerances. Buyers should tell the supplier whether brand colors are strict Pantone targets or approximate tonal matches. On natural canvas, exact color matching can be affected by the base fabric color, ink type, and curing. The pre-production sample should prove the print method, not just the bag shape. If the sample is printed with a different method from bulk, it should not be approved as the final production standard.
- Use screen print for solid logos, clean text, studio names, retreat marks, and simple wellness graphics.
- Use embroidery for small premium marks where texture matters more than large graphic coverage.
- Use woven labels for subtle repeat branding, side seams, or multi-product studio merchandise programs.
- Use heat transfer only when gradients, complex color, or photo-like artwork is necessary.
- Require rub testing, cure confirmation, and flap flex testing before approving bulk production.
Understand MOQ, Price Breaks, and Hidden Cost Drivers
MOQ is not only a number chosen by the factory. It comes from fabric availability, dyeing minimums, trim sourcing, print setup, cutting efficiency, sewing line setup, packaging purchases, and inspection administration. A supplier may offer 300 pieces for natural stock canvas with a one-color screen print, but the same design with custom dyed fabric, matte black hardware, custom cotton webbing, woven side labels, and printed retail packaging may require a much higher minimum.
Procurement buyers should separate MOQ by component. Ask for the MOQ for the bag body, fabric color, strap, hardware, zipper, woven label, hangtag, barcode sticker, and packing material. This protects the buyer from a common sourcing problem: the unit price looks acceptable at first, but after design confirmation the supplier reveals that one component cannot be ordered at the requested quantity. For first-time programs, stock canvas with custom print is often a smarter test than custom dyeing everything immediately.
Price breaks should also be requested in a controlled way. Ask suppliers to quote the same specification at two or three quantities, such as 300, 500, and 1,000 pieces. Separate setup costs from unit cost so the true reorder price is visible. Screen charges, sample charges, woven label setup, packing development, testing, and sample freight should not be hidden inside the unit price unless the buyer understands how they are amortized. For imported goods, carton CBM and gross weight are part of cost control because freight can change the final landed cost.
- Ask for component-level MOQ for fabric, dyeing, hardware, strap, labels, print, and packaging.
- Request quantity breaks using the same specification so the price curve is meaningful.
- Separate one-time setup charges from repeat-order unit cost.
- Confirm whether a low MOQ quote assumes stock fabric, stock hardware, and bulk packing.
- Compare landed cost, not only factory unit price, when carton volume or packing method differs.
Build a Quote Sheet That Suppliers Cannot Misread
The best wholesale quote process uses one controlled quote sheet for all suppliers. If one vendor quotes 12 oz natural canvas with bulk packing and another quotes 16 oz dyed canvas with individual polybags and a zipper, the lower unit price is not automatically better. Procurement teams should force comparability by sending the same spec, the same artwork, the same quantity breaks, and the same commercial terms to every supplier.
A complete quote sheet should include product name, SKU, target quantity, finished dimensions, canvas weight, fabric color, strap material, hardware finish, closure, pockets, print method, print size, number of colors, label details, packing method, carton quantity, carton size, gross weight, Incoterm, currency, payment terms, sample charge, sample lead time, bulk lead time, and quote validity. If the supplier cannot confirm an item, the sheet should show it as pending rather than allowing assumptions.
This is especially important for wellness studios, boutique chains, and distributors that may reorder later. A clean quote sheet becomes the basis for the purchase order, sample approval, inspection checklist, and reorder file. It also makes supplier negotiation more productive. Instead of asking only for a lower price, the buyer can decide whether to adjust fabric weight, remove custom hardware, simplify packing, change print size, or increase order quantity.
- Use one RFQ sheet for all suppliers and prohibit substitute materials unless clearly marked.
- Request prices at two or three quantity breaks with the same construction and packing.
- Require sample lead time and bulk lead time to state when the clock starts.
- Capture carton size, pieces per carton, gross weight, and CBM for freight comparison.
- Record quote validity, currency, Incoterm, payment term, and exclusions in writing.
Approve Samples With Tests, Not Just Photos
The pre-production sample is the buyer’s best chance to prevent bulk defects. A messenger bag can look good in a supplier photo while still having weak strap joins, uneven flap alignment, poor print curing, rough hardware, or insufficient gusset capacity. Procurement buyers should treat sampling as a structured review, not a casual visual approval. If the sample uses substitute fabric, temporary hardware, or a different print method, label it as a prototype rather than a production approval sample.
Sample review should include measurements, loading, use simulation, print checks, and packing checks. Measure the finished bag against the RFQ. Load it with the expected contents for several hours and watch for sagging, strap twisting, flap distortion, or seam strain. Open and close the flap repeatedly. Adjust the strap several times. Rub the print with a dry cloth and a slightly damp white cloth. Flex the flap at the natural fold to see whether ink cracks or peels. If the bag will be sold in the studio, place it on a shelf or display hook and check presentation.
The final approval should be written. Include photos, measurements, comments, approved color references, and any allowed tolerance. Keep one approved sample with the buyer and one with the factory if possible. Bulk production should match this approved sample unless the buyer signs off on a change. This is also the right time to approve individual packing, hangtag placement, barcode position, carton folding, and carton marks.
- Measure width, height, gusset, flap depth, strap range, pocket size, and logo position.
- Load the bag with realistic contents to check sagging, strap comfort, flap closure, and seam strain.
- Flex the printed flap repeatedly and inspect for cracking, peeling, or uneven ink behavior.
- Check hardware for smooth operation, sharp edges, plating scratches, rust marks, and secure backing.
- Approve the sample in writing with photos, measured tolerances, and packing confirmation.
Set Quality-Control Standards Before Production Starts
Quality control should be defined before cutting, not after defects appear. For custom canvas messenger bags, the inspection plan should cover fabric appearance, shade consistency, cutting accuracy, sewing, reinforcement, print quality, hardware function, measurement tolerance, cleanliness, odor, packing, and carton condition. A buyer does not need an overly complex laboratory program for every order, but the basic acceptance rules must be written clearly enough for the supplier and inspector to apply.
Defect classification helps avoid arguments. Critical defects may include mold smell, broken strap attachment, sharp hardware, severe stains, wrong artwork, or unsafe components. Major defects may include incorrect dimensions beyond tolerance, poor print adhesion, visibly crooked logo, broken stitches, zipper failure, or wrong packing. Minor defects may include small loose threads or slight natural canvas slubs outside the logo area, if they do not affect function or presentation. The buyer should define what is acceptable for natural canvas because seed flecks and slubs are part of the material but should not dominate the front logo area.
In-line checks are useful because they catch problems before the full batch is packed. Ask for production photos showing fabric rolls, cut panels, print panels, strap reinforcement, hardware attachment, and first packed cartons. For larger or higher-risk orders, book a final inspection before shipment and leave calendar time for rework. The inspection should compare bulk goods against the approved sample, not against memory or a supplier’s verbal description.
- Define critical, major, and minor defects before bulk production starts.
- Set measurement tolerance for main body, gusset, flap, strap length, pocket size, and logo position.
- Inspect fabric panels before printing to avoid placing logos over stains, heavy slubs, or dye streaks.
- Check stitch density, bartacks, seam allowance, loose threads, and raw edge control at stress points.
- Book final inspection early enough to allow sorting, rework, repacking, or replacement if needed.
Plan Packing, Allocation, and Clean Arrival
Packing is part of the product for wellness studio merchandise. Natural and light-colored canvas can absorb dust, moisture, carton odor, and abrasion marks during storage and transport. A bag that arrives stained, creased, or musty damages the clean, calm impression that wellness brands work hard to create. Buyers should specify packing at the RFQ stage because it changes both unit cost and freight volume.
Individual polybags offer strong protection against dust and moisture, but some wellness brands prefer reduced plastic. If using paper bands, tissue, or plastic-free packing, the buyer should understand the tradeoff: less protection from warehouse dust, humidity, and carton abrasion. A compromise may be a recyclable bag, glassine-style sleeve if suitable, paper band plus carton liner, or individual tissue wrap for retail presentation. The supplier should confirm whether the bags are folded flat, shaped, or lightly stuffed because this affects carton size and creasing.
Allocation is also important for chains, distributors, and launch programs. Carton marks should show SKU, color, quantity, purchase order number, destination, gross weight, and carton number. If the order is split across several studio locations, mixed cartons should be avoided unless the packing list is very clear. Carton weight should remain practical for manual handling to reduce crushing, dropping, and worker injury risk.
- Choose polybag, paper band, tissue wrap, carton liner, or plastic-reduced packing based on transit risk and brand policy.
- Confirm folding method because aggressive folding can crease flaps, distort straps, or mark printed areas.
- Use carton marks with SKU, color, quantity, PO number, destination, gross weight, and carton sequence.
- Add moisture-control measures when shipping light canvas by sea or during humid seasons.
- Avoid mixed cartons unless allocation labels and packing lists are detailed enough for warehouse receiving.
Specification comparison for buyers
| Spec decision | Recommended option | When it fits | Buyer risk to check |
|---|---|---|---|
| Canvas body fabric | 12 oz to 16 oz cotton canvas, about 380-540 GSM depending on weave and finishing | Wellness retail, member welcome kits, instructor bags, retreat gifts, and boutique merchandise that must feel durable without looking bulky | Do not compare only by ounce; request GSM, fabric width, color process, shrinkage expectation, and a swatch because loose-weave canvas can feel thinner than the stated weight |
| Bag structure | Front flap messenger shape with reinforced bottom, inner slip pocket, and controlled gusset depth | Studios carrying towels, notebooks, tablets, water bottles, class cards, product samples, or retail bundles | Unreinforced bottoms sag quickly; require bottom seam photos, loaded sample testing, and clear tolerance for flap alignment |
| Strap system | 38 mm to 50 mm cotton or polyester webbing with reinforced attachment and metal or high-grade plastic adjuster | Higher perceived value and repeated use by instructors, members, retreat guests, or resale customers | Cheap sliders slip or crack; cotton webbing may shrink or twist if not pre-shrunk, and narrow straps can feel uncomfortable under load |
| Print method | Screen print for solid logos; embroidery or woven label for small premium branding; heat transfer only for complex multicolor art | Brand logos, studio names, class slogans, retreat marks, and clean wellness graphics | Large prints across flap folds can crack; define placement away from fold lines and approve rub, cure, and flex test results |
| MOQ logic | 300-500 pcs for stock natural or standard dyed canvas; higher MOQ for custom dyed canvas, private hardware, custom webbing, or woven labels | Small chains, new studio launches, seasonal retail drops, teacher training programs, and distributor testing | Low MOQ quotes often assume stock materials; ask MOQ separately for fabric, labels, hardware, packaging, and print setup |
| Closure choice | Magnetic snap or hidden zipper under flap for security; no closure or cotton tie for lighter lifestyle use | Retail merchandise, studio staff bags, retreat welcome kits, and light commuter use | Snaps can tear canvas if not backed; zippers add labor and must be checked for smooth operation, seam alignment, and fabric catching |
| Packing format | Individual polybag, recyclable paper band, or tissue wrap inside export carton with carton marks and moisture control | Wholesale distribution, multi-location studio allocation, e-commerce storage, or clean retail backroom inventory | Loose bulk packing reduces cost but raises soiling, deformation, abrasion, and moisture risk, especially on natural or light-colored canvas |
| Supplier quote basis | Factory quote against one controlled RFQ sheet with fabric, size, construction, print, trims, packing, inspection, and Incoterm | Importers, distributors, wellness chains, and procurement teams comparing multiple factories or trading companies | Unit prices are not comparable unless all vendors quote the same GSM, print size, packing, carton quantity, sample policy, and shipping term |
| Lead time plan | 7-14 days for pre-production sample after artwork and material confirmation; 25-45 days for bulk after approval, depending on quantity and material readiness | Planned retreat launches, new studio openings, replenishment programs, and seasonal merchandising calendars | Holiday peaks, custom dyeing, late artwork, lab dip rejection, delayed deposit, and inspection rework can push production beyond the quoted calendar |
Buyer checklist before sampling
- Define the commercial purpose first: retail merchandise, member welcome kit, staff/instructor accessory, retreat gift, class pack, or distributor resale program.
- List the expected contents, such as towel, notebook, tablet, water bottle, apparel, skincare products, class cards, or welcome documents.
- State finished bag dimensions in width, height, gusset, flap depth, strap width, and adjustable strap length range, not only a reference photo.
- Specify canvas weight by both oz and GSM, plus color process: natural, bleached, stock dyed, reactive dyed, pigment dyed, washed, or custom PMS/lab-dip dyed.
- Confirm whether the bag should hold shape on a retail shelf, fold flat for economical shipping, or arrive lightly shaped for display.
- List reinforcement requirements: bottom panel, stress-point bartacks, box stitching, flap edge binding, inner pocket support, and strap attachment construction.
- Provide logo artwork as vector file with print size, placement from seams, color references, acceptable position tolerance, and whether artwork can be adjusted for fold lines.
- Choose the branding method: screen print, embroidery, woven side label, rubber patch, heat transfer, hangtag, inside label, or a combination.
- Decide whether hardware can be stock or must match a brand finish such as antique brass, nickel, matte black, gunmetal, or plastic-free.
- Ask for component-level MOQ for fabric, print, woven labels, zipper, hardware, hangtags, and custom packaging rather than accepting one blended MOQ.
Factory quote questions to send
- What exact canvas weight will you use in oz and GSM, and can you confirm whether the fabric is stock, newly dyed, washed, or custom dyed?
- Can you send fabric swatches or close-up photos comparing 12 oz, 14 oz, and 16 oz canvas in the same color and finishing treatment?
- What shrinkage, colorfastness, and hand-feel changes should we expect if the canvas is dyed, washed, or pre-shrunk?
- What is the MOQ for the bag body, custom fabric color, printed logo, woven side label, zipper, magnetic snap, custom hardware, and retail packing separately?
- Which print method do you recommend for our artwork, and what is the maximum print size on the flap without cracking, distortion, or uneven ink coverage?
- Will the approval sample be made with bulk-intended fabric, bulk strap, final hardware, final print method, and final packing, or with substitute materials?
- What stitch density, bartack positions, seam allowance, and reinforcement method will be used at strap ends, bottom corners, flap join, and closure points?
- Can you provide a marked construction diagram or annotated sample photos showing reinforcement points before we approve the order?
- How many pieces per carton, what carton size, what estimated gross weight, and what CBM per carton will be used for shipping calculation?
- What production lead time starts after deposit, sample approval, artwork confirmation, lab dip approval, fabric arrival, or all of these conditions?
Quality-control points to confirm
- Finished size tolerance should normally stay within plus or minus 0.5 cm for pockets and small details and plus or minus 1 cm for main body height, width, and gusset unless the buyer approves otherwise.
- Canvas should be free from visible oil marks, mildew smell, heavy slubs in the logo area, dye streaks, broken yarns, severe neps, uneven bleaching, and shade variation on front-facing panels.
- Natural canvas may include seed flecks, but the buyer should define how much is acceptable on the flap, front panel, and logo area before bulk cutting.
- Print edges should be sharp, color should match the approved swatch within agreed tolerance, ink should be properly cured, and the print should not crack after repeated flap flexing.
- Logo position should be checked from fixed reference points such as flap edge, side seam, or center line, with an agreed tolerance before production starts.
- Strap attachment points should include reinforced stitching, bartacks, or box stitches, with no skipped stitches, loose threads, needle cuts, weak seam ends, or exposed raw edges.
- Strap adjusters should hold under realistic load without slipping, twisting, sharp burrs, plating scratches, or staining the canvas during handling.
- Hardware should open and close smoothly, with no rust, burrs, plating inconsistency, weak magnet backing, or fabric tearing around snap reinforcement.
- Zippers, if used, should run smoothly across the full opening and pass repeated open-close testing without catching canvas fibers or distorting the flap.
- Inner pockets should be straight, securely stitched, correctly sized, and free from puckering that shows on the outside panel.