Why proofing matters on messenger bags
A canvas messenger bag is harder to proof than a flat tote because the print sits next to seams, flap edges, pockets, hardware, and strap anchors. The front panel may look generous on a computer screen, but once the sewing line adds a gusset, zipper, or pocket, the usable print area shrinks fast. If your logo lands too close to a fold or a bartack, the finished bag can look off-center even when the artwork file was correct. For trade show exhibitors, that is not a cosmetic issue. It becomes a late reprint, a missed freight cutoff, or a giveaway that does not match the booth presentation.
The right approach is to treat proofing as a production control step, not a design approval step. The factory should show how the logo sits on the actual bag construction, not just on a flat mockup. That matters more when the order has a fixed event date, because there is little recovery time if the first run misses the mark. Buyers who freeze the proof early usually save time later, even if the sample round feels slow at the start. A clean proof is cheaper than a second run and far cheaper than a damaged launch.
- A seam, pocket, or zipper line can cut into artwork that looked safe in the PDF.
- The proof should show the real bag shape, not only a digital layout.
- For show orders, one wrong print placement can cost more than the whole sample round.
Lock the bag spec before you touch the logo
Do not proof artwork before the base bag is frozen. On canvas messenger bags, the fabric weight, weave density, lining, closure style, and strap width all affect both print quality and buyer perception. A 12 oz, about 340 gsm, bag is common for lighter promotional use, but it will feel softer and less structured than a 14 oz, about 470 gsm, version. If the bag needs to hold catalogs, tablets, or sample kits, many buyers move to 16 oz, about 540 gsm, or add lining and reinforcement at the stress points. Those choices change the print surface and the way the bag hangs on the body.
Color also matters. Natural or undyed canvas accepts ink differently from dyed navy, black, or olive cloth, and recycled yarn lots can vary more than buyers expect. If the base color is not fixed, the same logo can read sharper or duller from one lot to the next. That is why the spec sheet should define the finished size, canvas GSM, lining, closure, hardware, and any prewash or enzyme treatment before the proof is approved. If a supplier tries to lock artwork first and bag spec later, the risk usually shows up in the first production run.
- 12 oz / 340 gsm: lower cost, lighter hand, good for simple promo use.
- 14 oz / 470 gsm: balanced choice for a retail-looking trade show bag.
- 16 oz / 540 gsm: better body for heavier inserts and premium branding.
- State whether the canvas is raw, washed, dyed, or recycled, because ink behavior changes with each finish.
Match the print method to the artwork and the canvas
For most custom canvas messenger bags, screen printing is still the cleanest route when the logo is bold, the colors are limited, and the buyer wants predictable cost. One-color and two-color spot logos are usually the easiest to control, especially on natural canvas. On dark fabric, a white underbase may be needed to keep the artwork sharp, and that adds cost and stiffness. If the art is simple, screen print usually beats a transfer on both unit price and repeatability. If the artwork crosses into multiple shades, gradients, or fine detail, the factory should explain exactly how the print will be built rather than guessing through a generic mockup.
Digital transfer or heat transfer can work for full-color art or short runs, but buyers need to test how the transfer behaves on textured canvas and at the fold line. Embroidery and woven patches are useful when the brand wants a more retail finish, but they are not ideal for tiny text or dense logos. As a rule, keep artwork vector-based, avoid hairline details, and define the print size in millimeters. If the logo is going onto a flap or gusset edge, give the supplier a hard no-go zone so they do not improvise around a seam.
- Screen print fits simple logos and repeated orders with stable artwork.
- Transfer methods fit gradients and small runs, but need fold and peel testing.
- Embroidery and woven patches add value, but not for tiny copy or fine lines.
- Provide vector files, Pantone references, and a fixed print area in mm.
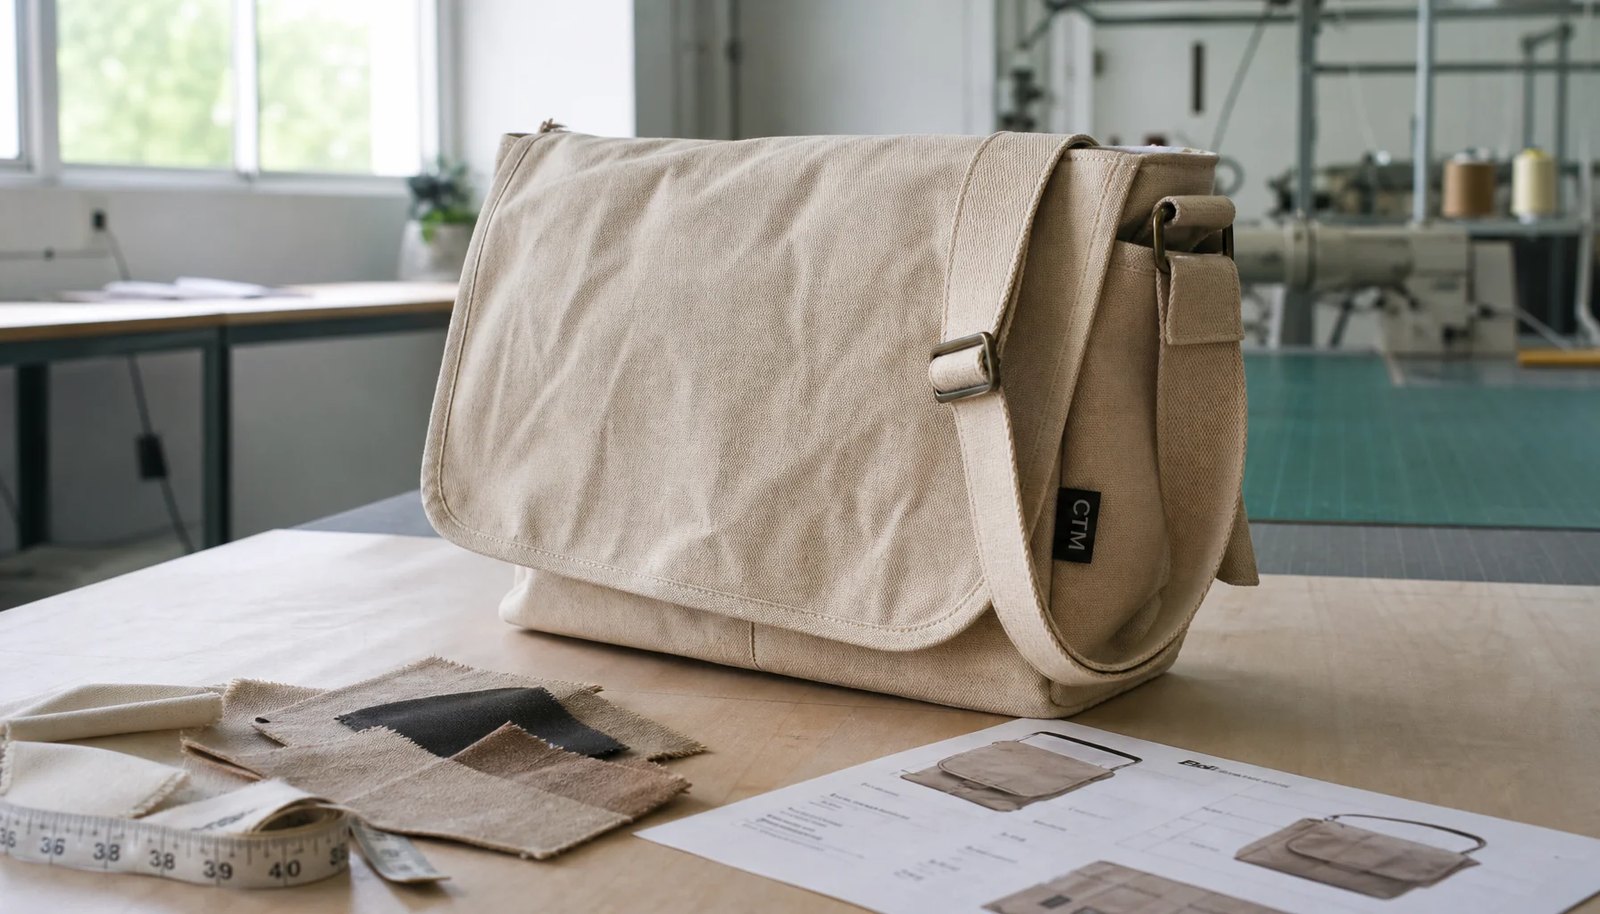
What a real proof package should show
A real proof package should show the actual bag construction with the actual decoration method, not a flat artwork overlay. The factory should send front and back views, a close shot of the logo, and a reference that shows exactly where the print sits relative to seams, pockets, and hardware. If the bag has a flap, zipper, or outer pocket, those elements need to appear in the proof so the buyer can see whether they interfere with the print field. This is especially important for trade show programs, where the bag is often used as a visible brand carrier and not just a carry item.
The proof should also state the print size, placement distance from edges, artwork version number, fabric lot, ink system, and whether there is a white underbase or topcoat. If the factory only sends a render, treat it as a layout draft rather than an approval document. A buyer should be able to trace the proof back to the purchase order without guessing which file was used. If the logo is small, include a close-up photo with a ruler in frame. That removes argument later if the bulk run drifts.
- Ask for front, back, and detail shots of the actual sample.
- Require the proof to list print size, location, and artwork version.
- If a seam or zipper can affect the logo, show it in the proof image.
- Do not approve a render as if it were a production sample.
Use the sample to catch fit, stitching, and brand errors
The sample is where buyers catch the mistakes that a file review cannot show. Measure the bag against the PO, then inspect the print location, stitch tension, strap symmetry, zipper function, pocket alignment, and label placement. On messenger bags, the strap anchor and flap area are especially sensitive because they can pull the panel out of shape and make the logo look crooked even if the print itself is centered. If the bag has a padded section or an internal divider, confirm that the added structure does not hide part of the print from normal viewing distance.
Set pass and fail criteria before the sample arrives. Many procurement teams allow a small placement tolerance, but the exact range should be agreed in writing and should be tighter on the logo than on the bag dimensions. The sample should also be folded the way it will be packed, because some inks crack or mark when the panel is compressed. If the sample uses a different fabric lot or a substitute zipper than the bulk order, treat it as a reference only. It is not a final signoff if the critical components changed.
- Measure the finished size and compare it to the signed spec sheet.
- Reject crooked labels, loose threads, skipped stitches, or weak bartacks.
- Fold and reopen the sample to see whether the print cracks or shadows.
- If the sample uses different fabric or hardware, do not treat it as full approval.
Build MOQ and quote logic around setup, not just unit price
MOQ on canvas messenger bags is usually driven by setup cost, not by the bag shell alone. A one-color screen print on stock canvas can sometimes support a lower MOQ because the factory only needs one print setup and one sewing flow. Add a second or third color, custom lining, custom zipper pull, or dyed fabric, and the MOQ often rises because more work has to be staged in the same production window. Buyers who request 300, 500, and 1,000 piece quotes can see how much of the price is setup and how much is actual variable cost. That is the fastest way to tell whether a supplier is truly flexible or just quoting a low headline number to win the inquiry.
The quote should separate the pieces that affect landed cost: fabric, lining, print, patch work, hardware, label, packing, and carton data. If a factory cannot give setup and unit cost separately, the comparison is usually unreliable. Ask for the sample fee as well, because some suppliers waive it against bulk order while others do not. For trade show buyers, a clean quote is worth more than a cheap one that hides the second-pass cost in freight, rework, or packing exceptions.
- Request tiered pricing at 300, 500, and 1,000 pieces if volume may grow.
- Separate setup, sample, unit, packing, and export-ready carton costs.
- Ask whether MOQ changes with print colors, hardware, or fabric choice.
- A quote without carton size and gross weight is not ready for apples-to-apples comparison.
Compare sourcing routes before you compare prices
The same canvas messenger bag can come from a direct factory, a trading company, a local decorator, or a hybrid route that combines imported blanks with domestic decoration. Direct factory sourcing usually gives the best control if the print line and sewing line are truly in-house. Trading companies are useful when you need more options or backup capacity, but buyers should expect an added margin and more dependence on the middleman to manage proofing discipline. Local decorators can save a late event order, but the unit cost climbs quickly and you may lose control over canvas shade or trim consistency. For any high-visibility trade show run, the lowest quote is not the best quote unless the proofing path is equally strong.
Landed cost should include more than FOB or ex-works price. Add the cost of sampling, proof shipping, inland freight, export documents, packing exceptions, rework risk, and the transit buffer needed before the show. The cheapest supplier often becomes the expensive one when the artwork needs a second proof or the bags miss the freight cutoff. The table above is useful only if each supplier is quoting the same print method, the same canvas weight, and the same packing standard. If those three variables are not aligned, the price gap is mostly noise.
- Direct factory works best when the print line and sewing line are both controlled in one place.
- Trading company quotes are useful for sourcing range, but watch for margin and proofing drift.
- Local printing is a backup route, not a low-cost default, when the deadline is tight.
- Compare quotes only after the fabric, print method, and packing spec are identical.
Set QC thresholds that stop show-day failures
A useful QC plan for a branded messenger bag has more than one checkpoint. Start with the pre-production sample, then inspect the first production output, then do a mid-run check, and finally review cartons before shipment. That sequence catches both setup mistakes and process drift. The most important checks are logo placement, print sharpness, stitch quality, strap attachment strength, zipper or flap function, and finished size. If the bag is carrying print samples, catalogs, or premium literature at a trade show, the buyer should also pay attention to handfeel and structure because a limp bag can make the brand look cheaper than expected.
Major defects on logo color, wrong artwork, open seams, or missing bartacks should be treated differently from minor cosmetic issues such as a loose thread or small packing mark. Many buyers use an AQL framework, but the logo itself often deserves a stricter rule than the bag body. If the print is visibly off-center or the wrong version is used, that is not a minor defect. The supplier should know the critical points before the run starts so they can fix the cause instead of sorting bad pieces at the end.
- Inspect the pre-production sample, first output, mid-run, and final cartons.
- Treat wrong logo, wrong placement, and open seams as critical defects.
- Check strap anchors, bartacks, and hardware movement under load.
- Keep photos of the approved sample and the first production pieces for comparison.
Plan packing and lead time around the show calendar
Packing decisions affect both appearance and schedule risk. For most trade show orders, each bag is packed in a polybag if cleanliness matters, then loaded into a fixed carton count that keeps the shape intact. Overpacked cartons crush the canvas and can leave a shadow on the print, especially when the logo sits near a fold line. Master carton marks should show the PO number, product code, ship-to, carton count, and any show-specific label the carrier needs. If the bags are being handed out at the booth, it is worth discussing whether the polybag should be retained or removed so the product does not arrive wrinkled and slow to unpack.
Lead time should be built backward from the show deadline, not from the PO date. Sample production, artwork approval, bulk sewing, print curing, carton labeling, booking, transit, and final delivery all consume calendar days. A common working range is five to ten working days for a sample or strike-off and roughly twenty-five to forty working days for bulk, depending on fabric availability and print complexity, but the buyer still needs a buffer before the freight cutoff. The safest schedule is the one that leaves room for a correction without forcing premium air freight at the end.
- Use one bag per polybag only if the product needs clean presentation or warehouse protection.
- Do not overpack cartons; compression can mark or distort the print.
- Mark cartons with PO, ship-to, product code, and carton count.
- Build a buffer before the show because the freight cutoff is the real deadline.
Keep the approval file tight before you release the PO
Once the proof is approved, keep every version in one file: artwork, sample photos, bag spec, carton spec, and the approval email. That file is your reference if the bulk run drifts or if the factory argues over which file was current. A clean approval packet also helps the procurement team compare future quotes because the next supplier can see exactly what was shipped and what was accepted. If the business wants a reorder later, the approved packet reduces the risk of rebuilding the spec from memory and making a subtle change that goes unnoticed until the bags arrive.
Do not issue bulk approval while the bag, print, and packing variables are still moving. If the logo position changes, the strap width changes, or the closure changes after the sample, the proof is no longer valid. Buyers sometimes lose time by trying to hold the old approval after changing a critical detail. A better practice is to version-control the art and the spec sheet, then reapprove only the changed element. That sounds strict, but it is faster than sorting a dispute after production.
- Archive artwork, proof images, sample photos, and the final PO together.
- Version-control the spec sheet so a later revision is obvious.
- Reapprove the sample if the strap, closure, print size, or fabric changes.
- Use the approval packet as the reference for future reorders.
Specification comparison for buyers
| Spec decision | Recommended option | When it fits | Buyer risk to check |
|---|---|---|---|
| Direct factory with in-house screen printing | Best for one-stop control on logo placement, ink matching, and production timing | Medium to large trade show runs with one to three spot colors and a stable artwork file | Verify the print line is actually in-house and not subcontracted after approval |
| Direct factory with outsourced embroidery or patch work | Use when you want a woven badge, small embroidered mark, or layered brand finish | Retail-style messenger bags where the logo should feel premium instead of promotional | Confirm who approves the patch sample and who owns any seam or stitch defects |
| Trading company quoting multiple bag factories | Useful when you need backup capacity, broader material choices, or fast quote collection | Shortlisting several factories across price and lead time tiers | Check for hidden margin, inconsistent proofing standards, and vague sample ownership |
| Local decorator applying print after blank bag import | Good for very small or urgent runs when domestic turnaround matters more than unit cost | Last-minute event orders, split ship-to locations, or small replenishment orders | Watch higher unit cost and the risk of mixed component quality from two suppliers |
| Factory with digital transfer for complex art | Best for gradients, fine detail, or artwork that would be expensive in multiple screen colors | Low to mid quantity orders with full-color logos and limited proof time | Test adhesion on textured canvas and check whether the transfer feels stiff or peels at the fold line |
| Imported blank bags plus local print finishing | Works when the base bag is approved but artwork is still changing close to the deadline | Programs where the bag spec is fixed and decoration is the only variable | Risk of shade mismatch, two-vendor blame, and a second round of freight cost |
| Specialist sample room before bulk factory | Good for critical show launches that need a clean pre-production signoff | First-time designs or buyers who need a stronger proofing process than the bulk line offers | Do not assume sample-room quality proves the bulk line can match it without recheck |
| Low-cost generalist bag supplier | Only acceptable when the bag is simple and brand tolerance is wide | Plain promotional use with no tight color or placement requirement | Expect weaker bartacks, off-shade canvas, and poor print registration on the final run |
Buyer checklist before sampling
- Lock the finished bag size, canvas GSM, lining, closure, strap width, and hardware before artwork proofing starts.
- Approve the logo in vector format with a defined print area, placement in millimeters, and Pantone references if color matters.
- Request a physical strike-off or pre-production sample on the actual canvas and with the actual print method.
- Record the acceptable placement tolerance, stitch tolerance, and color tolerance in the approval email.
- Separate setup fees, sample fees, unit price, packing, and freight-ready carton data in the quote.
- Confirm whether the print line, sewing line, and patch work are all in-house or partly subcontracted.
- Fix carton count, polybag requirement, master marks, and ship-to label format before bulk starts.
- Get the sample and bulk lead time in working days, not vague calendar promises.
- Keep the approved sample, approval photos, and the final artwork version in one file for dispute control.
- Reserve a transit buffer before the show date so a late carton or a reprint does not break the schedule.
Factory quote questions to send
- What exact canvas weight, weave, and finish will you use for the bulk run?
- Is the decoration done in-house, or do you send printing, embroidery, or patches to another workshop?
- What is the MOQ by print method, color count, and custom component choice?
- What setup fees apply, and do they include screens, plates, or digital file preparation?
- Can you send a strike-off or pre-production sample on the same fabric that will be used in bulk?
- What are the finished size tolerance, carton size, gross weight, and pack count?
- How long do sample production and bulk production normally take after artwork approval?
- What parts of the bag can be customized without changing the MOQ or adding a new setup charge?
- What Incoterm are you quoting, and what freight, packing, or export charges are excluded?
Quality-control points to confirm
- Finished dimensions match the approved spec sheet within the agreed tolerance.
- Canvas weight, handfeel, and shade match the approved sample or signed fabric reference.
- Logo placement stays within the agreed location tolerance and does not cross a seam unless approved.
- Printed color matches the approved reference and shows no obvious banding, pinholes, or washout on the canvas texture.
- No open seams, skipped stitches, loose threads, or weak bartacks at strap attachment points.
- Zippers, flaps, pockets, and closures open and close smoothly without distortion around the print area.
- Labels, woven tags, or embossing are correctly positioned and spelled exactly as approved.
- Fold testing does not cause cracking, peeling, or ink transfer at the main crease lines.
- Carton counts, inner packing, and master marks match the packing list and PO.
- Final cartons are dry, clean, and not overpacked to the point that the bags crease or crush.