Start with the procurement risk, not the prettiest mockup
A custom canvas grocery tote for a craft fair has to do two jobs at once. It needs to look good on a booth table, and it needs to survive the less glamorous parts of production: fabric cutting, sewing, printing, curing, folding, carton packing, freight, receiving, and event setup. The artwork is what visitors notice first. The sourcing risk usually begins much earlier.
Common problems are rarely mysterious after the fact. The canvas was described as “heavy” but never defined in GSM or oz/yd². The logo was approved on a digital mockup, not on real canvas. The print was centered on a flat template but drifted after sewing. The ink looked strong in a photo but arrived dull on natural fabric. Or the bags were folded straight through the logo before the print had fully cured. None of these issues require a complex product to occur; they happen when simple details are left open.
Treat print proofing as a production control gate, not as a design courtesy. The proof should confirm that the supplier can hold placement on a sewn textile product, print cleanly over canvas texture, cure or fix the ink, manage natural shade variation, and pack the bags without marking the front panel. That matters at craft fairs, where the tote may sit beside handmade goods, packaged food, art prints, books, candles, or premium gift bundles. A crooked logo or weak handle can make the entire merchandise program feel careless.
Separate aesthetic approval from commercial approval. A designer may approve the composition, but procurement still needs to approve the quote basis, tolerances, setup fees, sample route, inspection scope, packing method, carton data, and lead time gates. The cheapest unit price is not helpful if it excludes screens, uses lighter canvas, hides outsourced printing, or creates sorting problems when multiple designs arrive.
- Treat proofing as a controlled production checkpoint, not a casual sign-off on a mockup.
- Do not approve bulk production from only a blank tote, digital overlay, or low-resolution photo.
- Watch for preventable failures: placement drift, weak ink coverage, wrong canvas weight, short handles, loose reinforcement, mixed SKUs, and packing creases.
- Compare suppliers only after fabric, print method, setup charges, packing, carton data, and QC expectations are normalized.
- For craft-fair resale or merchandise, visible presentation defects are commercial defects even if the bag still functions.
Lock the tote specification before sizing the artwork
Many custom tote projects get out of sequence. The logo is approved first, then the buyer discovers that the selected bag has a deeper gusset, shorter handle, narrower front panel, or different seam layout than the mockup assumed. On a grocery-style tote, a print that looks centered on a rectangle can end up too close to a side fold once the bag is sewn and filled.
Before requesting quotes, create one base specification that every supplier must price. Describe the finished product, not just the cut fabric panel. Include finished width, height, gusset depth, handle drop, handle width, seam type, top hem, reinforcement, thread color, and any labels or hangtags. If you will reorder the same craft-fair tote across seasons, this written spec becomes the reference that keeps the product from slowly changing.
For many B2B grocery tote programs, 10 oz to 12 oz cotton canvas is a practical range. Ten oz canvas is often quoted around 339 GSM, and 12 oz around 407 GSM, though exact conversion and actual weight vary by weave and finishing. Lighter fabric may work for budget giveaways, but it can wrinkle more, feel less structured, and show less stable print coverage. Heavier canvas can improve retail feel and carrying confidence, but it also raises material cost, carton weight, sewing requirements, and sometimes freight cost.
The fabric finish changes the print result. Natural canvas gives the rustic, undyed look many craft-fair brands want, but it can vary by lot and may include cotton flecks. Bleached canvas improves contrast for many colored prints. Dyed canvas can make the tote part of the brand palette, but it may need different ink selection and separate opacity approval. If the same artwork will run on more than one base color, approve each base as its own proof.
- State finished width, height, and gusset depth in millimeters or inches after sewing.
- Specify canvas weight in GSM or oz/yd² and ask for the supplier’s tolerance, not only a term such as “heavy cotton.”
- Define handle drop and width. A handle drop around 250 to 300 mm may suit shoulder use, but approve it against your actual carrying style.
- Confirm seam construction: top hem, side seam, bottom seam, gusset seam, and handle reinforcement.
- Use 10 oz when cost and carton weight matter but the bag still needs a credible grocery feel.
- Use 12 oz when the tote will be sold as merchandise, carry heavier purchases, or need a more structured retail presentation.
- Do not finalize print placement until the supplier confirms no-print zones around seams, gusset folds, bottom fold, labels, pockets, and handle stitch boxes.
Build an artwork pack the factory can actually print from
A good artwork pack saves days of back-and-forth. A website logo, screenshot, or low-resolution JPG may be fine for early discussion, but it is not a production file. For printing, send vector artwork such as AI, EPS, SVG, or a production-ready PDF. Fonts should be outlined. Linked images should be embedded. Strokes, line weights, and any distressed texture should be preserved at final print size.
Placement needs numbers. “Centered,” “large,” and “slightly above the middle” sound clear in a design meeting, but they leave room for interpretation on the factory floor. A stronger instruction would say: logo 180 mm wide, centered on the front panel, top of artwork 115 mm below the finished top edge, no print closer than 35 mm from side seams or gusset folds. Your measurements will depend on the tote size, yet the principle is the same: give the factory reference points it can measure.
Color control also needs a practical standard. PMS references help communication, but they do not guarantee an identical result on natural cotton canvas. The fabric base, weave texture, absorbency, ink type, and curing method all affect appearance. Black artwork is usually forgiving. Cream, pastel, metallic, fluorescent, and exact corporate colors require more caution. If the tote is for a sponsor, retailer, or brand activation, approve the physical result on canvas rather than relying only on a screen proof.
Ask the printer to flag artwork risks before sampling. Fine lines can break across the weave. Small reversed-out text can fill in. QR codes can become unreadable if printed too small or with low contrast. Distressed textures may look intentional at one scale and dirty at another. These are easier to fix in the artwork pack than after screens are made.
- Provide editable vector artwork with fonts outlined and strokes expanded where needed.
- Name files by SKU, design, print color, placement, and revision date to avoid mixing craft-fair versions.
- List final print width and height in millimeters, not only visual scale on a template.
- Include a placement diagram with reference points from finished edges, gusset folds, handle stitch boxes, and any labels.
- Identify each print color with PMS, brand reference, or physical swatch, then approve the physical result on canvas.
- For fine text, ask the printer for minimum printable line weight, gap, and character height for the selected method.
- If using QR codes or small sponsor logos, require a physical proof and scan/readability check after printing.
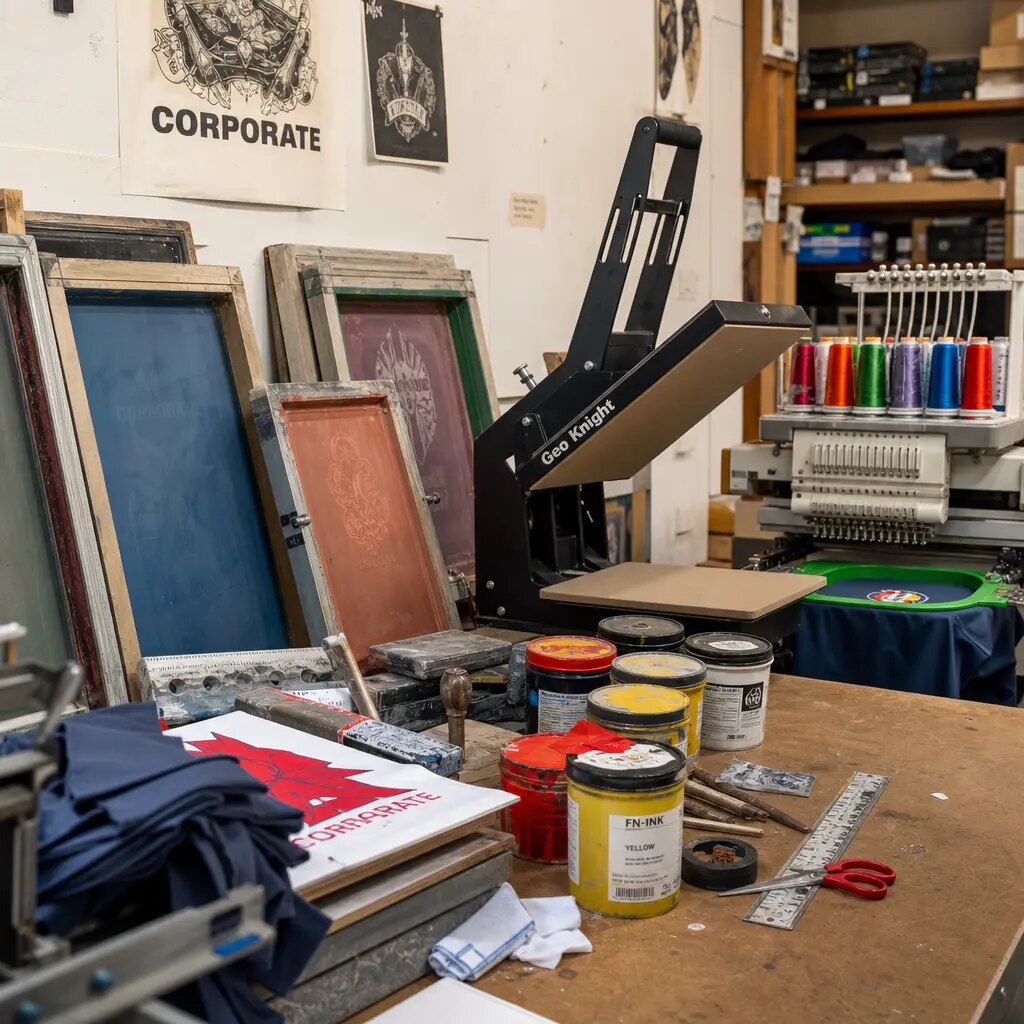
Choose the print method by repeatability, not habit
Screen printing is often the most straightforward choice for one-color to three-color craft-fair tote designs. It works well for bold logos, slogans, typography, simple illustrations, and repeat orders. It can also provide strong opacity on canvas when the ink system, screen setup, and curing process are controlled. Still, “screen print” is not a complete specification. Ask about screens per color, ink type, registration tolerance, mesh/detail limits, curing method, print size, and whether screen charges repeat on future orders.
Heat transfer, digital print, and embroidery can all be valid, but they change the proofing checklist. Heat transfer can support complex artwork or smaller runs, yet it must be checked for edge lifting, adhesive outline, film hand-feel, cracking, peeling, and fold resistance. Digital print can handle full-color graphics, but it may look softer or less opaque on natural canvas. Embroidery can feel premium for a small mark, patch-like detail, or logo label, but dense embroidery can pucker the panel and distort the front of the bag.
Think about how the tote will be handled after printing. Craft-fair inventory is often folded, packed in cartons, loaded into vans, stacked behind booths, rubbed against tables, and handled by shoppers before purchase. A proof should show more than color and placement. It should show whether the decoration tolerates folding, pressure, and normal handling. Ask how the ink is cured or fixed, whether printed surfaces can block when folded face-to-face, and what care instructions are reasonable.
Do not accept “durable” as the only answer. Durability needs a method, a test expectation, or an approved physical sample. If the supplier cannot explain how the sample and bulk run will use the same print process, the proof is weaker than it looks.
- Choose screen print for bold logos, simple illustrations, limited colors, repeat orders, and stronger opacity on canvas.
- Consider transfer for complex artwork or smaller runs, but inspect edge lifting, film hand, cracking, and fold marks.
- Consider digital print for full-color graphics, but approve sharpness, opacity, and color on the actual canvas texture.
- Use embroidery for small premium details rather than oversized dense artwork near seams or high-stress areas.
- Confirm setup charges per screen, per color, per design, per placement, or per order.
- Require the sample and bulk production to use the same print method, ink system, curing process, artwork size, and placement standard.
Know what a usable print proof must prove
A usable print proof is not the same as a polished mockup. A mockup can confirm layout intent. It cannot prove ink opacity, curing, hand-feel, canvas shade, edge sharpness, registration, or fold behavior. For a first order, a physical pre-production sample is the stronger approval tool because it brings the fabric, sewing, print method, placement, handles, and packing direction together in one product.
Measure the proof on the finished tote. Lay the bag flat, align the top edge, smooth the fabric without stretching it, and measure from fixed reference points. For a centered front print, check the left and right distances from the side seams or visible panel edges. For a lower-corner mark, measure from the finished side seam and bottom fold. For a gusseted tote, confirm whether the print stays on the front panel or crosses a fold line.
Look at the proof in more than one condition. View it flat, lightly filled, and folded the way it will ship. Natural canvas can change how a print reads under indoor lighting, daylight, and booth lighting. Small text that looks acceptable on a close-up photo may disappear from a shopper’s distance. A QR code that scans on a phone from a flat sample may fail after texture, fold, or low contrast is introduced.
Approval records should be specific enough that an inspector who was not in the design meeting can use them. Keep proof photos, measured dimensions, color references, accepted tolerances, and a signed or sealed master sample where possible. If a photo and physical sample differ in color, state which one controls. For repeat orders, this prevents gradual drift in logo size, print shade, handle length, and fabric finish.
- Require proof photos showing the full front panel, close-up print detail, side seams, handle stitch area, and fold direction.
- Approve the exact logo width, logo height, orientation, placement reference points, and placement tolerance.
- Measure from finished top edge, side seams, gusset folds, bottom fold, and handle stitch boxes where relevant.
- Inspect fine text, negative space, line breaks, edge sharpness, ink opacity, and multi-color registration.
- If the bag has a gusset, review the print while the tote is flat and lightly filled.
- Keep a sealed pre-production sample or signed approval sheet for bulk inspection and future replenishment.
Normalize supplier quotes before you compare unit price
Canvas tote quotes often look similar until the assumptions are unpacked. One supplier may quote 12 oz natural canvas, screen printing, export cartons, and a physical sample. Another may quote lighter fabric, exclude screen fees, leave carton data blank, and use a shorter handle. The unit price may be lower, but the landed cost and defect risk may be higher.
Ask every supplier to quote the same specification. Separate blank tote cost, printing cost, one-time setup charges, sample fees, artwork preparation, packing, labels, inspection, and freight assumptions. This matters for craft-fair buyers because the first order may test demand, while later orders may repeat the best design, add seasonal slogans, create city editions, or split inventory by booth or wholesale partner.
Clarify MOQ at the level where cost is actually created. A supplier may have an MOQ per fabric color, per tote size, per artwork, per print color, per placement, or per shipment. If you plan five small designs on one blank tote, setup charges may matter more than the base bag cost. If you plan one large repeat design, a higher setup cost may be acceptable if the production run is stable.
Workflow ownership deserves direct questions. Some suppliers sew totes and send them to an outside printer. Others print panels before sewing. Some print finished bags in-house. Any route can work if it is controlled. Procurement needs to know who checks first printed pieces, who stores the approved sample, who authorizes bulk continuation, and who is responsible if the print is off-center or the ink blocks during packing.
- Request a quote sheet separating blank tote cost, print cost, setup fees, sample fees, artwork fees, packing charges, labels, inspection, and freight assumptions.
- Clarify MOQ per size, fabric color, artwork, print color, and shipment, not only total order quantity.
- Ask if multiple artwork versions can share one blank tote production lot and how that affects setup charges.
- Confirm whether prices include export cartons, carton marks, inner packing, hangtags, barcodes, or polybags.
- Request carton dimensions and gross weight before comparing landed cost.
- Ask who performs printing, who inspects first production pieces, and who approves bulk continuation.
- Confirm payment milestones and whether sample fees are credited after PO placement.
Set sample approval rules that stop production drift
The pre-production sample should be as close to bulk production as possible. It should use final fabric or an approved bulk-equivalent fabric, final print method, final artwork size, final placement, final thread color, final handle construction, and the proposed packing direction. A blank sample confirms sewing and size. A print strike-off confirms ink on fabric. A full pre-production sample confirms the complete tote.
Review the sample with a checklist, not just a quick reaction. Measure finished width, height, gusset, handle drop, and handle width. Check the front panel in daylight and indoor light because craft fairs may happen outdoors, under tents, or inside exhibition halls. Inspect side seams, top hem, handle symmetry, reinforcement, thread trimming, panel puckering, and label placement. Then move to the decoration: opacity, edge quality, fine text, registration, curing, odor, tackiness, and fold behavior.
If the sample fails, make the correction measurable. “Move it up slightly” is not a production instruction. “Move the top of artwork from 140 mm to 115 mm below the finished top edge” is. If ink looks weak, ask whether the cause is the ink formula, mesh, print pressure, fabric absorbency, or curing. If the handle drop feels too short, revise the tote specification before bulk cutting begins.
Once approved, freeze the standard. Late changes to artwork scale, handle length, fabric finish, ink color, or packing method should be treated as new approvals, not small edits. Production drift usually starts with informal changes that never make it into the purchase order, sample record, or QC sheet.
- Approve a full pre-production sample for first orders, changed suppliers, changed artwork, changed fabric lots, changed print methods, or changed packing.
- Measure body width, height, gusset, handle drop, handle width, and print placement against the written specification.
- Check print opacity, edge sharpness, curing, fine text, registration, tackiness, odor, and cracking or transfer after folding.
- Inspect handle reinforcement, side seams, bottom seams, skipped stitches, thread tails, puckering, and panel alignment.
- Test the approved fold method to ensure the main logo is not sharply creased unless intentionally accepted.
- Document corrections with exact measurements, photos, and revised artwork files where needed.
Define QC thresholds that are practical and enforceable
Quality control for canvas grocery totes should match the end use. These bags are not technical apparel, but they still need to look clean on a display table, carry normal purchases safely, and represent the brand consistently. The most important inspection areas are fabric condition, finished measurements, print placement, print quality, stitch security, handle strength, packing condition, carton quantity, and SKU separation.
A useful QC plan separates critical, major, and minor defects. Critical defects affect safety, legality, or usability: mold, contamination, sharp foreign objects, broken load-bearing handles, open load-bearing seams, or incorrect mandatory labeling. Major defects affect saleability or brand presentation: wrong artwork, wrong print color, severe off-center placement, open seam, poor ink opacity, ink smear, wrong size, wrong fabric weight, or mixed cartons. Minor defects are limited issues that do not harm function or presentation beyond the approved tolerance, such as a small thread tail or a slight natural slub outside the print zone.
Use numeric tolerances wherever possible. For many standard tote programs, body dimension tolerance may be around ±10 mm and print placement tolerance around ±5 to 10 mm, depending on the design and supplier capability. Multi-color registration should be agreed separately. A large distressed illustration may tolerate more visual variation than a small sponsor logo, date line, or QR code.
Also define what cannot pass even if the average looks fine. Skipped stitches in load areas, loose bar-tacks, open seams, broken threads, handle reinforcement that cuts through the canvas, ink smears on the front panel, and unreadable small text should be listed clearly. First production pieces should be checked before the full print run continues; waiting until all bags are packed leaves only sorting, discounting, or remake discussions.
- Critical defects: broken handle attachment, open load-bearing seam, mold, contamination, sharp foreign object, or legally incorrect required marking.
- Major defects: wrong artwork, wrong SKU, wrong print color, visibly crooked print, poor opacity, ink smear, open seam, wrong size, wrong fabric, or carton shortage.
- Minor defects: small non-structural thread tails, slight natural slub, minor crease outside the print area, or approved shade variation.
- Define whether print placement tolerance applies to each unit or average production; for retail appearance, inspect each sampled unit against the limit.
- Check first production pieces before the full print run continues, not only after all bags are packed.
- Use the approved sample and written tolerance sheet together; one without the other leaves room for interpretation.
Treat packing and carton data as part of proofing
Packing may sound like a logistics detail, but it can ruin the print you just approved. If totes are folded through the main logo, packed before ink is cured, stacked under heavy compression, or mixed loosely by design, the shipment may arrive with creased panels, blocking marks, ink transfer, distorted handles, or sorting delays. Craft-fair teams usually need inventory ready for event setup, not a rework project the week before opening day.
Decide the packing route before bulk production. Options include bulk folded in master cartons, fixed-quantity bundles, paper-banded bundles, individual polybags, hangtags, barcode labels, or inner cartons by SKU. Individual polybags can protect presentation, but they add cost, material, and unpacking waste. Bulk packing can be efficient if the fold direction protects the print and carton quantity does not over-compress the bags. If the totes will also be sold online or through retail partners, barcode and SKU labeling may be required.
Carton data affects landed cost and receiving accuracy. Pieces per carton, carton dimensions, gross weight, net weight, carton strength, and marks should be part of the quote. For multiple artwork versions, require carton labels showing SKU, design name, color, quantity, carton number, and purchase order. Clear carton marks reduce the chance that the wrong tote design goes to the wrong booth, market, store, or fulfillment center.
Ask for packing photos before shipment on multi-design orders. They do not replace inspection, but they can catch obvious mistakes: mixed inner bundles, wrong carton marks, fold direction through the logo, missing barcode labels, or cartons packed beyond the agreed quantity.
- Approve fold direction and confirm the main logo is not sharply folded unless specifically accepted.
- Do not pack printed totes before ink is cured or fixed according to the chosen method.
- Specify bulk pack, bundle pack, paper band, polybag, hangtag, barcode, or plastic-free requirements.
- Confirm pieces per carton, carton dimensions, gross weight, net weight, carton material, and carton marks.
- For multiple designs, require SKU separation by carton or clearly labeled inner bundles.
- Ask for packing photos before shipment if the order includes several artwork versions or retail labeling requirements.
- Reject vague packing descriptions such as “standard export carton” unless carton quantity and marks are defined.
Plan lead time around proofing gates and the fair date
Do not treat the factory’s production lead time as the full calendar. When a supplier says production takes 20 to 30 days, that usually starts after artwork confirmation, sample approval, deposit or PO release, and material readiness. It may not include artwork cleanup, screen making, sample production, courier time, buyer review, correction rounds, inspection booking, export documentation, transit, customs clearance, or domestic distribution.
Build the schedule backward from the craft-fair date. Separate each gate: specification approval, artwork approval, sample or strike-off production, buyer review, revision if needed, bulk material purchase, cutting, sewing, printing, trimming, inspection, packing, shipment, and warehouse receiving. Each gate needs an owner and a deadline. If the design team changes artwork after screens are made, or procurement changes handle length after fabric is cut, the cost and timeline will change.
Ask suppliers for realistic slotting information instead of only asking whether they can go faster. Is fabric available? Is the print line open? Will printing happen before or after sewing? Is there a holiday, peak season, or sample-making queue? Can first production pieces be photographed or couriered before full bulk printing continues? These answers help you decide whether to simplify artwork, reduce the number of versions, approve local inspection, split delivery, or choose a faster packing method.
If the event date is fixed, reduce variables. Avoid untested print methods, color-sensitive artwork on a new fabric base, excessive SKU splits, and late packing changes. A simpler tote approved early is usually safer than a more ambitious design that reaches production without enough proofing time.
- Separate artwork time, sample time, sample shipping, review time, revision time, production, inspection, transit, and receiving.
- Confirm when lead time begins: after artwork approval, sample approval, deposit, receipt of materials, or production slot confirmation.
- Build time for at least one correction round on first orders or brand-sensitive craft-fair merchandise.
- Set the latest acceptable ship date and latest warehouse arrival date before placing the PO.
- Avoid last-minute artwork, color, handle, or packing changes unless the cost and schedule impact are approved in writing.
- If the event date cannot move, reduce risk by limiting artwork versions, avoiding untested print methods, and approving packing early.
Specification comparison for buyers
| Spec decision | Recommended option | When it fits | Buyer risk to check |
|---|---|---|---|
| Supplier route | Use a direct factory or coordinated supplier that can document cutting, sewing, printing, inspection, and export packing responsibilities. | Best for repeat craft-fair programs, retail merchandise, multi-SKU replenishment, and line-by-line RFQ comparison. | Ask which steps are in-house and which are subcontracted. If printing is outsourced, confirm who approves first production pieces and who pays for off-placement, ink transfer, or curing failures. |
| Fabric weight | Specify 10 oz to 12 oz cotton canvas, commonly about 339 to 407 GSM depending on conversion, weave, and finishing. | Good balance of structure, print stability, carton weight, carry strength, and retail feel for grocery-style totes. | Do not accept only “heavy canvas” or “thick cotton.” Require GSM or oz/yd², composition, finish, and weight tolerance, often quoted around ±5% unless otherwise agreed. |
| Fabric finish | Choose natural cotton canvas for a rustic craft-fair look, bleached canvas for brighter print contrast, or dyed canvas when tote color is part of the brand system. | Natural canvas suits artisan markets, farmers markets, book fairs, handmade product booths, and reusable shopping programs. Bleached or dyed bases help artwork stand out. | Natural shade varies by lot. Require a fabric swatch, approved lot reference, or confirmation that the print proof will be made on the actual bulk fabric lot. |
| Tote construction | State finished size as width × height × gusset, plus handle drop, handle width, seam type, stitch density, reinforcement, and thread color. | Useful when comparing suppliers or reordering the same SKU across craft-fair seasons. | A low quote may hide smaller finished dimensions, narrow handles, single-needle seams, weak bar-tacks, or no reinforcement at handle attachment points. |
| Print method | Use screen print for 1-color to 3-color bold logos; consider transfer or digital only when artwork complexity, color count, or MOQ economics justify it. | Screen print is usually the clearest quote basis for craft-fair logos, slogans, simple illustrations, and repeat programs. | Confirm ink type, screens per color, curing method, registration tolerance, opacity target, and whether the sample and bulk run use the same process. |
| Artwork control | Send vector artwork with outlined fonts, PMS or physical color references, final print size, and a measured placement diagram. | Required when several suppliers quote the same RFQ or when multiple artwork versions share one tote base. | Low-resolution files, unoutlined fonts, vague line weights, and loose placement language cause sample delays, wrong scaling, and remake risk. |
| Print placement | Measure placement from finished tote reference points: top edge, side seams, bottom fold, gusset fold, and handle stitch box. | Necessary for centered front logos, lower-corner marks, event dates, sponsor logos, and SKU families. | Use millimeter tolerances. For many standard tote runs, ±5 to 10 mm placement is realistic; tighter tolerances should be agreed before pricing and sampling. |
| Handle construction | Use self-fabric or webbing handles with agreed drop, width, stitch pattern, thread, and reinforcement method. | Suitable for grocery loads, books, packaged food, craft purchases, and event merchandise. | Short drops reduce shoulder usability. Narrow handles feel uncomfortable under load. Weak reinforcement can fail even when the body canvas is strong. |
| MOQ strategy | Approve one blank tote specification first, then split artwork versions only after setup economics are clear. | Useful for seasonal slogans, city editions, craft-fair booth designs, store logos, wholesale assortments, or event sponsor versions. | MOQ may apply per fabric color, design, print color, size, or shipment. Clarify setup charges and over/under shipment allowance. |
Buyer checklist before sampling
- Define the base tote before quoting: finished width, height, gusset depth, canvas weight in GSM or oz/yd², fabric finish, handle drop, handle width, seam type, stitch reinforcement, thread color, label requirements, and hangtag requirements.
- State whether dimensions are finished measurements after sewing. Add practical measurement tolerances, such as ±10 mm for body width/height and ±5 mm for handle width or print position, unless your retail standard requires tighter limits.
- Send final artwork in vector format, with fonts outlined, linked images embedded, line weights preserved, print colors named, and each design version clearly labeled.
- Include a measured placement diagram showing logo width and height plus distance from the finished top edge, side seams, gusset folds, bottom fold, handle stitch boxes, pockets, labels, and any no-print areas.
- Specify the fabric base as natural, greige, bleached, dyed, washed, or treated. Require a fabric swatch, shade reference, or actual production-lot confirmation before approving color-sensitive artwork.
- Confirm the exact print method: screen print, heat transfer, digital print, embroidery, or hybrid process. Ask for setup fees, screens, separations, ink type, curing or fixing process, and whether bulk production will match the sample process.
- Request a pre-production sample using final fabric or approved bulk-equivalent fabric, final print method, final artwork size, final placement, final thread color, final handle construction, and proposed fold or packing method.
- Compare quotes on the same basis: tote dimensions, canvas weight, fabric finish, composition, print method, number of colors, artwork versions, setup fees, MOQ, packing, carton data, sample policy, inspection scope, and freight assumptions.
- Require the supplier to confirm maximum usable print area and no-print zones. For gusseted totes, ask whether the printable panel excludes the side gusset folds and bottom fold.
- Define written QC limits for print registration, print placement, ink opacity, ink curing, rub resistance expectations, fabric defects, stitch density, skipped stitches, open seams, measurement tolerance, trimming, and carton quantity.
Factory quote questions to send
- What is the exact fabric composition and canvas weight in GSM and oz/yd²? What tolerance do you apply to fabric weight, and is the quoted weight before or after washing/finishing?
- Is the fabric natural, greige, bleached, dyed, washed, enzyme-washed, or treated? Can you provide a shade swatch or production-lot swatch before printing?
- What are the finished tote dimensions: width, height, gusset depth, handle drop, handle width, seam allowance, and measurement tolerance after sewing?
- What stitch construction is included: single needle, double needle, overlock, French seam, bound seam, box stitch, X-stitch, bar-tack, or another reinforcement? What stitch density do you target per inch or per centimeter?
- Is the quoted price based on screen printing, heat transfer, digital print, embroidery, or another method? Are setup charges applied per screen, per color, per design, per placement, or per order?
- What file formats do you require for production? Do you charge separately for artwork cleanup, color separation, halftone adjustment, font outlining, layout correction, or proof revisions?
- What is the maximum recommended print area on this tote size, and what no-print margin do you require from side seams, top hem, bottom fold, gusset fold, pocket edges, labels, or handle stitching?
- How will you match color: PMS reference, physical swatch, ink recipe, strike-off, approved pre-production sample, or production first article? Which reference controls if the digital proof and physical sample differ?
- Can you print the proof on the actual production fabric lot? If not, how will you control natural canvas shade variation and ink opacity between sample and bulk?
- What placement tolerance can you hold in production for this tote and artwork? Is ±5 mm, ±10 mm, or another tolerance realistic for the quoted price and method?
Quality-control points to confirm
- Fabric composition, finish, shade, and canvas weight match the approved specification. For weight, confirm the agreed unit and tolerance, such as GSM or oz/yd² with an agreed percentage range.
- Canvas panels are free from unacceptable oil marks, mildew, stains, holes, broken yarns, heavy slubs in the print zone, severe shade bands, or weaving defects that visibly affect the logo.
- Finished tote width, height, gusset width, handle drop, handle width, and seam alignment stay within the written measurement tolerance approved before production.
- Logo placement is measured from finished reference points and remains within the agreed tolerance, commonly ±5 to 10 mm for many standard tote orders unless a tighter retail tolerance is priced and approved.
- Print size matches the approved artwork dimensions. A small scaling change can make sponsor logos, fine text, QR codes, or date lines unreadable or visually unbalanced.
- Ink opacity is sufficient on the approved canvas base. The print should not look washed out, broken at fiber valleys, uneven between panels, or inconsistent across cartons beyond the approved sample range.
- Print edges are clean, with no unacceptable bleeding, pinholes, ghosting, scumming, ink drag, double image, clogged small text, or missing fine lines.
- Multi-color artwork aligns within the approved registration tolerance. Misregistration should not create visible color halos, shadows, or unreadable small elements.
- Ink is properly cured or fixed for the chosen process, with no tacky surface, strong residual odor, blocking between folded bags, ink transfer, or obvious cracking when folded as packed.
- Heat transfers, if used, are checked for edge lifting, adhesive outline, film hand-feel, cracking at fold lines, and inconsistent pressure marks on textured canvas.