Why print proofing is a sourcing control
Cotton drawstring pouches look easy to buy. They are small, familiar, and usually less expensive than the garment they protect. That is exactly why problems slip through. A pouch is not a flat carton with a logo on it. It is fabric, stitching, cord, print, packing, and handling all behaving together. The surface moves during cutting and sewing. The drawcord channel takes usable height. The front panel changes shape when the pouch is filled. A logo that looked centered on a digital mockup can sit too high, pull into the gathered top, or bend around a folded product in bulk use.
For eco apparel brands, the pouch often carries more value than the unit price suggests. It may hold socks, underwear, jewelry, accessories, care kits, folded tees, gift-with-purchase sets, or event merchandise. It may also be the first branded packaging a customer touches after the product itself. Thin fabric, weak closure, stained natural cotton, or a muddy logo print can make an otherwise careful apparel program feel unfinished.
A useful cotton drawstring pouches for eco apparel brands print proofing checklist has a simple purpose: turn brand expectations into production controls. It should identify the material, fit, construction, artwork, print method, tolerance, packing format, and inspection standard before the purchase order becomes bulk production. It should also make supplier quotes comparable. The goal is not impossible perfection from a soft sewn item. The goal is agreement on what the pouch must do, what variation is acceptable, and what must be fixed before shipment.
- Treat the pouch as a printed sewn packaging component, not only as a logo mockup.
- Approve fabric, construction, print, fit, and packing together because each affects the final result.
- Use the pre-production sample to test filling, closing, stacking, rubbing, and warehouse handling.
- Keep a signed spec sheet and approved sample for inspection, reorder consistency, and dispute resolution.
Start with fabric, GSM, and claim language
Fabric is the first decision to lock because it shapes almost every other decision. GSM affects handfeel, opacity, print clarity, carton weight, seam bulk, and closure behavior. For light inserts, socks, small accessories, sample kits, and promotional programs, 120-140 GSM cotton is often workable. It keeps the pouch soft and low-bulk. The tradeoff is that contents may show through, the surface can wrinkle around the logo, and the pouch may feel less structured in retail presentation.
For many apparel packaging programs, 150-180 GSM is a stronger starting range. It gives better opacity, a steadier print surface, and a more substantial hand without moving too quickly into heavy reusable-bag territory. Fabric above 200 GSM can feel premium, but procurement should check the full cost: higher material usage, more carton weight, thicker seams, and possible changes in how the drawcord gathers at the top.
Do not let GSM carry the whole fabric spec. A plain weave cotton, twill-like construction, bleached base, dyed shade, washed finish, or natural unbleached base can behave differently even at similar weights. Natural cotton is popular for eco-positioned packaging, but it is not a controlled white paper. Yarn shade, seed flecks, and finishing can vary by lot. Dyed cotton supports closer brand color direction, but it adds lab dip approval, shade tolerance, and colorfastness checks. If dyed fabric or printed areas will touch light garments, ask how color transfer risk is controlled.
Sustainability language needs the same discipline. A pouch that looks natural is not automatically organic, recycled, undyed, low-impact, or certified. If product pages, hangtags, retailer files, or customer-facing copy will mention organic cotton or recycled cotton, request documentation before the claim is approved. It is much easier to revise claim language during proofing than after thousands of pouches are printed and packed.
- Use 120-140 GSM when low bulk and basic function matter more than structure.
- Use 150-180 GSM when the pouch supports retail presentation or repeated handling.
- Ask for a swatch and sewn sample because flat fabric does not show seam bulk or channel behavior.
- Approve natural cotton shade range in writing if repeat-order consistency matters.
- Request documentation before making organic, recycled, or certified material claims.
Size the pouch around the packed product
Catalog pouch sizes are fine for early budget discussion. They are not enough for approval. Start with the product exactly as it will go into the pouch: folded garment, hangtag, care card, tissue, jewelry card, accessory set, barcode label, or insert leaflet. Thickness matters. A pouch that looks roomy when empty may become slow and awkward once a warehouse team has to pack real goods at speed.
Specify two dimensions, not one. Finished external size tells you how the pouch looks from the outside. Usable internal height below the drawcord channel tells you what the product can actually occupy. The top fold and cord channel can take more space than expected, especially on small pouches. If the product pushes into the channel, the pouch may not close cleanly. If the logo sits too close to that channel, it can disappear into the gathered fabric when the cord is pulled.
Side clearance also deserves attention. A 10-15 mm allowance on each side may work for flat accessories or light inserts. Thicker folded apparel, multi-item kits, and products with rigid cards often need more room. Too little clearance slows packing, strains side seams, and makes the logo distort across the product shape. Too much clearance can make the presentation look loose or oversized.
Clarify how the supplier measures. Some quotes refer to cut size before sewing. Others refer to finished outside size after sewing and pressing. Cotton relaxation, seam allowance, sewing tension, and handling can create variation, so tolerances should be realistic and written down. If the packed pouch must fit an e-commerce mailer, retail tray, master polybag, or specific carton, include those downstream limits in the RFQ.
- Measure the product in its final folded or bundled condition before approving pouch size.
- Specify finished external size in millimeters and usable internal space below the cord channel.
- Keep the logo away from the drawcord channel, side seams, bottom seam, and likely fold points.
- Run a pack test with actual contents or a weighted dummy load before bulk production.
- Confirm whether the supplier is quoting cut size, sewn size, or pressed finished size.
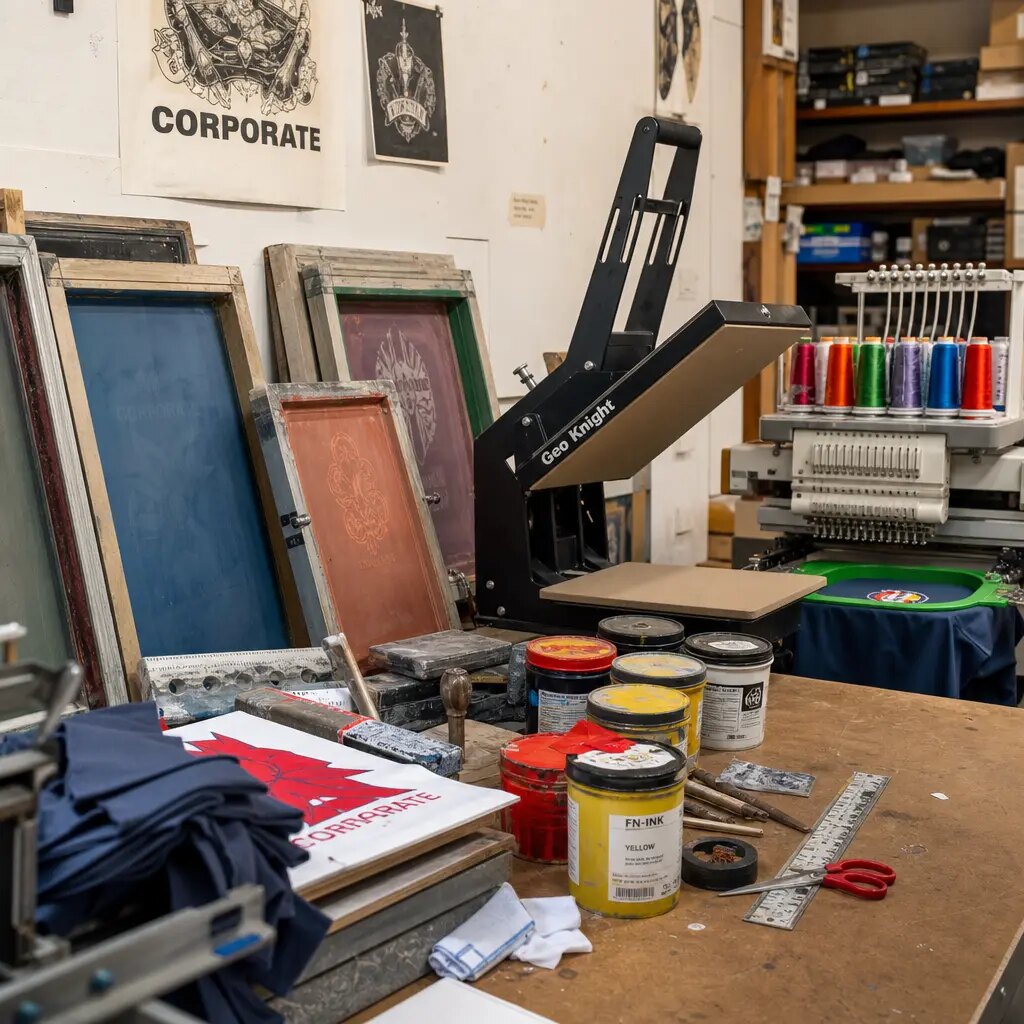
Match the print method to the artwork
Screen printing is usually the practical default for cotton drawstring pouches used by apparel brands. It works well for one-color or two-color logos, repeat programs, and soft matte brand marks on natural fabric. It can also be economical once screens and artwork are stable. Still, screen print is not magic. Cotton weave can soften edges, absorb ink unevenly, and make very small details less sharp than they looked on the PDF.
Heat transfer has a place when artwork uses many colors, gradients, photographic detail, or short-run graphics where screen setup is not efficient. The buyer should check the look and handfeel carefully. A transfer may sit on top of the fabric, show a film edge, look slightly shiny, or feel less integrated with the cotton. That may be acceptable for some designs. For a brand that wants a quiet natural packaging feel, it may be wrong even if the artwork reproduction is cleaner.
Embroidery is sometimes considered for premium reusable pouches, especially on heavier cotton. It should be tested rather than assumed. Needlework can pucker lighter fabrics, distort thin strokes, and make small text unreadable. It also changes cost, setup time, and minimum logo size. If embroidery is on the table, ask the supplier about backing, stitch density, minimum text size, and whether the fabric weight can support the logo without rippling.
Whatever method is chosen, ask how the factory controls curing, drying, stacking, and handling. Printed cotton pouches can mark each other if they are packed too soon or stacked under pressure before the print is ready. The proof should confirm not only how the logo looks on day one, but how it behaves after light rubbing, folding, stacking, and carton packing.
- Use screen print for simple brand marks, repeat programs, and soft matte cotton presentation.
- Use heat transfer for complex artwork only after checking film edge, shine, flexibility, and feel.
- Use embroidery selectively on heavier pouches where the logo scale can tolerate stitch limitations.
- Ask for a printed strike-off when print detail or brand color is important.
- Confirm ink curing and stacking controls before approving bulk production.
Make the artwork proof production-ready
A production-ready proof is not a pretty mockup. It is a controlled instruction file. It should include vector artwork, finished logo size in millimeters, color reference, print method, placement from finished pouch edges, orientation, safe print area, and artwork version. If the order includes multiple pouch sizes, review each size separately. A logo that looks balanced on a medium pouch may crowd the seams on a small pouch or look under-scaled on a large gift pouch.
The safe print area should be based on the finished sewn pouch, not only the flat fabric panel. The drawcord channel, top fold, side seams, bottom seam, rounded corners, and expected product bulge all reduce the true print zone. For a centered front print, define the measurement method. Is placement measured from the finished top edge, from the bottom seam, from the side seams, or from the bottom of the drawcord channel? Without this detail, one supplier may center the logo before sewing while another centers it after sewing. Both can say they followed the file, yet the finished pouches will look different.
Fine details need an early reality check. Ask the printer to confirm minimum line thickness, minimum gap, smallest readable text height, and QR code limits for the selected cotton and print method. A QR code that scans on screen may fail after ink spreads into the weave or after the pouch wrinkles. If a code is required, keep contrast high, use a conservative physical size, and scan the pre-production sample with ordinary phones under normal lighting.
Color also needs practical expectations. Pantone references are useful, but ink on natural cotton will not match coated paper exactly. The fabric base color changes the result. When brand color is critical, approve a strike-off or drawdown on the actual cotton or approved-equivalent fabric. Keep that approved print sample with the signed spec so later inspection is not based on memory.
- Send vector files such as AI, EPS, or production-ready PDF rather than only PNG or JPG.
- State logo width, height, placement, color reference, method, and artwork version in one approval file.
- Measure print placement from finished pouch edges using a method the supplier can repeat.
- Keep small text and QR codes conservative; test the physical sample, not only the digital file.
- Approve print color on cotton fabric when brand color control matters.
Use the sample like a performance test
The pre-production sample is where the sourcing decision becomes physical. For a first order, new supplier, new size, new fabric, or new artwork, the approval sample should be a sewn pouch using final or approved-equivalent fabric, actual drawcord, actual construction, actual print method, and intended packing approach. A flat printed strike-off is useful for early print and color review, but it cannot prove the finished item.
Inspect the sample in the way the pouch will actually be used. Fill it with the intended garment or accessory set. Pull the drawcord closed. Check whether the logo stays visible, whether the top gathers neatly, whether corners push against the seams, and whether packers could load the item at normal speed. Then handle it a little. Stack it. Rub the print lightly when cured. Place it in the intended mailer or carton. The test does not need to be theatrical; it needs to resemble real use.
A sample should also answer presentation questions. Does natural cotton variation sit comfortably with the brand's apparel? Does the cord color look intentional? Does the logo feel too high, too low, too large, or too faint once the pouch is filled? Does the pouch lie reasonably flat when empty and close evenly when full? These details are easier to correct before bulk cutting and printing begin.
Once approved, document the sample. Label it with approval date, artwork version, fabric reference, cord reference, finished size, and any accepted deviations. If a warmer natural shade is accepted, record it. If the supplier promises to correct loose thread trimming in bulk, record that too. A signed sample without notes can still leave room for argument; a signed sample plus written spec gives QC something concrete to inspect against.
- Approve a sewn pouch, not only a digital proof, before first-run bulk production.
- Test the sample filled, closed, stacked, rubbed lightly, and packed in the intended carton or mailer.
- Use the approved sample as the reference for incoming inspection and repeat orders.
- Document accepted deviations and required corrections before bulk production starts.
- Request a revised sample when fit, print clarity, material, or construction changes are material.
Normalize supplier quotes before comparing price
Cotton pouch quotes often look similar while hiding different assumptions. One supplier may include screen charges, sample cost, inner bundles, carton marks, and export cartons. Another may quote only the loose pouch and add setup, packing, labeling, or revision costs later. Before choosing on unit price, bring every quote back to the same base: finished size, GSM, cotton type, fabric color, drawcord, print method, number of print colors, artwork version, packing format, inspection expectation, delivery term, and timeline.
MOQ should be broken down by variant. A 3,000-piece order is not automatically one production run if it is split across three sizes and two logos. Different pouch sizes, fabric colors, cord colors, print colors, artwork versions, and packing formats can each require separate cutting, screen setup, color changes, labels, cartons, and QC separation. A low headline MOQ may be less useful than a clear MOQ structure that matches the actual SKU plan.
Ask what can be shared across variants. Multiple sizes may share the same fabric lot. Different artwork versions may not share screens. A cord color change may be simple if stock cord is available, or slow if it must be dyed or sourced specially. These details influence cost and lead time, and they matter more as the program becomes seasonal or multi-SKU.
Also clarify the production route. Some suppliers cut, sew, print, inspect, and pack under one operating system. Others coordinate multiple workshops. Neither model is automatically a problem. The important question is who owns the result. Procurement should know who checks fabric, who controls print curing, who verifies sewn dimensions, who trims threads, who packs cartons, and who pays to correct defects found before shipment.
- Compare suppliers only after the specification, packing, and delivery assumptions are aligned.
- Ask what is included and excluded: screens, samples, revisions, labels, cartons, inspection, and packing labor.
- Break MOQ down by size, fabric color, cord color, artwork version, and print color count.
- Confirm whether multiple variants can share fabric inventory or screen setup.
- Clarify who is responsible if sewing, printing, or packing defects appear before shipment.
Define QC tolerances before bulk starts
Quality control works best when acceptance points are agreed before production. Cotton pouches are soft goods, so they will not behave like rigid packaging. That does not mean anything goes. Finished size, usable capacity, logo placement, logo skew, stitch quality, shade range, drawcord length, print clarity, ink cure, odor, stains, and packing count should all have written expectations.
For finished size, define the tolerance in millimeters and the measurement condition. The pouch should be measured after sewing and finishing, laid flat without stretching. For print position, define the target and allowed movement from finished edges. Small movement may be acceptable. Large carton-to-carton variation is a bigger problem because it affects retail presentation and makes the brand look inconsistent. Logo skew deserves its own check; even a centered logo can look wrong if it tilts against the pouch edge.
Defect categories reduce argument at inspection. Critical defects may include wrong artwork, wrong material, severe contamination, strong unexpected odor, or mixed SKUs that prevent the goods from being used. Major defects may include unreadable logos, failed QR scans, open seams, blocked cord channels, ink transfer, heavy stains, wrong finished size, or incorrect packing counts. Minor defects may include small thread ends, light wrinkles, or natural shade variation inside the approved range.
The approved sample and written spec should work together. The sample shows the intended handfeel, shade, construction, and print character. The spec gives measurements and tolerances that a QC team can apply across cartons. Either one alone is weaker than both. Keep the final approved sample available for incoming inspection, reorder review, and supplier conversations if a later shipment drifts.
- Define finished size, print placement, logo skew, shade range, stitch quality, and cord length tolerances.
- Measure print placement from finished pouch edges, not from an unsewn fabric panel.
- Classify critical, major, and minor defects before inspection.
- Include ink cure, rubbing, odor, stains, loose threads, and cord function in the QC checklist.
- Use the approved sample and written spec together; neither is enough alone.
Control packing, labels, and traceability
Packing is often treated as the final detail. For B2B procurement, it affects freight cost, receiving speed, warehouse control, and sustainability perception. Since the pouch itself is packaging, unit polybags are not always necessary. Bundle packing may be better when pouches will be filled later by an apparel factory, distributor, or warehouse. Unit bags may still be justified for dust protection, retail display, barcode scanning, or direct-to-consumer fulfillment, but they add material, labor, carton volume, and handling steps.
The RFQ should state carton dimensions, pieces per carton, bundle quantity, net weight, gross weight, inner packing, carton mark format, barcode label needs, and whether cartons must be export grade. Lightweight pouches can become inefficient if they are packed in oversized cartons or mixed without clear labels. Carton-level lot codes and consistent marks help isolate issues later. If a print defect appears in one production lot, the team should not have to open every carton just to understand what is affected.
When the supplier is also packing garments or accessories into the pouches, treat that as kitting rather than simple pouch supply. Provide the folding method, insert order, label orientation, final closure method, carton layout, and SKU separation rules. Test the full packed unit during sample approval. A pouch that looks correct empty can distort around a thick garment, hide the logo behind a hangtag, or slow the line because the opening is too narrow.
Traceability does not need to be complicated. At minimum, carton labels should connect finished goods to SKU, size, color, artwork version, quantity, lot or batch reference, and destination where needed. This is especially helpful for repeat packaging programs, regional launches, and orders split across multiple apparel styles.
- Use bundle packing when pouches will be filled or allocated later.
- Use unit packing only when retail, dust control, barcode, or fulfillment requirements justify it.
- Confirm carton size, weight, and pieces per carton before freight comparison.
- Require carton marks with SKU, size, color, artwork version, quantity, lot code, and destination where needed.
- Test full kitting if garments, inserts, or accessories will ship inside the pouch.
Plan lead time around proofing and revisions
Lead time should not be reduced to one broad number. A useful schedule separates RFQ clarification, artwork setup, fabric sourcing, lab dip or swatch approval where needed, sample making, sample shipping, revision time, bulk material preparation, cutting, sewing, printing, curing, inspection, packing, and forwarder handover. Eco apparel launches often depend on seasonal delivery dates, retail windows, or coordinated product drops, so hidden proofing time can become a real risk.
Printing adds steps that basic sewn-goods timelines may miss. Screens need preparation. Ink needs proper curing. Printed pouches may need rest time before stacking or packing so the print does not transfer to adjacent cotton. Multi-color artwork can require registration checks and slower setup. If these steps are rushed, the shipment may arrive with tacky prints, offset marks, uneven density, or inconsistent logo placement.
Artwork changes are a common source of delay. If the brand changes the logo after screens are made, the supplier may need to remake screens and repeat proofing. If the pouch size changes after the fit test, cutting patterns, print placement, packing count, and carton size may all move with it. Procurement should set a final artwork lock date, sample approval deadline, bulk start date, inspection window, and handover date.
For first orders or new suppliers, build in revision time. The first sample may be close but still need a cord adjustment, placement correction, fabric shade approval, or print detail change. A realistic calendar protects the launch better than an optimistic one that assumes every approval happens on the first pass.
- Ask for sample lead time, sample revision lead time, and bulk lead time separately.
- Include screen making, ink curing, inspection, and cartonization in the schedule.
- Lock artwork before screen making whenever possible.
- Build a revision buffer for first orders, new suppliers, new materials, and QR code artwork.
- Confirm the ship window from sample approval date, not only from the first quote date.
Specification comparison for buyers
| Spec decision | B2B recommendation | Typical working range | Procurement risk to control |
|---|---|---|---|
| Fabric weight | Choose GSM around the packed item, presentation level, print method, and carton plan, not price alone. | 120-140 GSM for light inserts and low-bulk packaging; 150-180 GSM for stronger apparel presentation; 200 GSM and above when a heavier reusable pouch is intentional. | Low GSM can show contents, wrinkle around the logo, and feel thin. High GSM raises cost, carton weight, seam bulk, and may change drawcord closure behavior. |
| Cotton type and claim | State whether cotton is conventional, organic, recycled, bleached, dyed, or natural unbleached, and request documents for any sustainability claim. | Natural cotton shades vary by yarn and lot; dyed cotton requires lab dip or shade approval; certified claims need valid scope and transaction support where applicable. | Vague eco language can create compliance and marketing risk. Unapproved shade variation can make repeat orders look inconsistent. |
| Finished size | Specify finished external dimensions and usable internal space below the drawcord channel, both in millimeters. | Use the actual folded product plus side clearance. 10-15 mm per side may work for flat accessories; bulkier garments often need more. | Catalog sizes may be quoted as cut size or outside size. A tight pouch slows packing, strains seams, bends the logo, and may not close cleanly. |
| Print method | Use screen print for most simple one- or two-color brand marks; compare transfer or embroidery only when artwork or positioning justifies it. | Screen print for repeat logos; heat transfer for complex color or short-run graphics; embroidery mainly for heavier premium pouches. | Wrong method can cause ink bleed, tackiness, transfer marks, shiny film edges, cracking, puckering, or unreadable fine details. |
| Artwork proof | Approve vector artwork with logo dimensions, Pantone or ink reference, print method, minimum line width, safe print box, and placement from finished edges. | Minimum detail depends on fabric, mesh, ink, and printer capability. QR codes should be tested at physical sample stage. | A digital mockup cannot prove weave absorption, registration, channel interference, seam drift, or scan reliability. |
| Construction | Define side seam type, bottom shape, top fold depth, drawcord channel width, stitch density, thread color, and stress-point expectations. | Common simple pouches use a single-channel drawstring construction; heavier or repeated-use pouches may need stronger seams or bar tacks. | Loose thread, uneven channel width, open seam starts, twisted side seams, and weak cord exits make the pouch look low-grade and can fail during packing. |
| Drawcord | Specify material, diameter or thickness reference, color, length, knot or tip finish, and whether one-sided or two-sided draw is required. | Cotton cord gives a natural appearance; polyester or recycled polyester may improve color range, strength, or price control. | Cotton cord can fray or vary. Synthetic cord may conflict with the pouch's natural look. Inconsistent cord length changes closure and presentation. |
| MOQ structure | Quote MOQ by finished size, fabric color, cord color, print color count, artwork version, and packing format. | A 3,000-piece order split across three sizes and two logos may behave like six smaller production versions. | Headline MOQ can hide separate screens, color-change charges, cutting waste, packing labor, and longer production scheduling. |
| Sample approval | Approve a sewn pre-production sample using final or approved-equivalent fabric, actual cord, actual construction, actual print method, and intended packing. | Use a flat strike-off for early print review, then a sewn sample for final approval before bulk production. | Artwork approval alone cannot confirm capacity, closure behavior, logo position on a soft pouch, ink cure, stitching quality, or carton packing effect. |
Buyer checklist before sampling
- Confirm finished external pouch dimensions in millimeters and usable internal height below the drawcord channel, not only a catalog size name.
- Measure the actual packed product, including folded garment thickness, insert cards, hangtags, tissue, jewelry cards, or accessory sets that will go inside the pouch.
- Define cotton composition, GSM, weave appearance, finishing, shrinkage expectations if washing or steaming is involved, and whether the cotton is natural, bleached, dyed, organic, recycled, or conventional.
- Request supporting documentation before using organic cotton, recycled cotton, or other sustainability claims in customer-facing copy or compliance files.
- Specify drawcord material, approximate thickness, color, finished length, knot or tip finish, and whether the pouch requires a single drawcord or double drawcord closure.
- Approve vector logo artwork with finished print size, Pantone or ink reference, maximum printable area, exact placement from finished pouch edges, and orientation.
- Ask the printer to confirm minimum line thickness, smallest readable text size, and minimum QR code size for the selected cotton fabric and print method.
- State the print method, number of colors, ink type where relevant, curing requirement, and expected handfeel such as soft matte, opaque, raised, or transfer-film finish.
- Request a sewn pre-production sample using final or approved-equivalent fabric, actual cord, actual construction, intended print method, and intended packing method before bulk approval.
- Test the sample with the actual garment, accessory, insert card, or weighted dummy load to confirm fit, closure, logo visibility, and packing speed.
Factory quote questions to send
- What exact cotton composition, GSM, weave construction, and finishing treatment are included in the quote, and can you send a swatch from the intended bulk fabric lot or closest available production lot?
- Is the fabric natural, bleached, dyed, organic, recycled, or conventional cotton, and what documentation can you provide if our brand will make a sustainability claim?
- Are you quoting finished size or cut size, and what finished-size tolerance do you hold after sewing, pressing, and cord insertion?
- What pouch size do you recommend for our actual packed product, and what usable internal height remains below the drawcord channel?
- What drawcord material, color, thickness, finished length, and end finish are included, and can the cord be changed without changing MOQ or lead time?
- What is the maximum safe printable area on the finished pouch, and what logo placement do you recommend to avoid seams, folds, channel puckering, and closure distortion?
- Which print method is included, how many colors are included, what ink or transfer type will be used, and what extra cost applies for each additional color, screen, or artwork version?
- What minimum line thickness, smallest readable text height, and minimum QR code size can you reliably produce on this cotton fabric after curing and bulk handling?
- Will you provide a printed fabric strike-off, a sewn pre-production sample, or both, and will the sewn sample use final fabric, final cord, final construction, and final packing?
- What is your MOQ by finished size, fabric color, cord color, print color count, artwork version, and packing method, and can multiple sizes share fabric inventory or setup?
Quality-control points to confirm
- Finished size: measure length and width after sewing and finishing, using the same method defined in the specification, and confirm the intended apparel insert fits without forcing the drawcord closed.
- Usable capacity: test the pouch with the actual folded garment, accessory set, or weighted dummy load so closure, shape, and print visibility are checked under real use conditions.
- Print placement: verify the logo sits within the approved print box and within the agreed tolerance from finished pouch edges, with no channel overlap, seam interference, obvious height variation, or visible skew.
- Print clarity: check that edges are clean enough for the approved artwork, with no missing ink, blocked counters, bleeding, pinholes in critical logo areas, unreadable small text, or failed QR scan.
- Ink cure and transfer: after full cure, the print should resist normal hand flexing, stacking pressure, light dry rubbing, and contact with adjacent cotton without tackiness or color offset.
- Fabric appearance: inspect for approved shade and texture, with no oil stains, mildew marks, weaving defects in the logo zone, needle damage, heavy slubs through the logo, or unexpected chemical odor.
- Shade consistency: compare cartons against the approved swatch or sample under consistent lighting, and separate natural cotton variation from unacceptable mixed-lot variation.
- Stitching: side seams, bottom seams, and drawcord channel should be even, with no skipped stitches, open seam starts, broken thread, thread nests, raw edges exposed beyond the approved construction, or obvious thread color mismatch.
- Drawcord function: cord length should match the specification, ends should be secured as approved, and the pouch should open and close smoothly without the cord jamming, slipping into the channel, or tearing the channel edge.
- Shape and symmetry: the pouch should lie reasonably flat when empty, close evenly when filled, and avoid twisted side seams, uneven top edges, or distorted corners that make the logo look crooked.