Why Trade Show Pouches Fail In Real Use
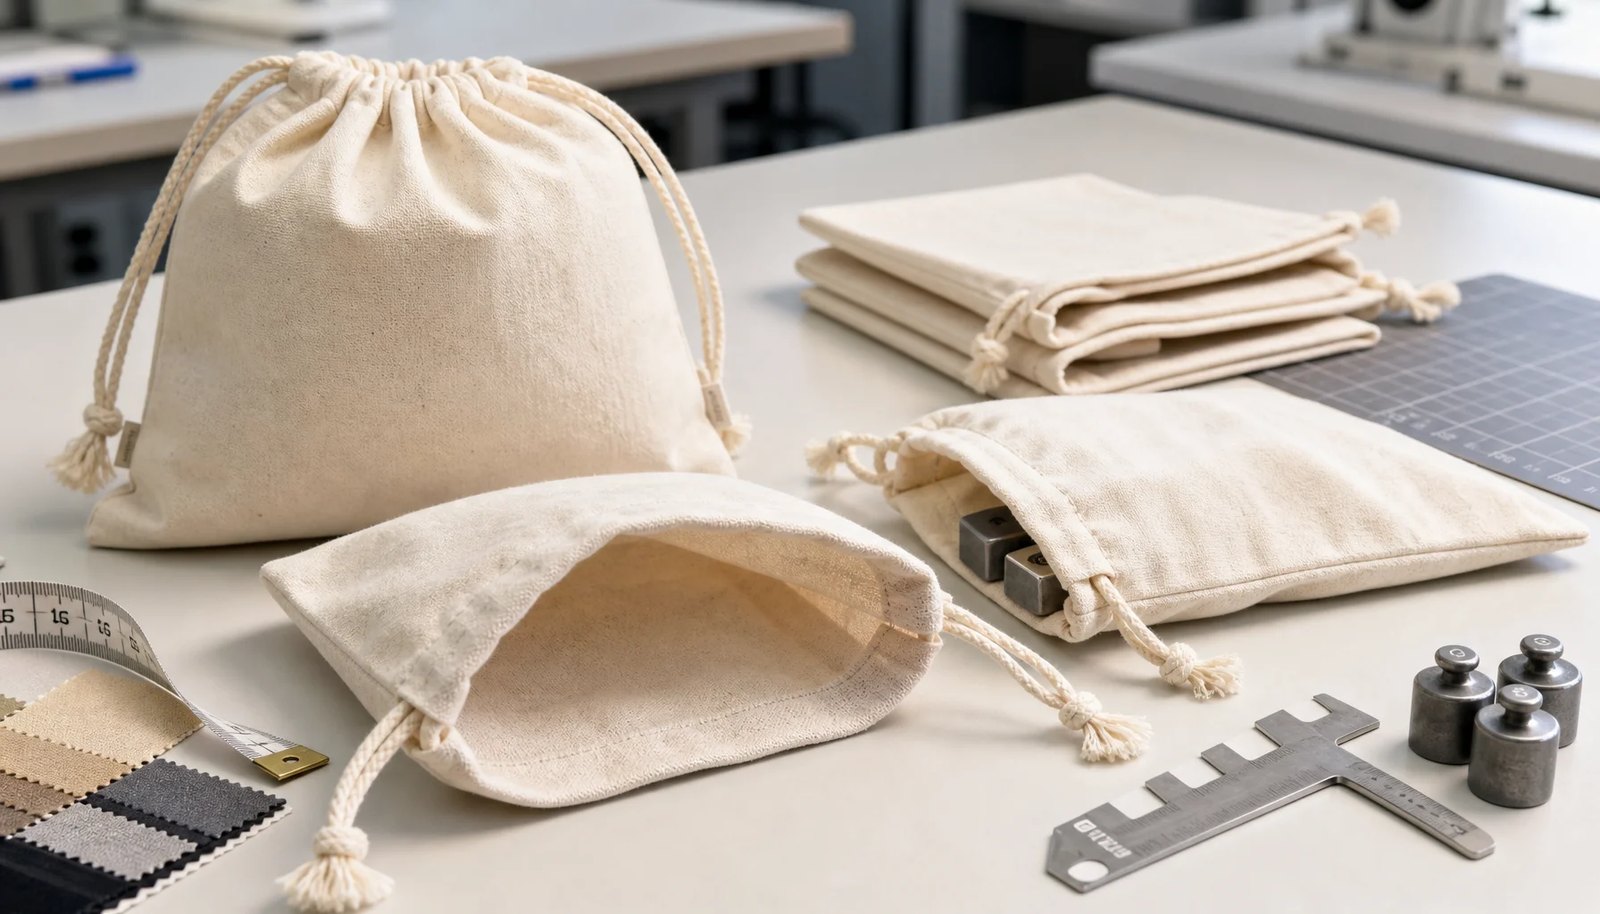
Cotton drawstring pouches look simple, but trade show use is a stress test. Booth staff pull them open repeatedly, visitors overfill them with catalogs and samples, and fulfillment teams may handle hundreds or thousands in a short window. A pouch that looks fine in a product photo can fail at the cord channel, the bottom corner, or the print layer once it is packed and moved at speed.
The procurement risk is not whether a cotton pouch can be made. The risk is whether the quoted pouch actually matches the event load, the handling pattern, the print requirement, and the packing workflow. If the RFQ does not define those details, the supplier may optimize for unit price by reducing fabric weight, stitch density, cord diameter, or packing labor.
For B2B buyers, the right comparison is not empty pouch appearance. It is the pouch in its real use condition: filled, pulled open quickly, closed repeatedly, stacked, shipped, and handed out in a booth environment. That is why durability testing belongs in the buying process before approval, not after a problem appears on site.
- Common failure points are cord openings, bottom corners, weak overlock seams, print cracking, and mixed packing errors.
- The correct benchmark is the filled pouch used at the booth, not a flat empty pouch on a desk.
- A strong RFQ defines size, fabric GSM, print method, packing format, and approval timeline before the supplier quotes.
- For trade shows, seam construction and cord reinforcement often matter more than the fabric name alone.
Start With The Packed Use Case, Not The Pouch Alone
A pouch spec should start with the contents. A pouch that carries pens and badges is a different product from one that holds sample bottles, brochures, power banks, or retail gift sets. The shape of the insert matters as much as the weight because a bulky item creates pressure points at the seams and distorts the pouch opening when it closes.
Buyers should define the target load in plain terms: what goes inside, how heavy the packed kit is, and whether the pouch must close fully without straining. If the event team will distribute the pouch pre-filled, the filled kit should be the reference, not a rough estimate. If the pouch is meant for booth staff to refill during the event, then repeated opening and closing should be part of the test plan.
This is also where size errors are avoided. Flat pouch size is not the same as useful interior space. Seam allowance, hem depth, and the drawcord channel all consume room. A pouch that is technically the same height as the product may still be too short once the top channel is built and the cord is threaded.
- List the contents by category and weight, such as literature set, accessory kit, sample kit, or retail gift kit.
- State whether the pouch must close fully, sit partially open, or remain easy to reopen throughout the event.
- If the insert is bulky, ask the factory to sample with the actual product shape or a realistic dummy weight.
- Use the filled kit as the acceptance reference whenever possible.
Fabric Weight, Weave, And Hand Feel
Fabric weight is the first durability decision, but it should be tied to how the pouch will be used. A 5 oz to 6 oz cotton pouch is often enough for light promotional items, cable kits, or small cosmetic samples. For heavier inserts, repeated reuse, or a more premium presentation, a 7 oz to 10 oz cotton canvas is safer and usually feels more substantial in hand.
Do not approve fabric by name alone. Cotton, canvas, muslin, calico, and natural cotton are used differently across factories and trading channels. The RFQ should request composition, GSM or ounce weight, weave style, color standard, and whether the pouch will be left natural, bleached, dyed, or finished in another way. If the buyer cares about eco positioning, natural shade variation and seed flecks may be acceptable, but they should be approved as part of the expected look.
The hand feel matters because the pouch is part of the brand experience. Very loose weave can feel cheap even when the size is correct. Very heavy canvas can feel premium but can also increase shipping weight, sewing time, and print cost. The buyer should balance visual quality, durability, and logistics rather than chase the heaviest fabric by default.
- Use about 150 to 200 GSM for light giveaways where the load is modest.
- Use about 230 to 340 GSM for reusable or premium pouches that must survive more handling.
- Ask for a measured fabric swatch before approving the bulk order.
- Check how the chosen fabric looks under bright light because thin weave can become transparent once printed or stuffed.
Seams, Bottom Corners, And Cord Channel Reinforcement
Most pouch failures start where stress concentrates: the side seam, bottom corner, and cord channel opening. A basic single overlock seam may be enough for very light items, but trade show programs usually need more protection. An overlock plus straight stitch, or a cleaner enclosed seam where budget allows, gives the pouch more tolerance when it is pulled open aggressively or packed tightly in cartons.
The top hem and cord openings deserve explicit specification. If the supplier does not back-tack the opening area, the seam can open under repeated pulling even when the body fabric itself is fine. If the cord channel is too narrow relative to the cord diameter, the cord can jam, twist, or create friction that eventually weakens the channel. Reinforcement is not a cosmetic detail. It is the difference between a pouch that lasts through the event and one that fails during booth setup.
The bottom corners also matter because they take the full weight of the insert. If the pouch will hold a box, bottle, or other hard-edged item, ask for corner reinforcement or a sturdier fabric weight before sampling. The goal is to keep seam stress low enough that the pouch closes cleanly without visible strain lines.
- Ask the factory to show how the side seams are finished internally, not just how the outside face looks.
- Specify back-tack at the cord openings for any pouch that will be opened repeatedly.
- Match cord diameter to channel height so the cord does not bind or disappear into the hem.
- If the contents are heavy or angular, reinforce the corners before the first sample is approved.
Print Methods And Logo Placement
Logo durability is as important as pouch durability. For most cotton drawstring pouches, screen print is the most reliable bulk method for solid logos and simple event branding. It gives predictable coverage, clear edges, and relatively controlled cost. Heat transfer can work for gradients or more complex artwork, but it should be tested on the actual cotton surface because edge lift, stiffness, and rub resistance can vary. Embroidery usually belongs on thicker canvas rather than thin loose-weave cotton, where stitching can cause puckering.
Placement should be specified in a drawing, not left to interpretation. The drawcord channel limits the printable area, and the print should not sit too close to the bottom seam where the fabric curves when the pouch is filled. For trade show tables, consistency is visible immediately. If some pouches sit higher, lower, or off-center, the whole order can look uneven even when the logo itself is technically correct.
The buyer should define print size, position from the top edge and side seam, number of colors, and acceptable shift tolerance. If there are multiple artwork versions for regions, distributors, or event sponsors, each version needs its own proof and approval. It is usually cheaper to solve placement issues during sample review than to sort through misaligned cartons just before move-in.
- Use screen print for solid brand marks, event names, and sponsor logos with limited colors.
- Use heat transfer only after checking flexibility, edge adhesion, and rub resistance on the chosen fabric.
- Avoid oversized dense ink blocks on loose weave cotton because cracking is more likely.
- Keep artwork clear of the top channel and the stitched side fold so it does not distort when filled.
Sample Approval And A Practical Durability Test Plan
A photo sample is not enough for cotton drawstring pouches used in events. The buyer should approve a physical pre-production sample made with the actual fabric weight, actual cord, actual print method, and intended packing method. If the sample uses different fabric from production, or if the print method changes later, the approval loses most of its value.
The sample review should be operational, not just visual. Measure the pouch, fill it with the real insert set or a realistic dummy weight, close it several times, and inspect how the seams respond. Then rub the logo with a dry white cloth and, if relevant to the event use, a slightly damp cloth. Record what passed, what was borderline, and what must not change in mass production.
A useful durability checklist does not need to imitate a lab report to be effective. It needs to answer one question: will the pouch survive the actual trade show workflow without embarrassing the brand or creating rework? If the answer is uncertain, hold the order until the sample is corrected. That discipline saves more money than rushing a weak approval.
- Approve finished size, fabric hand feel, shade, stitch density, cord pull, print color, and print placement.
- Keep one sealed approved sample for buyer-side inspection and one for the factory reference file.
- Record the acceptable tolerance for size and logo position before bulk production starts.
- Test the pouch with the real insert set whenever possible, not only a general weight placeholder.
Incoming QC And Production Control
Production QC should verify more than the final carton count. The factory should check fabric shade consistency, stitch density, seam integrity, cord movement, print registration, and packing count during the run. If the order includes multiple artwork versions, the team should control them separately so one version does not slip into another version's carton. That kind of mix-up is expensive to fix after shipment.
At incoming inspection, the buyer should recheck the approved sample against a random carton pull. Measure size, examine seam finish, inspect the top channel, and repeat the simple rub test on the printed area. If the pouch is supposed to carry a specific filled weight, repeat the hang or load test on a few pieces. If any section shows weak sewing, inconsistent print, or obvious packing mismatch, stop release until the issue is isolated.
Do not rely on carton gross weight alone when multiple sizes or artwork versions are in play. A carton can look correct on paper and still contain the wrong packing mix. Carton labels should show item code, artwork version, quantity, and order reference clearly enough that warehouse staff can verify the shipment without opening every case.
- Measure a random sample against the approved reference, not against the purchase order alone.
- Inspect cord openings, side seams, bottom corners, and print placement under bright light.
- Recheck the carton count and inner pack count separately before release to the event warehouse.
- If multiple artwork versions are ordered, mark them clearly at the carton and inner-pack level.
Packing, Cartons, And Booth Readiness
Packing is part of product quality because poor packing can crush cords, wrinkle printed faces, create moisture risk, or mix artwork versions. For most trade show orders, flat bulk packing in inner bags of 50 or 100 pieces is practical. That format makes receiving easier, simplifies counting, and reduces time at booth setup. If the pouches are going to a fulfillment center or distributor warehouse, carton labeling should be easy to scan and easy to read by hand.
The buyer should decide early whether individual polybags are required. Individual bags keep each pouch clean and can help with retail presentation, but they add material cost, labor, unpacking time, and waste. Bulk inner packs are often the better fit for booth giveaways, while individual bags may make sense for retail kits or high-touch gift sets. Cotton itself can absorb humidity, so dry packing and carton quality matter when the shipment will sit in storage before the event.
Ask for carton dimensions and gross weight before booking freight. If the shipment must arrive at a convention center, third-party warehouse, or regional event hub, receiving rules need to be checked in advance. A pouch order that lands at the wrong dock, with the wrong label format, can create more disruption than a minor production defect.
- Use flat packing to keep the print face smooth and make count checks easier.
- Request carton dimensions and gross weight before freight planning begins.
- Label cartons by artwork version if more than one logo version is produced in one order.
- Avoid mixed cartons unless your receiving team has time to re-sort before event setup.
MOQ, Pricing, And Quote Comparison
MOQ for cotton drawstring pouches is driven by more than sewing quantity. Fabric purchase, dye lot, cutting yield, screen setup, cord sourcing, labels, and packing all affect the minimum viable run. Natural cotton in a standard size with one simple print is usually easier to quote than custom-dyed fabric, unusual cord colors, multiple logos, or retail-style packing. That is why two suppliers can quote very different MOQs even when they appear to be selling the same pouch.
To compare suppliers fairly, separate the base pouch from the extra work. Ask for line items or clearly named inclusions for fabric, sewing, print setup, sample cost, packing labor, labels, and freight terms. A low unit price that hides setup charges is not a better quote if it forces costly rework or added sorting later. For trade show buyers, the real cost includes the risk of late fixes and booth-level labor, not just the factory invoice.
Landed cost matters because the pouch may travel by air to meet a deadline or by sea for a planned campaign. Higher GSM fabric, individual packing, and bulky cartons can change freight cost significantly. The right commercial choice is the one that fits the event schedule, the booth process, and the approved quality standard, not the one that only looks cheapest on the first page of the quote.
- Compare EXW, FOB, or delivered terms consistently across suppliers.
- Ask for carton dimensions and gross weight so freight can be estimated accurately.
- Separate sample, setup, packing, labeling, and courier charges from the unit price.
- Reject quotes that do not state fabric GSM, print method, and packing format.
Lead Time, Event Risk, And Final Acceptance
Trade show orders live under fixed deadlines, so lead time should be tied to approval milestones. A factory schedule normally starts after deposit, final artwork approval, fabric confirmation, and pre-production sample sign-off. If the buyer changes pouch size, artwork, or packing after sampling, the schedule can slip immediately. For that reason, the approval sequence should be documented before production begins.
Build the timeline backward from the event date, not from the desired ship date. Include sample making, sample courier time, buyer review, material purchase, printing, sewing, packing, inspection, freight, customs, and local delivery. If the pouches must arrive at a warehouse or convention center, receiving windows, label rules, and appointment requirements should be checked early. A strong pouch that arrives after booth move-in is still a failed order.
Final acceptance should combine quality and logistics. The goods should match the approved sample, the cartons should be marked correctly, and the shipment should be deliverable within the event window. If there is any mismatch between production, packing, or schedule, stop and resolve it before the goods leave the factory. That is the safest point to correct an order.
- Lock final artwork before sampling so screens or transfers do not need to be repeated.
- Allow extra time for dyed fabric, custom cord color, special labels, or complex packing.
- Request a dated production plan showing cutting, printing, sewing, packing, and inspection stages.
- Keep buffer time for freight delays, customs checks, warehouse appointments, and event move-in rules.
Specification comparison for buyers
| Spec decision | Recommended option | When it fits | Buyer risk to check |
|---|---|---|---|
| Fabric weight for giveaway pouches | 5 oz to 6 oz cotton, about 150 to 200 GSM | Light trade show kits with pens, badges, cables, cosmetic samples, or other inserts under about 500 g | Too-light fabric can look thin under backlight and stress the cord channel when visitors pull the pouch open quickly |
| Fabric weight for reusable or premium pouches | 7 oz to 10 oz cotton canvas, about 230 to 340 GSM | Heavier merchandise sets, retail gift packaging, or pouches that must survive repeated reuse after the event | Higher GSM raises unit cost, shipping weight, and sewing time, so the quote must include those effects |
| Seam construction | Inside overlock plus straight stitch, or a cleaner enclosed seam where the price allows | Most trade show programs, especially when the pouch will be handled by booth staff and visitors many times | A weak single overlock can unravel at the bottom corners after filling, stacking, or transit compression |
| Drawcord material | Cotton cord for a natural look; polyester cord for smoother pull and stronger abrasion resistance | Cotton suits eco-positioned branding; polyester suits repeated use and heavier handling | Cord diameter below spec can slip into the channel, twist, or feel cheap in hand |
| Cord channel reinforcement | Folded top hem with back-tack at the side openings | Any pouch expected to be opened, closed, and re-packed during the event | Unreinforced openings can split even when the body fabric itself passes a basic pull check |
| Logo print method | Screen print for solid logos; heat transfer for gradients; embroidery only on heavier canvas | Screen print is the most common bulk choice for simple trade show branding | Thick ink on loose cotton can crack, and embroidery on thin fabric can pucker or distort the pouch face |
| Packing format | Flat bulk pack by 50 or 100 pieces with inner bag or paper banding as required | Best for booth kitting, warehouse receiving, and carton-level count checks | Random mixed packing slows assembly and can hide shortages until the event setup window |
| Quote structure | Request separate line items for fabric, print setup, packing, sample cost, and freight terms | Useful whenever multiple artwork versions, custom colors, or regional kits are involved | A low unit price can hide setup, rework, or packing charges that change the real landed cost |
Buyer checklist before sampling
- Define the pouch by finished size and usable inner space, not by flat cutting size alone. Allow for seam allowance, top hem, and the drawcord channel when you compare samples.
- State the actual packed load for the pouch, including the shape of the insert if it matters. A pouch for flat literature behaves differently from one carrying bottles, chargers, or boxed samples.
- Specify fabric composition, GSM or ounce weight, color, shrinkage tolerance, and whether you want natural, bleached, dyed, or organic cotton. Do not rely on fabric names alone.
- Choose the seam construction for sides, bottom corners, and the top channel. Ask whether the factory uses overlock, double stitch, enclosed seam, or another method.
- Specify drawcord material, diameter, color, length, end finish, and whether the pouch opens with one cord or two cords. Match the cord to the intended handling speed at the booth.
- Define the print method, number of colors, maximum print area, print placement tolerance, and whether the artwork must align with the seam or center point.
- Request a pre-production sample made with the actual fabric, actual cord, final print method, and final packing style. A photo or virtual mockup is not enough.
- Set durability tests before bulk production: seam pull, cord pull, dry rub, damp rub if relevant, and a short hang or load test using the expected insert weight.
- Confirm packing details: quantity per inner pack, cartons per SKU or artwork version, moisture protection, carton markings, and whether pouches must arrive pre-sorted for booth kits.
- Compare suppliers using a full quote sheet that includes fabric weight, print setup, sample charges, packing labor, lead time, and trade terms. Do not compare unit price only.
Factory quote questions to send
- What fabric construction and GSM are included in the quoted unit price, and can you provide a measured fabric swatch or spec sheet?
- Is the quoted pouch size the finished flat size or the cutting size before sewing and shrinkage?
- What seam construction is included at the sides, bottom corners, top hem, and cord openings?
- What drawcord material, diameter, color, length, and end finish are included in the quote?
- Which print method is quoted, how many colors are included, and what is the maximum print area for this pouch size?
- Are screen charges, artwork setup, sample charges, courier cost, and packing labels included or listed separately?
- What is the MOQ for one fabric color and one logo, and how does pricing change if we split artwork across regions, distributors, or event versions?
- What durability checks do you run before shipment, and what acceptance tolerances do you use for seam strength, print adhesion, and size accuracy?
- How many pieces are packed per inner pack and export carton, and what are the estimated carton dimensions and gross weight?
- What production lead time starts after which approval point: deposit, artwork approval, fabric approval, or pre-production sample approval?
Quality-control points to confirm
- Measure finished width and height against the approved sample, using a practical tolerance such as plus or minus 5 mm for small pouches and plus or minus 10 mm for larger canvas pouches.
- Weigh or verify the fabric GSM against the approved swatch. Investigate transparency, loose weave, slub variation, or uneven dye before printing starts.
- Inspect the side seams and bottom corners under light tension. Reject broken stitches, skipped stitches, open seams, or uneven seam allowances.
- Pull the cord through the channel and close the pouch several times. The cord should not jam, twist excessively, fray, or disappear into the hem during normal use.
- Check the reinforcement at the cord openings and the top hem. Back-tack should be visible and even, with no loose thread tails that could unravel during handling.
- Rub printed logos with a dry white cloth and then a slightly damp white cloth if the program will see handling or light moisture exposure. Flag transfer, cracking, peeling, or heavy distortion.
- Confirm print placement from the top edge and both side edges. Misalignment is easy to see when pouches are stacked on a trade show table.
- Check the pouch with the actual insert set or an equivalent weight. A short hang test at about 1.5 times expected filled weight is a practical starting point for many programs.
- Verify inner pack count and carton count separately. Do not rely only on gross weight when multiple sizes, artwork versions, or packing styles are mixed in one shipment.
- Review carton strength, moisture protection, carton markings, and label readability so the pouches can move from warehouse to booth without last-minute re-sorting.