Start With the Real Craft Fair Use
Cotton drawstring pouches for craft fairs look simple, which is exactly why weak specifications slip through. A pouch may be counted at receiving, packed for an event, opened during booth setup, filled quickly, handled by shoppers, pulled closed many times, dropped into a tote, and later reused by the customer. A clean catalog photo does not prove that the bottom seam will hold, the cord will stay in the channel, or the logo will survive gathering at the top.
For procurement teams, distributors, event organizers, subscription box buyers, and maker brands, durability is not the same as buying the heaviest fabric available. The better goal is fit for use. A pouch for jewelry cards does not need the same construction as one carrying ceramic ornaments. A backstage packaging pouch can accept a more rustic finish than a branded gift pouch customers are expected to keep.
A useful RFQ turns that use case into measurable details: finished size, usable internal capacity, fabric GSM, fabric finish, seam type, stitch density, channel height, cord diameter, logo method, print position, packing format, carton marks, and final inspection tolerances. Those details help suppliers quote the same product instead of filling in gaps with their own assumptions.
This also keeps costs under control. Buyers often ask for heavier cotton when the real failure point is a narrow drawcord channel, poor seam tension, weak cord exits, or print placed too close to the gathering zone. Test the filled pouch first. It usually gives a clearer answer than GSM alone.
- Start with product weight, shape, edges, and handling conditions, not a generic pouch description.
- Separate presentation needs from strength requirements before comparing quotes.
- Write measurable tolerances into the RFQ and purchase order so inspection decisions are not subjective.
- Use a pre-production sample as the golden sample for size, fabric, cord, stitching, print, labels, and packing.
- Avoid vague terms such as heavy cotton, premium stitching, and durable print unless each term is tied to a test.
Choose GSM Without Overbuying
Fabric weight is usually the first topic in a cotton drawstring pouch quote, but GSM should follow the product load. For stickers, pins, jewelry cards, seed packets, paper goods, tea sachets, and other light craft fair items, 4 oz to 5 oz cotton, roughly 135 to 170 GSM, can work well when stitching and cord exits are properly controlled. It is economical and easy to fold, but it will not hide hard corners as well as heavier fabric.
For many cotton drawstring pouches for craft fairs, 5 oz to 6 oz cotton, roughly 170 to 200 GSM, is the practical middle range. It has enough body for soap bars, wax melts, small candles, stationery kits, cosmetic samples, ornaments, patches, and mixed maker assortments without creating a bulky pouch that slows packing or inflates carton volume.
Move to 7 oz to 8 oz cotton canvas, roughly 235 to 270 GSM, when the product is heavier, has harder corners, or needs a more premium reusable feel. This range can suit glass jars, ceramic pieces, boxed skincare sets, small tools, and heavier gift bundles. Still, heavier fabric brings tradeoffs. It can make a small pouch stiff at the channel, require a wider cord path, and increase freight volume.
GSM is only one part of fabric quality. A tightly woven 180 GSM cotton may perform better than a loosely woven fabric that feels thick but slips at the seam. Ask about weave density, finishing, shrinkage, surface cleanliness, and whether the cotton is greige, bleached, dyed, washed, organic, recycled, or conventional. Natural greige cotton may include seed specks, slubs, and shade variation; that is acceptable for many artisan brands, but it should be approved before cutting.
- 135 to 170 GSM fits low-load paper, jewelry, and giveaway items when seams are controlled.
- 170 to 200 GSM is a useful default for many craft fair packaging programs.
- 235 to 270 GSM is stronger for jars, ceramics, tools, boxed sets, and premium reusable packaging.
- Do not use higher GSM to hide weak stitching, poor cord exits, or incorrect sizing.
- Approve seed specks, slubs, shade variation, fabric hand feel, and surface cleanliness in the sample stage.
Size for the Filled Product
Flat outside size is not usable space. A pouch quoted as 15 x 20 cm does not hold a 15 x 20 cm product cleanly once side seams, the bottom seam, the top channel, fabric thickness, and product depth are considered. This is one of the most common reasons a pouch passes measurement inspection but fails during event packing.
Buyers should specify two sizes: finished flat size for production control and usable internal space for functional approval. If the pouch must hold a 7 cm soap bar, include the bar’s width, height, depth, wrapper, sleeve, care card, and finished weight. If the product has hard corners, call that out. Corners concentrate stress at the bottom and side seams, especially during transport to a booth or event kit assembly.
Channel height deserves its own line item. Many small and medium drawstring pouches use a folded channel of about 20 to 35 mm, depending on pouch size and cord diameter. Too shallow, and the cord may bind or tear the fabric. Too tall, and usable height disappears. The sample measurement sheet should list channel height separately from total height.
Tolerances should be realistic and tied to the product. Many small pouch orders use ±5 mm on finished flat size. Larger pouches may use ±10 mm unless the program requires tighter retail control. If the pouch must fit into an exact insert, display tray, or subscription box slot, tighter tolerances may be justified, but they need to be agreed before sampling. Also define how inspectors measure: flat, empty, smoothed by hand, and not stretched.
- Provide product length, width, depth, filled weight, hard-corner notes, inserts, and backing cards with the RFQ.
- State finished flat size and usable internal target as separate requirements.
- Record channel height because it affects closure function and usable capacity.
- Use ±5 mm for many small pouches and ±10 mm for larger pouches unless the program needs tighter control.
- Approve fit with the real product, not with a drawing, mockup, or similar sample alone.
Specify Seams Before Sampling
Most durability failures start at the seam system: side seams, bottom seam, bottom corners, top fold, and cord exits. For standard wholesale craft fair pouches, overlock plus lockstitch is a practical construction. The overlock controls raw edges; the lockstitch carries the main load. This is usually more reliable than a single row of stitching with exposed raw edges.
French seams are worth considering when the inside finish is part of the retail experience. They hide raw edges and give a cleaner look when customers open the pouch. They also add labor and can make very small pouches bulky, so they should be requested for the right reason: presentation and perceived value, not automatically for every order.
Stitch density should match fabric weight, thread, and equipment. Many cotton and canvas pouch programs fall around 8 to 10 stitches per inch. Too few stitches can create weak seams and visible gaps. Too many stitches can perforate lighter cotton and create a tear path. Buyers do not need to control every machine setting, but they should define visible acceptance standards.
Cord exits need more attention than they often get. When the drawcord is pulled, force concentrates at the channel opening. Medium and heavy products should use backstitching, bar-tacking, or another clean reinforcement method. Bottom corners should be inspected as well, because the filled product settles there first.
- Use overlock plus lockstitch for most standard cotton pouch orders.
- Use French seams when a clean interior is part of the retail presentation.
- Target about 8 to 10 stitches per inch unless the factory recommends an adjustment for the fabric and thread.
- Require reinforced cord exits for jars, candles, ceramics, boxed goods, tools, and other medium or heavy products.
- Reject skipped stitches, open seams, thread loops in the channel, twisted seams, poor tension, and loose overlock tails over 10 mm.
Test the Drawcord as a System
The drawcord is not just a string. It is a system made up of cord material, diameter, channel width, cord length, knot size, end finish, exit reinforcement, and friction. If one part is wrong, the pouch may be slow to pack, difficult to close, or easy to damage.
Cotton cord gives a natural look and suits handmade, artisan, and eco-positioned packaging. It can also fuzz, fray, or shed fibers if the quality is low. Polyester cord is smoother and often more abrasion-resistant, but it can look more synthetic and may not match every brand position. Either material can work; the final decision should come from testing the exact pouch construction.
Diameter should match the pouch. A 3 mm cord may be suitable for small jewelry and paper-goods pouches. A 4 mm to 5 mm cord often feels better on medium cotton or canvas pouches. Oversized cord can jam in a narrow channel and create bulky knots. Undersized cord can cut into fabric, slide too easily, or feel cheap.
Cord length is just as measurable. The pouch should open fully without the cord ends disappearing into the channel. When closed, the ends should be easy to grip but not so long that they tangle during packing. Knot size should prevent pull-through. Synthetic cord may need heat sealing to reduce fraying, but rough melted ends should be rejected if they scratch the hand or look unfinished.
- Approve cord material, diameter, color, length, knot size, end finish, friction feel, and pull-through resistance.
- Use about 3 mm cord for small pouches and 4 to 5 mm for many medium or heavier pouches, subject to sample testing.
- Open and close filled samples at least 30 to 50 cycles before production release.
- Pull both cords outward with firm hand force to check knot security, channel width, and exit reinforcement.
- Inspect for fraying, fuzzing, fiber shedding, rough movement, flattening, snagging, dye transfer, and pull-through.
Prove Logo Durability
For branded cotton drawstring pouches, the print is often the quality signal customers notice first. Screen printing is usually the practical choice for one to three solid colors, simple maker logos, event marks, and repeat wholesale programs. It can be soft, clean, and cost-effective on cotton when the ink, fabric surface, curing, and artwork are aligned.
Heat transfer can handle complex artwork, gradients, and multicolor illustrations, but it needs stricter approval. Transfers may peel, bubble, crack, or feel too plastic if the film and press settings do not match the cotton. A digital mockup can look perfect while the real pouch performs poorly after gathering and handling.
Artwork should be reviewed for production, not just brand accuracy. Thin strokes, tiny text, distressed effects, and large solid blocks can be risky on textured cotton. Ask for the minimum recommended line width and text height for the chosen decoration method. For detailed artwork, request a strike-off or print sample on bulk fabric before mass printing.
Placement matters because drawstring pouches gather at the top. If the logo sits too close to the channel, it may wrinkle, fold, or distort when closed. Many buyers keep the main artwork below the strongest gathering zone and set a print position tolerance, often ±3 to ±5 mm depending on pouch size and artwork. Durability testing should happen after curing, not immediately after printing. Use dry rub, crease, light fingernail scratch, and normal handling checks at minimum. Add damp rub or wash testing only when washable or repeat-use textile claims are part of the product brief.
- Use screen printing for simple solid logos and cost-sensitive high-volume craft fair programs.
- Use heat transfer only after adhesion, crease, rub, and hand-feel approval on the selected cotton.
- Specify logo size, reference point, printable area, and print position tolerance in millimeters.
- Keep key artwork away from the top gathering zone unless distortion is acceptable.
- Test print durability after curing with dry rub, crease, light scratch, and normal handling checks.
Write an RFQ Suppliers Can Price Fairly
Quote gaps usually appear because suppliers are not pricing the same pouch. One supplier may include 200 GSM fabric, reinforced cord exits, screen setup, bundle packing, and export cartons. Another may assume 150 GSM cotton, basic stitching, no setup charge, and loose packing. The lower unit price may not be the better offer once the assumptions are visible.
Separate the RFQ into product specifications and commercial terms. Product specifications include finished size, usable fit, fabric GSM, fabric finish, seam construction, stitch density, cord details, print method, labels, packing, carton marks, and inspection standards. Commercial terms include MOQ, price breaks, sample cost, screen charges, payment terms, Incoterms, lead time, and quote validity.
MOQ should be clarified by variable. A factory may accept 1,000 pieces total but require a minimum per size, fabric color, cord color, print design, or label version. Craft fair programs often include several maker logos, seasonal colors, or size assortments, so the setup plan matters. Ten logo versions at 200 pieces each is not the same production job as one 2,000-piece logo order.
Ask suppliers to list exceptions instead of silently substituting materials. If a quoted cord, fabric, seam, or print method changes during sampling, the buyer needs to know before approving cost and lead time. A slightly higher unit price can be the better procurement decision if it includes packing that reduces receiving labor and pre-event sorting.
- Ask whether MOQ applies per total order, size, fabric color, cord color, print design, label version, or packing version.
- Separate blank pouch cost, decoration cost, setup charges, labels, packing, samples, courier fees, and inspection requirements.
- Confirm Incoterms and whether carton data is final or estimated for freight planning.
- Require written approval before any substitute fabric, cord, seam construction, or print method is used.
- Compare quotes by landed cost, inspection risk, and receiving workload, not unit price alone.
Approve Samples With Real Tests
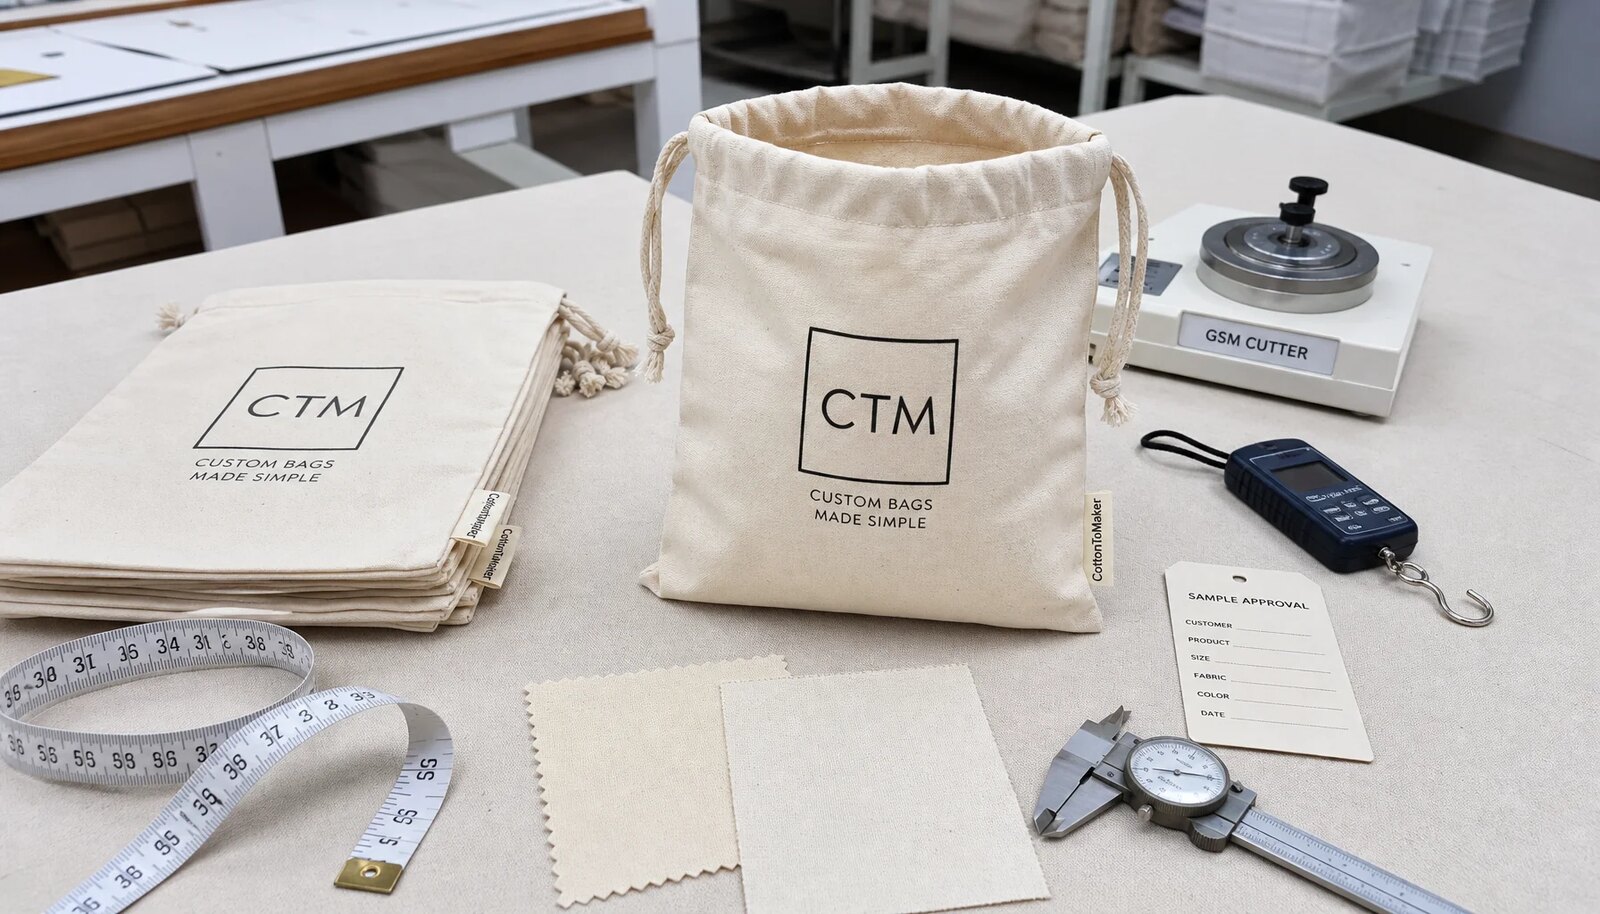
A photo sample is not enough. The pre-production sample should use bulk fabric or a clearly identified approved equivalent, final cord, final seam construction, final print method, labels if used, and the intended folding and packing method. If the sample uses substitute material, label it as a construction sample only. It should not become the final golden sample for bulk inspection.
Measure, photograph, weigh, fill, close, open, and inspect the sample. Record finished flat size, usable fit, channel height, cord length, print size, print position, seam type, fabric hand feel, shade, and packing fold. Both buyer and factory should keep an approved reference sample with a signed sample tag or approval record.
The filled-product check is the most important test. Put the actual soap bar, candle tin, jewelry card, glass jar, ceramic ornament, skincare set, or insert inside the pouch. Confirm that the pouch closes fully, the logo remains visible, the bottom seam is not overloaded, and no hard corner creates a pressure point. If one pouch size serves several products, test the largest, heaviest, and sharpest item in that group.
Durability checks do not need to be complicated, but they need to be consistent. Open and close the filled pouch 30 to 50 times. Pull the cords outward. Rub and crease the print after curing. Inspect bottom corners and the inside channel for thread loops. If the pouch must arrive display-ready, approve the folding and packing sample before bulk cartons are sealed.
- Keep one approved golden sample with the buyer and one with the factory for final inspection comparison.
- Record size, channel height, cord length, print position, fabric shade, seam type, and packing fold.
- Test with the actual product or the heaviest and sharpest product in the size group.
- Reject samples with uncured print odor, rough cord ends, twisted seams, weak exits, poor trimming, or thread loops in the channel.
- Approve substitute-material samples for construction review only, not as final production standards.
Control Packing, Cartons, and Allocation
Packing is part of quality control, especially for craft fair programs. Pouches often need to be allocated by event, booth, vendor, store, kit, logo version, color, or size. If mixed cartons arrive without a clear map, the buyer may spend hours sorting before the selling season. That labor can erase the savings from a cheaper unit price.
Flat bundles of 50 or 100 pieces are efficient for many wholesale event orders. They make counting easier, avoid unnecessary individual packaging, and support quick distribution. Individual polybags may be useful for retail-ready kits, fulfillment centers, barcode scanning, or contamination control, but they add cost, packing time, plastic use, and carton volume.
Natural cotton needs protection from dust, moisture, crushing, and odor. Cotton can absorb smells and show dirt if cartons are weak, damp, or poorly sealed. Printed pouches should be packed only after curing is complete to reduce blocking or ink transfer. Do not over-compress cartons if it creates hard folds across the logo.
Carton marks should be written into the packing instruction. Include PO number, SKU, pouch size, fabric color, cord color when relevant, print design, quantity, carton number, gross weight, net weight, and destination or event code when needed. If mixed cartons cannot be avoided, require an inner bundle layout so receiving teams can verify contents without opening every bundle.
- Use one SKU per carton where possible to reduce receiving and allocation errors.
- Use mixed cartons only with a written inner packing map and bundle-level identification.
- Specify flat bundles of 50 or 100 for most wholesale event distribution.
- Confirm carton dimensions, pieces per carton, gross weight, net weight, and shipment volume before freight booking.
- Protect printed areas from over-compression, moisture, odor transfer, dust, and uncured ink contact.
Plan Lead Time and Final Inspection
Lead time starts before sewing. Fabric availability, lab dips, artwork preparation, strike-offs, sampling, approval, deposit, bulk cutting, printing, curing, sewing, trimming, inline checks, final inspection, packing, and freight booking all affect the calendar. Craft fair dates are fixed, so late approvals often turn into rushed inspection or expensive freight choices.
The lowest-risk route is usually stock natural or bleached cotton, standard cord colors, simple screen printing, standard bundle packing, and clear inspection criteria. Dyed fabric, custom cord color, organic or recycled documentation, multiple logo versions, individual barcode packing, woven labels, and stricter retail inspection can all add time. They may be worthwhile, but they should be visible in the schedule.
The purchase order should state what triggers production lead time. Some suppliers count from deposit receipt, some from artwork approval, some from fabric arrival, and some from signed pre-production sample approval. If this is not clear, buyer and supplier may be working against different deadlines. Set dates for artwork, lab dips, sample comments, packing approval, inspection booking, and shipment release.
Final inspection should compare bulk goods against the golden sample and written PO tolerances. Check fabric shade, GSM records, finished size, channel height, stitching, cord function, print adhesion, print position, labels, bundle counts, carton marks, and carton condition. Classify defects before inspection: critical defects for safety risks or contamination, major defects for open seams, wrong size outside tolerance, wrong artwork, poor print adhesion, or cord failure, and minor defects for small trimming issues or shade variation within the approved range.
- Define whether lead time starts after deposit, artwork approval, fabric approval, or pre-production sample approval.
- Reserve time for lab dips, print strike-offs, curing, inspection, and freight booking.
- Use the golden sample and written tolerances as the inspection standard.
- Classify critical, major, and minor defects before final inspection.
- Do not release shipment until carton marks, bundle counts, and packed SKU allocation match the PO.
Specification comparison for buyers
| Spec decision | Recommended option | When it fits | Buyer risk to check |
|---|---|---|---|
| Light retail pouch fabric | 4 oz to 5 oz cotton, about 135 to 170 GSM | Jewelry cards, pins, stickers, paper goods, tea sachets, seed packets, and other low-load craft fair items | May wrinkle easily, show product corners, or tear near the channel if the seam allowance, stitch density, or cord exit is weak |
| General craft fair fabric | 5 oz to 6 oz cotton, about 170 to 200 GSM | Soap bars, wax melts, small candles, cosmetics samples, stationery kits, ornaments, and mixed maker assortments | If the fabric is loosely woven, GSM alone may not prevent seam slippage; verify weave density, hand feel, and filled-product performance |
| Heavy-duty canvas fabric | 7 oz to 8 oz cotton canvas, about 235 to 270 GSM | Glass jars, ceramic pieces, boxed skincare sets, small tools, heavier gift bundles, and premium reusable packaging | Can make small pouches stiff at the channel, increase carton volume, and slow packing if the cord is undersized or the channel is narrow |
| Finished size tolerance | ±5 mm for many small pouches; ±10 mm for larger pouches unless tighter retail tolerances are agreed | Bulk event packaging, wholesale craft fair kits, subscription box inserts, and retail accessory packaging | Flat outside size is not usable internal space; channel height, seams, product depth, and fabric thickness reduce usable capacity |
| Seam construction | Overlock plus lockstitch for most orders; French seam for premium visible-inside pouches | Wholesale craft fair programs, gift-ready packaging, and reusable customer-facing pouches | Single lockstitch without raw-edge control may pass a photo review but fail after repeated filling, pulling, and table handling |
| Stitch density | Commonly 8 to 10 stitches per inch, adjusted to fabric weight and thread | Standard cotton and cotton canvas drawstring pouch production | Too few stitches reduce seam strength; too many stitches can perforate lighter cotton and create a tear line |
| Drawcord specification | 3 to 5 mm cord diameter, matched to pouch size, channel width, and fabric weight | Most cotton drawstring pouches from small jewelry sizes to medium gift sizes | Thin cords can cut into fabric or feel cheap; oversized cords can jam, create bulky knots, or stop the pouch from closing cleanly |
| Cord material | Cotton cord for natural look; polyester cord for smoother movement and abrasion resistance | Cotton suits artisan and natural-brand packaging; polyester suits dyed pouches, repeated reuse, and consistent color programs | Cotton may fuzz or fray; polyester may look less natural and can slip if knots, end finishes, or channel exits are not controlled |
| Decoration method | Screen print for solid logos; heat transfer only after adhesion, crease, and rub testing | Maker logos, event branding, small retail marks, and simple one-to-three-color artwork | Thick ink can crack on gathered fabric; transfer films can peel, feel plastic, or fail on dusty or textured cotton |
Buyer checklist before sampling
- Define both finished flat size and usable internal space; account for side seam allowance, bottom seam, top channel height, fabric thickness, and product depth.
- List the actual product dimensions, unit weight, hard corners, inserts, backing cards, and whether the pouch must close fully when filled.
- Specify cotton type, construction, target GSM, acceptable GSM tolerance, weave feel, color, finishing, shrinkage expectation, and whether fabric is greige, bleached, dyed, washed, organic, recycled, or conventional.
- State whether natural cotton seed specks, slubs, shade variation, and minor weaving irregularities are acceptable or whether a cleaner bleached or dyed surface is required.
- Set seam requirements: no skipped stitches, no open seams, no broken threads, balanced tension, consistent seam allowance, trimmed thread ends, and no loose overlock tails longer than 10 mm.
- Require reinforced or backstitched cord exits for medium and heavy products, and inspect bottom corners because they carry much of the filled-load stress.
- Approve drawcord material, diameter, color, length, knot size, end finish, friction feel, and pull-through resistance on the exact pouch size.
- Match decoration to artwork: screen print for solid logos, heat transfer for complex artwork only after adhesion, crease, rub, and hand-feel approval.
- Define logo size, print position reference point, print position tolerance, and whether distortion is acceptable when the pouch is gathered closed.
- Request a pre-production sample made with bulk fabric, bulk cord, final stitching, final print, approved labels, and intended folding and packing method.
Factory quote questions to send
- What target GSM and ounce weight are quoted, and what tolerance applies to fabric roll inspection and finished goods acceptance?
- Is the fabric greige, bleached, dyed, washed, organic, recycled, or conventional cotton, and which certification documents are included, optional, or excluded?
- Is the quoted fabric in stock, or does it require weaving, dyeing, washing, finishing, or mill booking before cutting starts?
- What shrinkage should be expected if the pouch is washed, and is the pouch being quoted as decorative packaging or as a washable textile item?
- What finished flat size, channel height, seam allowance, and finished size tolerance are included in the quote?
- What seam construction is quoted for side seams, bottom seam, top channel fold, and cord exit points?
- What stitch density, thread type, thread color, reinforcement method, and trimming standard will be used for the approved sample?
- What drawcord material, diameter, color, finished length, knot size, and end finish are included, and can the cord open the pouch fully without disappearing into the channel?
- Which print method is quoted, how many colors are included, what artwork size is assumed, and what curing or pressing process will be used?
- What is the print position tolerance, minimum printable line width, and recommended clearance from the drawcord channel or gathering zone?
Quality-control points to confirm
- Finished size tolerance: use the purchase order standard, commonly ±5 mm for many small pouches and ±10 mm for larger pouches unless a tighter retail requirement is approved.
- Measurement method: measure flat and empty, smoothed by hand without stretching, from side seam to side seam and from bottom seam to top edge; record channel height separately.
- Usable space check: test the pouch with the actual product, insert, label, and backing card because flat dimensions do not include channel loss or product depth.
- Fabric GSM verification: use a GSM cutter and scale or approved mill data; do not rely on vague descriptions such as medium cotton, thick cotton, or premium canvas.
- Fabric appearance review: compare shade, seed specks, slubs, weaving marks, stains, holes, oil spots, odor, and hand feel against the approved sample under neutral light.
- Seam inspection: check for skipped stitches, open seams, broken thread, poor tension, exposed raw edges, twisted seams, loose thread loops, and overlock tails longer than the agreed limit.
- Load test: fill the pouch with the intended product weight plus a reasonable safety margin, suspend or hand-pull for a short controlled check, and inspect bottom corners and side seams.
- Cord cycle test: open and close the filled pouch at least 30 to 50 cycles during sampling; for repeat-use retail programs, specify a higher cycle count in the PO.
- Cord pull-through check: pull both cords outward with firm hand force and confirm knots, channel width, and exit stitching prevent the cord from entering the channel or tearing the fabric.
- Cord abrasion review: check for fuzzing, fraying, fiber shedding, flattening, dye transfer, rough movement, and snagging after repeated operation.