How to scope the bag before you request quotes
Buying cotton drawstring backpacks for a startup program is not mainly a style decision. It is a use-case decision. The bag may be handed out at a conference, included in an onboarding kit, used as lightweight merchandise, or packed with product samples and accessories. Those scenarios demand different levels of fabric body, seam strength, print durability, and presentation. If the RFQ does not state the use case, every supplier will fill in the gaps differently, and the quotes will not be comparable.
A useful spec starts with the contents and the handling cycle, not the logo. Ask what the bag needs to carry, how often it will be opened and closed, how far it may travel, and whether it must look polished after shipping. A welcome kit bag can be lighter and simpler than a retail pack, but it still needs stable stitching, clean folding, and a logo that lands in the right place. A bag that holds a notebook and charger should be built differently from a bag that only holds a T-shirt and brochure.
Procurement teams should also decide whether the bag is a branded giveaway, a channel-ready merch item, or a reusable utility pack. That choice changes not only the fabric weight, but also the acceptable surface finish, label type, packaging method, and inspection rigor. Once the end use is clear, the supplier can quote the right construction instead of padding the order with assumptions.
- Name the end use in the RFQ: giveaway, onboarding, merch, or utility pack.
- List real contents and approximate fill weight.
- State whether the bag is meant for one-time handout or repeated use.
- Separate visual branding requirements from strength requirements.
- Identify the receiving channel so packing can match warehouse or event needs.
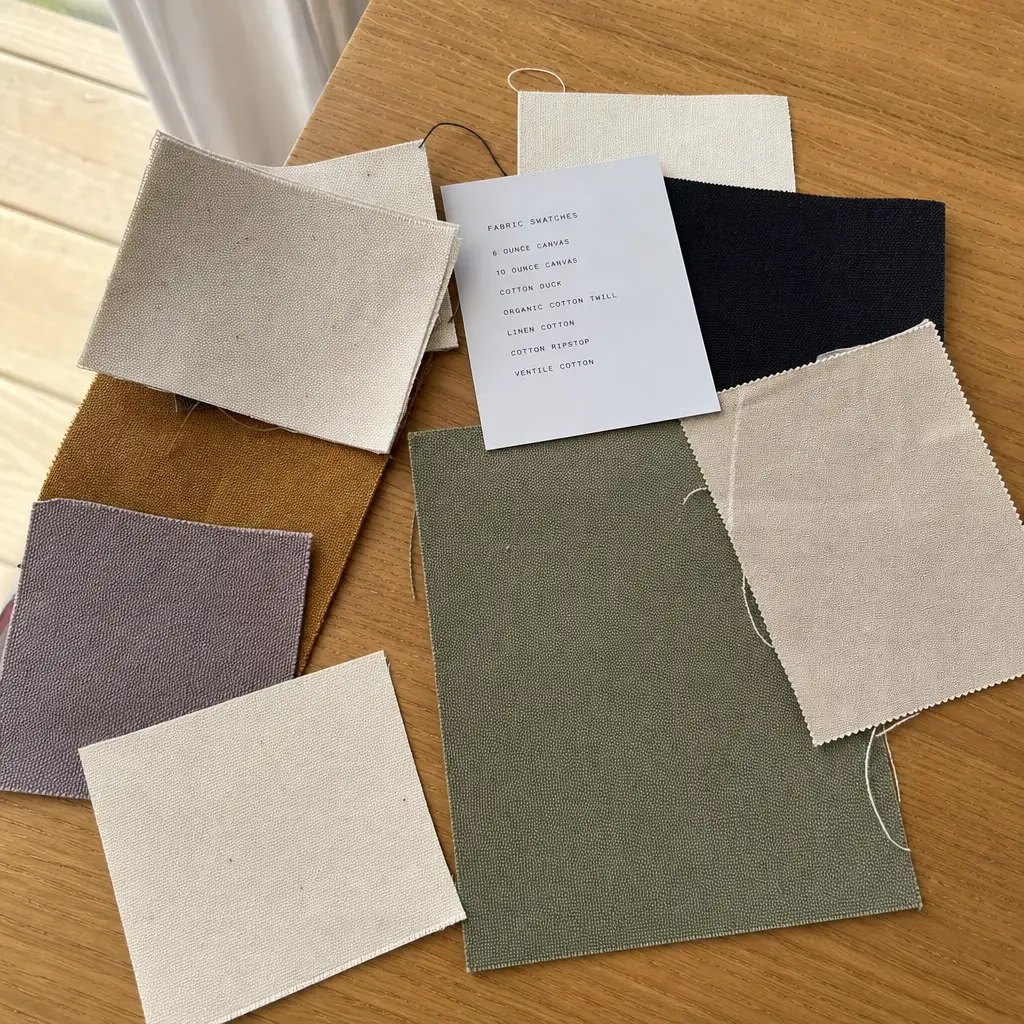
Fabric choices that affect cost, appearance, and defect risk
Fabric is the first major cost driver, but GSM alone is not enough. Two bags with the same nominal weight can behave very differently if one uses tighter weave and pre-shrunk cotton while the other uses loose weave with more surface variation. For a procurement buyer, the useful question is not only how heavy the fabric is, but how it will look, sew, fold, and survive transit. A lighter fabric may lower the quote, but it can also show contents, wrinkle more aggressively, and lose shape during shipping.
In practical buying terms, 140–180 GSM is often suitable for simple event giveaways where the bag carries light items and brand presentation matters more than repeated wear. Once the use case moves toward staff kits, repeat handling, or retail-facing distribution, 200–240 GSM is usually easier to defend. That heavier band costs more, but it improves the handfeel, reduces translucency, and gives the printer a more stable surface. Buyers should also ask whether the fabric is pre-shrunk or whether the supplier expects natural movement after cutting and sewing. Shrinkage is one of the easiest ways to create a bag that looks fine on approval day and less consistent after bulk production.
Color and finish matter too. Natural cotton can look premium and low-risk for color matching, but dyed cotton can introduce lot variation and surface shading if the factory changes dye lots or batch timing. If you need a clean, repeated rollout across offices or event waves, ask the supplier how they control shade consistency and whether one color should be treated as a separate material booking. If the answer is vague, the real production risk is probably also vague.
- Use lighter fabric only when the load is small and appearance is the priority.
- Choose denser cotton when the bag must hold heavier contents or stay presentable after travel.
- Ask whether GSM is measured on finished fabric or estimated from roll data.
- Request shrinkage expectation and weave density with the swatch.
- Treat color variation as a procurement risk, not just a visual preference.
Print method tradeoffs: what changes unit price and what changes durability
The print method affects more than the logo. It changes setup cost, production speed, softness of handfeel, and how well the bag survives packing and use. Screen print is usually the baseline choice for simple brand marks because it supports clear graphics and stable repeatability. It is especially practical when the artwork has one or two colors, large areas of solid fill, and a straightforward placement. For many startup programs, screen print delivers the best balance of cost and clarity.
But print choice should be tied to artwork complexity and quality target. Thin lines, small text, gradients, and intricate illustrations are harder to keep sharp on woven cotton. Embroidery can add a premium look, but it also creates stiffness, can distort lighter fabrics, and often increases sewing time and minimum order requirements. Heat transfer may solve detail problems for certain artwork, but it introduces its own risk around adhesion, edge lift, and long-term appearance. The buyer should ask the factory to recommend the method only after seeing the artwork file and the intended fabric, not as a generic default.
The most common source of misunderstanding is when the supplier quotes a print count but not the rest of the print system. Ask whether the price includes screens, plate setup, curing, and any extra charge for a second position. Also ask for a reference sample or photos that show print sharpness on a similar fabric weight. A good quote should state the method, ink type or finish if relevant, and any limitations on line thickness or color registration. That level of detail is what lets procurement compare suppliers on actual risk, not just on nominal unit price.
- Use screen print for simple logos and stable volume production.
- Use embroidery only when the premium effect is worth the added stiffness and cost.
- Avoid gradients and fine detail if the cotton weave is coarse.
- Ask what is included in setup: screens, plates, curing, and extra positions.
- Verify rub resistance and visual clarity after folding and handling.
A practical supplier comparison table for procurement teams
The best way to compare suppliers is to force the same assumptions across the quote set. Many buyers discover too late that one factory quoted bare fabric only, another included labels and packing, and a third left out setup fees or inspection. A thin comparison based on unit price alone invites mistakes. What matters is how each supplier handles the material, how they document quality, and how much rework risk they leave with the buyer.
Use the comparison table to assess commercial and operational fit at the same time. Fabric choice influences cost and return risk. Print choice affects both clarity and minimum order. Packing affects freight efficiency and destination handling. Supplier route matters because it changes how much visibility you have into the line, how quickly issues are corrected, and how easy it is to enforce a spec when the order moves into bulk production. For a startup launch or seasonal merch run, that visibility is worth real money.
When the quotes come back, ask the factory to line up every line item against the same spec sheet. If they cannot quote the same fabric, print method, packing format, and inspection scope, the comparison is not ready. Procurement value comes from removing ambiguity before PO issuance, not from sorting out gaps after the goods are in cartons.
- Normalize every quote to the same spec sheet before comparing price.
- Separate material cost from setup, sampling, packing, and inspection.
- Treat missing QC detail as a risk premium, not a savings.
- Ask for itemized exclusions so hidden charges do not appear later.
Inspection framework: move from visual checks to measurable acceptance
A good quality inspection checklist should be operational, not aspirational. Instead of saying the bags should look good, define what good means in measurable terms. For cotton drawstring backpacks, the important checkpoints are fabric consistency, print placement, stitch quality, cord security, and packing integrity. If the bag is for internal swag, you may tolerate slightly broader cosmetic variation. If it is for retail or client-facing distribution, the tolerance should be tighter and documented before production begins.
The strongest checklist combines three layers: first article or pre-production sample approval, in-line inspection, and final random inspection. Pre-production approval checks whether the chosen materials and methods are correct. In-line inspection catches problems before the whole order is finished. Final inspection confirms the shipment meets the agreed standard. If the factory only performs a final glance at the cartons, the buyer has little control over root-cause issues such as bad print registration, weak seams, or poor folding. Those problems should be caught while the line is still running.
A practical inspection standard should also use a sampling plan. AQL-based inspection is common in sourcing because it gives a structured way to sample cartons and classify defects. The exact AQL target should be agreed in the PO or quality annex, along with what counts as a critical, major, or minor defect. For example, seam failure, missing reinforcement, or a print that is grossly off-position should be treated as critical or major defects depending on your channel. Cosmetic issues such as loose thread ends may be minor if they are limited and easy to trim. If the supplier cannot discuss defect classes in this language, the QC system is probably too loose for a controlled buy.
The acceptance thresholds should be documented in plain language and tied to a sample. Measure logo location from the same seam reference every time. State the permitted difference in print placement. Define how many loose threads are acceptable, if any, and whether they can be trimmed or must trigger sorting. Record the inspection outcome with photos and carton numbers so the supplier can isolate the problem lot if a correction is needed.
- Use a three-stage system: pre-production, in-line, and final inspection.
- Agree an AQL table before shipment, not after defects appear.
- Classify defects into critical, major, and minor groups.
- Tie placement checks to seam references and measurement tools.
- Record photos, carton numbers, and defect counts by type.
QC checkpoints with pass/fail logic
Quality control becomes much stronger when each checkpoint has a clear pass/fail rule. On cotton drawstring backpacks, the inspection team should not only look for obvious damage. They should measure, test, and compare against the approved sample. The bag opening should close evenly and the channel should not twist. The cords should slide without snagging. The print should sit where the drawing says it should sit. These are small checks, but they prevent the most common complaints.
The fabric itself should be checked for lot consistency. One batch may feel smooth and another slightly rough even if both claim the same GSM. Inspect a meaningful sample for stains, weave defects, holes, and visible shade shift. Under normal lighting, the approved color should stay within the agreed range and should not appear obviously different from carton to carton. For branded programs, color drift can be enough to make the bag look off-spec even if it technically functions.
Seams deserve direct handling, not just a glance. Inspect the inside and outside for skipped stitches, puckering, and weak corners. Pull the cord exit gently to see whether the bar-tack and reinforcement hold. Check that any bottom reinforcement is centered and intact. If you want the factory to treat these as measurable requirements, write that into the inspection sheet. For example: no open seam, no missing bar-tack, no visible hole at cord exit, no print misalignment beyond the approved tolerance, and no carton damage that threatens the contents. A checklist with this kind of language gives the line leader and QC team a real target.
- Inspect both inside and outside seams.
- Test cord exits and bottom seams by hand before carton release.
- Check print placement against a measurement drawing.
- Treat gross misregistration, seam opening, and missing reinforcement as failures.
- Log all defects by location so the supplier can fix the right process.
Sample approval that actually protects the bulk order
One of the biggest sourcing mistakes is approving a sample that is too polished to represent the actual order. A hand-finished sample can hide weak stitching, overstated print quality, or an unrealistic fold pattern. The correct approval sample should be built from bulk-intended materials and should use the same factory process planned for production. That means the same fabric family, same cord type, same print method, same label type, and the same packing approach if the packing affects appearance.
The best practice is to request a pre-production sample after material booking rather than only reviewing a concept sample at the design stage. At that point the supplier has the actual materials in hand and the sample is more likely to reflect production reality. Measure it. Compare it against the drawing. Test the opening and cord action. Check whether the bag sits flat, holds shape, and folds cleanly. If the sample is acceptable only because someone manually corrected it, it is not a safe basis for bulk approval.
Keep one golden sample on the buyer side and one on the factory side, signed and dated. That reduces disputes when the bulk order arrives and a team member on either side changes. If the buyer later wants a change, issue a revision note rather than relying on memory. This is especially important for startup programs where marketing, procurement, and operations may all be touching the spec. A controlled sample record is cheaper than rework.
- Approve only a sample that uses bulk-intended materials and processes.
- Keep the golden sample signed, dated, and physically accessible.
- Require measurement checks for print placement and finished dimensions.
- Reject samples that rely on hand finishing to look acceptable.
- Record any revision as a new version, not an informal verbal update.
Packing, cartonization, and transit protection
Cotton bags are deceptively easy to damage in the packing stage. They wrinkle, absorb moisture, and can pick up edge marks if they are folded loosely or loaded into cartons without protection. For many distribution and event programs, bulk packing is more practical than individual polybags because it reduces labor and cube. However, the packing method still needs to be written down in detail. The factory should know how the bag is folded, how many go in each carton, whether insert sheets or protection material are required, and how carton marks should be printed.
Moisture protection is often overlooked until the destination warehouse reports odor, waviness, or carton dampness. If the route includes sea freight or a humid storage environment, ask for a moisture-control plan. That can be as simple as carton liners or desiccant where appropriate, but it should be consistent and costed into the quote. Buyers should also define the carton strength, particularly if the bags are carrying dense accessories. The product itself may be soft, but the cartoning still has to survive handling.
For retail-ready distribution, folding consistency matters because the first impression is visible before the bag is used. The fold should show the logo correctly and keep the top edge neat. For event fulfillment or office distribution, the goal may be count accuracy and fast receiving. Those two channels are different, and the packing spec should say which one applies. If the supplier is not packing to channel needs, the buyer ends up doing sorting work at destination.
- State the fold method and carton count in the RFQ.
- Add moisture protection when sea freight or humid storage is expected.
- Specify whether individual polybags, inserts, or hangtags are required.
- Match carton marks to the receiving warehouse process.
- Ask for carton weight and cube if freight planning matters.
MOQ, lead time, and the hidden cost of versioning
MOQ is rarely just about the bag pattern. It is usually driven by setup economics, fabric cutting efficiency, and how many versions the buyer wants to run. Every additional logo color, fabric color, label variant, or packaging format can create its own setup and raise the true minimum order. That is why startup buyers often get a friendly quote for one version and a very different number when they ask for options. The supplier is not necessarily overcharging; the run is simply less efficient.
Procurement should ask for MOQ at three levels: per artwork version, per fabric color, and per packaging variant. This separates real manufacturing constraints from optional upsells. If the supplier can only quote with broad ranges, push for a written explanation of what forces the quantity up. That may include screen setup, fabric width, cord color matching, or pack-out labor. Once you know the driver, you can decide whether the extra version is worth it.
Lead time should be broken into stages so the buyer can manage risk. A single delivery date hides the real schedule. Ask for the timing of sample approval, material sourcing, production, final inspection, and dispatch. If any stage depends on buyer approval or outside materials, write that dependency into the plan. A startup event can slip because of a three-day artwork delay or a two-week material booking issue; the supplier should not be able to blur those risks into one vague timeline.
The most useful lead-time question is not “How fast can you ship?” but “What changes the date?” That question exposes whether the factory has the material on hand, whether the line is stable, and whether the pack-out step is done in-house. A supplier that explains the timeline clearly usually has a better handle on execution than one that only promises a fast turn.
- Ask for MOQ by version, color, and packing format.
- Break lead time into approval, booking, production, inspection, and dispatch.
- Request the specific drivers that extend lead time.
- Limit variant count when the order is launch-critical.
- Treat setup-heavy features as real minimum-quantity drivers.
A clean RFQ and PO process for internal alignment
The strongest RFQ is the one that leaves little room for interpretation. It should describe the bag, the artwork, the fabric, the construction, the packing, the inspection target, and the delivery channel. That may sound detailed for a simple backpack, but simplicity on the product side often hides complexity in the quote. When buyers skip the details, the supplier fills them in with assumptions that may not fit the business need.
Internally, the procurement owner should keep one master spec sheet with version control. Marketing may want a visual tweak, operations may care about carton count, and finance may only see the unit price. Without a controlled document, those inputs drift and the supplier ends up producing a bag that no one fully approved. The spec sheet should include measurements, approved artwork files, packing instructions, inspection criteria, and the approved sample reference. Then the PO should mirror that document rather than paraphrasing it.
For startup programs, the handoff between buying and receiving is often where errors multiply. Tell the supplier what the warehouse or event team needs to see on cartons, and confirm whether the destination requires palletizing, barcode labels, or separate lot marking. That level of coordination saves time at receiving and reduces the chance that a good shipment is delayed because the paperwork or carton marks do not match the intake process.
- Use one controlled spec sheet with version history.
- Make the PO mirror the approved sample and packing rules.
- Align carton marks and labels with the receiving process.
- Require written approval for any later revision.
- Keep marketing, procurement, and operations working from the same document.
Specification comparison for buyers
| Procurement decision | Recommended approach | Cost or risk impact | What to verify in samples |
|---|---|---|---|
| Fabric weight | 140–180 GSM for low-cost event giveaways; 200–240 GSM for repeated use or retail-facing programs | Heavier fabric raises unit cost but lowers complaint risk, improves print appearance, and reduces seam stress when bags carry chargers, bottles, or kits | Measure GSM on finished fabric, confirm weave density, check shrinkage tolerance, and inspect whether the bag holds shape when filled |
| Fabric construction | Plain woven cotton for budget programs; denser canvas-style cotton when the bag needs better body and less show-through | Tighter weave improves print clarity and reduces distortion, but may increase material cost and make the bag feel stiffer | Ask whether the fabric is pre-shrunk, whether the lot is from the same roll family, and whether any coating or softening finish changes handfeel |
| Print method | 1-color or 2-color screen print for most startup branding; embroidery only for small logos and premium positioning | Screen print is usually the lowest-cost route and easiest to repeat; embroidery adds texture and perceived value but can raise MOQ, stiffness, and sewing time | Review print registration, edge sharpness, rub resistance, and whether small text stays readable after folding |
| Logo placement | Use measured placement from top seam and side seam, not visual centering alone | Misplaced logos create quality disputes even when the bag itself is acceptable; rework can be costly or impossible after sewing is complete | Approve a placement drawing with exact distances, and verify tolerances on the pre-production sample and first bulk lot |
| Cord and eyelet construction | Braided cord or cotton rope with reinforced exit points and secure stitching | Weak cord anchoring is a common failure point and can cause pull-out, especially when bags are overfilled or used repeatedly | Check bar-tacks, stitching density, fraying at cut ends, and smooth draw action without snagging |
| Reinforcement | Bar-tacks at cord exits and stress points; stronger bottom seam for heavier loads | Reinforcement adds a small cost but reduces seam failures and returns; skipping it often looks fine in photos but fails in use | Pull-test the cord exits, inspect the bottom seam, and confirm the factory’s stitch count or reinforcement pattern |
| Labeling | Woven side label or internal care label for most branded programs; printed neck label only when cost pressure is high | Woven labels improve presentation and traceability; printed labels may save cost but can look less finished and wear off faster | Check label placement, edge finish, legibility, and whether the label interferes with folding or seam lines |
| Packaging | Bulk pack for distribution programs; retail-ready folding and individual protection only when the channel requires it | Over-packaging raises cost and cube; under-packaging increases wrinkling, dirt risk, and carton damage during transit | Confirm fold method, carton quantity, moisture protection, carton marks, and whether any polybag or insert is included |
| Supplier route | Direct factory for controlled builds and repeat orders; trading layer only when broader sourcing support is needed | Direct factories usually give better visibility into materials and process control; intermediaries can add flexibility but reduce transparency | Request production photos, inspection evidence, and clarification on who owns quality responsibility at each step |
Buyer checklist before sampling
- Define the use case in functional terms: event giveaway, onboarding kit, retail merch, or internal staff pack.
- Write the target load in real items, such as notebook, charger, bottle, or lightweight apparel.
- Lock fabric GSM, weave type, shrinkage allowance, and whether the cotton must be pre-shrunk.
- Approve a measured artwork map that states print size, color count, and exact position from seams.
- Set seam and reinforcement requirements, including cord exit bar-tacks and bottom seam construction.
- Specify label type, label placement, and whether the label must be woven, printed, or omitted.
- State folding method, carton quantity, packing protection, and receiving carton marks.
- Ask the supplier to quote the same spec across all options so unit prices are truly comparable.
- Require a pre-production sample made from bulk fabric, final cords, final print method, and final labeling.
- Confirm who signs off on first-article, in-line, and final inspections before production starts.
Factory quote questions to send
- What exact fabric construction are you quoting, and how did you measure GSM on the finished material?
- Is the cotton pre-shrunk or not, and what shrinkage range should we expect after packing or handling?
- Which print method are you proposing, how many colors are included, and what changes the cost per extra color or position?
- Can you show a placement drawing with the logo distance from the top seam and side seam?
- What is the MOQ per color, per artwork version, and per packing method?
- What reinforcement do you apply at the cord exit and bottom seam, and is that included in the quoted price?
- Can you produce a pre-production sample using the same fabric roll family, final cord, final label, and the same print process planned for bulk?
- What documents can you provide for process control: material spec sheet, inspection record, and approved sample photos?
- What is your internal defect standard at line inspection and final inspection, and do you work to an AQL table?
- If we find a defect in bulk, who pays for rework, replacement, or sorting?
Quality-control points to confirm
- Fabric weight is within the agreed tolerance for the lot and matches the approved reference sample.
- The fabric surface is free from obvious slubs, holes, stains, oil marks, and severe shade variation.
- Logo size and position match the approved artwork drawing within the agreed measurement tolerance.
- Print edges are clean, colors are even, and thin text remains legible after folding and handling.
- No visible ink bleeding, cracking, or poor curing is present on the sample or inspected bulk pieces.
- Stitching is straight enough to avoid puckering, skipped stitches, loose thread clusters, or seam opening.
- Cord exits are reinforced, cords slide smoothly, and cut ends do not fray excessively.
- Bottom seam and side seams hold shape under hand load without obvious distortion or broken stitches.
- Label placement is correct and the label does not curl, twist, or interfere with the bag opening.
- Bag opening closes evenly and the channel width is consistent from left to right.