Why lead time planning matters for roaster merchandise
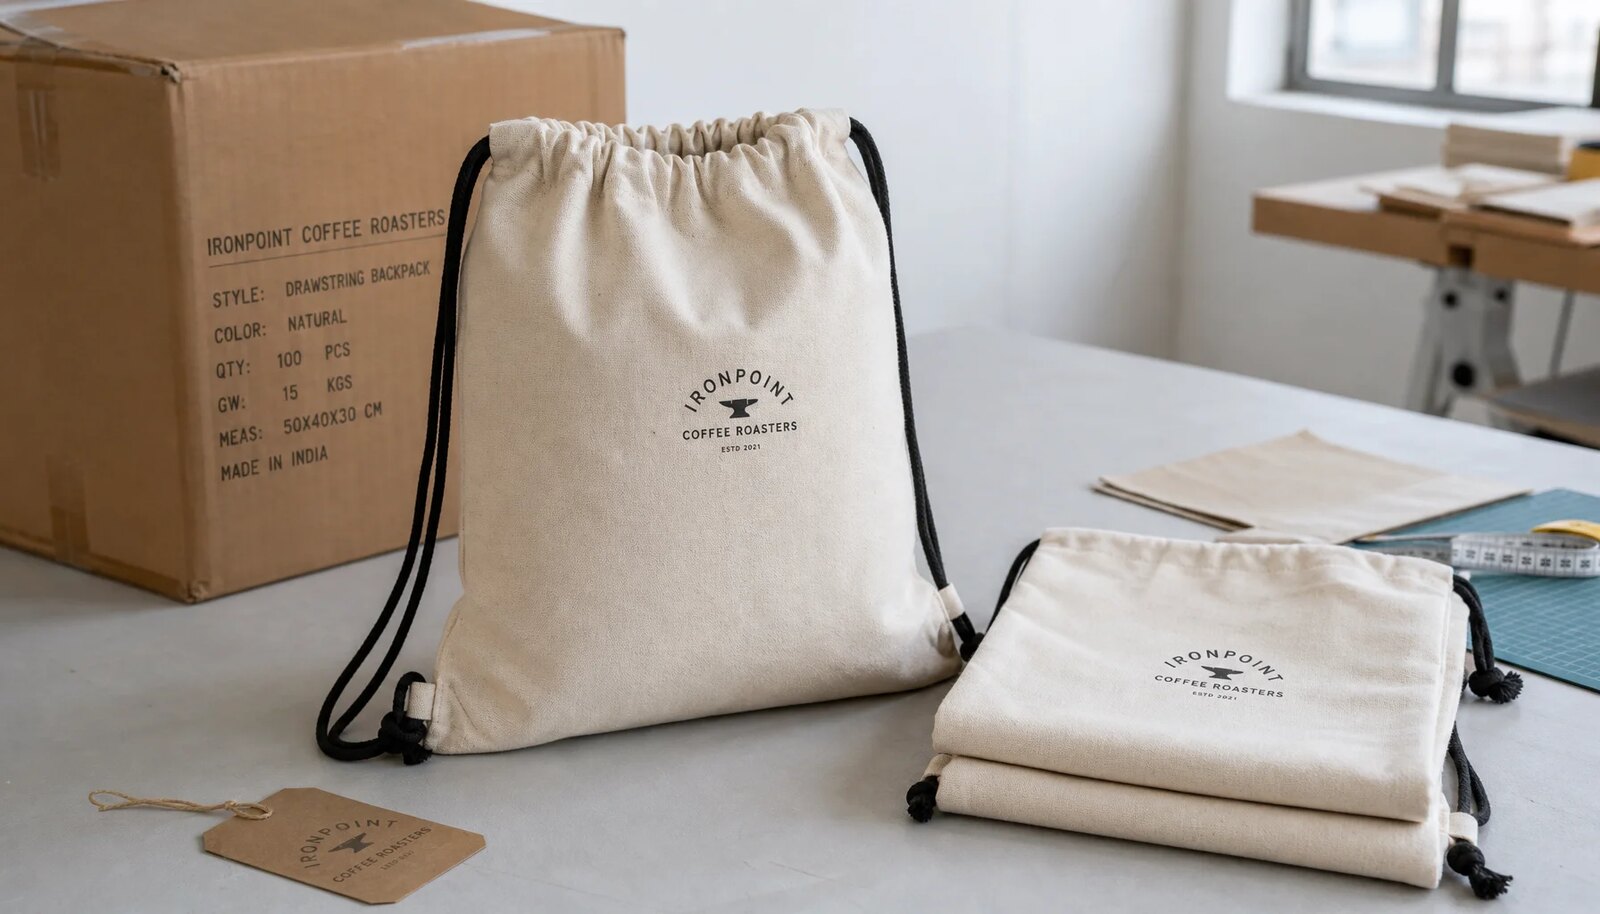
Cotton drawstring backpacks for coffee roasters are usually ordered to support a deadline, not just to fill a shelf. The trigger might be a seasonal launch, a cafe opening, a wholesale account welcome kit, a trade show, a subscription campaign, or a holiday bundle. When the bag lands late, the lost value is not only the bag itself. The brand misses the window where the product, the packaging, the retail display, and the promotion were meant to move together.
That is why lead time planning should start before the PO, not after it. A drawstring backpack looks simple at first glance, but the order still passes through specification, material confirmation, artwork review, sampling, cutting, printing, sewing, trimming, packing, inspection, and freight booking. If the buyer has locked the details, those steps move in sequence. If the RFQ says only natural cotton bag with logo, the supplier has to guess the fabric weight, finished size, cord type, reinforcement, and packing standard. Guessing is where schedules slip.
For coffee brands, the visual standard is often higher than for a basic event giveaway. The bag may sit beside printed coffee bags, cups, apparel, grinders, and tasting kits. Natural cotton and simple one-color artwork can look strong, but only when the fabric weight, print scale, cord quality, and finishing are under control. The practical sourcing goal is not just a price. It is a bag that arrives on time and looks consistent in a retail or wholesale setting.
- Lock the product spec before asking for final price comparison.
- Separate supplier production time from buyer approval time and freight booking time.
- Treat artwork, fabric, cord, and packing as lead time drivers, not decoration choices.
- Use an approved physical sample as the production reference when the order is tied to a launch or retail display.
Start with the use case, not the product name
The first sourcing question should be what the roaster expects the bag to do. A bag for a one-day coffee festival handout can be lighter and simpler than a bag sold in a cafe as branded merchandise. A bag holding one 250 g retail coffee pack does not need the same reinforcement logic as a bag carrying two 1 lb coffee bags, a mug, a notebook, and samples. The supplier cannot price accurately if the intended contents are vague.
Use case also changes the size logic. A compact add-on bag may only need to hold a coffee pack and a coupon card. A merch bag may need to hold apparel or a bundled gift set. A wholesale welcome kit may need enough room for printed coffee bags, a thank-you card, and small product samples without looking overstuffed. If the bag will be reused often, buyers should lean toward more durable fabric, stronger seams, and a more secure cord exit design.
Think through how the bag will be handed over. A bag that ships flat to a fulfillment center has different packing priorities from a bag that is displayed at retail ready to hang. If the bag is part of a bundle, the printed face may need to remain visible when folded. Those details are not cosmetic. They affect folding, packing, carton efficiency, and how much extra handling the supplier needs.
- State the primary use: retail sale, trade show handout, subscription insert, staff kit, or bundle packaging.
- Define the likely contents and approximate weight range.
- Decide whether the bag needs to feel reusable in a premium retail context or only functional in a giveaway context.
- Tell the supplier whether the bag will ship flat, be retail-ready, or sit inside another package.
Fabric specification: weight, weave, shade, and hand feel
The word cotton is too broad for procurement. Cotton canvas, cotton sheeting, cotton drill, muslin, and cotton-poly blends all show up in supplier conversations, but they behave differently. For a roaster-branded drawstring backpack, canvas is usually the safest starting point because it has more body, handles print better, and feels more credible beside premium packaged coffee. Lightweight sheeting can reduce cost, but it may look limp when the bag is empty. Blends may help with consistency or cost, but they change the hand feel and the brand story.
For most coffee roaster merchandise programs, 8oz to 10oz cotton canvas, approximately 270-340 GSM, is a practical baseline. That range usually feels substantial enough for retail use without making sewing, packing, and freight unnecessarily heavy. Below about 220 GSM, the bag can start to feel closer to a thin promo pouch than a reusable merch item. At 12oz and above, the bag may feel more premium, but the increase in material weight, sewing effort, and landed cost should be intentional, not accidental.
GSM and ounce references should be used together because suppliers do not always use the same shorthand. Ask whether the quoted GSM is based on greige fabric, finished fabric, or bulk fabric after dyeing or washing. A buyer does not need a perfect textile lecture. The buyer needs a fabric that matches the approved sample and does not swing visibly across panels or lots.
Shade control matters even more if the bag is meant to look natural rather than bright white. Unbleached cotton can show slubs, seed flecks, and tonal variation. Those traits may be fine, but they should be accepted on purpose. If the brand wants a cleaner retail look, specify bleached white or dyed cotton and set the shade standard in writing. If a dyed fabric is required, add time for lab dip or bulk shade approval and ask whether the supplier needs separate approval for fabric and cord color.
- Name the fabric type, not just cotton.
- Use both GSM and ounce references in the RFQ.
- Define whether the fabric can show slubs, flecks, or slight tonal variation.
- Ask if dyed fabric needs lab dip approval and extra lead time.
Artwork and print control that does not create rework
Screen printing is usually the most practical decoration method for cotton drawstring backpacks used by coffee roasters. It works well for bold roaster logos, cafe names, simple illustrations, and one-color graphics. Printing on cut panels before sewing often gives better control than printing on finished bags because the panel lies flat and the print area can be registered more consistently. Finished-bag printing can work, but seams, cords, and layers limit what the factory can control cleanly.
The artwork file should be production-ready. Vector art is preferred for clean logos and text. Buyers should provide final print dimensions, color references, and placement measurements. A statement like logo on front is not enough. Use references such as centered horizontally, top of print 8 cm below top edge, print size 22 cm wide, one-color black screen print. If the artwork includes fine lines, small reversed text, gradients, or a distressed effect, ask for a strike-off on actual cotton before bulk starts.
Color matching on cotton needs realistic expectations. Pantone references are useful, but ink on absorbent fabric does not behave like ink on coated paper. The fabric base tone, weave texture, ink absorption, and curing process all affect the result. If brand color matters, approve a physical strike-off and define what visual variation is acceptable under consistent lighting. For many roaster programs, black, off-white, dark green, or a muted brand tone is easier to hold than a bright saturated color.
Placement tolerance should also be written down. For simple front print placement, +/-5 mm from the approved reference is a common practical target, but the right tolerance depends on print size, bag pattern, and method. The buyer should also define what is not acceptable: smudging, ghosting, broken text, heavy ink buildup, visible pinholes, major off-center placement, and ink transfer during packing. If the print is large, ask whether the factory needs extra drying or curing time before folding.
- Provide vector artwork, final print size, Pantone reference, and placement measurements.
- Approve the print on actual fabric when the visual standard matters.
- Do not resize artwork after screens are made unless you are prepared for schedule impact.
- State whether the print is on cut panels before sewing or on finished bags after sewing.
- Define placement tolerance and obvious print defects before final inspection.
Construction details that affect durability and comfort
The bag body, cord, and seam finish all influence how the product feels in use. The top channel should be wide enough for the chosen cord to move smoothly without making the opening sloppy. Cord diameter and channel width need to be discussed together, not as separate afterthoughts. A cord that is too thin can feel sharp when the bag carries dense coffee packs. A cord that is too thick can slow sewing and make the channel bulky.
The lower cord exit points deserve special attention. That is where the bag takes repeated load, and that is where first-use complaints often start. For repeat-use merchandise, ask for reinforced corner patches, bartacks, or a seam treatment that spreads the load more evenly. If the bag is intended to hold heavier retail products, this detail matters more than a small difference in fabric weight.
Seam quality should be assessed with the same discipline. The top hem should be straight and secure. There should be no skipped stitches, loose ends, open seams, or needle damage on visible panels. If the bag is meant to feel like a retail item rather than an event handout, visible finishing has to be consistent from sample to bulk.
Comfort also matters. The cord should be long enough to cinch the bag without forcing a tight knot, but not so long that it becomes messy or catches during packing. Buyers should specify cord material, diameter, color, knot style, and end treatment. If the bag will be worn often, a smoother cord surface may be worth the added cost.
- Match cord diameter to channel width and intended load.
- Ask for reinforcement at cord exit points if the bag will carry coffee packs or other dense products.
- Check hem straightness, seam security, and visible stitch quality.
- Specify cord material, color, knot style, and end treatment in the RFQ.
MOQ, order splits, and variant strategy
Many procurement teams ask for MOQ as if it were one number. In practice, MOQ is usually shaped by fabric color, print design, print color count, cord color, packing method, and any label or hangtag requirements. A total order of 3,000 pieces may look efficient, but if it is split into six cafe logos, two fabric colors, and several cord colors, each variant may behave like a separate job with its own setup burden.
Coffee roasters often need multiple brand expressions: the main roaster mark, a cafe-specific mark, a wholesale program version, a seasonal blend design, or a co-branded event version. Those variants can be useful, but they should be planned as variants from the start. Each print design may need a separate screen. Each colorway may require separate material allocation. Each barcode or hangtag instruction can change packing. The quote should show those differences instead of hiding them in a single unit price.
One way to protect timing is to standardize the physical bag and vary only the print. For example, use one natural cotton body, one black cord, one reinforcement method, and one packing style across all versions. That allows the factory to cut and sew a consistent base while managing print setups by artwork. If the order is small or urgent, reducing the number of variants often matters more than squeezing out a minor price difference.
For repeat orders, buyers should ask what can genuinely be reused. The answer may include the same print layout, the same screen set, or the same packing fold. It may not include the same fabric lot, the same cord stock, or the same carton plan. Do not assume the previous order can be copied exactly without checking current material availability and current factory load.
- Break the order into quantity by artwork, fabric color, cord color, and packing method.
- Ask for MOQ by production variable, not only by total quantity.
- Reduce variant count if the launch date matters more than small design differences.
- Confirm what can be reused on a reorder and what must be rechecked.
Lead time map from RFQ to shipment readiness
A realistic lead time plan should be broken into stages. The exact number of days depends on order size, factory load, material availability, decoration complexity, and packing requirements, but a staged calendar is far more useful than one vague promise. For a straightforward order using stock natural canvas, one-color screen print, stock cord, and standard packing, the project may look like this: 2-4 days for RFQ clarification and artwork review, 5-8 days for sample or strike-off work, 2-4 days for buyer comments and approval, 5-10 days for material preparation and production scheduling, 15-25 days for cutting, printing, sewing, and trimming, and 2-5 days for packing, inspection support, and shipment readiness.
Those figures are planning ranges, not guarantees. They extend when the buyer wants custom dyed fabric, custom cord color, multi-color artwork, woven labels, hangtags, barcode labeling, or multiple artwork versions. They also stretch when internal approval is slow. A factory may need only a few days to prepare a sample, but the project can still lose two weeks if marketing, retail, and procurement review the sample one after another instead of in parallel.
The highest-risk point is often after the first sample. A buyer may like the general direction but request a heavier fabric, smaller logo, different cord, new hangtag, or revised fold. Some changes are reasonable. Others reset the schedule. A fabric weight change can trigger a new material search. A logo size change can require a new screen. A packing change can alter carton counts and freight cube. A cord change can affect both channel width and material lead time.
For launch-timed coffee programs, set a product freeze date. After that date, only non-physical details should move, such as delivery address or final carton mark text. Size, GSM, artwork, print position, cord, reinforcement, and packing method should be locked before bulk production is released. That gives the supplier a clear path and gives the buyer a defensible schedule.
- Plan clarification, sample making, buyer approval, material prep, production, packing, inspection, and freight booking as separate steps.
- Add time for custom dyed fabric, custom cord, multiple artworks, woven labels, or retail packing.
- Use a product freeze date before bulk cutting starts.
- Do not count freight booking or warehouse receiving as part of factory production time.
- Ask the supplier to identify which dates depend on buyer approval.
Sampling and approval: turn preference into measurable control
A pre-production sample should prove the product that will actually be made. For roaster-branded drawstring backpacks, that means actual fabric weight, actual fabric color, actual print method, actual print size, actual cord, approved reinforcement, and the intended folding or packing method. A digital mockup is useful for layout, but it cannot prove hand feel, print absorption, cord movement, or lower corner strength.
The buyer should inspect the sample like a small production unit. Measure finished width and height. Check the top channel width. Pull the cord several times. Look at the lower cord exits. Lay the bag flat and check whether the front panel twists or skews. Compare the print against the artwork file and placement references. If the logo is meant to sit 8 cm below the top edge, measure it and record that number.
Sample comments should be written as production instructions, not subjective reactions. Instead of logo feels too low, write move logo up 2 cm; top of print to be 6 cm below top hem. Instead of cord should be nicer, write use 6 mm black cotton cord, same as sample B. Instead of fabric should be thicker, write revise to 10oz cotton canvas, target about 340 GSM, supplier to confirm stock availability and lead time impact. Clear comments prevent re-sampling loops.
Keep approval records. A signed sample, a photo sheet, or a dated approval file should be linked to the PO. The record should include front view, back view, close-up of fabric, close-up of print, close-up of corner reinforcement, cord detail, and packing fold if relevant. That makes final inspection easier because there is a concrete standard to compare against.
- Approve a physical sample using actual bulk materials whenever timing and branding matter.
- Measure size, print position, channel width, and cord function during sample review.
- Write sample comments with numbers, reference points, and material names.
- Record the approved tolerance for print placement and finished dimensions.
- Do not release bulk production from a substitute-material mockup unless the commercial risk is accepted in writing.
Packing, cartons, and landed cost details
Packing is not a paperwork item at the end of production. It affects labor, carton efficiency, freight cube, warehouse handling, and sometimes print quality. A simple flat pack in inner bundles or polybags is usually enough for B2B coffee programs where the bag will be unpacked by a distributor, cafe team, or fulfillment center. Individual polybags, hangtags, barcode stickers, insert cards, or tissue wrap may be useful for retail sale, but they add handling steps and can slow the final stage.
The quote should state pieces per inner pack, pieces per export carton, carton dimensions, net weight, gross weight, and carton marking requirements. Those details let procurement compare landed cost instead of only unit cost. A lower unit price may not be attractive if carton utilization is poor or if each carton becomes too heavy for receiving. Overpacking can also crease prints or compress the canvas in a way that creates presentation problems.
Fresh screen prints should be folded carefully. If a large printed logo is folded sharply through the ink area too soon, the finished goods may show creasing, blocking, or surface marks. Ask the factory how prints are dried or cured before packing and whether paper interleaving is needed for heavy ink coverage. Interleaving adds cost and labor, so specify it only if the artwork requires it.
Carton labels and barcode placement should be approved before mass packing starts. Late changes at this stage are expensive because cartons may need to be opened, relabeled, or repacked. If goods will go to multiple cafes, warehouses, or wholesale customers, provide the carton mark and assortment plan early. Split shipments should be reflected in the packing sheet, not improvised after production is finished.
- Quote packing as a specification: inner pack count, carton count, carton size, net weight, gross weight, labels, and marks.
- Use individual polybags or hangtags only when the channel needs them.
- Confirm whether barcode labels go on the polybag, hangtag, inner pack, or carton.
- Check whether folding puts pressure across the printed logo.
- Approve final carton marks before mass packing begins.
QC checkpoints and release criteria for roaster-branded bags
Quality control should focus on the defects that affect brand presentation and real use. For cotton drawstring backpacks, the key areas are finished size, fabric consistency, print appearance, stitching security, cord function, lower corner strength, cleanliness, and packing accuracy. A long generic checklist is less useful than clear pass-fail criteria linked to the approved sample.
A practical inspection approach can use defect severity. Critical defects include wrong artwork, wrong fabric color, missing cords, open seams, detached cord exits, contamination, or finished goods that cannot function as bags. Major defects include obvious print misalignment, severe stains on the front panel, broken top channel stitching, size deviation beyond tolerance, missing reinforcement where approved, or cord movement so poor that the bag cannot close smoothly. Minor defects may include small thread ends, slight natural slubs, or mild shade variation that still matches the approved cotton standard.
For print QC, use the approved sample or strike-off as the reference. Measure placement against the agreed points, such as centerline and top hem. Inspect for smudging, ghosting, pinholes, broken text, heavy ink buildup, and unwanted strike-through. Natural cotton texture can create slight variation, but the brand mark should remain readable and commercially acceptable. If fine artwork is used, the inspection standard should be tighter and agreed before production.
For construction QC, pay special attention to the cord exits. Pull each side manually on inspected samples to check for loose stitches, tearing, or weak knots. The top channel should allow the cord to move without severe friction. The bag should lie reasonably flat without severe twisting. Carton QC should confirm count, assortment, labels, and marks. Before shipment release, buyers can request photos of front print, seam detail, cord exits, packed units, carton labels, and sealed cartons as supporting evidence.
- Set critical, major, and minor defect categories before final inspection.
- Use +/-1 cm as a typical finished-size tolerance only if the supplier confirms it suits the pattern and fabric.
- Use +/-5 mm print placement tolerance only after approving the production method and artwork scale.
- Check cord exit reinforcement with a practical pull test, not visual inspection alone.
- Verify carton count, carton labels, barcode placement, and packing sheet before shipment release.
Specification comparison for buyers
| Spec decision | Recommended option | When it fits | Buyer risk to check |
|---|---|---|---|
| Fabric weight | 8oz to 10oz cotton canvas, approximately 270-340 GSM | Retail merchandise, cafe add-ons, trade show kits, subscription gifts, and bundle packaging where the bag needs a reusable, substantial feel | Confirm whether GSM is measured on finished fabric or greige cloth; fabric below about 220 GSM can feel too thin, while 12oz and above can raise sewing time, freight weight, and landed cost |
| Fabric construction | Plain weave cotton canvas with an agreed shade, yarn appearance, and slub allowance | Natural, craft-positioned coffee brands that want a stable printable surface without moving into heavy tote construction | Mixed lots, loose weave, or strong slub variation can cause shade mismatch and break up fine print edges |
| Finished size | Common range 36 x 40 cm to 38 x 42 cm with a finished tolerance defined in the PO | Fits one to three coffee bags, retail merchandise, cupping tools, apparel, or event handout kits | Do not quote only nominal size; require finished tolerance, typically +/-1 cm for width and height, and confirm whether shrinkage and sewing take-up are included |
| Drawcord specification | Cotton cord or polyester cord, usually 5-7 mm diameter depending on channel width and load expectation | Cotton cord supports a natural look; polyester cord is often more consistent for black or dyed colors and may slide more smoothly | Cord diameter changes channel width, pull comfort, knot bulk, sewing speed, and strength; thin cord can feel sharp when the bag carries dense coffee packs |
| Print method | Screen print on cut panels before sewing for one-color or two-color logos | Bold roaster marks, cafe names, simple illustrations, and high-contrast natural cotton branding | Ask for print placement tolerance, commonly +/-5 mm from the approved reference; fine lines, reversed text, gradients, and distressed artwork need a strike-off on actual fabric |
| Artwork color control | Pantone reference plus approved physical sample or print strike-off | Useful when brand color matters but the base fabric is natural cotton, dyed cotton, or off-white canvas | Pantone on paper will not match perfectly on absorbent cotton; define acceptable visual variation under consistent lighting instead of expecting a coated-paper match |
| Lower corner construction | Reinforced corner patches, bartacks, or strengthened seam treatment at cord exit points | Recommended for repeat-use bags, retail merchandise, and bags carrying 250 g to 1 kg coffee packs or bundled goods | If reinforcement is omitted, cord exit tearing can become the first user complaint even when fabric GSM is acceptable |
| Packing route | Flat packed in inner polybags or bundle packs, then export cartons with count, carton size, gross weight, and marks agreed before PO release | Importers, distributors, and multi-cafe roasters balancing warehouse handling, freight cube, and retail readiness | Individual retail packing adds labor and can change carton utilization; late barcode or hangtag instructions can delay packing after sewing is complete |
| Sampling route | Digital layout, physical print strike-off if needed, then pre-production sample with actual bulk fabric, cord, reinforcement, and packing fold | Launch-timed coffee programs where logo scale, fabric hand, and presentation need to be approved before bulk | A mockup using substitute fabric does not control bulk risk; production should not start until actual-material sample comments are closed |
Buyer checklist before sampling
- Define the commercial use first: cafe retail sale, wholesale customer gift, trade show kit, subscription insert, staff merchandise, or seasonal bundle packaging.
- Set the required delivery date and work backward through sample approval, bulk production, final inspection, export packing, freight booking, and warehouse receiving.
- State finished bag size in centimeters, including tolerance, for example 38 x 42 cm +/-1 cm, and confirm whether dimensions are measured empty, flat, and after final pressing or packing.
- Specify fabric as cotton canvas with a GSM range and ounce reference, such as 8oz to 10oz or approximately 270-340 GSM, instead of using only words like premium or thick.
- Confirm fabric color standard: natural unbleached cotton, bleached white, dyed cotton, or custom color, and define how much shade variation is acceptable across panels and lots.
- Provide artwork as vector files with print size, print colors, print position, and reference measurements from top hem, side seam, or bag centerline.
- Decide whether the logo is printed on one side or both sides, and state whether slight print show-through, fabric texture breaks, or ink hand feel are acceptable.
- Choose cord material, cord diameter, cord color, cord end treatment, knot style, and whether lower cord exits need reinforcement patches or bartacks.
- Request a pre-production sample made with actual fabric weight, actual print method, actual cord, approved reinforcement, and the intended folding method.
- Separate quote quantities by artwork, fabric color, cord color, and packing type so the supplier can calculate MOQ, screen setup, and production grouping accurately.
Factory quote questions to send
- What fabric are you quoting: cotton canvas, cotton sheeting, cotton drill, or cotton-poly blend, and what are the exact GSM and ounce references?
- Is the quoted fabric stock material or made to order, and how many days are needed if the stock roll quantity is not enough for bulk?
- How do you control fabric weight tolerance, and can you provide GSM test results or roll inspection records for the production lot?
- What is the finished bag size, usable print area, seam allowance, top channel width, and finished size tolerance you will control during production?
- Will the logo be printed on cut panels before sewing or on finished bags after sewing, and what print placement tolerance should we approve?
- How many print colors, screens, and print locations are included in the quoted price, and are screen charges separate or built into the unit price?
- For Pantone colors, will you provide a print strike-off on actual cotton fabric, and how do you define acceptable color variation on natural cotton?
- What cord material, diameter, color, and construction are included, and is the cord stock available for the full quantity?
- Are reinforced corner patches, bartacks, or other lower cord exit reinforcements included; if not, what construction is standard?
- What is the MOQ by fabric color, print design, print color count, cord color, and packing method rather than only by total order quantity?
Quality-control points to confirm
- Finished size within agreed tolerance, for example +/-1 cm on width and height, measured flat on an empty bag after final finishing.
- Fabric GSM within the agreed production range, with no mixed fabric lots causing obvious shade or texture mismatch on visible panels.
- Fabric appearance consistent with the approved sample, allowing normal natural cotton slubs only if they were accepted at sample stage.
- Print placement centered or positioned according to the approved reference within agreed tolerance, for example +/-5 mm from centerline or top-edge measurement.
- Print color compared against approved strike-off or signed sample under consistent lighting, with realistic tolerance for natural cotton base shade.
- Print surface free from obvious smudging, ghosting, pinholes, broken fine text, heavy ink buildup, or unacceptable strike-through beyond approved sample.
- Top hem and drawcord channel stitched straight and secure, with no skipped stitches, open seams, broken threads, or needle damage on visible panels.
- Drawcord moves smoothly through the channel without severe friction, twisting, bunching, or channel blockage.
- Lower cord exit points reinforced as approved, with no loose stitches, tearing, or seam opening after a practical manual pull check.
- Cord length, knotting, cord diameter, and cord color consistent across the lot and matched to the approved sample.