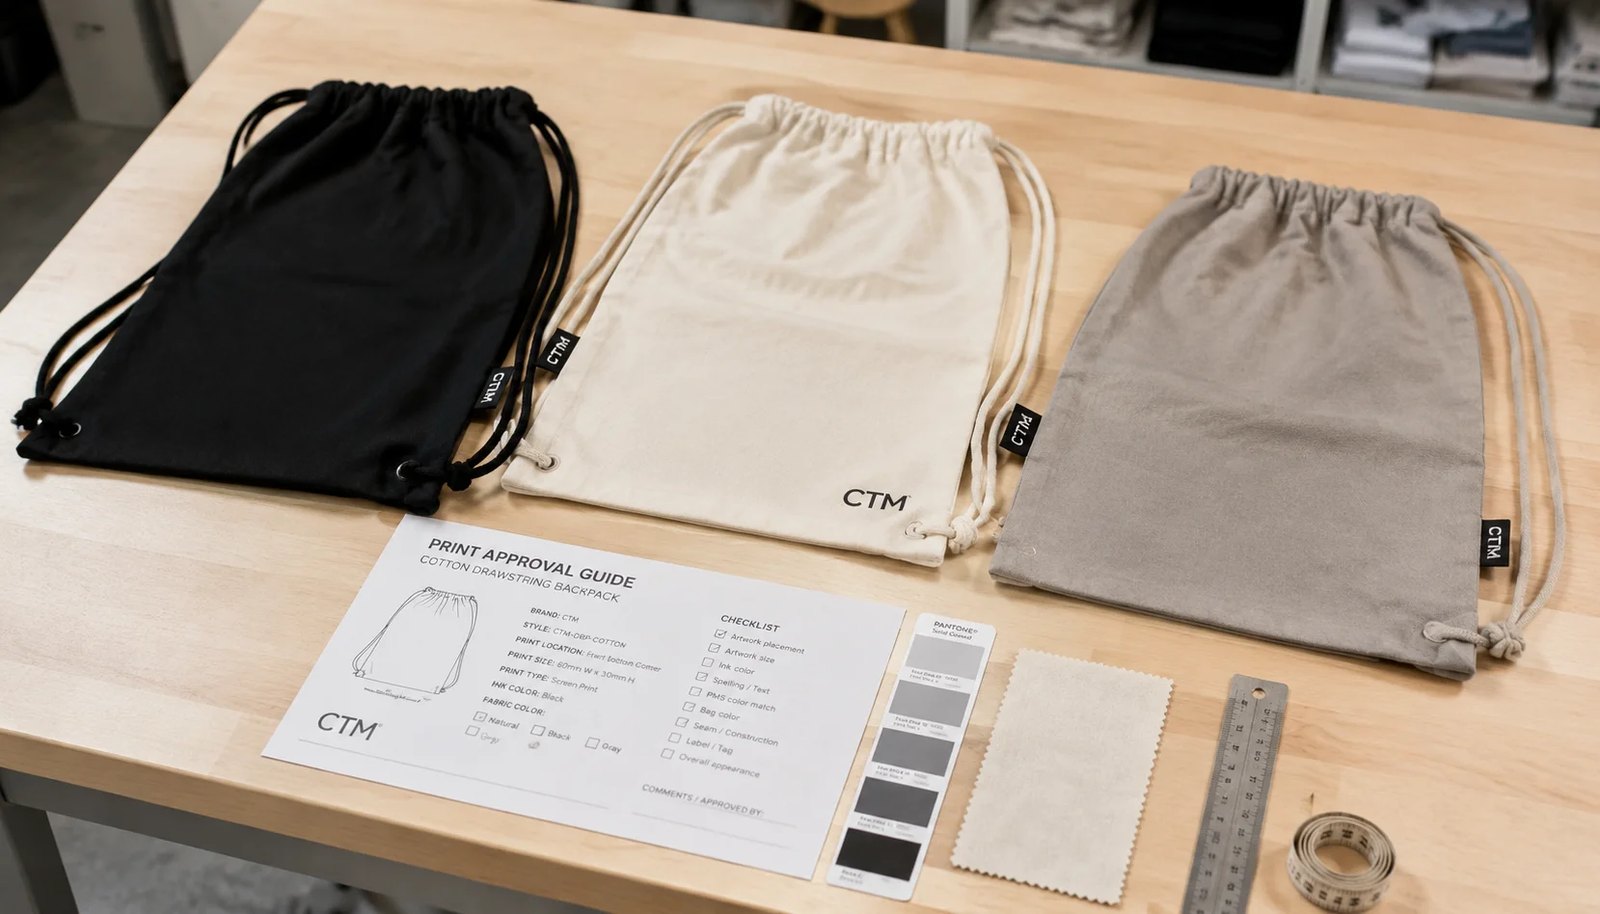
Why print approval is the real risk point on cotton drawstring backpacks
For liquor retailers, cotton drawstring backpacks usually sit in one of three programs: gift-with-purchase, seasonal store merchandise, or branded event packaging. In all three cases, the bag itself is simple, but the approval risk is not. Most disputes come from print expectations that were obvious in a digital mockup but impossible on a sewn cotton bag with a cord channel, fabric texture, and bulk production tolerances.
The buying problem is not whether a supplier can print a logo. The problem is whether the approved proof actually predicts the bulk result on the chosen cotton weight and bag construction. A buyer who approves only a flat artwork visual often receives bags with artwork too close to the channel, broken fine lines on slubby fabric, weak white ink on black cotton, or offset marks caused by packing before the print fully cures.
- Main failure mode: artwork approved without a print-safe area tied to the actual sewn bag
- Second failure mode: fabric and print method selected separately instead of as one production system
- Third failure mode: quote looked competitive because setup, sample, or packing risk was hidden
Choose the bag specification around the print, not only around the promotion
Many buyers start with the marketing purpose first, then let the factory fill in the technical details. For printed cotton drawstring backpacks, reverse that sequence. The print size, number of colors, and logo detail should shape the bag specification because fabric texture, channel depth, and finished dimensions affect print clarity more than most first-time buyers expect.
For liquor retail use, a practical starting point is 140-170 gsm cotton in a plain weave. That range balances cost, print stability, and perceived value. Below that level, the bag can still work for low-cost giveaways, but print distortion becomes harder to manage, especially with large front logos. Above about 180 gsm, the bag feels more substantial but costs rise, the drawstring gather becomes bulkier, and some buyers find the product starts to look more like a reusable shoe bag than a lightweight retail backpack.
- Common size range: 30 x 40 cm for accessories and promo kits; 35 x 45 cm for broader retail use
- Safer print zone: keep top of artwork at least 20-25 mm below the drawstring channel
- Fabric choice for sharp graphics: plain weave natural cotton with minimal slub
- Cord choice affects presentation: cotton rope feels better than thin polyester cord but adds cost
Match the print method to artwork detail and fabric color
Screen printing remains the most commercially useful method for cotton drawstring backpacks in bulk. It gives stable unit cost, decent opacity, and good speed when artwork is simple. For liquor retailer branding, that covers most logo-only jobs, event names, simple badge graphics, and one- or two-color promotional artwork. Where buyers get into trouble is forcing detailed gradients, metallic effects, or very fine legal text into a screen print layout that the fabric surface cannot support.
Heat transfer or DTF can solve detail issues, but they change hand feel and may not suit a soft natural-cotton retail aesthetic. On dark black cotton, opaque white screen print may require extra attention to underbase or double-hit coverage. On natural cotton, water-based ink often gives a more premium soft-hand result, but color brightness may be lower than the same art printed with plastisol. The print method should be approved with the fabric color and gsm at the same time.
- Best use of screen print: 1-3 spot colors, solid artwork, medium-to-large logo blocks
- Best use of heat transfer or DTF: multicolor detail where edge precision matters more than soft hand
- White on black risk: weak opacity if supplier quotes a low-cost single-pass print
- Fine serif text risk: fabric texture can break letter edges even when digital proof looks clean
How to read MOQ logic before comparing supplier quotes
MOQ on this product is rarely one number. It usually has at least three layers: fabric MOQ, bag construction MOQ, and print artwork MOQ. A quote that says 1,000 pieces may still assume one fabric color, one size, and one print design. If a liquor retailer needs the same backpack body with different store-group logos, event dates, or local distributor marks, the true economical MOQ is set by screen setup and production changeover, not only by sewing volume.
This is why a supplier can appear expensive on a 500-piece trial but competitive on a 3,000-piece grouped order. Buyers should separate fixed setup costs from variable unit costs. If you plan a rollout across multiple retail banners, ask for pricing in scenarios: one artwork, two artworks, and four artworks on the same bag body. That exposes whether the supplier has priced screens transparently or buried them inside the piece rate.
- Lowest unit cost usually comes from one fabric color, one size, one print placement
- Every added artwork version may trigger new screen or transfer setup charges
- Dyed black cotton usually has a higher MOQ or longer lead time than stock natural cotton
- Mixed SKUs can be efficient if bag body stays constant and only outer label changes
Approve samples in the right sequence so you do not pay for the wrong problem
A good sampling sequence saves both time and rework. Start with a digital artwork layout only to lock print size, location, and basic appearance. Then move quickly to one pre-production sample on bulk-like fabric with the real cord channel and intended print process. Do not over-invest in an early custom sample if the artwork itself is still moving; that just wastes sample fees and calendar days.
The most useful approval sample is not the prettiest one. It is the sample that reveals likely bulk weaknesses. For example, if your logo includes fine outlined letters, the sample should print those at final size on the actual weave. If your artwork is close to the top channel, the sample should be cinched and photographed while closed. If the bag will be packed flat for a distributor program, ask the factory to show how the fresh print looks after stacked packing.
- Stage 1: digital proof for dimensions, logo position, and Pantone intent
- Stage 2: physical pre-production sample on intended fabric and print process
- Stage 3: approval with measurable tolerances, not comments like 'looks good'
- Useful sample photos: flat front, cinched top, side seam, close-up of print edge and ink coverage
Set print acceptance criteria that a factory and inspector can actually use
Buyers often write vague approval notes such as 'logo centered' or 'color should match artwork.' Those comments do not help during inline or final inspection. Better practice is to define measurable tolerances and visible defect limits. On a cotton drawstring backpack, print position should be measured from the top finished edge below the channel and from the side seams. Ink coverage should be evaluated at a normal viewing distance under standard light, not against an unrealistic magnified image.
For liquor retail branding, readability matters. If the design includes store name, campaign date, or compliance wording, state the minimum legibility requirement on fabric. The acceptance standard should also mention what defects are not allowed: major smudging, double image, ghosting, pinholes across solid logo areas, and severe skew caused by misloading the bag on the print platen. A factory can control these points if they are written before production starts.
- Example print placement tolerance: within plus or minus 5 mm from approved location
- Example bag size tolerance: within plus or minus 1 cm depending on size and gsm
- No-go defect examples: unreadable text, obvious print tilt, heavy offset transfer to another bag
- Inspection view standard: evaluate logo clarity at arm's length under neutral factory light
Packing details matter because fresh prints fail in cartons, not on the press
A backpack can leave the print table looking fine and still arrive with rubbed logos, offset marks, or crushed presentation because of poor packing sequence. Cotton bags are flexible, so production teams often compress them tightly to save carton space. That is exactly where still-curing prints transfer onto neighboring fabric, especially in humid conditions or when heavy stacks are formed too quickly after printing.
For retail buyers, the best packing method is usually flat pack by fixed inner quantity with the print face oriented consistently. If individual polybags are used, make sure the decision is commercial, not automatic. Polybagging protects the print and keeps store receiving cleaner, but it adds labor, material, and in some markets additional packaging concerns. Where polybags are not wanted, use clean inner bundles with tissue or separator logic if the ink system is prone to offset.
- Specify whether bags are packed print-to-print, back-to-back, or with separators
- Set a carton gross weight limit suitable for your warehouse handling, often around 12-18 kg depending on market
- Request carton dimensions in the quote to estimate pallet and container efficiency
- If retail labeling is needed, place barcode stickers on outer poly or hangtag, not directly on printed fabric
Build the timeline from the true critical path, not from the sewing lead time
The visible part of this product is simple sewing, but the schedule usually depends on earlier steps. Fabric booking, dyeing if black or custom color is needed, screen preparation, and sample sign-off often determine whether a launch date holds. A buyer who counts only cut-and-sew days can miss the real bottleneck by a week or more. This matters in liquor retail because promotional windows are often fixed around holidays, tastings, or chain-wide campaigns.
A realistic planning method is to split lead time into approval, material, production, and dispatch stages. If the factory says twenty-five days, find out how many of those days start only after final artwork approval and pre-production sample sign-off. Also separate stock natural cotton from dyed fabric timing. Natural cotton may be available faster, while black fabric can require dye lot planning, shade approval, and a different print setup for white logo opacity.
- Common hidden delay: artwork revised after screens are already prepared
- Common hidden delay: black fabric dye lot approved, then white print sample fails opacity target
- Useful timeline format: sample days, material prep days, bulk sewing days, print days, packing days
- If campaign date is fixed, request a latest-safe approval date from the supplier
Compare quote data by cost driver so a lower unit price does not mislead you
A serious supplier quote should show enough structure for a buyer to model tradeoffs. On this product, the major cost drivers are fabric gsm, fabric color, bag size, cord type, print method, print size, number of print colors, and packaging style. If only one all-in piece price is shown, it becomes difficult to judge whether the factory is truly competitive or simply omitting setup, stronger packing, or a realistic sample route.
An efficient comparison sheet uses one approved baseline specification, then tests a few controlled variants. For example, compare 140 gsm natural cotton versus 170 gsm black cotton; one-color screen print versus two-color screen print; loose bulk packing versus individual poly. That approach gives procurement teams usable data without turning the RFQ into an open-ended redesign exercise.
- Example cost adder categories: higher gsm fabric, dyed fabric, extra screen color, larger print area, retail labeling
- Sample costs should be listed separately from bulk unit price
- Freight planning improves if quotes include carton count and CBM estimate
- When comparing factories, normalize Incoterm first before judging unit price gaps
The easiest mistakes to prevent before you release the purchase order
Most preventable errors happen because one technical point stayed implied instead of written. The bag arrives at the right size but the print is too high. The logo color is close but not opaque enough on black. The sample used smooth fabric but bulk used a rougher weave. The quote included a basic cotton cord but the buyer expected a thicker premium drawstring. None of these are rare production accidents; they are normal outcomes of incomplete RFQs.
Before issuing the PO, convert the approval into a short production schedule with locked specs, approved visuals, and measurable tolerances. The point is not to create paperwork for its own sake. The point is to make the factory production file and the buyer expectation file the same document. That is what reduces dispute risk when the bags are already packed and export-ready.
- Lock the reference sample or artwork version number on the PO
- State approved gsm, fabric color, print method, and print size in the order line
- Attach packing specification and carton mark format to the PO, not in later email only
- Require supplier approval of the same spec sheet used internally by your buying team
Specification comparison for buyers
| Spec decision | Recommended option | When it fits | Buyer risk to check |
|---|---|---|---|
| Fabric weight | 140-170 gsm cotton | Best for promo backpack use with printed branding and moderate bottle accessory weight | Below about 130 gsm can distort under print tension and feel too light for retail resale |
| Fabric construction | Plain weave cotton with low slub variation | Needed when logo edges, legal text, or small artwork must print cleanly | Heavy slub or uneven weave can break fine lines and make proof approval misleading |
| Bag size | Approx. 30 x 40 cm or 35 x 45 cm | Fits gift items, accessories, mini bottles where legally permitted, or branded retail merchandise | If buyer expects full-size wine bottle fit, confirm height, base width, and local retail compliance before printing |
| Print method | Screen print for solid logos; heat transfer only for detailed multicolor artwork | Screen print suits most liquor retailer promo graphics at better bulk cost | Heat transfer can crack or feel plastic-like; screen print may not hold gradients or photo detail |
| Print placement | Centered front with 20-25 mm tolerance from drawstring channel | Reduces distortion from gathers and cord movement during use | Artwork placed too close to top channel may wrinkle, hide text, or print unevenly after cinching |
| Ink type | Water-based or soft-hand plastisol depending color and fabric | Water-based works on natural cotton with softer feel; plastisol helps on dark fabric or opaque white logos | Unclear ink spec leads to hand-feel complaints, rub issues, or color mismatch on dark cloth |
| MOQ structure | Single color grouped by same fabric and size; separate MOQ by print design | Useful for chain-store rollouts using one bag body with different regional logo versions | Small split runs raise setup cost fast; quote may hide per-artwork screen charges |
| Packing method | Flat packed in inner poly by fixed quantity, export carton by gross weight limit | Protects print face and keeps receiving count simple for distributors | Tight compression can offset fresh prints; oversized cartons increase damage and warehouse labor |
| Approval sample route | Digital artwork proof plus one pre-production printed sample on bulk-like fabric | Best balance between speed and print risk control for branded retail orders | Paper proof alone will not reveal ink opacity, shrinkage effect, or drawstring-channel distortion |
Buyer checklist before sampling
- State final bag size with width, height, and any gusset requirement; do not assume bottle fit from a generic drawstring backpack size.
- Specify cotton fabric weight in gsm and whether natural, bleached, dyed black, or custom dyed fabric is required.
- Define print method by artwork zone: screen print for main logo, transfer only if small details or multicolor art cannot be separated economically.
- Provide vector artwork and Pantone references; note any acceptable color tolerance for natural cotton shade variation.
- Mark a print-safe area that excludes the drawstring channel and side seam distortion zones.
- Approve print dimensions in millimeters, not only visual mockups, to avoid oversized art on small bags.
- Request a pre-production sample made on bulk-like fabric with actual cord, stitching, and print process.
- Set acceptance criteria for print position, ink opacity, edge sharpness, and rub resistance before production starts.
- Define packing count per inner pack and per carton, plus carton weight limit for easier warehouse handling.
- Clarify whether retail labeling, barcode stickers, hangtags, or country-of-origin marks are needed at packing stage.
Factory quote questions to send
- What fabric gsm do you recommend for this bag size and intended retail use, and what is the tolerance range in bulk?
- Is the quoted print method screen print, heat transfer, DTF, or another process, and why was that method selected for this artwork?
- How many print screens or color stations are included in the quote, and what are the setup charges for repeat orders?
- What is the maximum printable area after allowing for drawstring channel, seam allowance, and fabric shrinkage?
- Can you provide a pre-production sample on the same fabric weight and color as mass production, not substitute stock?
- What print registration tolerance and placement tolerance do you hold in bulk production?
- How do you test print adhesion or rub resistance on cotton drawstring backpacks, especially on dyed black fabric?
- What is the MOQ by fabric color, bag size, and print artwork version, and can mixed print designs share one fabric run?
- How is the order packed after printing to prevent ink offset, and how long do printed bags rest before final packing?
- What carton dimensions, units per carton, and gross weight are expected for this specification?
Quality-control points to confirm
- Fabric weight should be checked against approved gsm range using production fabric, not only lab swatches.
- Bag body dimensions should be measured after sewing with agreed tolerance, especially width and channel depth affecting print position.
- Print placement should stay within approved tolerance from top channel and side seams to avoid visual drift on store display.
- Ink coverage on natural or black cotton should meet approved opacity standard with no obvious pinholes at normal viewing distance.
- Fine text and line art should remain legible after printing and light handling, without broken strokes caused by fabric texture.
- No visible ink smearing, ghosting, or offset marks should appear on adjacent bags inside the same pack.
- Drawstrings should pull evenly from both sides, knot securely, and show no loose fray that could undermine retail presentation.
- Seam stitching should be even with no skipped stitches, especially at lower corners where loading stress concentrates.
- Dyed fabric lots should be checked for color consistency so printed logo color does not shift visually across cartons.
- Carton counts, barcode labels, and any retail insert components should match packing list before container loading.