Why This Portfolio Has To Be Treated Like A Working Document Tool
A canvas zipper portfolio for a farmers market vendor is not a generic stationery pouch. It is a working item for permits, order pads, cash count sheets, receipts, business cards, venue maps, QR cards, and sometimes a slim tablet or phone-sized device. In practice, it gets opened and closed many times in a day, moved from tote to table, and used in damp or crowded conditions where corners snag, zippers catch, and prints wear faster than the buyer expects. That is why procurement should treat it like a working tool rather than a novelty accessory.
The buying decision should start with the actual load and the actual handling pattern. If the item is only meant to carry a few pages and cards, a lighter build may be fine. If it must survive field use, reorders, and multiple vendors handling the same SKU, the spec has to be explicit. The simplest way to keep the quote honest is to define the use case before the supplier sees the artwork file. Once the factory knows the contents, dimensions, and handling environment, the quotation becomes a real production offer instead of a vague promotional price.
This is also where many programs go wrong. Buyers request a premium canvas portfolio, then later discover that one vendor wants a flat sleeve, another needs a gusset, and a third expects a tablet pocket plus branding. Those are different products. If the product definition is loose, the quote will drift, the sample will look better than the bulk, and the reorder will not match the first lot. Procurement should force the conversation down to measurable details before cost is discussed.
- List the exact contents the portfolio must carry, including the thickest paper stack or the device model if a tablet is included.
- State whether the item is for one person, a shared market team, or a retail customer who will carry it independently.
- Decide whether the portfolio must lie flat on a table, fit inside a tote, or slide into a vendor kit drawer without snagging.
- Define the acceptable life cycle in your own terms, such as one season, one year, or a repeat program with scheduled reorders.
Lock The Use Case And Dimensions Before The Supplier Quotes
The fastest way to get misleading pricing is to ask for a zipper portfolio without specifying the format. A document sleeve for A4 paper is not the same as a letter-size carrier or a small organizer with pen slots and a divider. For A4 use, a practical internal clear size is often at least 225 x 315 mm so the sheets slide in without catching the seam allowance. For letter use, a practical target is at least 235 x 305 mm. If you want a slim tablet to fit as well, name the exact device model and case thickness instead of guessing by screen size.
Tolerance matters because canvas and zippers are not rigid components. A useful starting point for a buyer spec is +/- 5 mm on finished width and height, +/- 3 mm on pocket depth, and +/- 2 mm on zipper length. If the supplier cannot quote against a tolerance, then any production variation can be defended as acceptable. That becomes a problem when the same portfolio must hold a stack of forms, a receipt pad, and cards without bulging or binding at the zipper track.
The buyer should also decide whether the inside is a single open cavity or a divided layout with a document pocket, pen slots, or a small note section. Each option changes the cutting pattern, sewing time, and usable space. A single-compartment design is easier to source and often more durable. A multi-pocket build is more useful, but it needs clearer instructions and tighter approval discipline. Put that choice in writing before you compare suppliers, or you will end up comparing two different products as if they were the same thing.
- Specify whether the portfolio is built for A4, letter, receipt pads, business cards, or a device sleeve format.
- Add a tolerance line to the spec so the factory knows what variation is acceptable before bulk cutting starts.
- Confirm whether the item must stay slim or whether it can carry a gusset for extra capacity.
- Ask the end user how the portfolio will be stored and carried, because that changes the best construction choice.
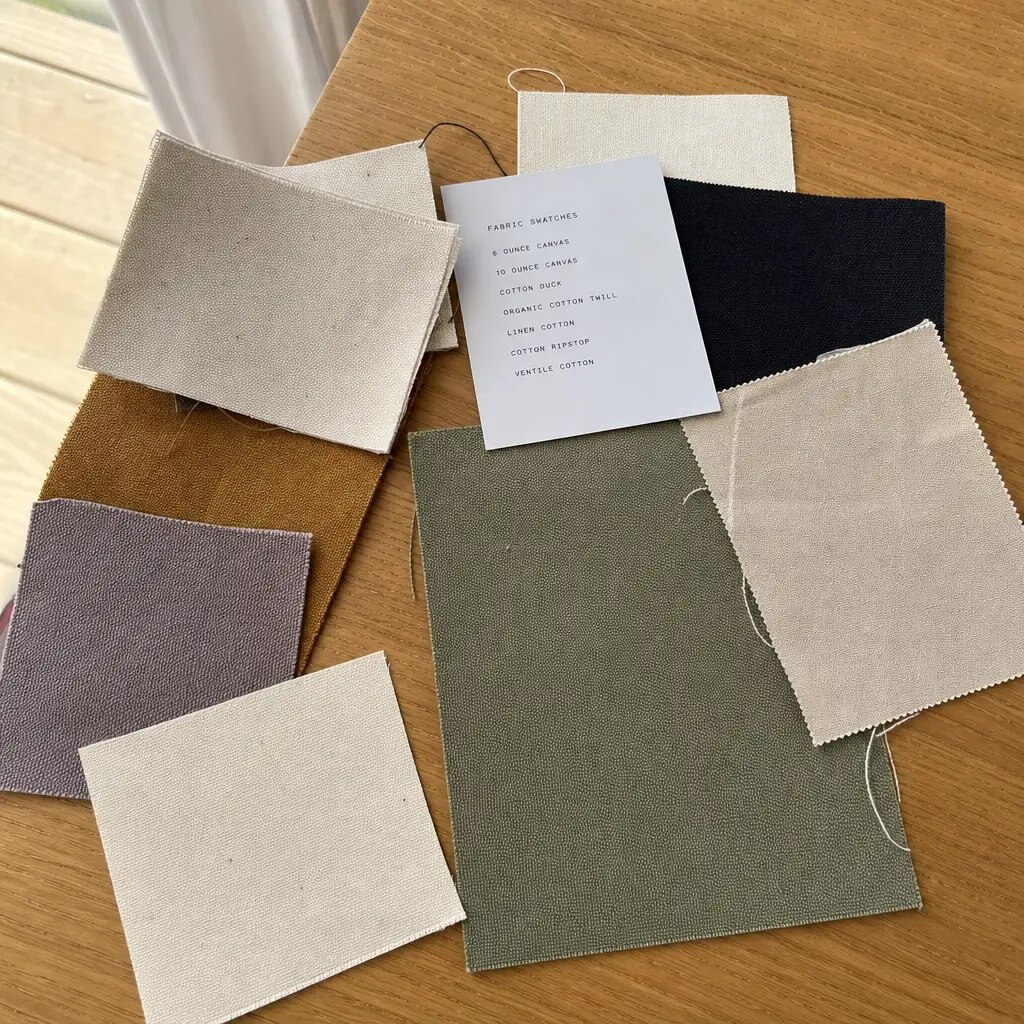
Specify Materials In Finished, Measurable Terms
For most working programs, a finished canvas weight around 12 oz to 14 oz, or roughly 400 to 500 GSM after finishing, is a practical starting point. Lighter canvas can be acceptable for a promo run, but it often feels too soft once the portfolio carries paper, cards, and pens. If the supplier quotes cotton canvas, poly-cotton canvas, or recycled PET canvas, ask for the exact blend ratio and the finished weight after coating, washing, or other finishing steps. Loom-state descriptions are not enough because they hide how the material will actually feel in use.
The zipper deserves the same discipline. For a standard flat portfolio, a nylon coil zipper in the #5 range is usually a sensible default. A lighter #3 zipper can work on small, low-load items, but it is often too light for daily field handling. A heavier #8 zipper may be appropriate if the design is unusually large or the contents are bulky. Also define the zipper tape width, puller finish, and whether the slider should be auto-lock or non-lock, because those details affect both function and replacement cost on reorder.
If the portfolio uses lining, binding tape, a divider, or an interior pocket, specify those components in the same material list instead of leaving them implied. The best way to avoid substitutions is to make the BOM boringly complete. That means fabric type, color reference, zipper spec, puller finish, label type, thread type if relevant, and the packaging material. A supplier can only quote accurately when the trim list is complete enough to source against.
- Quote canvas in finished oz and GSM, not just as thick or heavy.
- Require the exact fiber blend and ask whether the supplied fabric is dyed, bleached, washed, or coated.
- Set the zipper size, tape width, puller style, and closure behavior in the RFQ.
- If any metal trim is used, identify the finish and ask whether it can stain the canvas or discolor after handling.
Choose The Right Sourcing Route Before You Compare Price
Different supplier routes carry different risks. A direct sewing factory usually gives the best control over dimensions, seam structure, and trim continuity, which is valuable when the portfolio is part of a repeat vendor kit or retail line. A trading company can be useful when you need one contact for multiple products, but you should still require the actual factory name, the trim source, and a clear statement on who approves deviations. A specialized bag workshop is often the strongest fit when the construction has multiple pockets, labels, or reinforcement points that need to stay consistent across reorders.
Low-price general suppliers can be acceptable only when the spec is simple and the buyer is willing to tolerate broader variation. That route becomes risky when the order depends on exact fabric weight, exact zipper behavior, or a particular packing method. The main buyer-side mistake is comparing a simple blank sample from one supplier with a fully packed, printed, and inspected offer from another. Those are not comparable quotes, and they will not lead to a clean award decision.
The rule is straightforward: compare routes only after you normalize the product spec, Incoterm, carton count, decoration method, and the level of documentation provided. If the supplier is not the actual maker, ask who controls cutting, printing, stitching, final packing, and defect disposition. If those answers are vague, the apparent price advantage may vanish the first time you need a correction, a reorder, or batch-level evidence for a customer review.
- Use a direct factory when repeatability and control of construction details matter.
- Use a trading company only if it can disclose the actual factory and trim sources.
- Use a workshop or specialist bag maker when the layout includes multiple pockets or reinforcement details.
- Do not compare a blank item quote with a decorated, packed, and inspected quote unless the scope is identical.
Request Compliance Evidence That Matches The Actual Batch
For procurement, compliance is not a certificate folder. It is proof that the materials, trims, print, labels, and packaging match the product you are buying. Ask for a product specification sheet, a bill of materials, and any destination-market restricted-substance evidence that applies to the item and market. If the product is sold in the EU, ask whether REACH-related declarations are available where relevant. If it is sold in the US and you plan to use specific claims, ask the supplier to support those claims with documentation rather than marketing language. If you plan to print fiber content or recycled content on packaging, request the backing documents for that claim before production starts.
The most important question is whether the documents are tied to the same batch as the bulk order. A generic test report for a similar canvas color or a different zipper supplier does not protect the buyer. Ask who owns the BOM, who signs off on substitutions, and whether sewing, printing, and final packing are in-house or subcontracted. If the supplier cannot identify the actual source of the label, zipper, ink, or carton, then the compliance file is not yet procurement-grade.
This is where a lot of acceptable-looking programs fail in review. The sample matches, the price is strong, and the documentation is present, but the documents do not line up with the delivered goods. The fix is simple: require lot or batch references, ask for lot-specific evidence when the order includes regulated claims, and make any material or trim substitution subject to written approval before production resumes. That keeps the order defensible if the buyer later needs to show how the item was sourced.
- Request a BOM that names the fabric, zipper, puller, label, ink, and packaging materials.
- Ask for batch-specific evidence whenever the supplier makes a claim about fiber content, recycled content, or restricted substances.
- Confirm whether the supplier uses in-house sewing, printing, and packing or subcontracts those steps.
- If you need country-of-origin or labeling support, ask for the exact wording before the PO is issued.
Construction Details And Tolerances That Decide Durability
Procurement teams often focus on the front panel and miss the details that control failure. On a canvas zipper portfolio, the stress points are the zipper ends, the corner seams, the pocket opening, and any strap or loop attachment. Ask for seam allowance, stitch density, bartack placement, and the panel order used in sewing. A practical buyer-side starting point is at least 8 mm seam allowance on main seams and 10 mm around zipper insertion, with 8 to 10 stitches per inch on visible seams unless your factory engineers the pattern differently. Narrow allowances make the item look neat in samples and weak in production.
If the portfolio has a gusset, divider, or pen slots, the construction should be shown in a sketch or sample breakdown so the factory cannot improvise the build. The buyer should also define how flat the item must lie and how much distortion is acceptable after assembly. A simple internal check is to confirm that the body does not twist, the zipper track is even, and the corners do not bubble after closure. Those are practical issues on a worktable and they show up fast when the item is handled by non-technical users.
If a wrist loop, tab, or handle is added, ask for a static pull check in your own spec, such as 10 kg for 10 seconds as an internal acceptance benchmark. That does not replace a formal test if you need one, but it does give the factory a clear durability target. It also helps the buyer avoid the common mistake of buying a display-friendly sample that fails once weight and repeated use are introduced.
- State seam allowance, stitch density, and reinforcement points in the RFQ.
- Ask for a construction sketch if there is a gusset, divider, or pocket system.
- Check whether the zipper is top-stitched, bound, or hidden and make the chosen method part of the approved sample.
- If a loop or handle is included, write down a pull-test requirement instead of assuming the factory will self-define durability.
Branding And Decoration Need Placement Control, Not Just A Logo File
Decoration is where quotes often become misleading. A single-color screen print is usually the simplest and most economical choice for a bold logo. Heat transfer can work when the artwork is more detailed, but it should be tested for cracking, edge lift, and rub resistance. A woven label or sewn side label gives a more durable and premium result, especially if the brand wants the item to feel more like a retail product than a giveaway. Embroidery is possible, but it can add bulk and may distort thin canvas panels if the logo is too dense or too close to a seam.
The real control point is placement. Ask the supplier to show the artwork size in millimeters, the exact offset from the edge or centerline, and the reference side of the product. Keep the print or label at least 15 mm away from zipper seams unless the design has been engineered around that overlap. If the brand uses multiple vendor names or seasonal artwork variants, define which artwork files are approved for which SKU and keep the color reference in the PO. For dyed trim or colored canvas, ask for lab dips or color references before bulk production so the factory does not guess.
Decoration should also be tied to the intended selling channel. Farmers market vendors often want a clean, readable logo that survives a season of daily use, not a flashy finish that looks good for one event and wears fast after that. That makes durability a real commercial issue, not a cosmetic preference. When the artwork is simple, check rub resistance and edge quality. When the artwork is layered or detailed, approve a decorated sample and make sure the supplier understands that moving the logo is not a silent substitution.
- Use screen print for simple graphics and stable repeat volume.
- Use a woven or sewn label when durability and a premium look matter more than a fully printed face.
- Approve a strike-off or decorated sample before the factory starts the full run.
- Lock artwork placement in millimeters so the logo does not drift batch to batch.
Build A Quote That Exposes Real Cost Drivers
A useful RFQ separates the portfolio into its real cost components: canvas body, zipper, puller, lining if any, divider or pocket if any, label or patch, decoration, packing, carton, and any testing or setup charge. If the supplier gives one blended number, you cannot see whether the cost driver is fabric weight, decoration method, or packaging. That matters when one version is printed and another uses a woven label, or when one build is a simple sleeve and another includes a divider and pen slots. The labor difference can be material even when the product looks similar in photos.
Ask for price breaks at 300, 500, 1,000, and 3,000 pieces so you can see where setup cost falls away. Also ask what happens if you change the artwork size, move the label, switch from printed decoration to a sewn patch, or upgrade the zipper. A quote should clearly state whether the price is EXW or FOB, what is excluded, whether cartons and master packing are included, and whether any temporary stock fabric is being used. If one supplier appears cheaper but excludes packing, inspection, or setup, the landed cost can end up higher than the more complete quote.
For buyers managing seasonal or recurring market programs, the question is not only unit price. It is the cost of change. If a supplier charges a new setup fee every time the label shifts 10 mm or the zipper puller changes, that should be visible before the award. Put those trigger points into the quote request so the commercial comparison reflects how the product will actually be ordered over time.
- Request separate lines for body, zipper, decoration, packing, and testing.
- Compare EXW with EXW and FOB with FOB so freight assumptions do not distort the price.
- Ask what triggers a higher MOQ, such as custom zipper tape, dyed canvas, or a special puller.
- Have the supplier state all exclusions explicitly, including artwork charges, carton charges, and sample fees.
Sample Approval And QC Should Be Treated As A Gate, Not A Formality
A sample is only useful if it proves the actual production build. The buyer should expect at least a proto sample and a pre-production sample. For branded or higher-risk programs, add a decorated sample or strike-off and keep a signed golden sample on file. The pre-production sample should use final fabric, final zipper, final label or patch, and final packing method. If the factory changes any of those elements after approval, the order should be treated as a deviation, not a routine substitution.
QC should be specific. Check dimensions with a ruler, cycle the zipper at least 10 times, inspect stitch density, and run a dry rub test on printed areas. A practical inspection target for many buyers is AQL 2.5 for major defects and 4.0 for minor defects, but the important part is that the AQL level is written into the PO or inspection plan before production starts. Also inspect the first carton and the random carton pulls for zipper scuffs, fabric creases, loose threads, and any sign that the packing does not protect the decorated surface.
The buyer should also define what counts as a fail before inspection starts. For example: misaligned artwork, a zipper that snags on the first pass, a seam that opens under normal tension, a fabric weight below the approved range, or a carton count mismatch. That gives the receiving team a decision rule instead of a subjective argument. If the product is meant for repeated vendor use, it is cheaper to reject a weak batch at source than to absorb replacement work later.
- Keep a dated golden sample with front, back, inside, zipper, and label photos.
- Reject any bulk lot that does not match the approved materials or construction details.
- Write the inspection standard into the PO before the goods are produced.
- Use the pre-production sample to confirm both the product and the packing structure.
Packing, Lead Time, And Reorder Control Should Be Written Into The PO
Packing affects both damage risk and warehouse efficiency. For retail or direct-to-consumer channels, individual polybagging protects the canvas, print, and zipper pull. For distributor or kit programs, bulk pack by SKU can reduce plastic and make receiving easier. The buyer should specify unit pack, carton count, carton dimensions, carton gross weight, and outer mark format before production starts. As a practical warehouse target, many teams prefer cartons under 15 kg gross so manual handling stays manageable. If the shipment is moving by sea or through a humid lane, ask whether the supplier uses a moisture barrier, a desiccant, or a carton liner.
Lead time is not just production time. A first order usually includes sampling, artwork approval, material reservation, bulk sewing, final inspection, packing, and freight booking. For planning purposes, a common range is 7 to 14 days for samples and 20 to 35 days for bulk after approval, but the actual schedule depends on whether the fabric and zipper are already in stock and whether the decoration is simple or layered. For reorders, ask the supplier to keep the BOM, approved sample photos, and trim sources on file, and require a change notice if any substitution is proposed.
Reorder control matters because the second order is where a program often drifts. A supplier may switch fabric lots, alter zipper pullers, or change packing to save time unless the buyer has locked the approved configuration. The PO should state that the next lot must match the golden sample unless a written deviation is approved. That keeps the buyer from discovering a difference only when the box lands at receiving.
- Set unit pack, carton count, carton dimensions, and carton gross weight before the PO is released.
- Ask for moisture protection if the lane is humid or the shipment is likely to sit in transit.
- Separate sample time, bulk time, inspection time, and freight time in the schedule.
- For reorders, require the supplier to confirm that fabric, zipper, label, and packing are unchanged or disclose the exact substitution in writing.
Specification comparison for buyers
| Supplier option | What to verify | Commercial advantage | Buyer risk to control |
|---|---|---|---|
| Direct sewing factory | zipper source record, production-line zipper test photos, approved trim card, cutting marker photos, and final open-carton count | Better sample-to-bulk control and faster production feedback | May be weaker on export paperwork or branded packing unless checked early |
| Trading company | Factory name, production photos, trim-source proof, and who owns QC decisions | Can coordinate small mixed orders and extra services | Markup can hide real factory capability and slow defect decisions |
| Specialized bag workshop | zipper gauge, zipper tape width, puller finish, binding tape, corner reinforcement, seam allowance, and document-size tolerance | More practical for detailed construction, trims, and repeat programs | Capacity may be limited during peak seasons |
| Low-price general supplier | 300D-600D polyester, 10-12 oz canvas, or recycled PET with backing stiffness matched to document weight | Useful for simple promotional runs with loose specs | Material downgrades, weak packing, and vague inspection scope can erase savings |
| Retail-ready supplier | flat packing, insert board if needed, SKU bundles, carton weight limit, moisture protection, and barcode visibility | Can handle labels, SKU separation, carton marks, and receiving rules | Higher unit cost must be compared against reduced warehouse work |
| Compliance-focused supplier | Fabric records, labeling review, test plan, and production traceability | Safer for retail programs and repeat brand orders | Documentation claims need evidence, not only sales language |
| Local sample room plus bulk factory | Signed sample, bulk factory handoff, first-piece photos, and deviation owner | Good for complex branding before large production | Sample room quality may not match bulk line unless handoff is controlled |
Buyer checklist before sampling
- Define the exact document set the portfolio must carry before you ask for price, such as A4 sheets, letter paper, receipts, a clipboard, pens, business cards, or a slim tablet.
- Set a finished internal clear size rather than a vague product name. For A4 use, ask for at least 225 x 315 mm internal clearance; for letter use, ask for at least 235 x 305 mm, then confirm seam allowance and zipper tape do not reduce usable space.
- Write the tolerance in the RFQ. A practical starting point is +/- 5 mm on width and height, +/- 3 mm on pocket depth, and +/- 2 mm on zipper length unless your design is unusually tight.
- Specify finished fabric weight in oz and GSM, not just a marketing phrase such as heavy canvas or premium cotton.
- Lock the zipper grade, puller style, closure direction, and tape width in the quote so the factory cannot swap in a lighter zipper or a different puller finish.
- Choose one decoration method, one artwork size, and one placement reference, then approve a strike-off or decorated sample before bulk sewing starts.
- Ask for compliance evidence tied to the actual batch, including restricted-substance testing where applicable and any claim support for recycled content, organic content, or fiber composition.
- Require a pre-production sample made from final materials, final zipper, final label or patch, and final packing method.
- Set reinforcement expectations at stress points such as zipper ends, corners, pocket openings, and strap or loop attachments if included.
- Compare quotes only after normalizing Incoterm, carton spec, quantity, decoration count, packing scope, and what is excluded from the price.
Factory quote questions to send
- What is the finished internal size, external size, and tolerance for width, height, pocket depth, and zipper length?
- Is the canvas weight measured after finishing, and can you share the actual GSM or oz range from production, not a marketing estimate?
- What is the fabric composition, and can you confirm whether it is 100% cotton, poly-cotton, or recycled PET canvas with the declared blend ratio?
- What zipper type, zipper size, zipper tape width, and puller finish are included in the quote, and what is the backup source if the preferred trim is unavailable?
- Which decoration method is included, what is the maximum number of colors or stitch changes before pricing changes, and what is the setup charge per color or placement?
- What seam allowance, stitch density, and reinforcement method are standard for the body, zipper ends, and corners?
- What are the MOQ and price breaks at 300, 500, 1,000, and 3,000 pieces, and what component change triggers a higher MOQ?
- What sample stages are included: proto sample, decorated sample, pre-production sample, and retained golden sample?
- Which compliance documents can you provide for the fabric, trim, ink, label, and packaging materials, and are they tied to the same batch or lot code?
- What are the EXW and FOB prices, what is excluded, what is the packed carton spec, and what is the realistic lead time for sample approval, bulk production, inspection, and export booking?
Quality-control points to confirm
- Check finished width, height, and pocket depth against the signed spec sheet with a calibrated ruler or steel rule, not a visual estimate.
- Measure zipper length, zipper tape placement, and puller alignment on the sample and on the first production lot.
- Cycle each sample zipper at least 10 open-close passes and reject any snagging, tooth misalignment, hard pull, or end-stop failure.
- Inspect seam allowance at the body seams and zipper ends; a common buyer-side target is at least 8 mm on main seams and 10 mm where the zipper is inserted, unless the pattern is engineered differently.
- Verify stitch density on visible seams, with a typical target of 8 to 10 stitches per inch for canvas construction unless your factory spec requires otherwise.
- Check for bartacks or reinforced backstitching at corners, zipper ends, and any loop, strap, or tab attachment points.
- Perform a dry rub test on printed areas with white cloth for at least 10 back-and-forth passes and reject early ink transfer or cracking.
- Confirm artwork placement against the approved reference, including distance from the edge, centerline, and zipper seam, so one batch does not drift visually.
- Open random cartons after compression and check for moisture, scuffing, crushed corners, or zipper pulls damaging adjacent items.
- Inspect carton count, master pack count, and outer marks against the packing list before goods are released from receiving.