Start With the Commercial Use
Canvas zipper portfolios for craft fairs can serve very different jobs. One buyer may need a low-cost booth organizer for receipts, vendor permits, order forms, and price sheets. Another may sell the portfolio as branded merchandise. A sponsor may need it as a vendor welcome pack. A sales team may use it as a wholesale buyer kit holding line sheets, swatches, and catalogs. The same product name can hide different quality, packing, and allocation requirements.
Define the use before asking for a lower MOQ. Internal booth folders may need reliable zippers, correct document fit, and bulk cartons. Retail merchandise needs cleaner fabric, stronger cosmetic inspection, individual packing, barcode accuracy, and better presentation. Event distribution needs exact-count cartons and clear carton marks by fair city, team, or sponsor. Wholesale kits need a more polished hand-feel because they are handled during buyer conversations.
This early decision also keeps the specification from becoming overbuilt. Pockets, linings, custom zipper pulls, several logo versions, and retail packaging may all be useful in the right program, but each one can add setup, component MOQ, sewing time, and inspection points. For a first order, protect the features that affect function and brand presentation, then treat decorative upgrades as priced options.
If the order is likely to repeat, tell the supplier. A repeatable craft fair portfolio gives the factory a reason to preserve material references, screens, carton marks, and sewing notes. MOQ negotiation is easier when the supplier sees a controlled reorder path rather than a one-time request for many exceptions.
- Classify the project as internal use, retail merchandise, sponsor gift, buyer kit, or regional event distribution.
- Write the target contents into the RFQ: catalogs, A4 sheets, US letter forms, receipt envelopes, sticker sheets, sample cards, or permits.
- Decide whether the item must be retail-ready, event-ready, or simple bulk-packed for later sorting.
- Avoid adding pockets, lining, or custom hardware until the base MOQ and delivery window are realistic.
Find the Real MOQ Driver
MOQ negotiation works best when the buyer asks what creates the minimum. The limit may not be sewing capacity. It may be fabric roll yield, zipper purchase quantity, print setup, label supplier MOQ, cutting-table efficiency, packing labor, or production-line scheduling. A supplier may accept 300 pieces if the order uses stock natural canvas and a standard zipper, but require a much higher quantity for custom dyed canvas, custom zipper tape, or a branded puller.
Ask for quote breaks at 300, 500, 1000, and 2000 pieces using the same specification. This shows whether the supplier is spreading fixed setup charges over the order or whether material purchasing is the true constraint. If the price drops sharply after 500 pieces, setup and cutting efficiency may be important. If it drops only after 1000 or 2000 pieces, fabric, zipper, print, or packing purchasing may be driving the economics.
The best MOQ concession is usually a production simplification, not a quality compromise. A buyer can approve a stock canvas shade, standard zipper tape color, standard puller, or common carton count. Those concessions reduce supplier friction without weakening the product. By contrast, removing sample approval, accepting vague material specs, shrinking the zipper below functional need, or skipping inspection can create expensive event problems.
When multiple logo versions are needed, structure the order as one base product with controlled final variations. For example, 900 pieces split into three printed versions is easier to manage if the canvas, zipper, size, construction, and packing remain identical. The supplier can purchase and sew efficiently, then manage artwork version control during printing and packing.
- Ask which item controls MOQ before asking for an exception.
- Keep fixed setup charges separate from unit price in the quotation.
- Negotiate decorative choices before compromising size, zipper function, sample approval, or QC access.
- Use total-order volume to support logo splits when the base portfolio remains consistent.
Specify Size by Usable Fit
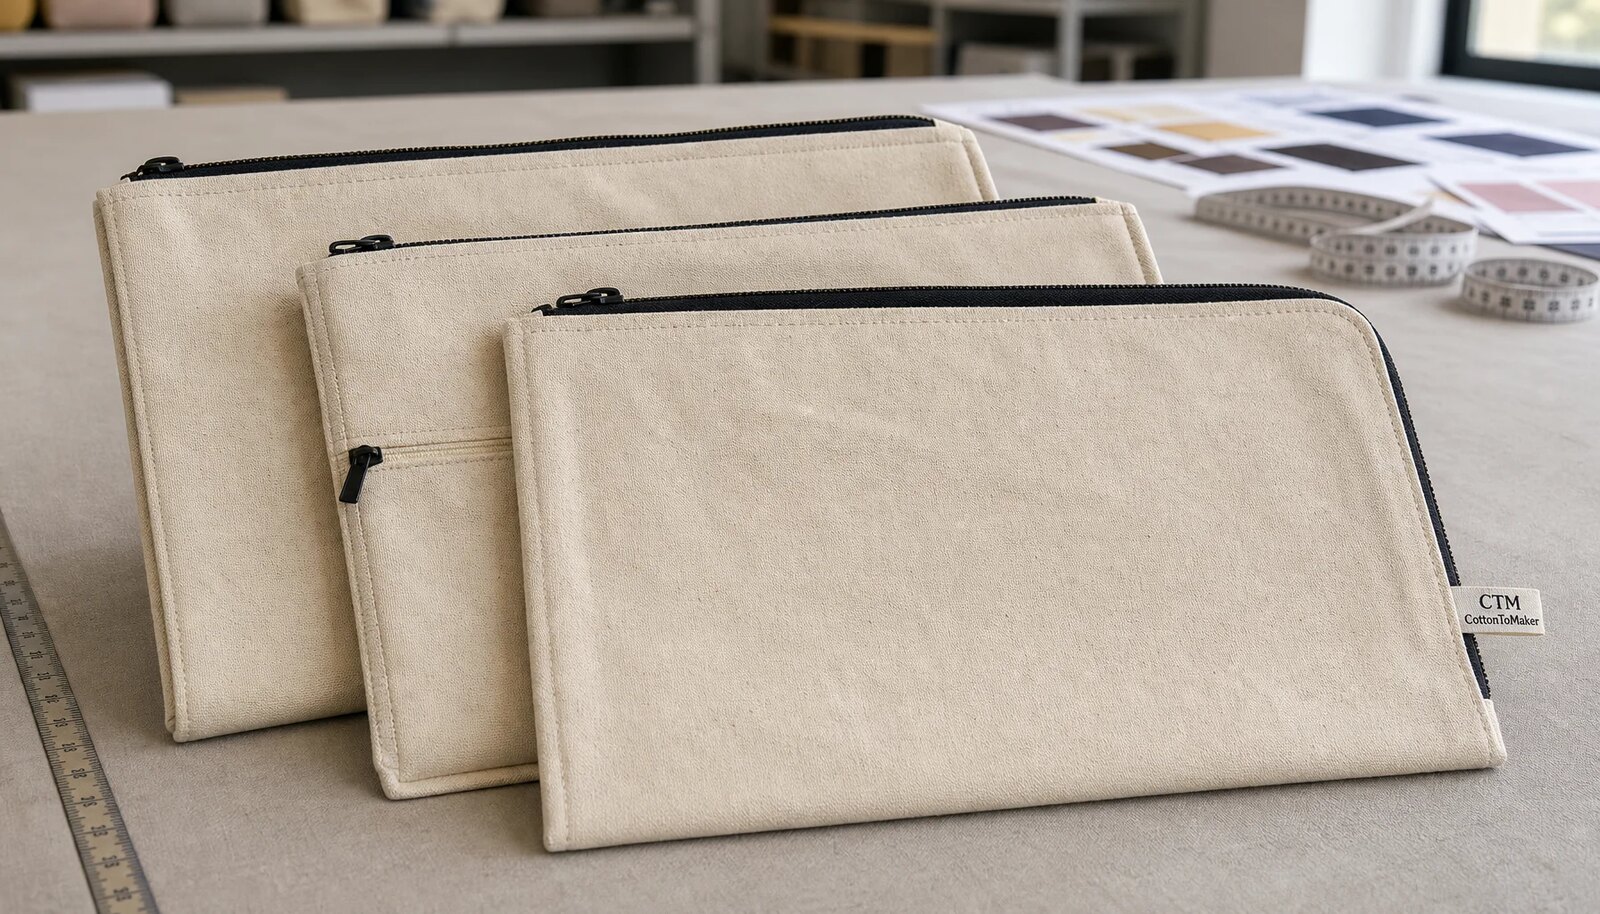
A portfolio that measures correctly outside can still fail in use. Documents need clearance around seams, binding, zipper tape, fabric thickness, and zipper ends. A4 paper is 21 x 29.7 cm, and US letter is 21.6 x 27.9 cm, but the buyer should specify the usable inside dimension, not only the finished outside measurement.
For many flat document portfolios, outside sizes around 35 x 26 cm for A4-related contents or 36 x 27 cm for US letter-related contents are practical starting points, depending on orientation and zipper opening. These are typical buyer specs, not universal standards. The final size should be tested with the actual contents, including catalog thickness, rigid inserts, sticker sheets, envelopes, or sample cards.
Zipper orientation affects usability and cost. A long-side zipper usually makes documents easier to insert quickly. A short-side zipper can work for smaller kits but may bend large sheets during use. A three-side zipper improves access, but it adds zipper length, sewing time, alignment risk, and packing bulk. If thick contents are required, quote a gusset separately because even a small gusset changes cutting yield and carton volume.
The sample approval should include a document-fit test. Insert and remove the real contents repeatedly, not just once for a photo. Watch whether corners bend, whether the zipper end catches, and whether the filled portfolio stays flat. Craft fair teams often work quickly in crowded booths, so the design should tolerate normal handling.
- State outside size, usable inside size, zipper opening length, orientation, corner shape, and tolerance.
- Use +/- 5 mm as a typical starting tolerance for flat portfolio width and height unless contents require tighter control.
- Test the sample with the real paperwork, inserts, catalogs, or cards that will be used at the fair.
- Quote gusset, lining, slip pocket, card slot, and pen loop as separate cost and MOQ options.
Choose Canvas With Clear Tolerances
Canvas should be specified as a production material, not only as a style description. A useful RFQ states fiber content, fabric weight, color, finish, hand-feel, roll shade expectations, and defect limits. For many B2B craft fair portfolios, 12 oz cotton canvas, often around 380-420 GSM after finishing, is a balanced starting point because it has structure without excessive corner bulk.
A lighter 10 oz canvas, often around 300-340 GSM depending on weave and finish, can work for giveaways, internal folders, and light documents. It may wrinkle more and feel less premium on a booth table. A heavier 14 oz canvas, often around 430-480 GSM, can look stronger but may increase sewing difficulty, carton weight, zipper waves, and bulky corners. These ranges should be treated as typical sourcing references, not guaranteed conversions, because ounce weight and GSM vary with yarn, weave, finishing, washing, starch, bleaching, and coating.
Natural canvas often includes seed flecks and small slubs. That character can be acceptable for a craft-oriented brand, but buyers should still reject oil stains, water marks, mildew odor, heavy color bands, dirty fingerprints, and major weaving defects. Bleached canvas gives a cleaner print ground, while dyed canvas can support brand color but may require lab dips, shade-band approval, fabric mill minimums, and longer lead time.
For low MOQ programs, stock natural or stock dyed canvas usually gives the most practical balance of cost, timing, and control. If custom dye is required, ask the supplier to quote the fabric MOQ separately from the finished-goods MOQ so the commercial impact is visible.
- Balanced spec: 12 oz cotton canvas, approximately 380-420 GSM after finishing, firm hand-feel, stock natural or stock dyed shade.
- Lower-cost spec: 10 oz canvas for light contents after checking opacity, wrinkle level, and print show-through.
- Premium spec: 14 oz canvas only after testing seam bulk, zipper flatness, stacking, and carton weight.
- Fabric QC should define GSM tolerance, shade band, slub limits, stain standard, odor standard, shrinkage expectation, and finish.
Control the Zipper and Sewing Build
The zipper is the most handled component on the portfolio. For A4 or letter-size canvas portfolios, a No. 5 nylon coil zipper is a practical default because it generally runs more smoothly over longer openings than a No. 3 zipper and feels more robust to users. Metal teeth can look premium, but they may add weight, raise cost, and mark fabric or print surfaces during packing.
Zipper MOQ depends on tape color, slider type, puller style, plating, and branding. Standard black, white, natural, or neutral tape colors are usually easier to source. Custom tape color, special plating, molded pullers, or logo pullers can trigger separate component minimums and tooling. If a branded puller is important, quote it as an option with mold cost, component MOQ, sample timing, and replacement terms.
Sewing details should be visible in the specification. Define seam allowance, stitch density, thread color, binding method, zipper-end reinforcement, corner construction, and label placement. Bound inside seams reduce fraying and improve appearance, but they add labor. Zipper ends and corners deserve attention because they often fail before flat panel seams when users pull quickly.
Inspection should treat zipper issues as functional defects, not minor cosmetic issues. Major defects include slider jamming, tooth separation, broken puller, sharp exposed ends, tape twisting, severe waves, skipped stitches at zipper ends, and open seams. The approved sample should become the reference for zipper feel and sewing finish.
- Use a No. 5 nylon coil zipper as a typical default for full-size document portfolios.
- Keep standard zipper tape and standard puller when MOQ and lead time are tight.
- Specify seam allowance, stitch density, thread color, binding method, and zipper-end reinforcement.
- Place woven labels away from high-stress zipper ends unless reinforcement is included.
- Check sampled zippers through at least five open-close cycles during inspection.
Match Decoration to Order Reality
Artwork often creates hidden MOQ and lead-time pressure. Craft fair buyers may request seasonal graphics, sponsor names, city versions, maker-brand logos, or multiple colorways. Each added color, placement, or decoration method can require setup, strike-off approval, curing time, line cleaning, and version-specific inspection. Decoration should be chosen for the artwork, quantity, and delivery window.
One-color screen print is often the safest first choice for simple logos or event marks in 300-1000 piece orders. It is familiar, cost-effective at moderate quantities, and easy to inspect when the artwork is not too fine. Two-color screen print can work, but registration tolerance must be defined. On textured canvas, large solid areas may show fabric texture or small pinholes, while fine type and thin lines may lose sharpness.
Heat transfer can work well for lower-volume multicolor artwork or seasonal graphics that are not proven yet. The buyer should test edge adhesion, hand-feel, cracking, flexibility, rub marks, and packing impressions on the actual canvas. A transfer that looks sharp on a smooth test fabric may behave differently on natural cotton canvas.
Embroidery and digital print are options, but they should be quoted deliberately. Embroidery suits small premium marks but may distort a flat document panel if the stitch area is dense. Digital print can handle complex artwork, but color on natural canvas is less predictable than on a white synthetic surface. For the first MOQ negotiation, screen print or a tested transfer usually gives the clearest cost-control path.
- Screen print: best for simple spot-color logos; define Pantone target, print size, curing, and position tolerance.
- Heat transfer: useful for lower-volume multicolor artwork; test hand-feel, edge lift, cracking, and packing marks.
- Embroidery: suitable for small premium logos; avoid large dense stitch areas on flat panels.
- Digital print: consider for complex artwork only after approving color expectations on actual canvas.
- Print QC should cover safe distance from seams, edge sharpness, ink coverage, pinholes, rub marks, and color match.
Compare Suppliers by Order Scenario
A supplier comparison should not stop at unit price. Two quotes may look similar while carrying different assumptions about fabric, zipper, print, packing, inspection, and event allocation. A procurement buyer should compare suppliers against the actual order scenario: trial order, logo-split program, retail-ready merchandise, sponsor distribution, or premium buyer kit.
For a trial order, the best supplier may be the one with stock canvas, standard zippers, fast sampling, and transparent setup charges. For a retail order, the better supplier may have stronger cosmetic QC, barcode handling, and cleaner individual packing. For a regional event program, version control, carton marking, and exact-count packing may matter more than a small unit-price difference.
Ask each supplier to quote the same base specification and the same quantity ladder. Then add scenario-specific lines: logo split fee, barcode fee, carton split fee, retail packing upgrade, sample revision cost, inspection support, and lead-time impact. This prevents a low quote from hiding work that will later appear as delays or destination labor.
Landed cost per usable approved piece is the most useful comparison. Add unit price, amortized setup charges, sample cost if allocated, inland freight, inspection cost, international freight, duty, destination fees, repacking labor, and expected unusable pieces. If each fair team needs an exact quantity, a standard over/under shipment tolerance may not be acceptable.
- Compare suppliers using the same specification, quantity breaks, packing method, and shipment term.
- Score quotes by scenario fit, not only by ex-factory price.
- Ask for carton quantity, carton dimensions, gross weight, net weight, estimated CBM, and packing orientation.
- Confirm over/under shipment tolerance when event allocation requires exact counts.
- Calculate landed cost per usable approved piece after setup, freight, inspection, and repacking assumptions.
Use Samples to Freeze the Standard
Sampling should prove the production method, not simply provide a visual mockup. A rough development sample made from substitute fabric can help confirm shape, but it should not authorize bulk production. Before cutting bulk material, request a pre-production sample made with the intended canvas, zipper, slider, puller, thread, print method, label placement, inner packing, and carton concept where possible.
If any sample component is substituted, the supplier should state that clearly and confirm when the final material will be available. Vague sample approvals are a common source of inspection disputes. The approved sample should become the reference for hand-feel, shade, zipper operation, sewing finish, print appearance, usable size, and packing method.
The approval process should include measurement and use testing. Measure outside width and height, usable inside size, zipper opening length, print size, print position, seam allowance, and label placement. Insert the actual contents several times. Open and close the zipper at least ten times on the sample. Rub the print with a clean dry cloth and check for obvious ink transfer, cracking, edge lift, or unwanted gloss depending on the print method.
Keep a dated sample record. Save ruler photos, swatch references, artwork files, Pantone targets, written correction notes, and packing photos in one project folder. If possible, keep one signed physical sample with the buyer and one with the factory. Bulk production should not begin until corrections, artwork, packing, and carton marks are approved in writing.
- Approve a pre-production sample using bulk-intended materials wherever possible.
- Record outside size, usable size, zipper opening, print size, print position, seam allowance, and label placement.
- Test real contents, zipper function, print rub, odor, corner behavior, and stacking before approval.
- Reject samples with wrong usable size, zipper catching, print lift, severe shade mismatch, strong odor, or poor packing fit.
- Require written approval before bulk cutting, printing, or final material purchasing when risk is high.
Set Inspection Standards Early
Quality control should be written before production starts. Canvas zipper portfolios have predictable risk points: size variation, tight document fit, zipper failure, seam puckering, print placement, weak ink coverage, fabric stains, loose threads, odor, and packing errors. A purchase order with measurable standards gives both sides a basis for correction before cartons leave the factory.
Measurement control should include outside dimensions, usable inside dimensions, and zipper opening length. For many flat portfolios, +/- 5 mm on finished width and height is practical. If the product holds rigid sample cards, exact catalogs, or inserts, the usable dimension tolerance may need to be tighter. Print position can often be controlled to +/- 3 mm for centered logos and +/- 5 mm for larger panel graphics, using the approved sample as the visual reference.
Zipper inspection should be repetitive. Selected pieces should be opened and closed at least five cycles during final inspection. Inspectors should look for slider jamming, tooth separation, loose pullers, rough stops, tape twisting, skipped stitches near zipper ends, and sharp exposed edges. Carton packing should also be checked because pullers can mark printed panels under pressure.
Cosmetic standards should match the channel. Retail craft fair merchandise requires cleaner fabric, better thread trimming, more consistent print, and individual packing inspection. Internal booth folders can accept minor natural canvas character, but not stains, odor, broken stitches, or functional zipper problems. Packing inspection should verify counts, logo versions, barcode accuracy, carton marks, dry cartons, secure tape, and approved variant mixes.
- Size QC: outside width and height, usable inside size, zipper opening length, corner shape, and document-fit test.
- Zipper QC: five open-close cycles, smooth slider, secure stops, flat tape, no sharp parts, and no skipped stitches at stress points.
- Print QC: approved color target, position tolerance, coverage, edge sharpness, curing, pinholes, cracking, transfer lift, and rub marks.
- Sewing QC: stitch density, seam allowance, back-tacking, binding, label security, loose threads, puckering, and reinforced zipper ends.
- Packing QC: correct count, correct SKU, clean bag or band, barcode, carton mark, dry carton, secure tape, and approved variant mix only.
Pack for Fair Distribution
Packing is part of procurement control, not an afterthought. Craft fair programs often require fast sorting by booth team, city, sponsor, store, or retail SKU. If the supplier quotes only loose bulk packing, the buyer may need destination repacking, relabeling, or manual allocation just before the event. That labor can erase a small unit-price saving.
Individual packing options should match the channel. A clear recycled polybag protects the item and keeps barcode labels visible. A glassine-style paper sleeve or paper belly band may fit a more natural brand presentation but needs testing for scuffing and moisture exposure. Retail-ready goods may need barcode labels, hangtags, warning labels where applicable, and clean carton presentation. Internal booth organizers may need simpler packing, but still require accurate counts and clean cartons.
Master carton quantity often falls around 50-100 pcs depending on portfolio size, fabric weight, zipper puller, and packing method. The right count should be confirmed by carton dimensions, gross weight, net weight, estimated CBM, stacking behavior, and whether the contents crease under compression. Cartons packed too tightly can create zipper impressions or print rub. Cartons packed too loosely can allow shifting and corner damage.
For logo-split or regional programs, confirm whether mixed cartons are allowed. If not, carton marks should identify logo version, SKU, destination, quantity, purchase order, and carton number. If mixed cartons are approved, require an inner packing list and clear separation. Event buyers should also discuss over/under shipment tolerance because exact allocation may matter more than a standard production variance.
- Choose individual polybag, paper sleeve, belly band, or retail label based on channel and handling needs.
- Confirm carton quantity, carton dimensions, gross weight, net weight, estimated CBM, and stacking risk.
- Require carton marks by logo version, SKU, destination, quantity, PO number, and carton number when allocation matters.
- Define whether mixed cartons are permitted and how they must be labeled and inspected.
- Check that zipper pulls, labels, and printed panels do not mark each other under carton pressure.
Specification comparison for buyers
| Sourcing scenario | Best-fit order structure | Commercial advantage | Watch-outs before approval |
|---|---|---|---|
| First craft fair trial order | 300-500 pcs using stock natural canvas, standard No. 5 nylon zipper, one-color logo, and simple individual packing | Lower setup risk and faster approval because the supplier can use existing materials and a simple sewing flow | Unit price may be higher; confirm sample fee, screen fee, carton quantity, and whether reorder pricing improves |
| Regional fair program with logo splits | 600-1000 pcs total with one shared body specification and two or three controlled print versions | Factory can buy, cut, sew, and pack one base product while managing artwork versions near the final stage | Require line clearance, version labels, carton marks, and inspection counts by logo to avoid mixed allocations |
| Retail booth merchandise | 500-2000 pcs with cleaner fabric grade, tighter cosmetic QC, barcode labels, and display-ready packing | Higher sell-through readiness and less destination repacking for fair booths or pop-up retail tables | Packing labor, barcode setup, and cosmetic rejects can raise cost; approve fabric shade band and retail defect standard |
| Sponsor or vendor welcome kit | 500-1500 pcs with fixed delivery date, exact-count cartons, and possibly sponsor artwork | Works well when event allocation is known and cartons can be marked by city, sponsor, or booth team | Avoid late artwork changes; confirm over/under shipment tolerance and whether mixed cartons are allowed |
| Premium buyer kit or wholesale packet | 300-1000 pcs with firmer canvas, smooth zipper, clean logo placement, and document-fit testing | Better presentation for line sheets, order forms, price lists, and sample cards used in sales conversations | Do not overbuild with pockets or custom pullers unless the quantity supports added operations and component MOQ |
| Complex custom build | 1000+ pcs with dyed canvas, custom zipper tape, branded puller, lining, pockets, or multiple print colors | More brand control and feature differentiation for repeat programs or retail SKUs | Custom materials may create separate MOQs, longer lead times, lab dips, tooling, and stricter sample approval needs |
Buyer checklist before sampling
- Define the business use first: booth organizer, retail item, sponsor gift, vendor welcome pack, wholesale buyer kit, workshop packet, or regional event allocation.
- Request quantity breaks at 300, 500, 1000, and 2000 pcs using the same specification so price differences are not caused by hidden spec changes.
- State finished outside size, usable inside size, zipper opening length, orientation, target contents, and measurement tolerance before negotiating price.
- Ask which component controls MOQ: canvas roll, custom dye lot, zipper tape, slider, puller, print screen, transfer plate, woven label, packing, barcode, cutting batch, or production scheduling.
- Choose the first-order simplification deliberately: keep the body construction stable, then decide whether logo, barcode, or carton splits are commercially necessary.
- Provide vector artwork, print size, print position, Pantone or closest spot-color target, minimum line thickness, and notes for large solids, distressed textures, halftones, or small type.
- Separate unit price from one-time charges such as sample fee, screen fee, strike-off fee, transfer plate, artwork cleanup, custom label setup, barcode setup, carton mark setup, and zipper puller tooling.
- Request a pre-production sample made with bulk-intended canvas, zipper, slider, puller, thread, print, label, inner packing, and carton-packing concept where possible.
- Set measurable QC standards for size, usable fit, zipper cycling, seam allowance, stitch density, print position, print durability, stains, odor, thread trimming, and carton accuracy.
- Confirm carton quantity, carton dimensions, gross weight, net weight, estimated CBM, packing orientation, compression risk, SKU labels, barcode labels, destination marks, and mixed-carton rules.
Factory quote questions to send
- What is your standard MOQ for this canvas zipper portfolio, and which component sets the limit: fabric, zipper, print setup, label, packing, cutting efficiency, or line scheduling?
- Can you quote the same specification at 300, 500, 1000, and 2000 pcs, with unit price and one-time charges shown separately?
- Which canvas weights and colors are regular stock items, and what GSM tolerance, roll width, shade variation, and finishing method apply to each?
- For natural canvas, can you provide an approved shade range and state how you classify seed flecks, slubs, color bands, stains, and weaving defects?
- What zipper size, zipper tape material, slider type, puller style, end-stop method, tape color options, and puller finish are included in the base price?
- Can one total order be split across two or three printed logos if the portfolio body, zipper, packing, and carton quantity stay the same? What additional fee or lead time applies?
- Which print method do you recommend for our artwork size, line thickness, ink coverage, and quantity? What are the setup cost, strike-off cost, revision cost, and production tolerance?
- What print-safe distance do you require from zipper teeth, seam allowance, binding, label tabs, folded edges, and rounded corners?
- What are your standard tolerances for finished width and height, usable inside dimension, zipper opening length, print position, stitch density, and seam allowance?
- How many manual zipper cycles do you check during internal QC, and what defects are considered major or critical for zipper operation?
Quality-control points to confirm
- Finished width and height should normally stay within +/- 5 mm for flat portfolios unless the buyer specifies a tighter functional requirement or the design includes gusseting, heavy binding, or unusual shaping.
- Usable inside dimension must be measured separately from outside size because zipper tape, binding, seam allowance, and fabric thickness reduce the document space.
- Zipper opening length should be checked against the approved sample and target contents; documents should insert and remove without bent corners or forced angle.
- Zipper operation should be tested for at least five open-close cycles on sampled pieces, with no slider jamming, tooth separation, tape twisting, broken puller, rough top stop, or sharp exposed end.
- Zipper tape should sit flat, with no severe waves, uneven stitch tension, open seams, skipped stitches at zipper ends, or left-right panel mismatch.
- Print position should stay within +/- 3 mm for centered logos and +/- 5 mm for large panel graphics unless a tighter approved standard is written.
- Print quality should be checked for pinholes beyond the approved strike-off, weak ink coverage, blurred edges, color mismatch, ink bleeding, cracking, transfer lifting, scorch marks, and unwanted gloss variation.
- Canvas shade should be compared to approved swatch or shade band under consistent lighting; natural cotton flecks may be acceptable, but oil marks, water stains, dirty fingerprints, and strong color bands should not be accepted for retail-ready goods.
- Sewing should be checked for consistent stitch density, secure back-tacking, even seam allowance, no broken stitches, no skipped stitches, no loose threads longer than the agreed limit, and no seam puckering that affects appearance or function.
- Stress points such as zipper ends, corners, label insertion points, pull tabs, and pocket openings should be checked because these areas usually fail before flat panel seams.