Why a portfolio proof is not just a logo proof
A canvas zipper portfolio can look straightforward in a catalog image: rectangle, zipper, logo, done. In production, it behaves nothing like a flat promotional print. Canvas has texture and stretch. Seams change the reference points. Zipper tape adds thickness along one edge. Printing pressure may vary once the panel is cut, sewn, folded, or packed. A PDF proof can confirm the artwork layout, but it cannot prove that the finished bag will carry the logo cleanly or zip without catching.
That distinction matters for farmers market vendors because the portfolio is usually working gear. It may hold permits, daily harvest lists, allergen sheets, laminated menus, wholesale order forms, price cards, invoices, market maps, cash envelopes, and small catalogs. It may sit on a damp table, ride in a vehicle crate, slide into a booth bin, and get opened in front of customers. A pretty logo loses value quickly if the zipper snags, the print cracks at a fold, or the inside sheds lint onto paperwork.
The sourcing goal is to approve a repeatable production standard before bulk begins. That standard should cover fabric, finished dimensions, zipper behavior, logo placement, print method, trim, interior layout, packing, and carton labeling. Think of the proof as a product approval file, not a design approval email. The physical sample, artwork sheet, tolerance sheet, and PO should all point to the same version.
- Treat canvas zipper portfolios for farmers market vendors as functional business bags with decoration, not as flat print merchandise.
- Use a physical pre-production sample when the order value, resale channel, or brand visibility justifies the cost.
- Tie approval to one artwork file, one material specification, one tolerance sheet, and one signed sample record.
Start with the vendor use case
The best specification begins with what the vendor will actually put inside the portfolio. A produce farm may need letter-size crop lists, market permits, order pads, and laminated price sheets. A bakery may carry menus, allergen information, packaging labels, and wholesale forms. A flower vendor might use the portfolio for event notes and order cards. Prepared food sellers may carry laminated sheets that are thicker and less flexible than ordinary paper. These details are more useful than a generic phrase like document pouch.
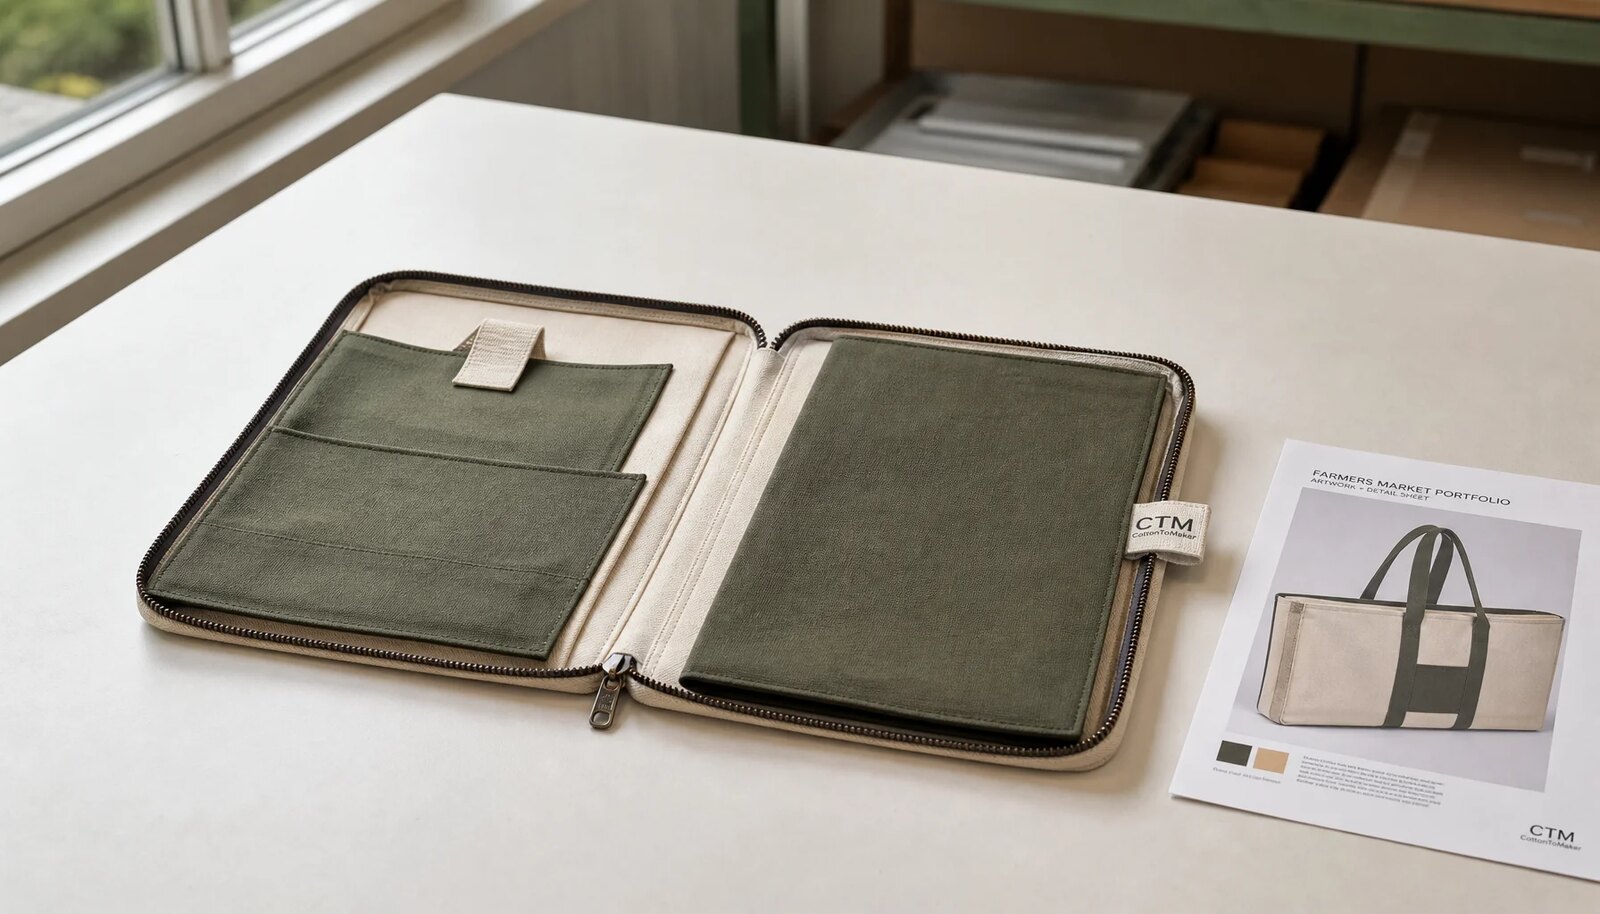
Specify finished outside dimensions and usable inside dimensions separately. A portfolio can measure correctly on the outside and still feel too tight because zipper tape, seam allowance, binding, lining, and canvas thickness reduce the internal space. If the contents are based on letter size, A4, half sheets, tablets, clipboards, catalogs, or ring-bound order books, name those items and state the loaded thickness. A flat sleeve is clean and compact, but a gusseted style may be better when vendors need to carry more than loose paper.
Decide the carry method early. Some programs only need a slim zip document case that sits inside a stall bin. Others need a handled portfolio carried from a vehicle to a booth. Handles change reinforcement, sewing time, packing size, and logo placement. If the item is for resale rather than internal distribution, the buyer may also need a cleaner interior, stronger perceived hand feel, hangtag, barcode label, or retail-ready unit pack.
- Define contents by size and thickness before requesting price.
- State whether the portfolio is flat, gusseted, handled, or internally organized.
- Separate required functions from optional features so suppliers do not quote different products under the same name.
Write canvas specs a factory can quote
Canvas is not one material. A quote that says cotton canvas may refer to different weights, weave densities, yarn qualities, finishes, shrinkage levels, and surface grades. For many canvas zipper portfolios, 12 oz to 16 oz cotton canvas is a practical B2B range. Converted by area weight, that is roughly 407 to 544 GSM. The number is only meaningful when the supplier states whether it is finished fabric weight after dyeing, washing, coating, or backing.
The surface matters as much as the weight. A coarse canvas can look sturdy and appropriate for market use, but it may break up fine logo edges, small sponsor marks, QR codes, and narrow type. A smoother canvas improves print definition, yet it may feel lighter if the construction is too soft. Natural canvas may show flecks, seed particles, and tone variation. Dyed canvas may vary by dye lot. Buyers who care about repeat orders or brand color should approve a swatch or lab dip before committing to bulk.
Finishing also affects proofing. If fabric is washed after printing, the artwork may soften. If panels are printed before sewing, placement must allow for cutting tolerance and seam allowance. If the finished portfolio is printed after sewing, raised seams, zipper tape, and corners can create uneven pressure. Before asking suppliers to quote, decide what matters most: crisp logo detail, rugged hand feel, structured body, dye consistency, lower shrinkage, or lowest unit cost. One product rarely optimizes all of those at once.
- Ask for composition, finished weight, weave or surface description, dye color, finish, and shrinkage expectation.
- Approve physical swatches for natural, dyed, washed, or coated canvas instead of relying only on color names.
- Make suppliers quote the same fabric stage: finished weight against finished weight, not greige weight against finished weight.
Specify the zipper as a working component
The zipper is one of the most used parts of the portfolio, so it deserves more detail than zipper closure. Nylon coil zippers are common for canvas portfolios because they are flexible, relatively light, and usually smooth around corners. Metal zippers can give a heavier premium look, but they add weight and may need more care around thick seams or curves. Plastic molded zippers can work for some bags, though they may feel bulky on slim document portfolios.
A procurement specification should include zipper type, gauge if the supplier can state it, tape color, slider material and finish, puller style, pull direction, zipper opening length, and end stop method. Color-matched zipper tape usually looks cleaner on retail-facing bags. Contrast tape can also work, but only when it is intentional. Accidental mismatch between canvas, zipper tape, and puller finish is a sampling problem that can become a bulk problem fast.
Pay close attention to zipper ends. The tape must be anchored securely, and the slider should not catch on seam allowance, binding, lining, or thick corner construction. If the portfolio includes handles, pen loops, dividers, or internal pockets, those areas need the same stress-point thinking. Ask whether the factory uses bar tacks, dense stitching, binding, or other reinforcement where repeated pulling occurs. Then open and close the sample many times, pack it as intended, and check the zipper again after pressure has been applied.
- Document zipper type, tape color, slider finish, puller style, opening length, and end stop construction.
- Check the zipper on the packed and unpacked sample, because pressure can reveal catching or slider marks.
- Inspect zipper ends, corners, handle bases, and pocket openings as stress points during final QC.
Match print method to artwork risk
Screen printing is often a strong choice for simple brand marks, bold type, and repeat orders. It can provide good opacity on canvas when the ink system and curing are appropriate. Even so, buyers should check minimum line weight, small text legibility, registration, and whether dark canvas requires an underbase. A one-color logo on natural canvas is a very different job from a three-color sponsor layout on black, forest green, or olive fabric.
Transfer methods, including heat transfer and digital transfer options, can be useful for multi-color artwork, gradients, short runs, and several market groups under one purchase order. The tradeoff is durability risk. Transfers should be tested for adhesion, edge lift, cracking, hand feel, and heat marks on the final canvas. A transfer that looks sharp on a flat strike-off may fail near a fold, zipper seam, or high-flex corner.
Embroidery, woven labels, cotton labels, and patches can be better for some brand programs. Embroidery may pucker thinner panels or leave a rough reverse side if the inside is not finished cleanly. Labels and patches add sewing operations and may carry separate MOQs or color limitations. The practical answer is not that one branding method is always best. Choose based on artwork, quantity, canvas texture, fabric color, use case, and the level of repeatability the program needs.
- Use screen print for simple spot-color logos where opacity, cost control, and repeatability matter.
- Use transfer methods for complex artwork or low quantities, but test edges, folds, and adhesion on the final canvas.
- Avoid tiny sponsor logos, fine QR codes, and small legal text unless the factory proves readability on a physical sample.
Build a production-ready print proofing checklist
A print proofing checklist should be clear enough for both the production supervisor and the final inspector. Instead of writing logo centered on front, state the logo width and height, the distance from the zipper seam or top edge, the distance from the side seam, and the acceptable tolerance. Flexible fabric shifts under handling, so the reference points must be stable construction points that exist on every finished unit.
Artwork control deserves the same discipline. Procurement teams often send revised files through several email threads, then discover that production used an earlier version. Each file should have a clear name, revision number, date, color reference, and approval status. If the order includes multiple farmers market vendors, sponsor logos, regions, or seasonal designs, assign a separate artwork code to each version. That code should appear on the PO, sample sheet, carton label, and inspection report.
Color standards should be practical, not wishful. Pantone references are useful, but canvas color, weave, ink chemistry, and curing can change the apparent result. A physical strike-off or printed pre-production sample is the better approval standard when color matters. State whether the goal is close brand matching against the approved sample or a broader commercially acceptable range. That wording prevents arguments caused by comparing ink on textured cotton canvas to a coated-paper brand guide.
- Record logo dimensions, location from seams, color reference, print method, and placement tolerance.
- Name every artwork version with a code that follows the sample, PO, carton label, and inspection report.
- Approve a physical printed standard for brand-sensitive color, opacity, and edge sharpness.
Compare quotes beyond the unit price
A useful supplier quote separates the major cost drivers: fabric, zipper and trim, cutting, sewing, printing, print setup, sample charges, label or patch charges, packing materials, carton labeling, inspection support, inland freight if applicable, and export documents where relevant. When everything is blended into one number, it becomes hard to know whether two suppliers are quoting the same canvas zipper portfolio.
MOQ rules can change the budget quickly. One supplier may quote a minimum by total order. Another may require minimums by bag style, fabric color, zipper color, print artwork, label version, or packing style. Farmers market programs often need one shared portfolio style with several sponsor logos or regional versions. If each artwork version must meet a separate MOQ, buyers need to know that before the quantity plan is approved.
Sample type is another quote variable. A low-cost structure sample made with available fabric can confirm size and pattern, but it cannot approve final print quality, fabric shade, zipper finish, or packing. A pre-production sample made with final materials and decoration costs more, but it is the sample that should become the production master. Quote comparison should therefore be based on the product that will actually ship, not the cheapest partial sample or incomplete spec.
- Request a price ladder with separate sample, setup, unit, packing, label, and shipment-related charges.
- Clarify MOQ by style, color, zipper, artwork, label, and total PO.
- Only compare quotes after aligning fabric weight, zipper spec, print method, sample type, construction, QC, and packing.
Approve samples in the right order
Sampling should follow the largest unresolved risk. If the pattern, gusset, handle, interior pockets, or usable size is still uncertain, start with a prototype or fit sample. It does not need final artwork if the purpose is to validate structure. Measure it, load it with real documents, zip it closed, and decide whether the opening and capacity are right before spending time on color matching.
Once the structure is settled, move to a strike-off or printed panel if print risk is high. Then request a pre-production sample with final canvas, final zipper, final slider, final trim, final branding, final construction, and intended packing. Review that sample against the same checklist final QC will use. Measure outside and inside dimensions, check logo position, compare color, test the zipper, inspect the interior, and look at how the packed unit presents.
Sample approval should leave a clean record. If the buyer approves a sample and later changes logo size, zipper color, fabric shade, label placement, or packing, the factory needs written change approval. Informal changes create disputes because the production team may follow the last signed sample. For repeat orders, keep one physical master sample and one digital approval sheet so the next run is judged against the same standard.
- Use prototype samples for structure and pre-production samples for final approval.
- Test the sample with real contents and the intended packing method before signoff.
- Do not mix approval versions; every change should have a dated record and revised artwork or spec code.
Make QC measurable and staged
Quality control should be written before production starts. Vague standards such as good stitching or clean print leave too much room for interpretation. A stronger QC sheet states the allowed dimensional tolerance, print placement tolerance, color standard, zipper function requirement, stitch condition, acceptable fabric variation, packing method, carton quantity, and defect classification.
For sewn canvas portfolios, inspection works best in stages. Incoming material inspection checks fabric weight, shade, stains, odor, weave defects, zipper tape color, sliders, labels, and trims before cutting. In-process inspection checks panel orientation, print placement, ink cure or transfer adhesion, cutting accuracy, zipper sewing, thread tension, pocket placement, and seam alignment before the whole lot is packed. Final inspection checks finished dimensions, zipper action, print condition, loose threads, stains, interior cleanliness, carton count, SKU separation, and label accuracy.
AQL inspection can be appropriate for larger B2B orders, but smaller runs still need a defined inspection sample and defect list. Critical defects may include wrong artwork, wrong SKU label, broken zipper, missing component, severe contamination, or unsafe sharp trim. Major defects may include crooked print outside tolerance, open seam, zipper snagging, strong shade mismatch, transfer lift, or poor packing that damages the logo. Minor defects may include small thread ends or slight cosmetic variation inside the approved standard.
- Define critical, major, and minor defects before bulk begins.
- Measure print and dimensions from the same reference points shown on the approval sheet.
- Request inspection photos of fabric, print, zipper ends, interior, packed units, carton marks, and any defects found.
Treat packing and carton marks as part of the proof
Packing can protect or damage an otherwise acceptable portfolio. Printed canvas can scuff, collect dust, crease across the logo, or show zipper pull impressions when compressed. Flat packing may protect the printed face better, but it increases carton size. Folding can reduce freight volume, but the fold direction must avoid permanent marks through the logo or a stiff transfer area. Unit protection should match the channel, whether that means polybag, tissue, paper band, insert card, hangtag, barcode label, or no individual plastic.
Carton marks are operational controls. Farmers market programs may include multiple vendor groups, sponsor versions, market locations, or seasonal artworks. If cartons are not labeled clearly, receiving teams can mix versions and distribute the wrong portfolio. Cartons should show SKU, artwork code, fabric color, quantity, PO number, carton sequence, destination, and barcode format if required. Mixed-version cartons should be avoided unless the buyer has approved the pack plan in writing.
Approve packing before bulk production, not after finished goods are waiting. Ask for a packed pre-production sample or packing photos showing fold direction, printed-face protection, unit count, carton size, carton label placement, and master carton weight. If the portfolios will be kitted with other items, confirm whether they must arrive flat, pre-labeled, barcode-ready, or grouped by location. Packing belongs in the print proofing checklist because it affects both product condition and receiving accuracy.
- Specify unit pack, fold direction, printed-face protection, carton count, and gross weight limit.
- Require carton labels to show SKU, artwork code, color, quantity, PO number, destination, and carton sequence.
- Keep artwork versions physically separated unless a mixed-carton plan is documented and approved.
Specification comparison for buyers
| Spec decision | Recommended option | When it fits | Buyer risk to check |
|---|---|---|---|
| Sourcing route | Direct bag factory with sewing control and verified print capability | Best for repeat B2B programs, branded resale, distributor orders, and projects where the approved sample must be repeated closely | Confirm whether fabric receipt, cutting, printing, sewing, final inspection, packing, and defect resolution are managed by the same factory or subcontracted |
| Sourcing route | Trading company or sourcing agent with named factory partners | Useful when you need quote benchmarking, several bag categories, language support, or backup capacity | Ask which factory makes the sample, who signs the approval standard, who owns artwork control, and who pays for sorting or rework if bulk misses the approved sample |
| Sourcing route | Domestic decorator using imported blank portfolios | Can work for short runs, urgent event distribution, or late personalization after blanks are in stock | Check blank consistency, printable area, zipper quality, inventory replacement policy, and whether decoration heat or pressure affects the zipper area |
| Fabric weight | 12 oz to 16 oz cotton canvas, typically about 407 to 544 GSM when converted by area weight | Good balance for document portfolios that need body, repeated handling, and printable surface without excessive bulk | Verify whether the quoted weight is finished fabric weight after dyeing, washing, coating, or backing; do not compare greige weight against finished weight |
| Fabric finish | Dyed or natural canvas with approved swatch, surface cleanliness, and shade tolerance | Best for brand-sensitive kits, resale channels, market organizer programs, and repeat orders | Request lab dip or fabric swatch approval, then define acceptable shade variation by approved swatch or grey scale rather than color name only |
| Print method | Screen print with spot colors and documented ink system | Best for simple logos, bold type, one- to three-color artwork, and quantity programs where setup is amortized | Check opacity on textured canvas, registration tolerance, minimum line weight, ink cure, rub resistance, and whether dark fabric needs underbase |
| Print method | Digital transfer, heat transfer, or DTF-style transfer where suitable for the canvas | Works for multi-color art, gradients, short runs, event versions, and many artwork variants under one PO | Test edge lift, cracking on folds, hand feel, heat marks, wash or wipe behavior if relevant, and adhesion near seams, zipper tape, and high-flex areas |
| Branding option | Woven label, cotton label, patch, or side tab | Useful when the design needs subtle branding, premium appearance, or repeat logo consistency without large panel printing | Confirm label material, stitch placement, colorfastness, attachment strength, and whether label MOQ differs from bag MOQ |
| Construction | Bound internal seams, reinforced zipper ends, stable stitch density, and clean thread trimming | Best for portfolios carried weekly, packed in carts, used on outdoor tables, or sold as reusable vendor gear | Inspect seam allowance, stitch count per inch, skipped stitches, corner puckering, zipper tape anchoring, and loose threads inside the portfolio |
Buyer checklist before sampling
- Define the buyer channel: market organizer kit, vendor association program, distributor resale, farm brand merchandise, sponsor giveaway, or retail product line.
- List the actual contents before choosing the pattern: permits, letter or A4 sheets, laminated menus, wholesale price lists, order pads, cash envelopes, catalogs, tablet, sample cards, or folded market maps.
- Specify finished outside dimensions and usable inside dimensions separately, including width, height, gusset depth, zipper opening length, and maximum loaded thickness.
- State fabric composition, finished canvas weight in oz and/or GSM, weave or surface description, dye color, shade standard, shrinkage expectation, and whether coating, backing, washing, or enzyme finish is allowed.
- Define zipper type, zipper gauge if known, tape color, slider material and finish, puller shape, pull direction, end stop construction, and whether zipper ends require reinforcement.
- Send vector artwork with outlined fonts, embedded or linked color references, final logo size, placement from fixed seams or edges, approved revision code, and separate files for each artwork version.
- Choose print method based on artwork complexity, fabric color, line weight, expected quantity, durability need, and hand feel; list screen charges, transfer charges, color matching, and sample print charges separately.
- Request the right sample stage: prototype for size and structure, strike-off for print/color, and pre-production sample for final fabric, zipper, trim, print, construction, and packing.
- Set measurable tolerances for finished dimensions, print position, logo size, print color, registration, stitch density, zipper operation, stains, thread trimming, carton quantity, and label accuracy.
- Confirm MOQ by style, fabric color, zipper color, print design, label version, and total purchase order, especially when multiple market groups or seasonal artworks share one program.
Factory quote questions to send
- What exact fabric are you quoting: composition, yarn or weave description if available, finished GSM or oz weight, dye method, finish, coating or backing, and whether the weight is measured before or after washing or finishing?
- What zipper are you quoting: coil or metal, gauge if available, tape color, slider material, puller style, end stops, opening length, and reinforcement at zipper ends and corners?
- Which print or branding method will you use for this artwork, and what is included in setup, screen charge, transfer charge, color matching, strike-off, and pre-production sample fees?
- What minimum line weight, minimum text size, color count, registration tolerance, and printable area do you recommend for this canvas surface and finished portfolio pattern?
- What is the MOQ by bag style, fabric color, zipper color, print artwork, label version, and total PO, and how does pricing change if several artwork versions share one shipment?
- Can you provide a price ladder at practical quantities with separate lines for sample cost, unit cost, print setup, packing, carton labeling, inspection support, inland freight, and export document charges where applicable?
- What sample types are available, and which sample will use final canvas, final zipper, final slider, final trim, final print color, final placement, final stitching, and intended packing?
- What finished dimension tolerance and print placement tolerance can you hold in normal production, and can you inspect against our approval sheet using fixed measurement points?
- How do you check print cure, rub resistance, transfer adhesion, ink tackiness, zipper operation, zipper end strength, seam strength, shade consistency, and visible stains during production?
- What is your standard lead time after written sample approval, and where are the main schedule risks: fabric sourcing, dye lot approval, artwork correction, print curing, sewing capacity, packing, inspection, or export booking?
Quality-control points to confirm
- Fabric weight should match the approved range, with no obvious thin spots, severe slubs, loose weave, shade mismatch, oil marks, mildew odor, heavy lint, or contamination that affects print coverage.
- Fabric shade should be checked against the approved swatch or lab dip under consistent light, with natural canvas variation judged against the agreed standard rather than a color name alone.
- Finished dimensions should stay within the buyer-approved tolerance, especially overall width, height, gusset depth, zipper opening, internal pocket size, and usable document area.
- Print placement should be measured from stable reference points such as zipper seam, side seam, bottom edge, or marked centerline, not judged only by eye on a flexible panel.
- Print quality should be compared with the approved physical standard for color, opacity, edge sharpness, registration, ghosting, bleeding, tackiness, cracking, transfer edge lift, and coverage across the canvas texture.
- Zipper should run smoothly from end to end, close without catching fabric, hold at end stops, and show secure stitching where zipper tape meets corners, binding, or stress points.
- Stitching around zipper, corners, handles, pockets, pen loops, labels, and binding should show even stitch length, no skipped stitches, no broken thread, no open seams, no severe puckering, and clean trimming.
- Reinforcement points should be checked with light manual stress during inspection, especially zipper ends, handle attachments, pocket openings, label attachments, and any area that receives repeated pulling.
- Inside construction should be clean for the intended channel, with no loose raw edges that shed badly, trapped thread, exposed adhesive, sharp zipper tape ends, loose debris, or rough parts that could damage paperwork.
- Packing should protect the printed face, avoid zipper pull impressions, maintain consistent unit count per carton, keep artwork versions separated, and prevent corner crushing during normal handling.