Why gift-shop buyers should treat canvas zipper portfolios as a durability purchase, not just a print purchase
Canvas zipper portfolios look simple until you put them into real gift-shop use. Shoppers pick them up repeatedly, open and close the zipper from awkward angles, overstuff them with stationery or paper goods, and then return them to the shelf. The product has to survive that behavior while still looking neat enough to sell itself from a display table. That is why the buying decision is not just about artwork and size; it is about construction, zipper quality, seam reinforcement, and how the item packs.
A sample photo can look clean and still fail once the bulk lot arrives. The usual problems are zipper drag, wavy top edges, puckered seams, artwork damage at the fold line, and cartons that compress the profile so much the item no longer looks premium. In gift retail, defect cost shows up in returns, markdowns, staff time spent repacking damaged units, and the lost shelf value of anything that looks tired before it reaches the register.
For procurement buyers, the useful question is not “Does it look good?” but “Will it hold shape, open smoothly, and arrive in sellable condition after packing and transit?” That question changes how you write the RFQ, what you ask the supplier to prove, and what you inspect before approval.
- Retail handling is harsher than sample-room handling: shoppers pull, fold, restuff, and set items back down repeatedly.
- The weak points are usually the zipper tape ends, corners, and print fold lines, not the face fabric alone.
- A usable sourcing brief should define measurable durability targets, not just dimensions and artwork placement.
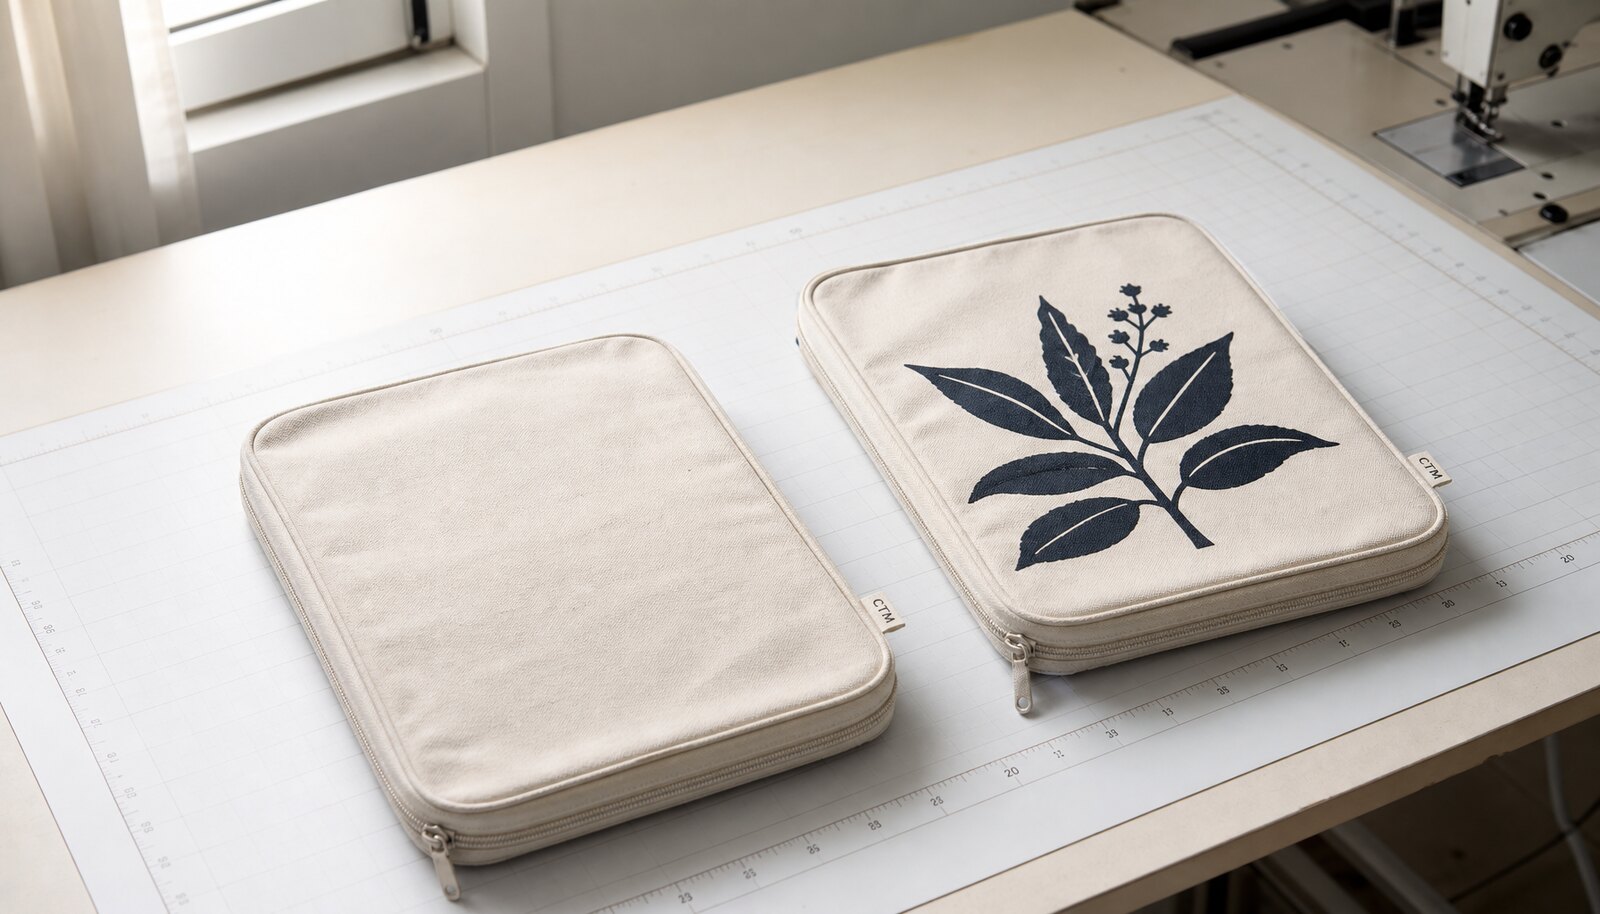
Choose fabric weight, finish, and body structure with the end use in mind
For most gift-shop programs, 12oz to 14oz cotton canvas is the practical range for canvas zipper portfolios. Below that range, the body can feel soft and collapse around the zipper opening, which makes the product look less structured on shelf. Above that range, the portfolio may feel premium, but sewing gets harder, corner turning takes longer, and freight weight climbs faster than many buyers expect. If the item will carry paper inserts, notebooks, event tickets, or a small stationery set, you want enough rigidity to protect shape without turning the item into a bulky case.
The finish matters almost as much as the weight. Ask whether the canvas is natural, bleached, dyed, washed, or pre-shrunk. A controlled finish helps keep the finished dimensions stable after sewing and packing. It also reduces the risk that one lot looks square and the next lot shrinks or skews enough to throw off logo placement. If the factory answers only with phrases such as “good canvas” or “high quality cotton,” push for a measured spec in GSM or oz with a tolerance range.
The structure should match the retail promise. A simple flat portfolio for cards and receipts can use a lighter build than a portfolio meant to carry catalog sheets or a gift set. If the item needs to stand up more firmly, ask whether the supplier can add a light lining, a fusible layer, or a reinforced seam map. Those changes affect cost, but they also affect how the product presents on shelf and how often it comes back as a complaint.
- 12oz: workable for lighter retail use and lower-cost programs, but it needs tighter seam QC.
- 14oz: better body for shelf presentation, stronger fold memory, and a safer default for printed fronts.
- Pre-shrunk or controlled-finish canvas reduces size drift and improves repeat-order consistency.
Map the use case before you send the quote request
Gift-shop buyers often source by catalog style, but the better approach is to define the use case first. A canvas zipper portfolio used to hold postcards or gift cards has very different stress than one that carries brochures, sketch paper, or a small stationery assortment. The load profile drives the right zipper size, seam reinforcement, and pack format. If you do not state the load profile, suppliers will quote to the lightest interpretation and you may only discover the weakness after the first store reset.
It also helps to think in SKU terms before production begins. One body style with one or two colorways is easier to manage than a long list of combinations across canvas color, zipper color, print version, and insert type. In seasonal gift retail, too many variants create dead stock quickly. A better plan is often to keep the underlying body construction unchanged and refresh the line through artwork, hangtags, or insert cards.
Retail display matters too. Ask how the portfolio will look when hanging, stacked, or laid flat in a gift display. Some products sell better with a visible zipper pull and a stiffer front panel; others need a softer hand and a natural canvas look. The wrong display assumption can turn a perfectly functional product into a slow mover because it does not photograph or merchandise well.
- Define whether the item is for documents, stationery, tickets, cards, or mixed retail inserts.
- Keep the core body spec stable and vary only artwork or tag details when possible.
- Consider how the product will be displayed: flat, stacked, hanging, or boxed for self-service.
Compare sourcing routes with real tradeoffs, not just factory-versus-trader labels
A direct factory quote is usually the best fit when you care about material control, repeatability, and traceable QC. The factory can show the sample room, explain how it cuts and sews the portfolio, and revise reinforcement details without relaying everything through another party. That matters if your gift shop business is seasonal or if the same style will be reordered in multiple waves. The downside is that factories can be less flexible if your order is very small or if you need many mixed SKUs.
A trader or sourcing agent can help when the order is mixed and you need coordination across several items, but buyers should not assume that convenience equals control. Ask who owns the spec, who approves substitutions, and who signs off the final inspection. If the answer is vague, you may be paying for coordination without getting traceability. In this category, traceability is not an abstract preference; it is the difference between catching a material swap early and discovering it after cartons are already in transit.
The middle ground can work if the supplier is transparent. Some trading firms operate with solid factory access and organized QC. If they can show the actual production facility, document the zipper and fabric source, and commit in writing to final inspection responsibility, then the route may be acceptable. The key is not the business model; it is whether the supplier can document exactly what will be made and how it will be checked.
- Direct factory: stronger for repeat orders, custom trim control, and visible process ownership.
- Trader or sourcing agent: workable if they can document material traceability and final QC responsibility.
- Do not compare quotes until you know who controls fabric booking, zipper booking, and sample approval.
Use a real durability testing checklist before production approval
A useful durability test should mirror how the portfolio will actually be handled in gift shops. You do not need a lab report for every buy, but you do need a repeatable checklist with sample size, method, and pass/fail criteria. A single sample can hide weaknesses, so ask for multiple samples from the same preproduction run and compare them side by side. For a standard program, three to five samples per style is a practical minimum for internal evaluation, with one kept as the master reference.
Start with zipper cycling. Open and close each sample 30 times by hand, then repeat after loading it with the intended product weight or a representative substitute. The zipper should track smoothly, the slider should not snag, the puller should remain secure, and the top stops should stay intact. Pass criteria: no missing teeth on coil zippers, no popped top stop, no slider derailment, and no visible tape separation. If the zipper feels stiff on the first few cycles, do not treat that as minor. It usually indicates poor alignment, weak tape attachment, or a low-grade slider that will worsen in production.
Next, test seam and corner stress. Load the portfolio to the expected retail use weight and flex the corners and top edge several times. Watch for loose stitches, seam opening, twisting at the zipper end, and puckering around the bar-tack area. Pass criteria: no seam opening longer than 1 mm, no broken stitches at stress points, and no thread tails longer than the agreed trim tolerance. Then run a fold-and-rub test on the printed area if the portfolio has artwork. Fold it along the same line used for packing, then rub the print with moderate hand pressure for 20 passes using a clean white cotton cloth. The print should remain intact and should not crack, transfer, smear, or become glossy in a way that looks damaged on shelf.
A simple abrasion check also helps. Rub the body fabric and printed area with a clean white cotton cloth for 20 passes. If the cloth picks up visible color, print residue, or loose fiber beyond what you would expect from unfinished canvas, the finish or print cure needs attention. Finally, check finished dimensions after the sample has rested flat for at least 24 hours. A portfolio that misses the agreed size by more than the tolerance can still be used, but it will likely create packing and display problems later.
- Use three to five samples when evaluating a new style or new supplier.
- Zipper cycling: 30 open-close passes per sample, then repeat under load.
- Seam stress: load, flex corners, and inspect zipper ends and bar-tacks for opening.
- Fold-and-rub: test the printed panel along the actual packing fold line with 20 cloth passes.
- Measure finished width, height, and zipper opening after a 24-hour rest before approval.
Make the testing section actionable: methods, sample size, and pass/fail criteria
The durability checklist becomes useful when it is written like an inspection plan rather than a general recommendation. A procurement-ready checklist should state what to test, how to test it, what instrument or reference to use, and what counts as a fail. That keeps the factory from interpreting your requirement too loosely and gives your internal team a standard way to compare suppliers.
For zipper performance, keep the test simple enough to repeat but strict enough to catch early failure. Use a counted cycle test of 30 cycles for sample screening and 50 cycles if the supplier is new or the zipper is a custom spec. Evaluate the slider at every 10-cycle interval. Failure indicators are snagging, partial closure, puller loosening, tape twisting, or a slider that no longer returns cleanly to the start point. If one sample fails, do not average it away; note the defect and ask whether the supplier can explain the cause and prevention.
For seam integrity, use a load-and-flex check. Fill the portfolio with a weight that reflects intended use and flex the top seam and corners 10 times. Pass if the seam remains closed and stitching stays intact. Fail if there is any seam opening, broken top stitching, or deformation that would show in retail display. For printed items, use a fold-line rub test with a white cotton cloth. The key point is not whether the design still looks “mostly fine,” but whether the print would be judged damaged by a shopper at point of sale.
If your buyer team wants one compact sheet, use a simple scoring format: pass, marginal, or fail. Marginal means the sample is usable only if the supplier provides a corrective action and a confirmed re-sample. That keeps the checklist practical and avoids endless debate over whether a flaw is “reasonable.”
- State sample size, cycle count, load level, and pass/fail criteria in the RFQ or tech pack.
- Use 30 cycles for screening and 50 cycles for higher-risk sourcing or new suppliers.
- Define failure as snagging, slider looseness, tape twisting, seam opening, print transfer, or visible deformation.
- Treat marginal results as rework items, not as automatic approval.
Write QC requirements that a supplier can actually inspect against
Quality control becomes useful only when the factory can inspect against a measurable standard. For canvas zipper portfolios, the inspection plan should include stitch count, seam quality, zipper operation, print appearance, color consistency, dimensions, and carton condition. If you only say “good quality,” the factory will use its own standard, which may not match a gift-shop buyer’s expectation for clean presentation.
Specify the stitch count per inch or per segment where it matters most. The exact number will vary by construction, but the supplier should tell you the planned stitch density and show that the seam tension is even. Ask them to check bar-tacks or reinforcement stitches at zipper ends, corners, and any attachment points. These are the spots that fail first when customers open the portfolio with one hand or stuff it too full.
For appearance, include print placement tolerance, thread trimming, loose fiber tolerance, and color consistency. If the portfolio is natural canvas, shade variation is part of the material’s character, but the lot still needs to be visually acceptable as a matched set. For printed items, ask the supplier to inspect for ghosting, misregistration, pinholes, and edge fuzz. A good retail buyer does not need perfection in the laboratory sense; they need a lot that looks deliberate and consistent on display.
Do not forget dimensional tolerance. Carton packing often exposes size drift that the sample room did not notice. If the portfolio is too large, it can wrinkle in the carton. If it is too small, it can look cheap or leave excessive empty space. The QC sheet should therefore include the allowable range for width, height, zipper opening, and panel alignment, not just a center target.
- Require inspection criteria for stitch count, seam tension, loose threads, print placement, and visible shade consistency.
- Specify bar-tacks or reinforcement at zipper ends and stress points.
- Add dimensional tolerance for width, height, zipper opening, and any gusset or pocket location.
- Ask for a final appearance check under normal shop-light conditions, not only under bright factory lamps.
Compare supplier quotes with a framework that shows ambiguity, not just price
A quote comparison is only useful if the answers are comparable. The most common mistake is to line up unit prices and ignore how each supplier defined the item. One supplier may quote a lighter canvas, another may omit a reinforcement step, and a third may be using a different zipper grade while still calling the product the same name. That is why procurement should force each quote onto the same field list before comparing numbers.
Build your evaluation around three buckets: spec clarity, production control, and commercial risk. Spec clarity means the supplier can name the fabric, zipper, stitch approach, print method, and packing format without hedging. Production control means they can explain sample flow, in-process checks, and final inspection. Commercial risk means they understand how substitutions, lead-time slip, or hidden packaging changes will affect the order. A vague answer in any of those buckets should lower the score.
When a supplier says “same as sample” or “equivalent quality,” ask what exactly counts as equivalent. Equivalent to what weight? What zipper? What finish? What shrinkage? What internal standard? If they cannot answer without referring back to you, they may not have a stable spec in house. That does not automatically disqualify them, but it does mean they should not be treated as a fully controlled source.
For gift-shop buying, the cheapest quote is often the one with the most open interpretation. A slightly higher quote with a clearly documented sample, controlled packing, and stronger QC may save money once returns, markdowns, and replacement shipments are added in. Compare the likely cost of defects, not only the invoice line.
- Normalize all quotes to the same spec sheet before comparing price.
- Score each supplier on spec clarity, process control, and commercial risk.
- Treat ambiguous language like “equivalent,” “regular quality,” or “standard packing” as a follow-up item, not an answer.
Use a buyer-friendly scoring model to separate strong suppliers from vague ones
A simple scoring method keeps supplier evaluation disciplined. Use 1 to 5 points for each of five areas: fabric clarity, zipper clarity, print clarity, QC clarity, and commercial clarity. A score of 5 means the supplier gave a specific answer with measurable detail and supporting evidence. A score of 3 means the answer is usable but incomplete. A score of 1 means the supplier stayed vague, changed terms, or avoided the question entirely.
Look for the difference between confident and specific. A confident supplier may say the zipper is good; a specific supplier will tell you the zipper type, slider construction, cycle check, and what happens if the zipper fails the sample. A confident supplier may say the printing is durable; a specific supplier will describe the ink or transfer method, curing approach, and how the print behaves after folding. Those are not the same thing. Procurement teams should reward specificity because it reduces surprises later.
Ambiguity also shows up in the commercial terms. If the supplier says the lead time is “about 30 days” but cannot say whether that includes sample revision, material booking, and pre-shipment inspection, the number is not operationally useful. If they quote a low unit price but cannot tell you the carton count or outer carton dimensions, you may see freight and damage costs later. The evaluation framework should therefore treat clarity as part of price, not separate from it.
A simple red-flag rule helps. If a supplier gives two or more vague answers in the same quote, do not proceed to sample approval until those points are clarified in writing. That safeguard is especially useful for seasonal gift-shop buying, where there is little room to correct a problem after production starts.
- Score each supplier from 1 to 5 in five areas: fabric, zipper, print, QC, and commercial clarity.
- Prefer answers that name methods, tolerances, and responsibility, not just general quality claims.
- Use a red-flag rule: two or more vague answers means the quote is not ready for approval.
Plan SKU mix, seasonality, and display behavior before you buy inventory
Gift-shop inventory lives and dies by timing. A portfolio that works in spring travel, museum shops, or holiday gifting may not move the same way in the off-season. That means your SKU plan should reflect retail calendar pressure, not only manufacturer convenience. If you over-split the line into many canvas colors and print versions, you may create too much slow-moving stock. If you keep the body style stable and vary the artwork or hangtag, you can often refresh the line without reworking the construction.
Seasonality also affects the kind of durability test that matters most. For a holiday buy, the item may be handled more often during display setup, stacked with other gift items, and packed more densely in cartons. For a summer travel buy, the portfolio may be stuffed and unzipped more frequently by end customers. Your product brief should reflect the season and the retail channel. Otherwise, the supplier tests one use case while your stores sell another.
Display behavior deserves its own attention. Ask whether the portfolio should hang from a tag, sit flat in a tray, or stack cleanly in a counter display. A soft body may look great in hand but slump in a display stack. A very stiff body may hold shape well but look too formal for a casual gift-shop aisle. Buyers should match product body to shelf presentation, not just to technical cost.
Return and defect cost should be part of the buying conversation. A unit that costs slightly more but holds its shape and arrives with fewer defects often protects margin better than a bargain item that needs repacking or replacement. For small gift shops, even a modest defect rate can be expensive because labor is limited and shelf space is precious.
- Keep the base SKU stable and use print or tag variations to follow seasonal demand.
- Match durability priorities to the buying season and the retail channel.
- Factor in returns, repacking time, and markdown risk when judging a quote.
Specification comparison for buyers
| Decision area | Recommended spec for gift-shop portfolios | Why buyers choose it | What to verify before PO |
|---|---|---|---|
| Canvas weight | 12oz to 14oz cotton canvas, or a documented equivalent with stated GSM/oz and tolerance | Gives enough body for display, protects contents, and still sews at a practical production speed | Ask for the fabric spec sheet, lot swatch, and an incoming-material tolerance such as ±5% on GSM/oz; reject terms like “thick canvas” without numbers |
| Fabric finish | Controlled finish such as pre-shrunk, washed, or tightly controlled greige-to-finish process | Helps finished size stay stable after cutting, sewing, and packing; reduces shape drift between lots | Ask for shrinkage results after the supplier’s own wash or steam process; verify that print placement still aligns after finishing |
| Zipper build | Nylon coil zipper with tested slider, secure top stops, and puller sized for retail handling | Usually gives smoother operation and fewer snag points than low-grade tooth styles | Request zipper brand, slider type, puller material, and cycle-test evidence; ask whether the zipper passed at least 50 open-close cycles without failure in sample evaluation |
| Stitching spec | Even stitch density, reinforced corners, and bar-tacks or equivalent reinforcement at stress points | Reduces seam opening at zipper ends and corner pullout under repeated use | Request stitch count per inch in critical seams, thread type, and a reinforcement map on the tech pack |
| Artwork method | Screen print for simple logos; heat transfer or digital print only when design complexity requires it | Keeps cost controlled and improves durability when the print process matches the canvas surface | Confirm cure/adhesion method, rub resistance, and whether the print still looks clean after folding along the pack line |
| Packaging | Flat-packed in protective inner polybag or equivalent, then carton-packed to prevent crush and zipper rub | Preserves shelf appearance and reduces transit damage | Approve fold method, inner protection, carton fill, carton drop expectations, and retail label placement |
| MOQ strategy | Start around 500 to 1,000 pcs per style/color when body construction is shared | Keeps unit economics workable without creating too many slow-moving variants | Separate body color, zipper color, print version, and packing format so the factory cannot hide split costs |
| Supplier route | Direct factory with sample room and documentable QC, or a trader only if traceability and final inspection responsibility are clear | Direct control matters when repeatability and brand consistency are more important than a fast quote | Check who owns material booking, who signs off preproduction samples, and who is liable for defects or substitutions |
Buyer checklist before sampling
- Confirm canvas weight in GSM or oz and require a numeric tolerance, not a marketing description.
- State zipper type, slider type, puller style, and whether the zipper finish should match or contrast with the canvas.
- Approve artwork size, placement, and print method against a sewn sample, not a digital proof alone.
- Define finished dimensions, zipper opening length, seam allowance, and acceptable measurement tolerance after sewing.
- Specify what the portfolio will carry: stationery, documents, tickets, cards, small gift sets, or mixed retail inserts, because load profile changes durability needs.
- Require packing instructions: flat fold, inner bag, barcode label, hangtag, master carton count, and whether any zipper protection is needed.
- Ask for photos of seam ends, zipper tape attachment, corner reinforcement, and print edges before bulk approval.
- Set an internal defect threshold for visible flaws, because gift-shop buyers often care about shelf appearance as much as function.
Factory quote questions to send
- What is the exact canvas specification by weight, weave, and finish, and what tolerance do you allow on incoming fabric?
- Which zipper brand or equivalent are you quoting, and what is the slider and puller construction?
- What print method are you pricing, how many colors are included, and what setup charge applies to each artwork location?
- What is your MOQ per color, per print version, and per zipper color if we combine SKUs in one order?
- What sample type will you provide first, what will it cost, and how long will it take from artwork approval to delivery?
- What are your standard carton dimensions, units per carton, and packing protection method for zipper heads and folded canvas?
- What QC checks do you perform on stitching, zipper cycling, print adhesion, carton drop resistance, and final appearance before shipment?
- What is your production lead time after sample approval, and how does it change for repeat orders, peak season, or trim changes?
- Can you quote EXW, FOB, and CIF separately so we can compare landed cost properly?
- If any material is substituted, who must approve it in writing, and how do you document that change?
Quality-control points to confirm
- Canvas weight, hand-feel, and finish match the approved sample and remain consistent across the lot.
- Zipper opens and closes smoothly without waviness, tooth gaps, slider drag, or tape twisting.
- Seams are straight, bar-tacks are secure, and stitch tension is even around stress points and corners.
- Artwork is placed within the agreed tolerance and does not crack, peel, smear, or gloss unevenly after folding and rubbing.
- Finished dimensions stay within tolerance for width, height, and zipper opening length.
- Packing protects the portfolio from crushing, zipper damage, print rub, and carton shift during transit.
- Cartons pass a simple drop check without obvious burst seams, crushed corners, or product deformation.