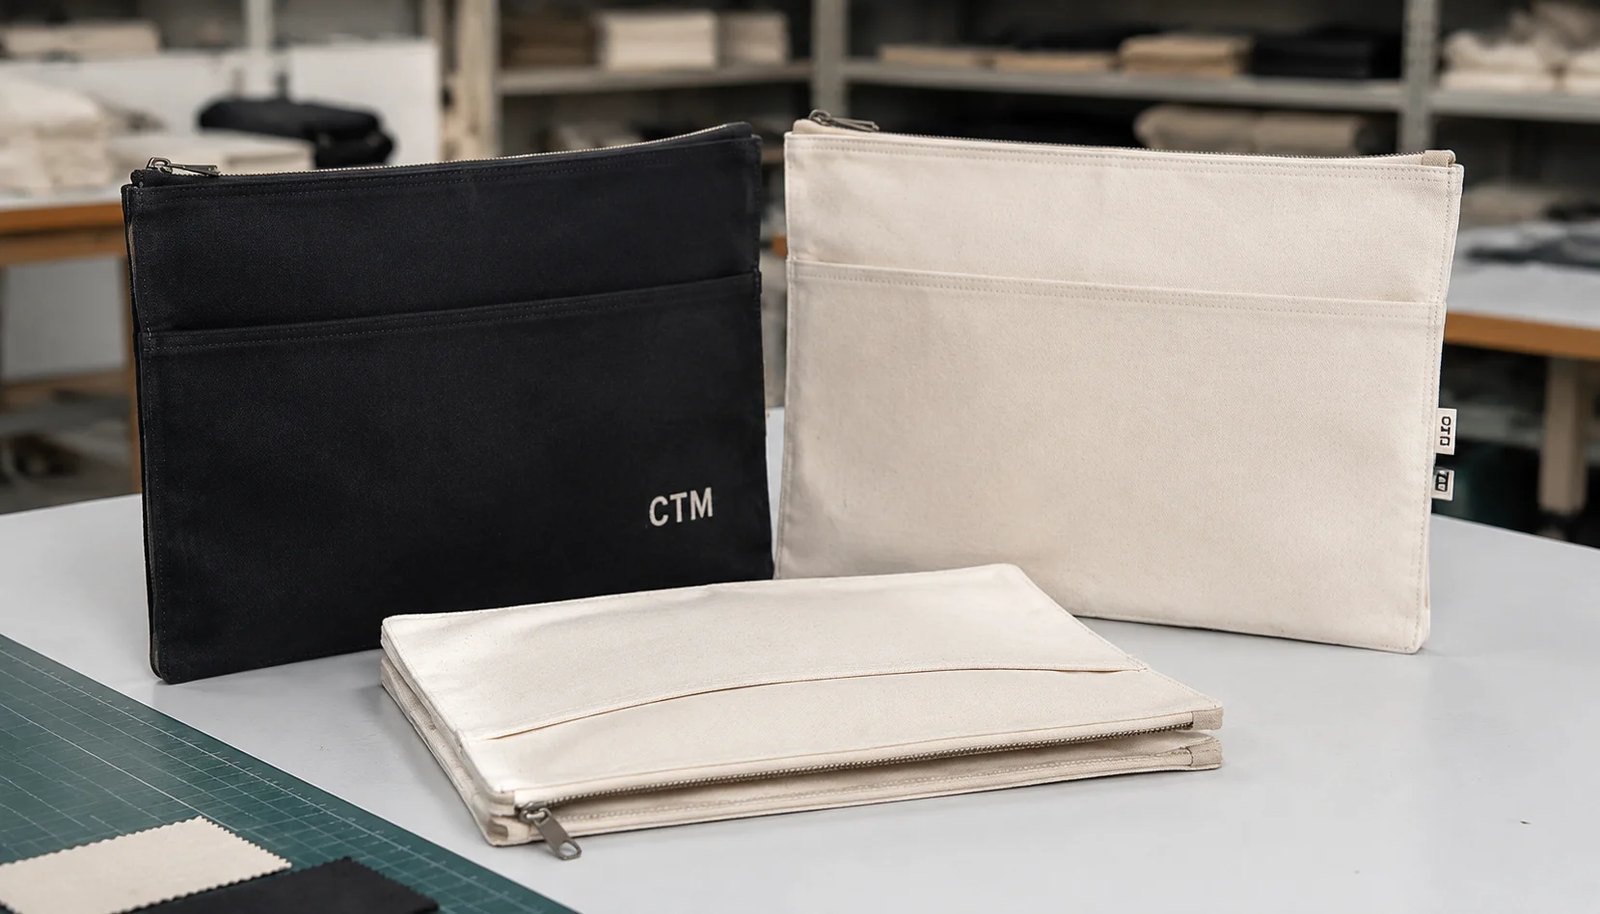
The buying problem museum shops actually face
Museum shops usually buy a canvas zipper portfolio as a retail item, not as a generic promotional pouch. That changes the sourcing standard immediately. The product has to feel appropriate next to books, journals, and exhibition merchandise, but it still has to land at a workable margin after freight, receiving, and retail presentation costs are included. Procurement teams often lose time because the first supplier inquiry is too broad. Terms such as 'canvas document bag', 'zip portfolio', or 'A4 pouch' attract very different constructions. One supplier may quote a soft 10 oz pouch with a basic coil zipper, another may price a 14 oz structured case with better finishing, and both may describe the item as the same product.
The real buying problem is not whether a supplier can sew a rectangular canvas case. Many can. The harder problem is getting comparable offers tied to one product standard. If the RFQ is loose, each supplier fills the gaps differently on canvas weight, shrinkage allowance, zipper grade, print coverage, seam finishing, and individual packing. The quote sheet then looks like a price comparison, but it is actually a comparison of assumptions. Museum buyers can spend several rounds negotiating an apparent unit-price gap that is really a hidden specification gap.
This matters more for museum retail than for short-lived promotion because the item is judged visually and by hand. Shoppers notice a wavy zipper line, a limp body, off-center branding, or packing creases quickly. Internal teams notice when a product meant to hold brochures or A4 papers ends up undersized because the supplier interpreted dimensions loosely. A weak starting brief creates delays in sampling, confusion during approvals, and preventable disputes after the PO is placed.
The practical fix is to treat the first inquiry as a normalization exercise. Before negotiating price, buyers need to define the product's use case, capacity requirement, fabric range, zipper route, branding method, and packing level. That structure makes the supplier responses more useful and gives procurement a clearer basis for landed-cost decisions.
- Common quote mismatch: one supplier prices 10 oz canvas while another uses 14 oz.
- Common sample mismatch: a sales sample is made with a smoother zipper or cleaner fabric than the production quote assumes.
- Common approval gap: logo placement is approved visually without a measurable tolerance.
- Common freight surprise: heavier canvas and lower carton efficiency increase landed cost more than expected.
Write the RFQ around use case, not only dimensions
A museum shop portfolio with the same outside dimensions can be purchased for very different reasons. It might hold exhibition brochures, sketch materials, notebooks, member welcome documents, school-program packs, or a premium gift-with-purchase set. Those uses drive the right construction. A simple brochure holder can be flat and unlined. A sketchbook case may need a firmer hand feel, cleaner inside finishing, or a slightly larger gusset-free capacity allowance. A donor or member gift item may need better presentation packing and tighter branding control than an everyday shop SKU.
If the RFQ only says size, color, and logo, suppliers will fill in the missing design logic with whatever protects their quoted price. That usually means lighter fabric, minimal inside finishing, stock zipper choices, and basic packing. The result can still be technically acceptable, but it may miss the retail objective. Procurement teams then end up correcting fundamentals in sampling instead of comparing offers on a stable basis.
A stronger RFQ starts with one plain-language product statement at the top. For example: 'Canvas zipper portfolio for museum shop retail, designed to hold A4 exhibition materials and light stationery, sold as a premium desk and travel accessory.' That sentence gives the merchandiser and factory context for material and construction recommendations. Under that line, list the mandatory technical points: closed size, capacity requirement, desired hand feel, fabric weight range, zipper type, branding method, inside features, and retail packing expectations.
It also helps to clarify what is non-negotiable versus flexible. For example, exact A4 fit and centered logo placement may be fixed, while zipper pull shape or inside pen loop can remain optional. Suppliers are more likely to give useful quotations when they know which elements are core function and which are variables for cost control. This approach reduces sample drift, shortens clarification rounds, and gives museum buyers cleaner leverage when a supplier later proposes a substitution.
- Useful RFQ line: 'Canvas zipper portfolio for museum shop retail, designed to hold A4 exhibition materials and light stationery.'
- Specify whether the portfolio must fit documents, a notebook, a tablet sleeve, or a mixed gift set.
- State whether the feel should be soft, structured, or firm when held empty.
- Note whether the item is a core repeat SKU, an exhibition-limited item, or an event-based seasonal order.
Choose canvas weight by shelf feel, capacity, and freight impact
For most museum shop programs, 12 oz to 14 oz cotton canvas is the sensible starting range, roughly around 340 to 400 GSM in finished form depending on the fabric route. That range usually gives enough body for a portfolio to feel more substantial than a basic zip pouch without becoming unnecessarily stiff or expensive. Below that, a larger-format item can sag, wrinkle more easily, and read as promotional rather than retail. Above that, sewing becomes harder, zipper insertion can become less clean, and export carton weight rises quickly.
The correct fabric is not only a matter of 'premium feel'. It depends on panel size, end use, printing method, and whether the portfolio includes any internal support. A 12 oz fabric can feel quite solid on a smaller A5 or compact document case. The same fabric may feel softer on a large A4-plus piece with broad front panels. Conversely, a 14 oz fabric may appear ideal in hand, but when combined with a metal zipper, board insert, or multiple inside features, it can push the item into a bulky or freight-inefficient range.
Museum buyers should ask for at least two fabric options when the design is still open. A 12 oz version and a 14 oz version will often reveal the right commercial balance. Reviewing both samples side by side helps the team judge not only touch but also lay-flat performance, print result, and retail appearance after packing. If the natural look of cotton is part of the product story, discuss whether visible neps or seed specks are acceptable. Some museum assortments benefit from that authentic look; others need a cleaner bleached or dyed base because the brand standard is more refined.
It is also worth confirming how the supplier is describing fabric weight. Some quotations refer loosely to greige weight, others to finished weight, and some sellers use rounded retail language such as 'heavy canvas' without a tested figure. That creates confusion in comparisons. Procurement should request the quoted weight basis and, where possible, ask the supplier to weigh the approved sample and identify the actual fabric used. That is a simple control that reduces later downgrades.
- 10 oz or about 280-300 GSM: lower cost, softer body, and better suited to lightweight programs or small formats.
- 12 oz or about 340 GSM: common balance point for everyday museum retail assortment.
- 14 oz or about 400 GSM: stronger body and more premium presence, but higher sewing difficulty and freight cost.
- Natural canvas can show nep and seed specks; decide early whether that variation supports or conflicts with the intended retail look.
Zipper specification is a product-performance decision, not a trim detail
On a canvas zipper portfolio, the zipper is one of the first points a shopper touches and one of the most common sources of complaints when quality slips. Buyers sometimes treat it as a minor trim choice, but that is risky. The zipper affects opening smoothness, shelf appearance, durability, and even how flat the product sits when closed. On a heavier canvas body, poor zipper insertion or weak tape quality can create visible wave, puckering, corner distortion, or snagging that makes the whole item feel low grade.
Museum shop procurement teams should specify zipper type in full rather than using generic wording. Nylon coil is often the most practical route because it is flexible, runs smoothly, and integrates well with flat textile products. Metal zippers can create a more premium or industrial look, but they add weight, increase the chance of corner stiffness, and may be less forgiving on a broad portfolio panel. The right choice depends on the design intent, price point, and how often the item is expected to be opened and closed.
Beyond material type, buyers should define zipper size or gauge, tape color, slider finish, puller style, and whether any custom branding is required. A black nylon coil zipper with a matte pull can read very differently from a bright metal zip with polished hardware, even on the same canvas body. If the museum wants a quiet, archival-inspired aesthetic, a low-contrast zipper route may be better than decorative hardware. If the product is tied to a bold exhibition identity, hardware finish may become part of the visual statement.
Sample review should include repeated opening and closing, not just a quick visual check. Ask the supplier how they control zipper wave on heavier canvas and request close-up photos of zipper ends, top stops, and corner transitions on similar products. The best suppliers usually answer with process specifics such as seam allowance control, tape handling, stabilizing methods, and first-piece QC. A vague answer is a warning sign, because zipper-area quality is rarely fixed by inspection alone once production is underway.
- Specify zipper type, gauge, tape color, slider finish, and puller style in the RFQ.
- Check both performance and appearance: smooth travel, neat end finishing, and a flat zip line matter equally.
- Use caution with metal zippers on heavier canvas if low weight or easy lay-flat performance is important.
- Treat custom zipper pulls as a separate cost and MOQ discussion, not an assumed standard feature.
Select print and branding methods based on artwork risk
Museum shop graphics often come from institution logos, archive references, or licensed exhibition artwork with stricter visual expectations than typical promotional goods. That makes branding method selection more technical than many buyers expect. The question is not simply which method looks attractive in a sample room. It is which method reproduces the artwork reliably on textured canvas while staying inside the target margin and quality tolerance.
For one-color or simple two-color institutional branding, screen print is usually the safest starting point. It offers good edge clarity, repeatability, and cost efficiency at volume. It also tends to wear well if properly executed on the right canvas base. Digital print becomes more relevant when the museum needs full-color imagery, gradients, or short-run exhibition graphics that would be too expensive to separate for screens. Heat transfer can reproduce complex detail too, but buyers need to assess edge visibility, hand feel, and how the transfer sits on the fabric surface. Embroidery and woven labels can work well for secondary branding, particularly when the front face should stay understated.
The useful sourcing discussion is about failure modes. If the main risk is losing fine-line clarity on textured natural canvas, screen printing on a cleaner fabric base may outperform a digital route. If the main risk is losing artwork fidelity on a temporary exhibition piece, digital may be justified despite higher cost. If the front panel must remain minimal but the museum still wants branded identity, a woven side label or interior label can reduce visual clutter while keeping brand presence.
Approval should be based on a strike-off or sample on the actual production canvas, not a paper proof alone. Fabric texture, absorbency, and color base can shift how the artwork appears. Procurement should also define the placement reference clearly: measured from bottom edge and side seam, or aligned to panel center, not merely 'centered visually'. That gives QC a workable standard and prevents avoidable arguments over print position in bulk.
- Screen print: best for 1-3 colors, strong line clarity, and cleaner cost structure at higher volume.
- Digital print: useful for full-color exhibition art or shorter runs, but validate rub resistance and color consistency.
- Heat transfer: effective for detailed imagery, though edge feel and surface look need review.
- Woven label or side label: good for subtle institutional branding when the front panel should remain clean.
Choose the supplier route with the right control model
For a canvas zipper portfolio, the supplier decision is not just a simple direct-factory versus trading-company debate. The core issue is who actually controls the product standard from quote through shipment. A direct sewing factory can be excellent if it has real experience with flat zip cases, stable trim sourcing, and a disciplined sample-to-bulk handoff. A trading company can also be the better route when the museum program includes mixed SKUs, special packaging, or layered approvals, provided the trader has clear ownership of factory selection and QC decisions.
This product family exposes capability differences quickly. Many bag suppliers can make basic totes, but cleaner portfolio construction is more demanding. The zipper line has to stay straight, the panels must balance, inside finishing is more visible, and print placement stands out immediately on a flat surface. A supplier that performs well on simple open-top totes may still struggle with neat zipper insertion or consistent corner shape on a portfolio. That is why buyers should request evidence tied to similar items, not only a broad catalog.
Useful evidence includes recent production photos, close-up images of zipper ends and inside seams, packing photos, and explanations of how pre-production samples are linked to booked materials. Ask who approves bulk trim cards, who checks the first production pieces, and whether the sales contact can share a named factory and product history. If the supplier claims expertise, they should be able to discuss detail-level issues such as zipper wave on 14 oz canvas, print distortion near seams, or carton-count tradeoffs for heavier fabric.
Museum shops also need to consider operational fit. A retail-ready supplier may cost more per piece but reduce receiving and store-prep labor by handling labels, assortments, or barcodes correctly. A low-price producer may still be suitable for a simple entry-price item if the museum can tolerate looser specs and simpler packing. The right route depends on the merchandise objective, not only the initial unit quote.
- Good evidence: recent similar-item photos showing inside finishing, zipper tape alignment, and corner details.
- Good evidence: a sample approval process tied to actual production materials and trim cards.
- Weak evidence: only catalog beauty shots with no close-up construction detail.
- Weak evidence: identical MOQ and lead-time claims across every fabric and branding option.
Understand MOQ logic and quote structure before negotiating unit price
Museum shop orders are often moderate in scale, especially when tied to a specific exhibition, anniversary, or seasonal launch. That makes MOQ structure one of the biggest hidden cost drivers. A supplier may advertise a 500-piece or 1,000-piece MOQ, but the real constraints often sit underneath the headline. There may be separate minimums for dyed fabric, print artwork, zipper color, woven labels, or custom pullers. If buyers negotiate only the top-line MOQ, they can still be forced into costly mix surcharges, delayed approvals, or material substitutions later.
A better approach is to separate fixed costs from variable costs in the quote. Request price breaks at realistic museum quantities such as 300, 500, 1,000, and 3,000 pieces if relevant to the program. Then ask the supplier to list adders or minimums for each variable element: custom dye, extra print color, custom zipper pull, insert board, woven label, swing tag, barcode application, and assortment packing. This turns a vague price conversation into a sourcing model the procurement team can actually use.
That structure also helps internal decision-making. A museum may discover that a stock natural canvas with one-color print is commercially viable at a modest opening order, while a custom-dyed body with exhibition artwork only makes sense if sales volume is high enough to absorb setup costs. For a short exhibition window, the lower-risk option may be more profitable even if the unit price is slightly higher, because it avoids dead stock and complicated approvals.
Procurement should also ask how the supplier treats repeat orders. Some setup costs disappear after the first run; others return if artwork or colorways change. Knowing this early helps the museum distinguish between a one-time launch cost and a sustainable replenishment cost. It also prevents the common mistake of approving a feature-rich sample whose economics only work at much higher volume than the museum will ever buy.
- Fabric MOQ may differ sharply between natural canvas, stock dyed fabric, and custom-dyed fabric.
- Print setup costs matter much more on short runs than on replenishment orders.
- Custom zipper pulls, embossed patches, and special hardware usually need higher volume to make sense.
- Split deliveries, SKU assortment, and special carton marking can create hidden labor charges even when basic MOQ is met.
Approve the pre-production sample with measurable acceptance criteria
A museum shop sample should not be approved because it 'looks about right' in a meeting. The sample stage is where the buyer locks the standards that protect the bulk order. On this item, the recurring failures are predictable: size drift, weak body feel, zipper waviness, off-center branding, label misplacement, and packing choices that create creasing. If approval remains purely visual, the factory has too much room to interpret those points differently once production starts.
The most useful control is a short approval sheet tied to the pre-production sample. It should include closed size and tolerance, capacity check, fabric description, zipper type, print placement measurements, acceptable color reference, stitching expectation, inside-feature dimensions if any, and final packing method. Include photos of the approved sample from front, back, inside, zipper end, and packed condition. When the same reference is used by the buyer, salesperson, merchandiser, and line supervisor, avoidable disputes fall away.
Buyers should also distinguish clearly between a sales sample and a true pre-production sample. A sales sample is often made from available stock materials chosen to look good quickly. It can still be useful for concept review, but it does not prove bulk readiness. The pre-production sample should be made from booked fabric, the intended zipper, approved artwork setup, and the final construction notes. That is the sample that should be signed before cutting begins.
For museum procurement teams, measurable acceptance criteria also support smoother third-party inspection. Inspectors can verify size, placement, stitching, function, and packing against a practical document instead of relying on general impressions. That is especially important when the museum buyer is not present during production and must depend on remote reporting.
- Example size tolerance: finished closed size within +/- 0.5 cm.
- Example logo placement tolerance: within +/- 0.3 cm from approved reference point.
- Example zipper standard: opens and closes smoothly through repeated cycles with no snag or tape distortion.
- Example visual standard: no visible oil marks, major slubs in print area, or skewed label placement.
Build QC around the failures that matter in retail
Quality control on a canvas zipper portfolio should focus on the defects that affect retail presentation, user function, and receiving accuracy. Generic bag inspection is not enough. A piece can technically pass a broad workmanship check and still disappoint in store if the body feels underweight, the zipper line waves, or the front print drifts visibly from one side. Museum retail teams usually need a product that looks neat when stacked, hangs correctly if merchandised vertically, and works immediately when a customer tests it by hand.
At minimum, the inspection plan should cover five groups of checks. First, dimensional checks: closed size, opening width, and any critical inside feature measurements. Second, material checks: fabric weight basis, color consistency, visible texture in the print area, and trim match to approved sample. Third, workmanship checks: stitch density, seam balance, corner shape, loose threads, raw-edge control, and label placement. Fourth, function checks: zipper smoothness, end-stop security, and lay-flat appearance when fully closed. Fifth, packing checks: orientation, barcode placement, assortment accuracy, and carton count.
For museum programs with more detailed graphics, print review deserves separate attention. Inspectors should compare not only color and sharpness but also the relationship of the artwork to the edges and zipper line. Even small placement drift becomes visible on a flat rectangular product. If the print area sits near a seam, ask the supplier during development how that area is stabilized to reduce distortion. Where multiple colorways or SKUs are ordered, assortment checks are as important as workmanship checks because receiving errors create downstream retail problems.
It is also useful to define when QC takes place. Inline checks after the first pieces are sewn can catch zipper or construction issues before large quantities are completed. Final random inspection confirms whether the order meets the approved standard overall. For more complex museum launches, requesting first-piece or inline photos before full production is a practical extra control, especially when the item combines heavier canvas with exact branding placement.
- Prioritize zipper-area appearance and function because it is one of the most visible and most touched parts of the product.
- Use measurable checks for print position, not only visual comments such as 'centered'.
- Confirm carton assortment, barcode, and carton marks with the same rigor as sewing quality.
- Ask for first-piece or inline production photos when the item includes tight branding or heavier materials.
Packing, compliance, and lead-time planning affect landed value
Packing decisions for museum shop portfolios are not just warehouse details. They shape retail presentation, transit protection, carton efficiency, and internal handling cost. Flat packing is common, but the exact method matters. If fresh prints are packed face to face too tightly, transfer or scuffing can occur. If heavier canvas is folded poorly or compressed, the portfolio can arrive with stubborn creases or zipper dents that reduce shelf appeal. If barcodes and assortment labels are placed inconsistently, receiving slows down and errors multiply.
Many museum programs do well with a simple but defined retail-ready pack: one piece per recycled polybag or equivalent protective sleeve, zipper closed, logo facing one direction, and an insert board only if the item needs shape retention for display. Too much inner packing raises cost and waste without adding value. Too little protection can undermine a product that otherwise passed inspection. Buyers should also request carton dimensions, carton quantity, and gross weight early in the quote stage because heavy canvas products can become freight-inefficient quickly.
Compliance and labeling should be addressed at the same time, not as a late afterthought. If the museum requires origin labeling, barcode formatting, retailer-specific carton marks, or documentation tied to internal compliance procedures, those points need to appear in the RFQ and sample approval. A supplier may be perfectly capable of sewing the item but weak on paperwork and retail labeling discipline. That gap often surfaces late, when it is expensive to correct.
Lead time should be broken into stages rather than accepted as one simple number. Ask for a timeline covering sample development, artwork proofing, material booking, pre-production sample, cutting and sewing, inspection, and shipment cutoff. The biggest delays often happen before sewing starts: color approvals, revised print files, trim nominations, or custom dye booking. For exhibition-driven launches, that staging gives the museum a realistic critical path and helps the team decide whether to simplify materials in order to protect the selling window.
When procurement compares offers, all of these factors should roll up into landed value, not just FOB price. A slightly higher quote that includes stable fabric, stronger zipper control, cleaner retail packing, and workable documentation may be the better commercial buy. A lower initial quote can become expensive once damage risk, receiving labor, freight inefficiency, or schedule slippage is included.
- Define whether the individual barcode sits on the polybag, hangtag, or sewn label before the first sample is approved.
- Set carton quantity according to item weight and carton strength, not only warehouse preference.
- Break lead time into approval, material, production, inspection, and shipment stages to expose schedule risk early.
- Compare suppliers on landed value: unit price, freight impact, damage risk, receiving efficiency, and schedule reliability together.
Specification comparison for buyers
| Supplier option | What to verify | Commercial advantage | Buyer risk to control |
|---|---|---|---|
| Direct sewing factory | zipper source record, production-line zipper test photos, approved trim card, cutting marker photos, and final open-carton count | Better sample-to-bulk control and faster production feedback | May be weaker on export paperwork or branded packing unless checked early |
| Trading company | Factory name, production photos, trim-source proof, and who owns QC decisions | Can coordinate small mixed orders and extra services | Markup can hide real factory capability and slow defect decisions |
| Specialized bag workshop | zipper gauge, zipper tape width, puller finish, binding tape, corner reinforcement, seam allowance, and document-size tolerance | More practical for detailed construction, trims, and repeat programs | Capacity may be limited during peak seasons |
| Low-price general supplier | 300D-600D polyester, 10-12 oz canvas, or recycled PET with backing stiffness matched to document weight | Useful for simple promotional runs with loose specs | Material downgrades, weak packing, and vague inspection scope can erase savings |
| Retail-ready supplier | flat packing, insert board if needed, SKU bundles, carton weight limit, moisture protection, and barcode visibility | Can handle labels, SKU separation, carton marks, and receiving rules | Higher unit cost must be compared against reduced warehouse work |
| Compliance-focused supplier | Fabric records, labeling review, test plan, and production traceability | Safer for retail programs and repeat brand orders | Documentation claims need evidence, not only sales language |
| Local sample room plus bulk factory | Signed sample, bulk factory handoff, first-piece photos, and deviation owner | Good for complex branding before large production | Sample room quality may not match bulk line unless handoff is controlled |
Buyer checklist before sampling
- Define the end use clearly: document holder, sketchbook case, exhibition merchandise, member gift, staff welcome pack, or donor event item.
- State finished size in closed position and note tolerance, for example 35 x 27 cm +/- 0.5 cm, plus any required inside capacity such as A4 booklet fit.
- Specify fabric as finished GSM or oz and composition, for example 100% cotton canvas 12 oz finished, rather than only 'heavy canvas'.
- List canvas color route: natural, bleached, stock dyed, or custom dyed, and state whether Pantone color matching is required.
- Describe zipper construction in full: nylon coil or metal, size or gauge, tape color, slider finish, puller style, and whether branded zipper is required.
- Mention structural details such as lining, foam, board insert, piping, binding, inside sleeve, pen loop, elastic holder, or hanging loop.
- Identify print or branding method and artwork coverage: one-color screen print, woven label, embroidery, digital print, heat transfer, or mixed branding.
- Set logo position with measurable references from bottom edge, side seam, and zipper line so inspection has a clear standard.
- Note retail and warehouse requirements including recycled packing, barcode stickers, swing tags, carton labels, assortment rules, and carton weight limit.
- Request pricing at two or three volume breaks and ask suppliers to separate one-time setup charges from repeat-order unit pricing.
Factory quote questions to send
- Is your quoted canvas weight based on greige fabric, dyed fabric, or the finished fabric after washing or coating?
- Which factory will sew this item, and do you have recent production experience with zipper portfolios or document pouches rather than only tote bags?
- What is the MOQ by canvas color, print design, zipper color, woven label, and any custom zipper pull or patch?
- Does the quote include screen charge, digital print setup, zipper pull mold cost, woven label charge, barcode sticker application, and carton marking?
- What fabric options can you quote in 10 oz, 12 oz, and 14 oz canvas, and how does each change unit price, carton count, and gross weight?
- What print method do you recommend for our artwork file, and what are the limitations on fine lines, halftones, gradients, or distressed details on canvas texture?
- What zipper brand or equivalent are you quoting, and can you provide a sample showing repeated open-close performance on the actual portfolio size?
- What are your standard tolerances for finished size, print placement, color matching, zipper alignment, and label position on this item?
- Can you send a pre-production sample made from actual bulk fabric, actual zipper, and the final print setup before mass cutting begins?
- How many pieces fit per export carton, what carton size and gross weight apply, and how do those numbers change with heavier fabric or insert boards?
Quality-control points to confirm
- Finished size must be within the agreed tolerance when measured laid flat in the closed position.
- Canvas weight, hand feel, color, and visible texture must match the approved sample with no substitution to lighter or looser fabric.
- Zipper must run smoothly end to end with no tooth wave, tape puckering, slider snagging, missing top stop, or distorted seam at either end.
- Front and back panels must sit balanced so the portfolio lies flat when closed and does not twist or pull at the zipper line.
- Print color density, edge sharpness, and artwork position must match the approved sample with no pinholes, ghosting, smudges, or off-position logos beyond tolerance.
- Stitching must be even, with no skipped stitches, loose threads, seam grin, needle damage, or exposed raw edges where finishing is specified.
- Corner shape, binding, and seam allowance must be consistent from piece to piece so the product presents cleanly on shelf.
- Inside features such as sleeves, pen loops, inserts, and labels must be centered, securely sewn, and sized to the approved function.
- Labels, barcodes, retail tickets, and carton marks must match approved artwork, SKU mapping, and receiving requirements.
- Packing must prevent print transfer, zipper dents, fold creasing, moisture exposure, and assortment errors during export transit.