Start With the Bottle Data
For event procurement, “canvas wine carrier for a 750 ml bottle” is not enough detail to quote or inspect. A Bordeaux bottle, Burgundy bottle, sparkling bottle, dessert wine bottle, and custom event bottle can all carry the same volume while creating different fit problems. The widest diameter affects loading speed. Shoulder height changes how the canvas pulls near the opening. Capsule height, neck tags, and thick wraparound labels can cause rubbing even when the empty carrier looks correct.
Create a bottle data line before sending the RFQ. Record total height, widest body diameter, shoulder height from base, neck diameter, capsule height, and any label, sleeve, foil, or tag thickness. For many one-bottle canvas wine carriers, a practical starting clearance is about 5-8 mm around the widest point, but that must be checked in the sample because seam allowance, canvas weight, gusset shape, and top binding reduce usable space.
Fit is also about workflow. A guest giveaway needs fast loading and comfortable carry. A VIP table placement needs the bag to stand neatly with the logo facing forward. A retail order may need hangtags or barcode labels. A kitted gift may need the loaded carrier to fit inside a fixed outer box. Define that use case before approving dimensions.
- Measure the actual bottle instead of relying on “standard 750 ml.”
- Test the largest bottle in the program, then check smaller bottles for stability.
- State whether the carrier must also hold a card, corkscrew, tag, or insert.
- Request sample photos with the bottle inserted, standing upright, and lifted.
- Confirm whether staff will load carriers at the factory, warehouse, venue, or table.
Convert the Brief Into Specs
A strong buying brief turns a visual expectation into measurements a factory can cut, sew, decorate, and inspect. For a one-bottle carrier, the core dimensions are finished body width, finished body height, gusset depth, top opening width, handle width, handle drop, logo size, and logo placement. Use millimeters and include a simple drawing with arrows so the same reference can be used by sales, production, QC, and packing.
For sewn canvas goods, tolerances need to be realistic. A common starting point is +/-5 mm for body width, height, and gusset depth, with +/-3 mm for simple logo placement on a flat front panel. These are not universal rules. Heavy canvas, washed finishes, bulky seams, and manual logo placement may require wider limits. If sponsor artwork must align tightly across table displays, confirm feasibility during sampling rather than after production.
Separate functional and cosmetic requirements. A carrier that is too narrow may be unusable; a small loose thread inside may only need trimming. Front-panel stains, crooked logos, wrong labels, and odor should be treated more seriously than hidden internal irregularities. Attach the approved swatch, artwork proof, sample photos, tolerance sheet, and packing instructions to the purchase order.
- Use millimeters for dimensions and placement.
- Identify critical dimensions separately from cosmetic preferences.
- Define acceptable natural canvas variation before bulk production.
- Attach approved sample records to the PO, not only to an email thread.
- Make the inspection standard available before cutting starts.
Choose Canvas by Performance
Canvas weight affects structure, print quality, sewing speed, carton weight, freight volume, and how the carrier feels in a guest’s hand. For event wine carriers, 10-12 oz cotton canvas is often a practical starting point. Suppliers may describe this as roughly 340-407 gsm, depending on conversion method and whether the weight is measured before or after finishing. Ask that question directly, then approve the actual swatch.
Lighter canvas, such as 8-9 oz, may work for short-use promotional sleeves where cost and low freight weight matter most. It can also collapse more easily, show hard fold lines, and feel less substantial. Heavier 12-14 oz canvas, roughly 407-475 gsm, can improve upright presentation for hospitality suites, winery retail, and VIP gifting. It can also create thick seams, visible needle marks, higher carton weights, larger packed volume, and print gaps over coarse texture.
Finish matters as much as weight. Natural unbleached canvas gives a warm look but normally includes some seed flecks, slubs, and shade variation. Bleached canvas gives a cleaner logo field but can show handling marks. Dyed canvas needs dye-lot control if production is split. Washed canvas may feel softer but can change dimensions. Approve shade, handfeel, odor, surface texture, and acceptable variation before the bulk fabric is cut.
- Specify both oz and gsm when possible.
- Ask whether fabric weight is measured before or after finishing.
- Use 10-12 oz as a practical starting point for many event orders.
- Consider heavier canvas or a base insert for premium standing display.
- Reject oil marks, mildew, dark streaks, holes, and strong odor as fabric defects.
Engineer the Handle and Base
A filled bottle puts concentrated stress on a small textile item. The highest-risk points are the handle roots, side seams, top fold, and base seam. The RFQ should name the handle material, width, drop, attachment position, thread color, and reinforcement method. Cotton webbing is common because it is flat, stable, comfortable, and easy to inspect. Self-fabric handles can look clean but may twist if the canvas is light. Rope handles can feel gift-oriented but need secure anchors and usually pack less flat.
For any carrier intended to lift a full bottle, specify visible reinforcement such as bartack, box stitch, or cross stitch at the handle roots. A single plain stitch line may be acceptable for a decorative sleeve, but it is risky for guest takeaway, staff handout, or retail use. Inspect for broken stitches, skipped reinforcement, loose webbing, uneven handle height, puckering, and pulling at the root after a filled-bottle handling test.
The base controls presentation. A flat sleeve is economical but may let the bottle roll, lean, or distort the logo panel. A gusseted base improves standing stability. A sewn-in or removable insert can improve structure but adds cost, labor, weight, and packing volume. If the carrier goes into a larger gift kit, test it inside the outer box after loading the bottle.
- State handle material, width, drop, position, stitch pattern, and thread color.
- Require reinforced handle roots for loaded carrying.
- Specify gusset depth when table display matters.
- Check internal seams so rough allowances do not scrape labels.
- Approve photos of handle roots and filled-bottle standing stability.
Match Branding to Risk
Branding is where quotes often stop being comparable. Screen print is usually efficient for bulk canvas wine carriers with simple one-color or two-color logos. It can be readable and cost-effective, but canvas is textured. Small type, thin lines, tight registration, and large solid areas may show edge softness, small voids, or ink gaps. The factory should review artwork before confirming the method.
Heat transfer can help with detailed artwork or smaller runs, but adhesion and handfeel must be tested on the exact canvas. A transfer that looks sharp on day one may crack, peel, or feel too plastic if film and heat settings are wrong. Embroidery can look premium for simple marks, but it can distort lighter canvas and make small sponsor text difficult to read. Woven labels and cotton patches are useful when buyers want durable smaller branding without printing across a rough surface.
Quote all branding costs clearly. Include the method, number of colors, setup charges, artwork file requirements, version charges, label minimums, and proofing fees. Provide vector artwork where possible, define Pantone references, and place artwork from fixed edges rather than saying “center front.” For event date, sponsor, city, table, or venue versions, confirm whether each one needs a separate screen, label run, or packing line.
- Use screen print for simple bulk logos.
- Use woven labels or patches for smaller durable branding.
- Use embroidery only when artwork is simple enough for thread.
- Require a strike-off for sponsor logos, fine type, and color-sensitive marks.
- Check spelling, date, URL, QR code, and barcode accuracy line by line.
Verify the Supplier Before PO
Supplier verification should go beyond unit price. Ask whether the supplier controls fabric sourcing, cutting, sewing, decoration, packing, and inspection in-house or through subcontractors. Subcontracting is not automatically a problem, but undisclosed handoffs can make defect responsibility and timing harder to manage. For event programs, the buyer needs to know who is accountable if the print, stitching, or packing fails inspection.
Ask for evidence that the supplier has handled similar canvas bottle bags or structured cotton carriers. Useful proof can include reference samples, production photos, material swatches, stitch close-ups, packing photos, and anonymized examples of previous similar work. Do not ask for confidential customer claims; ask for verifiable production capability. Also request capacity information: planned daily output, number of sewing lines, decoration schedule, and whether the order will be split across multiple batches.
Compliance needs depend on market and use. For many event carriers, buyers may request material composition, azo-free dye statements where relevant, REACH or Prop 65 positioning for applicable markets, packaging information, or social compliance documents if required by the buyer’s program. The point is not to collect paperwork for show; it is to confirm that the supplier understands the destination market, documentation needs, and inspection coordination before the deposit is paid.
- Confirm which processes are in-house and which are subcontracted.
- Request production photos or reference samples of similar bottle carriers.
- Ask for capacity, production schedule, and batch-splitting details.
- Clarify defect responsibility across sewing, printing, labels, and packing.
- Confirm third-party inspection access before balance payment.
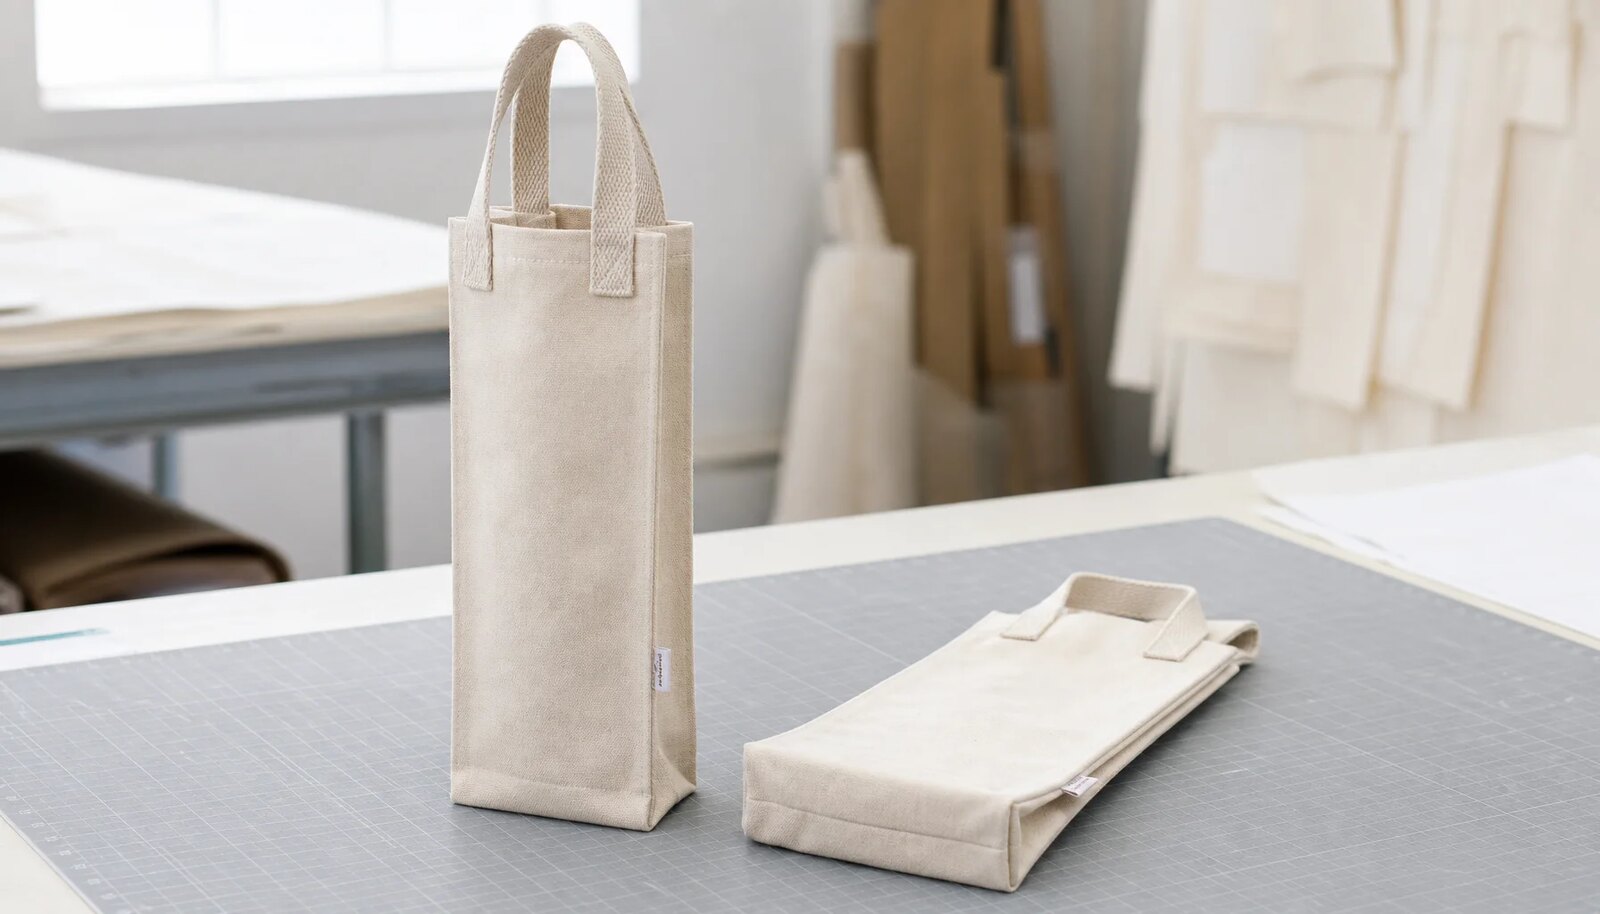
Use Samples as Approval Tools
A sample should prove how the bulk order will be made. The pre-production sample should use the intended canvas weight, finish, handle, thread, label, logo process, folding method, and packing format. If the supplier sends a substitute fabric or print-only mockup, keep it for discussion, but do not treat it as final approval. The approved sample becomes the inspection standard, so it must represent production.
Test the sample the way the event team will use it. Insert the actual bottle several times. Check for tightness at the widest point, snagging at the top seam, label rubbing, capsule interference, and difficulty removing the bottle. Stand the filled carrier on a flat surface and look for leaning, twisting, collapse, or top-edge pulling. Lift by the handle, hold at least 30 seconds, swing gently several times, set down, and inspect handle roots, base seam, and side seams.
Packing tests are part of sample approval. Fold the carrier the way the factory plans to pack it. Check whether the logo creases, print offsets onto adjacent fabric, or the bag picks up marks from tissue, polybags, or carton pressure. Rub the printed area lightly with a clean white cloth to screen for poor curing or transfer. If hangtags, insert cards, barcodes, or retail labels are included, open and repack the sample.
- Do not approve bulk production from a substitute sample without written limits.
- Test fit, lift, standing stability, print durability, and packing appearance.
- Keep one approved sample or a complete photo record for inspection.
- Record sample changes in writing before material purchase or cutting.
- Confirm sample approval covers both product and packing.
Set AQL and Defect Rules
Quality control becomes clearer when defect classes are agreed before production. Critical or major defects for canvas wine carriers often include unusable bottle fit, wrong artwork, wrong logo version, missing label, open seams, broken handle reinforcement, severe front-panel stains, mold, strong mildew odor, and incorrect packing that prevents event distribution. Minor defects may include a small loose thread, slight natural slub, or internal irregularity that does not affect function or visible presentation.
For final inspection, use an agreed random sampling plan. Many buyers use ISO 2859-1 / ANSI ASQ Z1.4 with general inspection level II as a familiar starting framework, then set acceptable quality limits by defect class. For example, the buyer may allow no critical defects, a low AQL for major defects, and a higher AQL for minor defects. The exact limits should be chosen by the buyer, supplier, and inspection partner based on order risk, event deadline, and replacement feasibility.
Inspection should not begin only after all cartons are sealed. Request first-piece photos showing cut panels, handle position, reinforcement, first printed panels, labels, and first packed carton. For higher-risk orders, add an in-line check while correction is still possible. Final inspection should pull cartons from different parts of the lot, measure multiple pieces, test filled-bottle function, review branding and label accuracy, verify counts, and document pass/fail status with photos and carton numbers.
- Define critical, major, minor, and acceptable natural variation before sewing.
- Use an AQL/sample-size plan instead of inspecting only convenient cartons.
- Request first-piece photos for material, stitch, branding, and packing.
- Document measured samples, defect photos, carton numbers, and rework actions.
- Do not release shipment until pass/fail status and corrective action are clear.
Control Packing and Receiving
Packing can protect a good order or create the last problem before the event. Bulk packing is economical and works when carriers will be repacked by a warehouse or added to kits. The risk is hard creasing, flattened gussets, print rubbing, and extra labor at the venue. Individual polybags, tissue, separated layers, or insert cards improve presentation and SKU control, but they increase cost, labor, carton volume, and sometimes sustainability concerns.
Approve carton specifications before final packing starts. Confirm pieces per carton, carton dimensions, gross weight, carton strength, folding direction, inner liner, moisture protection, and whether printed panels face inward or outward. For shipments split by city, venue, sponsor, event date, or table group, carton marks must be easy for receiving teams to read under time pressure. Each carton should show style code, design version, color, quantity, carton number, destination, and event code if used.
Canvas can absorb moisture and odor during long-distance shipping or storage. Ask about inner poly liners, sealed cartons, pallet wrapping, silica gel where appropriate, and storage conditions. Before shipment release, open cartons from different parts of the stack to verify counts, folding, SKU mix, carton marks, odor, and presentation condition. A correctly made carrier in the wrong carton can still slow down event setup.
- Choose bulk packing only when creasing and repacking labor are acceptable.
- Use tissue, individual packing, or separators when presentation matters.
- Approve carton quantity, dimensions, gross weight, and marks before packing.
- Use clear carton numbering and destination labels for multi-venue programs.
- Check moisture, odor, SKU sorting, and carton labels before shipment release.
Specification comparison for buyers
| Buying area | Recommended specification | Best fit | Inspection risk to control |
|---|---|---|---|
| Bottle fit | Base the pattern on measured bottle height, widest diameter, shoulder height, neck or capsule height, and label thickness | Event programs using Bordeaux, Burgundy, sparkling, dessert, or custom branded bottles | Do not approve from a generic 750 ml reference; test the physical sample with the actual bottle or a measured dummy |
| Finished dimensions | Set body width, height, gusset depth, top opening, handle drop, and logo placement in millimeters | Custom carriers where table presentation, kitting, or repeatability matters | Typical starting tolerances may be +/-5 mm for sewn body dimensions and +/-3 mm for simple logo placement, subject to sample approval |
| Canvas material | 10-12 oz cotton canvas, roughly 340-407 gsm depending on supplier conversion and finishing | Most event planner orders needing structure, printability, and manageable carton weight | Confirm whether weight is before or after finishing; approve a swatch for shade, handfeel, odor, slubs, and seed flecks |
| Premium structure | 12-14 oz canvas, roughly 407-475 gsm, or 10-12 oz with gusset/base insert | VIP gifting, winery retail, hospitality suites, and upright table display | Check sewing bulk, needle marks, print coverage over texture, carton gross weight, and packed volume |
| Handle and load | 25-38 mm cotton webbing with bartack, box stitch, or cross stitch reinforcement | Guest takeaway, staff distribution, tasting-room sales, and repeated lifting | Document handle drop, stitch pattern, attachment position, and filled-bottle lift test; reject broken stitches or pulling at roots |
| Branding control | Screen print for simple bulk logos; woven label or cotton patch for smaller durable branding | Sponsor marks, event names, private-label gifts, and versioned programs | Require strike-off or pre-production sample; check spelling, Pantone target, placement, registration, curing, rub-off, and SKU separation |
| Supplier verification | Use factories or suppliers that disclose production process, similar-order experience, capacity, and QC plan | Custom event deadlines, repeat programs, mixed versions, or inspection-sensitive orders | Ask for production photos, compliance documents where relevant, in-line checkpoints, and third-party inspection coordination before balance payment |
| Packing and routing | Define folding, individual or bulk packing, carton quantity, carton marks, destination labels, and moisture protection | Multi-venue events, kitting warehouses, retail shelves, or sponsor-separated cartons | Inspect counts, mixed-SKU sorting, carton labels, odor, creasing, print offset, and presentation condition before shipment release |
Buyer checklist before sampling
- Measure the actual bottle: total height, widest body diameter, shoulder height, neck diameter, capsule height, and label or sleeve thickness.
- Define the use case: table display, tasting handout, guest takeaway, VIP gift kit, retail shelf, warehouse kitting, or courier shipment.
- Specify finished dimensions in millimeters: body width, body height, gusset depth, top opening, handle width, handle drop, and logo placement from fixed edges.
- State canvas fiber content, target oz/gsm, finish, color, dye-lot expectation, odor standard, and acceptable natural variation such as seed flecks or slubs.
- Define handle material, width, drop, attachment position, reinforcement stitch, thread color, and filled-bottle lift requirement.
- Freeze branding details before quoting: artwork file type, print size, Pantone references, number of colors, label version, placement, and tolerance.
- Require a physical pre-production sample made with the intended canvas, handle, stitch construction, branding method, label, folding, and packing method.
- Classify defects before production: critical, major, minor, acceptable natural fabric variation, and required rework or replacement action.
- Set inspection timing: fabric approval, first-piece photos, in-line check when practical, and final random inspection before shipment.
- Specify packing and receiving needs: bulk or individual packing, tissue, hangtag, barcode, carton quantity, carton marks, mixed-SKU sorting, destination labels, and moisture protection.
Factory quote questions to send
- What exact canvas are you quoting: fiber content, weight in oz and gsm, weave if known, finish, color, and whether weight is measured before or after finishing?
- Can you provide a swatch from the intended production lot, and will bulk fabric be matched to it for shade, handfeel, odor, thickness, and visible natural variation?
- What finished dimensions are included in the price: body width, height, gusset depth, top opening, handle width, handle drop, and measurement tolerances?
- What bottle dimensions did you assume when quoting, and can you test the sample with our actual bottle or a dummy matching our measurements?
- What handle material and reinforcement method are included: cotton webbing, self-fabric, rope, bartack, box stitch, cross stitch, rivet, or another construction?
- What filled-bottle lift or handling check do you perform, and what failure points would cause rejection at handle roots, side seams, or base seam?
- Which decoration method is included, how many colors are covered, what setup charges apply, and what artwork file format do you need?
- How do you control logo placement on sewn canvas, and what tolerances do you accept for position, registration, ink color, edge clarity, and ink coverage?
- Does MOQ apply per body style, fabric color, logo design, label version, packing configuration, or destination split?
- What similar canvas wine carrier or bottle bag orders have you produced, and can you share production photos or reference samples without disclosing confidential customer details?
Quality-control points to confirm
- Use the approved sample, spec sheet, artwork proof, fabric swatch, and packing standard as inspection references.
- Check bottle fit using the actual event bottle or a measured dummy matching widest diameter, shoulder shape, total height, capsule height, and label thickness.
- Measure finished body width, height, gusset depth, top opening, handle width, handle drop, handle attachment position, logo placement, and label placement.
- Use agreed tolerances: common starting points are +/-5 mm for stable sewn body dimensions and +/-3 mm for simple logo placement, but only if confirmed during sampling.
- Inspect handle roots for bartacks, box stitching, or agreed reinforcement; reject broken stitches, skipped reinforcement, loose webbing, severe puckering, and uneven handle height.
- Perform a filled-bottle handling check: insert the bottle, lift by the handle, hold at least 30 seconds, swing gently several times, set down, and inspect stress points.
- Inspect stitch density, thread tension, seam straightness, seam allowance, raw edge control, skipped stitches, broken threads, needle damage, puckering, and loose trimming.
- Check fabric panels for oil marks, water stains, mold spots, mildew odor, dark streaks, dirt, excessive slubs, holes, abrasions, and shade variation outside the approved swatch range.
- Review printing for correct artwork, spelling, Pantone target, edge clarity, ink coverage, curing, registration, cracking, peeling, bleeding, rub-off, and offset onto adjacent bags.
- Inspect woven labels, patches, hangtags, cards, barcodes, QR codes, and retail labels for correct content, straight placement, secure sewing, and consistency across versions.