Plan From the Warehouse Date Backward
For craft fairs, the date that matters is not the day the factory finishes sewing. It is the day the cartons are available, counted, allocated, and ready for the event team or distributor. A supplier may quote 25 working days for mass production, but that number usually does not include RFQ cleanup, artwork proofing, sample making, sample shipping, buyer review, possible sample remake, material booking, final inspection, export handling, freight transit, customs clearance, inland delivery, warehouse receiving, or booth-kit preparation.
Start with four dates before asking for prices: craft fair opening date, booth-kit or distributor dispatch date, required warehouse arrival date, and latest acceptable ex-factory date. That sequence keeps the project anchored to the selling window. For many craft fair programs, goods need 3-7 calendar days after warehouse arrival for carton checks, SKU sorting, tagging, routing, or regional dispatch. If those days are not protected, the team may end up unpacking and sorting under event pressure.
Freight mode changes the calendar. Ocean freight can protect landed cost, but it needs the largest buffer. Air freight can rescue a late order, though it may damage margin on low-cost canvas carriers. Express courier can be useful for samples or a small emergency allocation, but it is rarely the right base plan for full export cartons. For first custom orders, 8-12 weeks before the required warehouse arrival date is a more realistic sourcing window than a simple production-day count. Repeat orders may move faster, but only when fabric, screens, labels, packing, and specifications are unchanged.
- Set required warehouse arrival before accepting any production lead time claim.
- Reserve 3-7 calendar days for warehouse receiving, carton checks, SKU allocation, and event dispatch.
- Allow 5-10 working days for RFQ clarification if bottle dimensions, artwork, or packing details are incomplete.
- Allow 7-14 working days for a pre-production sample after artwork and material details are confirmed.
- Plan 20-35 working days for typical custom mass production after written sample approval, depending on quantity and SKU splits.
- Separate sample time, production time, inspection time, freight transit, customs clearance, and local delivery in the calendar.
Turn Bottle Fit Into Real Measurements
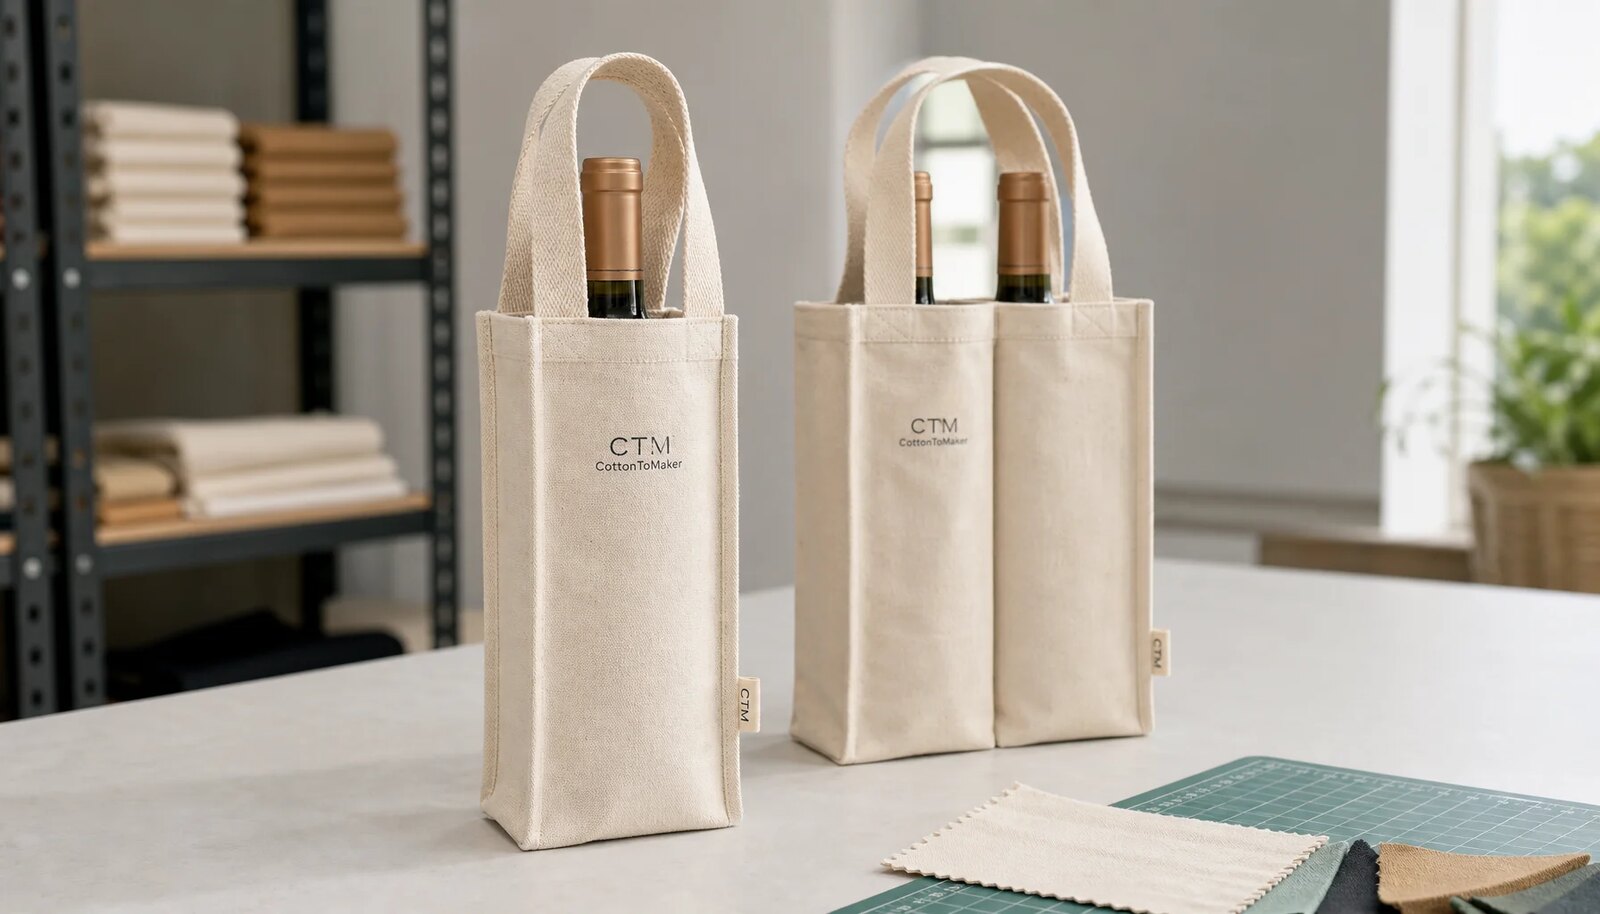
A canvas wine carrier is a load-bearing package for glass, not a small tote with a logo. Panel size alone is not enough. Wine bottles vary in height, base diameter, shoulder shape, and filled weight. A standard 750 ml Bordeaux bottle is often slimmer and straighter than many Burgundy bottles. Sparkling bottles can be wider, heavier, and harder to insert cleanly. A carrier can look fine in a product photo and still be too tight, unstable, or awkward once the actual bottle mix is used.
The RFQ should state the bottle requirement before the visual details. Is the carrier for one bottle, two bottles, or a mixed-use retail format? For one-bottle bags, focus on finished height, opening width, base gusset, and handle drop. For two-bottle bags, the divider becomes a functional part of the product. It should reach the base zone and be secured into side, bottom, or center seam points so the bottles stay separated while shoppers walk through crowded fair aisles.
Approve fit with a physical sample whenever timing allows. Test the largest and heaviest bottle, not the easiest slim bottle. The opening should allow insertion without forcing. The base should support the bottle without dramatic leaning. The handle should feel secure in the hand, and the front panel should present the print cleanly when loaded. If the product will be sold as a reusable gift carrier, the loaded appearance matters as much as the empty sample.
- Provide bottle height, maximum body diameter, shoulder style, and filled weight for each bottle type.
- State whether the carrier must fit Bordeaux, Burgundy, sparkling, standard 750 ml, or mixed bottle shapes.
- Specify finished opening width, body width, finished height, base gusset width, and target handle drop.
- For two-bottle carriers, define divider height, anchoring points, seam integration, and whether padding or stiffening is required.
- Use the largest and heaviest intended bottle for sample approval, not the easiest slim bottle.
- Reject samples that require forced insertion, collapse at the opening, lean heavily, or allow glass-to-glass contact.
Select Canvas Weight With Landed Cost in Mind
Fabric weight influences almost every commercial decision: structure, print appearance, sewing speed, carton weight, freight cost, and the shopper’s perception of value. For most custom canvas wine carriers for craft fairs, 10-12 oz cotton canvas, roughly 280-340 GSM, is a practical starting range. Ten-ounce canvas can work well for many one-bottle promotional and gift programs when the handle and seams are properly reinforced. Twelve-ounce canvas gives a firmer handfeel and is often the safer starting point for two-bottle carriers, retail resale, and premium winery merchandise.
Do not compare fabric names without numbers. Supplier conventions vary by market, finishing, and whether the weight is stated before or after treatment. Ask for both oz and GSM on every quote. Fabric below roughly 260 GSM may reduce unit cost, but it can sag around full bottles, wrinkle more visibly after packing, and feel too disposable for a craft-market program. On the other side, fabric above roughly 380 GSM may increase sewing resistance, needle wear, fold bulk, carton gross weight, and freight expense.
Finish matters too. Natural canvas can show slubs, seed flecks, and shade variation, which may be part of the desired craft look if the acceptance range is agreed in advance. Dyed canvas needs shade approval against a physical swatch or signed sample, especially for repeat orders. Washed or softened canvas can feel more relaxed but may bring more dimensional variation. Put the expected handfeel, surface character, shrinkage, and shade rules in writing before sampling.
- Use about 8 oz only when low cost and light promotional use are more important than structure.
- Use about 10 oz for balanced one-bottle programs with reusable value and moderate freight weight.
- Use about 12 oz for two-bottle carriers, retail resale, or a more structured gift presentation.
- Use 14 oz or heavier only after checking sewing feasibility, fold bulk, carton weight, and freight impact.
- Request a swatch or signed sample for fabric shade, slubs, finish, and handfeel approval.
- Write the quoted fabric as both oz and GSM to avoid confusion between suppliers.
Treat Handles and Seams as Load Points
Handle construction can make or break a wine carrier. A filled 750 ml wine bottle commonly weighs about 1.2-1.6 kg depending on glass weight and closure. A two-bottle carrier can exceed 3 kg before hangtags or other packaging are added. If the handle is too narrow, stitched too shallowly, or attached with weak thread, the carrier can fail even when the canvas body looks substantial.
Specify the handle like a functional component. Cotton webbing in the 25-38 mm range is common for reusable wine carriers. The best width depends on bag scale, target price, and hand comfort. Handle drop should allow comfortable hand carry without letting bottles swing excessively. Reinforcement should be visible, repeatable, and strong at every attachment point. Box stitch, cross stitch, and dense bar tacks can all work when seam allowance, stitch density, and thread quality are controlled.
Do not leave seam quality for final inspection alone. Ask the factory how it reinforces high-stress points and how it checks skipped stitches, broken thread, loose back-tacking, and uneven handle placement. Divider seams deserve the same attention. On a two-bottle carrier, the divider is not decorative; it protects glass from impact and helps the loaded bag keep its shape.
- Specify handle webbing width, handle drop, attachment depth, reinforcement style, and thread color.
- Use box stitch, cross stitch, or bar-tack reinforcement at handle load points.
- Define acceptable handle drop tolerance, often around +/-10 mm unless a tighter retail spec is required.
- Inspect skipped stitches, broken stitches, loose threads, seam allowance, and handle alignment across cartons.
- Load-test samples and production units with the intended bottle weight plus a practical safety margin.
- Treat divider attachment and base seams as functional strength points, not only appearance details.
Match Printing to Artwork Risk
Screen printing is usually the practical default for canvas wine carriers with solid winery logos, event marks, and one- to three-color artwork. It is efficient at MOQ quantities and suits the clean, tactile look buyers often want for craft fairs. On natural canvas, dark ink usually gives strong contrast. On dyed canvas or when using light ink, the supplier may need an underbase, adjusted ink system, or tighter curing control. A digital proof cannot show how ink will sit on textured cotton.
Heat transfer, digital print, and embroidery can also be valid, but each adds different approval questions. Heat transfer can handle gradients and small runs, yet the edge appearance, handfeel, and rub performance need review. Digital print can support multicolor artwork, but exact color matching on cotton texture may be harder. Embroidery can look premium, though it can distort small lettering, add stiffness, and increase cost. If several local logos are planned, check screen charges and production sequencing before the PO is issued.
Send production-ready artwork. That means vector files, Pantone or approved color references, print size, print position measured from seams, number of colors, and number of print locations. Fine lines, tiny reversed copy, and complex gradients should be tested on the actual canvas. Print approval should cover opacity, edge sharpness, registration, curing, dry rub resistance, and placement. If the logo sits close to a seam, gusset, or handle attachment, write realistic placement tolerance into the spec.
- Send vector artwork, Pantone or approved color references, print size, and placement measurements from seams.
- Confirm whether the quote includes screen charges, underbase, extra colors, repeat setup, and artwork cleanup.
- Approve ink opacity and color on the selected canvas, not only on a digital proof or paper strike-off.
- Avoid tiny text, thin lines, and reversed copy on coarse canvas unless the supplier proves the result.
- Check dry rub resistance, curing, cracking, registration, and transfer edge quality before mass approval.
- Include artwork proofing and print strike-off time in the lead time calendar.
Reduce MOQ Pressure by Limiting Splits
MOQ is not always one clean number. A factory may manage minimums by fabric color, cutting lot, body style, print artwork, screen setup, label, hangtag, barcode, packing configuration, carton mark, and shipment. A buyer may see one 3,000-piece order. The factory may see three body styles, four fabric colors, eight event logos, and separate destination cartons. Every split adds setup time, scheduling friction, inspection complexity, and packing risk.
For craft fair programs, the most efficient structure is often one standardized body with controlled artwork variation. A natural canvas two-bottle carrier can support several fair or winery logos if the fabric, dimensions, handles, divider, labels, and packing method stay the same. If every distributor wants a unique fabric color, compare the sales value against dye-lot approval time, smaller cutting lots, shade risk, and longer production scheduling. Often, one fabric color plus event-specific print or hangtag gives better control.
Make the MOQ logic visible in the quote. Ask for total quantity and quantity per style, fabric color, artwork, label, packing method, and shipment. Also ask whether price breaks apply when several artwork versions share one fabric and sewing batch. Some suppliers separate screen charges from unit price; others blend setup into the unit cost. Either model can work, but procurement needs to know which cost changes when SKUs are added or removed.
- State total order quantity and quantity by body style, fabric color, artwork, label, packing method, and destination.
- Ask whether MOQ applies per fabric color, artwork, size, label, carton mark, shipment, or production batch.
- Use one carrier construction for multiple fair editions when the timeline is tight.
- Request separate pricing for screens, labels, hangtags, barcodes, and special cartons.
- Lock SKU splits before bulk cutting to reduce leftover material and packing errors.
- Require SKU-level packing lists so event allocations match the production plan.
Use Samples to Prove the Whole Product
Sampling should answer procurement questions, not just confirm that a mockup looks attractive. A development sample can help with basic size and shape. The sample used for mass-production approval should go further: actual fabric weight, actual handle webbing, final divider construction, final print method, labels, barcode, hangtag, and intended packing fold. Without those details, the sample does not prove ink curing, loaded handle strength, divider performance, fabric shade, label accuracy, or carton presentation.
Review the sample with the bottle in hand. Load it, carry it, set it down, and inspect it again. For a two-bottle style, load two filled bottles and move the carrier lightly to see whether the divider stays centered and prevents glass contact. Check handle stitching after carrying. Look at print opacity, edge definition, rub resistance, and placement against seams. Then fold, pack, unpack, and refold the sample so you can see whether the logo panel creases in a way that affects retail presentation.
Written sample comments become the production standard. Record approved dimensions, tolerances, print position, fabric shade reference, handle construction, divider details, label placement, barcode placement, and packing method. If changes are required, say whether a remake is mandatory before bulk production. Keep one signed approval sample with the buyer and one signed sample at the factory. Final inspection should compare bulk goods against the signed sample and written spec, not against a photo buried in an email thread.
- Approve a pre-production sample made with actual fabric, handle, divider, print, labels, barcode, and packing fold.
- Measure finished height, width, opening size, gusset, handle drop, divider height, and print placement.
- Use practical written tolerances, such as +/-5 mm for many small dimensions and +/-3-5 mm for print placement where feasible.
- Carry the loaded sample and inspect handle stitching, seam distortion, divider movement, and user comfort afterward.
- Review print edges, ink coverage, rub resistance, logo position, fabric shade, and fold marks on the actual canvas.
- Keep signed approval samples with both buyer and factory for inspection reference.
Normalize Quotes Before Choosing a Supplier
A low unit price is only useful when the quotes describe the same product and service level. Canvas weight, finish, finished dimensions, handle width, divider construction, print method, screen charges, labels, hangtags, barcodes, carton quality, packing labor, sample fees, inspection support, and delivery terms can all shift the true cost. One supplier may include export cartons, barcode labels, and screen setup. Another may quote only the sewn carrier.
Ask each supplier to show inclusions and exclusions clearly. This does not require margin disclosure; it simply lets procurement compare landed readiness. A move from one-color to four-color screen print may affect setup cost and schedule more than a modest fabric-weight change on a small run. Retail hangtags, individual polybags, kraft sleeves, or destination-specific barcodes can slow packing and add labor. Carton dimensions and gross weight should be requested early because heavier canvas and poor carton utilization can change freight economics.
Confirm payment terms, sample charges, inspection timing, delivery terms, and quote validity before PO release. If inspection must happen before balance payment, put that in the purchase order. If the quote is ex-factory, the buyer or forwarder owns pickup and freight booking. If the quote is FOB, DAP, or another delivered term, clarify which origin charges, documents, duties, taxes, and inland costs are included. For fixed craft fair dates, the safer supplier is often the one with a complete, specific, schedule-realistic quote rather than the lowest vague price.
- Compare fabric weight, dimensions, handle construction, divider details, and print method before comparing unit price.
- Confirm whether screens, underbase, labels, hangtags, barcodes, packing labor, cartons, and carton marks are included.
- Request carton dimensions, carton quantity, and gross weight early for freight and warehouse planning.
- Record sample fees, remake fees, payment terms, inspection terms, delivery terms, and quote validity.
- Ask suppliers to separate sample lead time, production lead time after approval, inspection date, and shipping assumptions.
- Select based on landed readiness, documented specification, and calendar reliability, not unit price alone.
Design Packing for Distribution Reality
Packing determines whether the carriers arrive clean, countable, and easy to route. Craft fair goods may move from factory to forwarder, port, warehouse, distributor, event staff, and booth setup crew. Each handoff brings risk: creasing, dust, print transfer, carton damage, or SKU confusion. A good packing plan protects the product and helps the warehouse identify the right artwork version without opening every carton.
Flat packing is common because it saves space and supports efficient export cartons. Still, canvas can hold creases if cartons are over-compressed, especially when pressure lands across the printed front panel. Two-bottle dividers can also flatten in a way that makes the bag look distorted at first unpacking. Ask for packing photos, carton dimensions, and gross weight before shipment release. If presentation is important, reviewing a sample carton is more useful than reviewing a single folded unit.
Packing materials should match brand policy and handling risk. Individual polybags protect against dust and print rubbing but may conflict with sustainability goals. If polybags are not used, specify bundle packing, tissue, kraft paper, separators, or clean carton liners where needed. Carton marks should include SKU, artwork version, quantity, PO number, country-of-origin wording if required, and destination or fair location when relevant. Clear carton marks save receiving time and reduce the chance that the wrong design reaches the wrong event.
- Define whether carriers arrive flat, folded, bundled, individually packed, or retail-ready.
- Specify pieces per bundle, inner carton quantity, export carton quantity, and maximum carton gross weight.
- Use SKU-specific carton marks for artwork version, destination, PO number, carton number, and quantity.
- Protect printed panels from rubbing, dust, transfer marks, and compression creases.
- Request carton dimensions, carton gross weight, and packing photos before shipment release.
- Confirm barcode, hangtag, country-of-origin, and distributor labeling rules before production packing starts.
Build a Lead Time Risk Map
Lead time failures usually come from several small delays, not one dramatic mistake. Missing Pantone references, incomplete bottle dimensions, late sample comments, unavailable fabric, delayed labels, overloaded print capacity, public holidays, and freight booking problems can each add a few days. In a craft fair program, those few days can trigger air freight, partial shipment, or missed allocation. A risk map makes the weak points visible before the purchase order is released.
Assign ownership. The buyer owns final artwork, SKU quantities, bottle data, label files, internal approvals, payment timing, and response speed. The factory owns fabric sourcing, sample accuracy, production sequencing, print execution, sewing quality, packing data, and inspection readiness. The forwarder owns booking visibility, documents, transit updates, and estimated arrival. If a distributor is involved, that team owns receiving rules, carton labeling instructions, allocation plans, and event delivery windows.
Agree on fallback actions while options still exist. If the sample is late, will the buyer approve by detailed photos first or wait for the physical sample? If ocean transit becomes too slow, what quantity should move by air? If one artwork version is delayed, can the remaining SKUs ship first? If natural canvas shade differs slightly from a prior order, who can approve commercial acceptability? These decisions are easier before production starts than one week before the fair.
- Freeze artwork before sample making unless the calendar allows a second sample round.
- Book fabric only after GSM, color, quantity split, and body style are confirmed in writing.
- Set latest acceptable dates for sample approval, production start, inspection, ex-factory, and warehouse arrival.
- Create fallback rules for partial air shipment, upgraded service, split delivery, or delayed SKU release.
- Use in-line production photos to check print, handle reinforcement, divider construction, and packing before final inspection.
- Assign owners for buyer approvals, factory milestones, forwarder bookings, and distributor receiving.
Specification comparison for buyers
| Planning decision | Recommended procurement approach | Why it matters for craft fairs | Buyer risk to control |
|---|---|---|---|
| Reverse calendar | Work backward from required warehouse arrival, then add buffers for sample approval, inspection, freight, customs, and event allocation | Craft fair dates are fixed, and goods often need 3-7 days for receiving, SKU sorting, booth kits, or distributor dispatch before the event | A carrier that arrives after the selling window becomes stranded seasonal inventory even if the factory met its production promise |
| Fabric weight | Use 10-12 oz cotton canvas, approximately 280-340 GSM, for most reusable wine carrier programs; confirm both oz and GSM on the quote | This range usually balances structure, printability, sewing efficiency, and carton weight for one-bottle and many two-bottle formats | Under about 260 GSM can sag around glass bottles; above about 380 GSM can increase needle breakage, sewing time, carton gross weight, and freight cost |
| Bottle capacity | Specify bottle type, maximum diameter, height, filled weight, opening width, base gusset, and whether the fit must cover Bordeaux, Burgundy, or sparkling bottles | Wine bottle shapes vary materially; sparkling bottles can be wider and heavier than standard still wine bottles | A bag that fits a slim sample bottle may be unusable for a customer’s actual bottle mix |
| Divider construction | For two-bottle carriers, require a divider sewn into the base zone and secured into side, bottom, or center seam points | The divider prevents glass-to-glass contact while shoppers walk through crowded fair aisles | A divider tacked only near the top can twist, collapse, or allow bottles to collide |
| Handle reinforcement | Use 25-38 mm cotton webbing with box stitch, cross stitch, or bar-tack reinforcement at load points; define handle drop and stitch density | A filled 750 ml wine bottle commonly weighs about 1.2-1.6 kg, so two-bottle carriers can exceed 3 kg before packaging | Unspecified webbing width, shallow seam allowance, weak thread, or short stitch runs can create loaded-use failures |
| Print method | Use screen print for solid logos and event marks; use heat transfer, digital print, or embroidery only when artwork complexity justifies the added approval controls | Screen print is usually efficient for MOQ runs and gives a clean craft-market look on canvas | Poor curing, unapproved underbase, incorrect Pantone target, or fine artwork on coarse weave can create cracking, rubbing, or color mismatch |
| MOQ structure | Consolidate body fabric, construction, and packing, then split artwork only where sales allocation requires it | Factories manage minimums by fabric color, cutting lot, body style, print setup, label, carton mark, and shipment | Too many small SKU splits increase setup cost, scheduling risk, inspection complexity, and packing mix-ups |
| Sample route | Approve a pre-production sample made with actual fabric, webbing, divider, print, label, barcode, and packing fold before bulk cutting | The sample should prove bottle fit, loaded carry strength, print quality, appearance, and carton presentation | A plain size sample does not validate ink curing, shade, divider placement, handle security, label accuracy, or carton fit |
| Packing plan | Flat pack by SKU with defined bundle quantity, inner quantity, export carton quantity, carton marks, barcode position, and print protection | Craft fair goods may pass through forwarders, warehouses, distributors, event teams, and booth setup crews | Over-compression can crease front panels; unclear carton marks can send the wrong design to the wrong fair location |
Buyer checklist before sampling
- Confirm craft fair date, booth kit deadline, distributor dispatch date, required warehouse arrival date, latest inspection date, and latest acceptable ex-factory date before requesting quotes.
- Define bottle type, bottle height, maximum body diameter, shoulder shape, filled bottle weight, and whether the carrier must fit standard 750 ml, Burgundy, Bordeaux, sparkling, or mixed bottles.
- Specify one-bottle or two-bottle construction, finished width and height, opening size, base gusset width, divider height, divider anchoring, handle drop, webbing width, seam allowance, and reinforcement method.
- State fabric weight in oz and GSM, fabric color, dye or natural finish, shrinkage expectation, acceptable slubs, acceptable shade range, and whether dyed canvas must match a physical swatch.
- Provide artwork as vector files with Pantone or other color references, print size, print position from seams, number of colors, number of print locations, and minimum readable text size.
- Set written tolerances such as finished dimension tolerance, print placement tolerance, handle drop tolerance, stitch quality rules, carton count tolerance, and acceptable natural-canvas variation.
- Require a pre-production sample using actual bulk fabric, handle webbing, divider construction, print method, labels, barcode, hangtag, and planned packing fold.
- Test the sample with the largest and heaviest intended bottle, including insertion, loaded carrying, divider separation, base stability, print rub, and front-panel presentation after unpacking.
- Ask suppliers to separate artwork proofing time, material booking time, sample production time, sample shipping time, mass production time after approval, inspection date, ex-factory date, transit time, and local delivery time.
- Confirm MOQ per body style, fabric color, artwork, label, hangtag, barcode, packing method, and shipment, plus price breaks when artwork versions share the same fabric and sewing batch.
Factory quote questions to send
- What exact canvas weight are you quoting in oz and GSM, and is the fabric natural greige, dyed, washed, preshrunk, enzyme washed, or finished after weaving?
- What are the finished dimensions, opening size, base gusset, handle drop, handle webbing width, seam allowance, divider height, and divider anchoring method included in the quote?
- What tolerances do you apply for finished height, width, gusset, handle drop, divider height, print position, fabric shade, stitch quality, carton count, and carton gross weight?
- Is the quoted branding screen print, heat transfer, digital print, embroidery, woven label, hangtag, or a combination, and how many colors and positions are included?
- Are screen charges, underbase printing, repeat setup, artwork cleanup, hangtags, barcodes, labels, inner packing, export cartons, and carton marks included or charged separately?
- What is the MOQ per style, per fabric color, per artwork, per label, per packing method, and per shipment, and what price break applies if several artwork versions share one fabric batch?
- Can you make a pre-production sample using actual bulk fabric, actual handle webbing, final divider construction, final print method, final label, barcode, and intended packing fold?
- How many working days are needed for artwork proofing, sample production, sample shipping, sample remake if required, material booking, and mass production after written approval?
- What loaded carry test do you normally perform for wine carriers, what bottle weight or test load do you use, how long is the hold or carry cycle, and how is failure defined?
- How do you check print curing, dry rub resistance, ink opacity, registration, edge sharpness, and Pantone or approved-sample color consistency on canvas?
Quality-control points to confirm
- Measure finished height, width, opening size, base gusset, handle drop, handle webbing width, divider height, and print position against the approved sample and written tolerances before final packing.
- Use practical tolerances unless the product requires tighter control: often about +/-5 mm for small finished dimensions, +/-10 mm for handle drop, and +/-3-5 mm for print placement, subject to the approved spec.
- Run a loaded carry check using the intended bottle weight plus a safety margin; inspect handle attachment, top seam, divider seam, base seam, stitch distortion, and fabric tearing after testing.
- For two-bottle carriers, load two filled bottles and confirm the divider reaches the base zone, remains centered, and prevents glass-to-glass contact during light movement.
- Check print opacity, registration, edge sharpness, curing, dry rub resistance, cracking, transfer edges, and color consistency on the actual canvas color, not only on a digital proof.
- Review fabric shade, slubs, stains, creases, loose yarns, holes, weaving defects, and dye streaks under consistent lighting with an approved swatch or signed sample as the reference.
- Inspect seam allowance, stitch density, skipped stitches, broken stitches, loose threads, back-tacking, bar tacks, and handle reinforcement position at high-stress points.
- Confirm labels, hangtags, barcodes, SKU stickers, carton marks, inner quantities, export carton quantities, carton dimensions, and gross weight before authorizing shipment.
- Check packing compression and flatness after cartons are closed; front panels should not be crushed so tightly that visible logo creases become a retail presentation issue.
- Classify handle failure, open seams, wrong artwork, unusable bottle fit, severe print defects, wet cartons, incorrect carton count, and mixed SKU packing as major defects requiring correction before release.