Start With the Buying Job, Not the Bag Name
A useful RFQ for canvas wine carriers starts before fabric weight, logo size, or MOQ. It starts with the job the carrier has to do. A checkout add-on for an eco apparel store does not need the same structure as a wine club gift, a corporate holiday pack, or a premium bottle presentation in a lifestyle assortment. The product name sounds simple, but the use case changes almost every procurement decision: base rigidity, handle strength, decoration method, carton packing, and even the amount of natural shade variation a buyer can accept.
Factories often quote the simplest version when the brief says only canvas wine carrier. That quote may look attractive because the unit price is low and the sample photographs well when empty. The risk appears later, when a full bottle pulls at the handle roots, the base bows, the print looks soft on a loose weave, or the carrier arrives with fold marks across the logo. For B2B buyers, the real task is to make the expected performance visible before anyone prices the item.
Eco apparel brands also need the carrier to carry a brand message. It should feel reusable, low-waste, and aligned with apparel merchandising, while still fitting a wholesale, promotional, or gift-with-purchase cost model. That balance is practical, not abstract. A lighter canvas may protect margin but feel weak around the bottle. A heavier canvas may look excellent but raise sewing cost, carton weight, and landed cost. Write the commercial intent into the brief so suppliers can quote the right version from the start.
- Define the use case before requesting quotes: retail accessory, gift packaging, wine club pack, corporate gift, or promotional bundle.
- State whether the carrier must protect a bottle during fulfillment or only present it after the bottle is already safely packed.
- Connect material choice to target shelf price, brand positioning, expected order volume, and landed-cost limits.
- Tell suppliers the bottle family and loading condition so they do not quote a generic tote-style construction.
Choose Canvas Weight With Structure and Freight in Mind
Canvas weight is one of the quickest ways to change cost, feel, and production behavior. For many one-bottle programs, 12 to 14 oz cotton canvas is a sensible starting point. It gives the carrier enough body to feel reusable without making sewing, folding, and export packing unnecessarily difficult. In GSM terms, this often lands around 400 to 475 GSM, although the conversion is never perfect because yarn count, weave density, and finishing all affect the finished cloth.
A 16 to 18 oz canvas, often around 540 to 610 GSM depending on construction, belongs in the conversation when the program is more premium. It can help the bag stand upright, give the hand feel more substance, and make a simple logo look more intentional. The tradeoff is not just fabric price. Heavier cloth creates thicker folded seams, increases needle wear, slows difficult sewing points, and can make handle-root stitching less forgiving. Across a few thousand units, the extra grams also become real freight weight.
Do not let weight become the only quality shortcut. If the issue is base sag, a double-layer base or insert may solve the problem better than upgrading the entire body. If the issue is handle stress, stronger bartacks, wider webbing, or a better stitch pattern may matter more. If the issue is print clarity, a tighter weave or smoother finish may outperform a heavier but rougher canvas. Ask suppliers to explain why their recommended weight fits the bottle, not just what weight they have in stock.
- Use 12 to 14 oz canvas as the cost-controlled starting point for many one-bottle programs.
- Consider 16 to 18 oz canvas when premium hand feel and upright shelf presence matter more than lowest landed cost.
- Ask for both oz and GSM, plus weave and finish, because weight alone does not define performance.
- Use targeted base and handle reinforcement before automatically increasing the full body fabric weight.
Specify Fiber, Finish, and Shade Standards
Eco apparel buyers often care about the material story, but procurement has to turn that story into verifiable language. Cotton canvas may be conventional cotton, organic cotton, recycled cotton, or a cotton blend. Each option affects availability, price, shade consistency, minimums, and documentation. If a sustainability claim will appear on a hangtag, product page, wholesale line sheet, or retail sign, ask early what composition documents or certification references the supplier can support. A natural-looking canvas is not automatically organic, recycled, or undyed.
Finish changes both appearance and production risk. Unbleached natural canvas has the warm, slightly irregular look many eco brands want. It may also include seed flecks, slubs, and shade movement between rolls. Those characteristics can be brand-right if everyone approves them in advance. Bleached canvas gives stronger print contrast and a cleaner background, but it may not fit every environmental message. Dyed canvas can support seasonal color stories, yet it brings lab dip timing, dye lot control, and higher minimums. Garment-washed canvas feels softer, but washing can shift dimensions and create more batch variation.
Treat shade as a tolerance, not a last-minute argument. For natural canvas, approve a range instead of one perfect swatch. For dyed canvas, approve lab dips before bulk fabric production and ask whether the same dye lot can cover the whole PO. If the carrier will sit beside apparel in a store, compare the canvas under lighting that resembles the retail environment. Factory photos can hide warmth, gray cast, and print contrast problems.
- Separate material claims from visual appearance; natural canvas does not automatically mean organic or recycled.
- Approve natural canvas with an acceptable shade range, including seed flecks and slubs if they are part of the look.
- For dyed canvas, confirm lab dip timing, fabric minimums, dye lot control, and shade tolerance.
- Check print contrast on the final fabric finish, not on a generic white swatch.
Fit the Carrier to Bottle Geometry
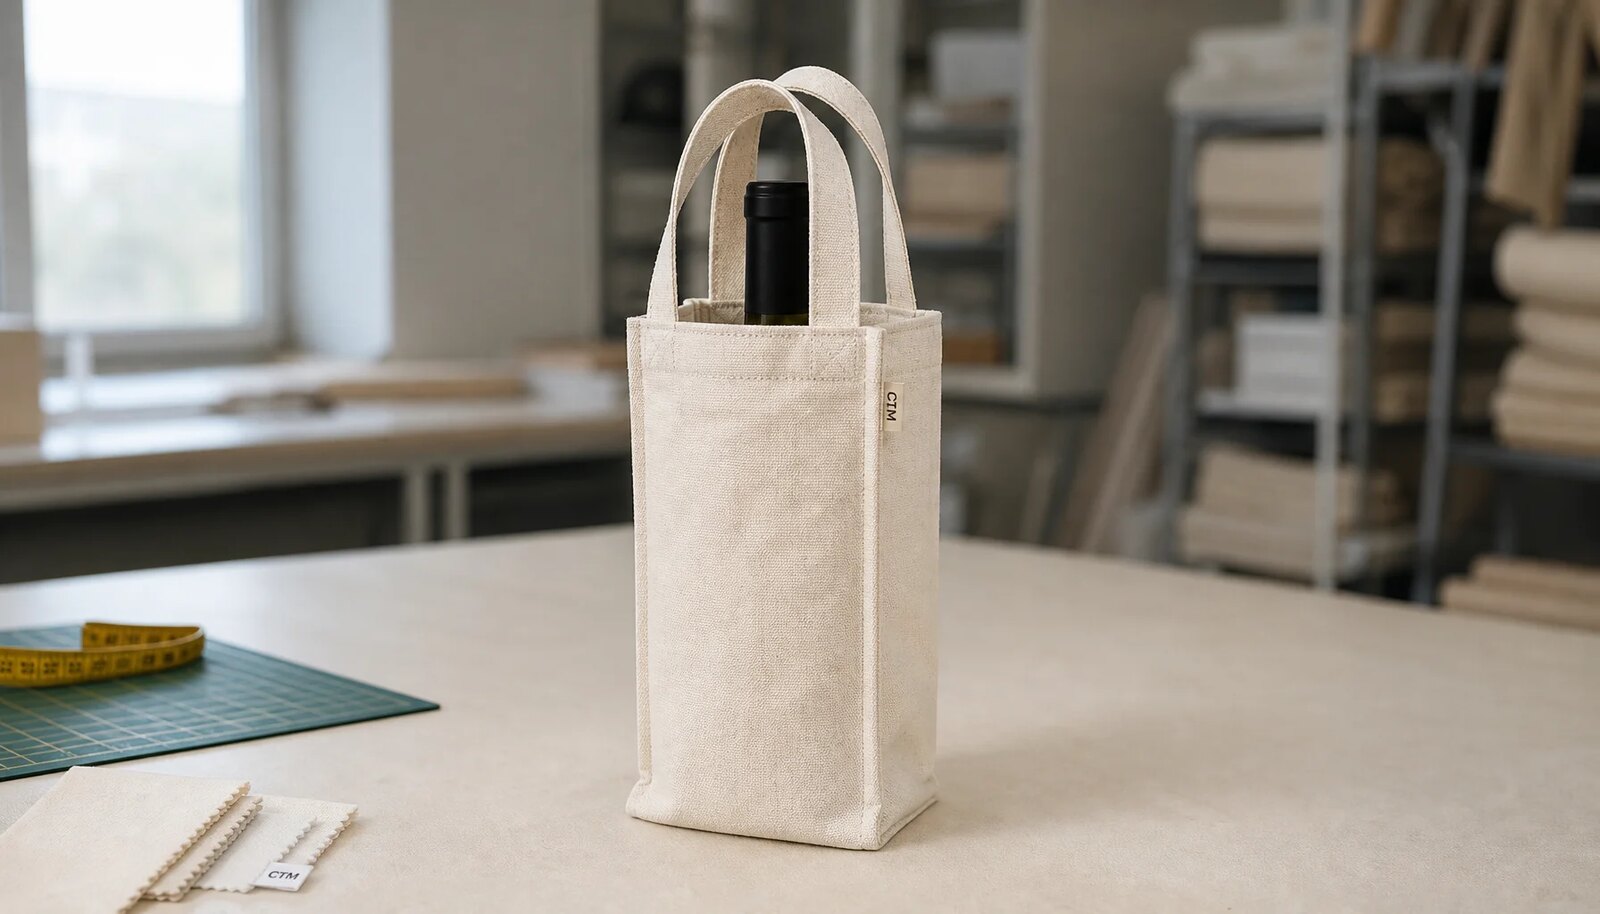
Bottle fit is where good-looking samples often become annoying products. A standard 750 ml bottle can vary widely by style, with many bodies around 70 to 90 mm in diameter and heights around 280 to 340 mm. Sparkling bottles, premium wine bottles, wide-shoulder shapes, and gift-sleeved bottles can sit outside the size assumed by a factory. A carrier that works for one bottle may scrape a label, pinch the shoulder, or wobble with another.
Internal dimensions matter more than flat external measurements. Usable width and depth determine whether the bottle slides in cleanly. Usable height affects how much neck is exposed and whether the presentation looks intentional. Opening size matters because wider shoulders can catch at the top even when the body technically fits. Base shape matters too. A weak or narrow base can make a bottle lean even when the fabric is heavy.
Build fit around the largest bottle that must work, then test the smaller ones for presentation. Too much clearance can make the carrier feel sloppy and unbalanced. Too little can damage paper labels, foil, or decorative bottle finishes. A practical starting point for many single-bottle carriers is about 5 to 10 mm of clearance at the widest point, but the final number should come from real samples. For two-bottle carriers, divider placement, bottle spacing, and loaded balance become part of the fit spec, not optional details.
- Provide bottle height, body diameter, shoulder width, and any gift sleeve or wrap thickness in millimeters.
- Ask for internal dimensions, not only external flat measurements.
- Test the widest required bottle during sampling, then check smaller bottle families for wobble and presentation.
- For two-bottle carriers, inspect divider security, bottle spacing, and loaded balance.
Place Reinforcement Where the Load Lives
Reinforcement should follow the stress points. On a wine carrier, those points are usually the base, handle roots, lower side seams, and divider attachment lines. A full bottle creates downward force that can bow a soft base. The same bottle pulls against the handles every time a customer lifts, swings, or passes the carrier across a counter. An empty sample can look clean and still fail the loaded-use expectation.
Base choices include double-layer canvas, a hidden insert, a removable board, or a more structured boxed bottom. A double-layer base keeps the product flexible and textile-led. A board can improve shape, but the material matters because moisture, odor, recyclability, and pressure marks may become concerns. If the carrier must fold tightly for import, rigid structure can also create carton and presentation issues. For eco apparel programs, the best answer is often a measured one: add structure where needed without turning a reusable textile item into a bulky package.
Handle construction deserves its own line in the spec. Self-fabric handles look cohesive, but they need enough width and reinforcement to feel comfortable under load. Cotton webbing is efficient and strong, though it creates a more utility-driven look. Box stitching, cross stitching, and bartacks can all work if the factory executes them cleanly. For a standard full 750 ml bottle, a practical loaded-use target is about 1.2 to 1.5 kg. Test repeated lifting, not just a single still photo with a bottle inside.
- Reinforce the base and handle roots before adding unnecessary weight to the whole body.
- Choose base construction based on loaded stability, folding method, moisture risk, and sustainability requirements.
- Specify handle width, handle drop, stitch pattern, thread color, and reinforcement method.
- Run a loaded carry test on samples, including repeated lifting and normal handoff movement.
Match Branding to Canvas Texture
Branding is where a canvas wine carrier either feels like a considered apparel accessory or a cheap giveaway. For many eco apparel programs, one- or two-color screen printing is the most practical default. It works well for bold logos, clean type, and repeat production. It also keeps cost visible. Still, canvas is not paper. Fine lines can fill in, small type can blur, and large ink areas can feel stiff if the ink deposit is heavy.
Woven labels, side tabs, and sewn patches give a more garment-like finish. They work well when the brand mark is subtle, when the canvas texture is too irregular for small printed details, or when the same base carrier may be used across several seasons. Labels bring their own buying questions: MOQ, lead time, fold type, edge finish, stitch color, placement, and label inventory. A tiny label placed too close to a seam can look accidental, so measure placement from a fixed reference point.
Embroidery can look premium, but it is not automatically better. Dense embroidery can distort lighter canvas, add backing, increase stitch count cost, and slow production. Heat transfer may suit small runs, but it may not match the durability expectations of a reusable textile item. Digital print can handle detailed artwork, yet canvas texture and base color can reduce sharpness. When artwork is not final, ask for two decoration routes in the quote. That gives merchandising and procurement a real comparison instead of a preference debate.
- Use screen print for bold, repeatable, cost-controlled branding on most canvas wine carriers.
- Use woven labels or side tabs when the product should feel closer to an apparel accessory.
- Specify Pantone target, artwork size, minimum line weight, placement tolerance, and acceptable fiber show-through.
- Approve a strike-off or decorated pre-production sample before bulk production.
Compare Suppliers on Assumptions
The cheapest quote is often cheap because it is quoting less. One supplier may price 12 oz natural canvas with no base reinforcement and a one-color print. Another may include 16 oz canvas, reinforced handle roots, a base insert, a woven label, and a stronger carton. Both lines may say canvas wine carrier, but they are not the same product. Buyers need a quote format that exposes the assumptions.
Ask suppliers to separate fabric, sewing, decoration, labels, inserts or dividers, sample fees, setup charges, inner packing, master carton, and freight-ready dimensions. Price breaks at multiple quantity tiers also help because setup charges, label minimums, and fabric minimums can distort the unit cost at small quantities. MOQ should be confirmed by bag style, fabric color, dyed fabric, print color count, custom label, and packing method. A single MOQ number is rarely the whole story.
The sourcing route changes ownership. A direct factory with structured bag experience is usually better for custom dimensions and repeat control. A trading company can help when the PO includes several eco packaging or apparel accessory categories, but the buyer should know who owns sample corrections, inspection failures, and replacement timing. Ask bottle-specific questions. Strong suppliers can talk clearly about base sag, handle reinforcement, divider behavior, and print limits on canvas without leaning on vague reassurance.
- Compare quotes only after matching fabric weight, structure, decoration, packing, and MOQ assumptions.
- Ask who is responsible for sample correction, failed inspection, rework, and replacement timing.
- Favor suppliers that can discuss bottle-specific construction risks in practical terms.
- Request price breaks at multiple quantity tiers so fixed setup costs are visible.
Use Sampling to Remove Ambiguity
Sampling should be an approval process, not a photo exchange. If the shape is new, a development sample is useful for checking size, balance, and basic construction. That sample may use available fabric, so it should not become final approval unless the supplier confirms it matches final material and construction. The real decision point is the pre-production sample.
A pre-production sample should use final fabric weight and finish, final handle construction, final base or divider, final decoration, final thread color, and final packing method. Load it with the target bottle. Measure the inside of the body, not just the outside. Check the opening, base, handle comfort, seam strain, twisting, label scraping, and whether the carrier stands upright. Then inspect the decoration under good light for color, coverage, registration, and placement.
Document the approval with numbers and photos. Record logo placement from the top edge, side seam, bottom edge, or handle reference point. Note handle drop, stitch pattern, thread color, folding direction, and carton packing. Keep one approved sample sealed for inspection comparison and one working sample for handling. If timing forces approval from a substitute-material sample, treat that as a known risk because fabric behavior, sewing performance, and print quality can still change.
- Separate development samples from final pre-production samples.
- Approve bulk production only against a sample made with final fabric, final decoration, and final reinforcement.
- Test samples loaded, not only flat or empty.
- Record approval measurements and photos so QC has a clear reference.
Set QC Criteria for Loaded Use
Quality control for canvas wine carriers should combine normal soft-goods inspection with bottle-specific checks. Standard inspection covers fabric defects, dimensions, stitching, cleanliness, decoration, and packing. Bottle-carrier inspection adds loaded stability, handle strength, base sag, divider movement, bottle fit, and odor. These are simple checks, but they matter because the product is meant to be carried with weight inside.
Define tolerances before production starts. For many programs, plus or minus 5 mm on internal width, depth, usable height, and handle drop is a practical starting point, while logo placement may need a tighter tolerance such as plus or minus 3 mm from the approved reference point. The exact tolerance should fit the design. Also define what counts as a major defect: skipped stitches at handle roots, broken stitches, needle cuts, seam puckering, loose thread tails, incorrect label orientation, print transfer, or a carrier that cannot stand correctly when loaded.
During inspection, randomly load units with the target bottle or equivalent weight. Lift by the handle, set the carrier on a flat surface, and watch what happens to the base, seams, and handle roots. For two-bottle styles, check whether bottles collide or lean into each other. If there is a divider, move the loaded carrier gently and see whether the divider shifts. Smell the product after unpacking too. Adhesives, coatings, inks, or damp cartons can create complaints even when the sewing passes.
- Inspect loaded performance as well as flat dimensions and cosmetic appearance.
- Define tolerances for internal fit, handle drop, logo placement, stitch quality, and shade variation.
- Check divider movement, base sag, odor, print transfer, and carton compression.
- Keep the approved pre-production sample available during final inspection and receiving.
Control Packing, Cartons, and Timing
Packing is not just an end-of-line detail. It affects how the carrier looks when the buyer receives it and how much the shipment costs to move. Bulk packing can be efficient, but folding must protect the printed face and avoid hard creases through the logo. Inner polybags protect against dirt and moisture, while paper bands, tissue, or reduced-plastic packing may fit eco apparel positioning better. Each option changes labor, moisture risk, presentation, and carton efficiency.
Collect carton information before freight planning: master carton quantity, carton dimensions, net weight, gross weight, and carton strength. Many buyers prefer gross carton weights around 12 to 15 kg where possible for manual handling, but the right limit depends on the carrier size, carton quality, and warehouse rules. Too much compression can mark the print or distort the base. Too little wastes freight space. For larger or launch-critical orders, ask for a packing trial or carton photos before mass packing.
Lead time should be managed as a chain of approvals. Fabric sourcing, dyeing or washing, label production, print strike-off, sample revision, bulk cutting, sewing, inspection, packing, and export booking can all add time. The supplier's production lead time after sample approval is useful, but it is not the full calendar. Ask which materials are in stock, which are made to order, and which components have separate minimums or longer lead times. For seasonal launches or holiday gifting, leave room for one sample correction and one inspection issue. Last-minute air freight can erase the savings from a low unit price very quickly.
- Approve folding and inner packing so units arrive clean, shaped, and retail-ready.
- Get carton size, carton count, net weight, gross weight, and carton markings before freight booking.
- Ask which components are in stock and which require fabric, dye, label, or print lead time.
- Build sample correction and inspection time into the schedule for launch-critical orders.
Specification comparison for buyers
| Spec decision | Recommended option | When it fits | Buyer risk to check |
|---|---|---|---|
| Sourcing route | Direct factory with bottle-bag experience | Best for repeat programs, custom dimensions, reinforced handles, divider construction, and tighter print/QC control | Confirm the factory has made bottle carriers before; tote-bag experience alone does not prove load-bearing construction skill |
| Sourcing route | Trading company or sourcing agent with named factory responsibility | Useful when you need several eco packaging or apparel accessory categories consolidated into one PO | Ask who owns sample correction, failed inspection costs, and replacement timing if the factory misses the approved spec |
| Fabric weight | 12 to 14 oz cotton canvas, about 400 to 475 GSM depending on weave and finish | Good balance for value-led eco apparel brands that want a sturdy, reusable one-bottle carrier without premium-heavy cost | Thin or loosely woven canvas can buckle around a full bottle and make print edges look soft |
| Fabric weight | 16 to 18 oz cotton canvas, about 540 to 610 GSM depending on construction | Better for premium gift programs, winery retail, club member packs, and higher-priced brand merchandise | Higher weight increases material cost, needle wear, sewing difficulty at handle roots, carton weight, and sometimes minimums |
| Fiber and claim | Natural cotton, organic cotton, recycled cotton, or cotton blend with documentation | Use when the program needs a sustainability claim or a clear material story on hangtags and line sheets | Do not assume visual texture proves fiber content; ask for composition documentation and any certification references |
| Fabric finish | Unbleached natural canvas with an approved shade range | Works for organic, low-impact, earth-toned apparel branding and simple one-color logos | Natural shade variation must be approved with a tolerance range; do not judge bulk against a single ideal swatch |
| Fabric finish | Bleached, dyed, or garment-washed canvas | Fits programs needing a cleaner brand color, softer hand feel, or stronger contrast with printed artwork | Dye lots and washing can shift dimensions and shade; require shrinkage and color approval before bulk cutting |
| Structure | Single-bottle carrier with reinforced base and handle roots | Best default for retail display, gifting, and efficient import packing | Base sag and handle tearing are common if reinforcement is not defined in the tech pack |
| Structure | Double-layer base, board insert, divider, or boxed bottom | Use when the bottle is heavier, the carrier must stand upright, or two bottles must travel separately | Extra structure can add cost, thickness, and packing volume; confirm the carrier still folds and packs efficiently |
Buyer checklist before sampling
- Confirm the bottle family in millimeters, including the widest body diameter, total height, shoulder shape, and any premium bottle shape that may be used in the program.
- Define the carrier purpose clearly: retail accessory, gift packaging, wine club pack, corporate gift, promotional bundle, store merchandising item, or transport-protection item.
- Set the target canvas weight in oz and GSM, and state whether the fabric is natural, bleached, dyed, washed, recycled cotton blend, organic cotton, or conventional cotton.
- Ask the supplier to identify weave, yarn appearance, hand feel, finishing process, and expected shade variation instead of accepting only the word canvas.
- Specify internal width, depth, usable height, opening size, base shape, handle drop, handle width, and the target clearance around the bottle.
- Decide whether the carrier needs a base board, double-layer base, lining, divider, padding, or bartack reinforcement, and show each item on the spec sheet.
- Choose the branding method and lock down logo size, Pantone target, print placement from seam and top edge, label position, and artwork tolerance.
- Request a costed quote with separate lines for fabric, sewing, print, label, insert or divider, packing, sample charges, tooling or setup, carton, and freight-ready dimensions.
- Confirm MOQ by bag style, fabric color, print color count, custom label, dyed fabric, decoration method, and carton packing method.
- Request a development sample if the shape is new, then approve a pre-production sample made with final fabric, final print or label, final reinforcement, and final packing method.
Factory quote questions to send
- What exact fabric weight in oz and GSM are you quoting, and what is the weave construction, yarn count, and finishing process?
- Is the canvas conventional cotton, recycled cotton, organic cotton, cotton-poly blend, or another blend, and can you quote certification or composition options separately?
- What shrinkage should we expect after cutting or washing, and what tolerance do you hold on finished dimensions after production?
- Is the quoted price based on single-layer canvas, double-layer base, lined construction, base board, divider, padding, or another reinforcement method?
- Which bottle dimensions did you assume when quoting, and what internal carrier dimensions will you produce for the body, base, opening, and usable height?
- What handle construction is included: self-fabric handle, cotton webbing, folded canvas handle, cross-stitch, bartack, or box-stitch reinforcement?
- What is the seam allowance, stitch density, and thread type on the main seams and handle roots?
- What is the MOQ by bag style, fabric color, dyed fabric, print method, print color count, custom woven label, and packaging method?
- Which branding method is included in the unit price, how many colors are included, and what are the setup charges, screen charges, plate charges, or label minimums?
- What artwork limits should we follow for screen print, including minimum line weight, minimum text height, maximum print size, mesh count, and ink type?
Quality-control points to confirm
- Canvas weight matches the approved range within the agreed tolerance, and hand feel is not noticeably thinner, looser, or softer than the approved pre-production sample.
- Fabric shade matches the approved lab dip, swatch, or sample within the agreed tolerance, with natural canvas variation judged against an approved range rather than a single ideal piece.
- Internal dimensions fit the approved bottle family, with enough clearance for loading without scraping labels and enough height for stable presentation.
- The carrier stands upright when loaded with the target bottle and does not sag, twist, or collapse at the base under normal handling.
- All seams are straight, evenly tensioned, and free from skipped stitches, broken stitches, puckering, loose thread tails, needle cuts, or obvious seam wandering.
- Handle attachment points use the approved reinforcement method and pass a realistic loaded carry test for the intended bottle weight.
- Base board, double-layer base, divider, lining, or padding sits flat and does not shift, curl, rattle, or distort the bottle position during loading and carton movement.
- Print color aligns with the approved strike-off or pre-production sample, with no major bleeding, cracking, ghosting, pinholes, off-registration, or unintended ink transfer.
- Logo placement, label placement, and print size match the approved measurement from top edge, side seam, bottom edge, or handle reference point within the agreed tolerance.
- Woven labels and sewn patches are straight, securely stitched, correctly oriented, and free from frayed edges, dirty marks, or inconsistent stitch color.