Why durability matters more than style for gift shop wine carriers
Gift shop buyers often start with color, logo placement, and shelf appeal, but the first real failure is usually physical. A canvas wine carrier that looks good on display can still fail when a customer lifts a full bottle by the handle, twists the bag while paying, or carries it from register to car. Once a carrier tears or the bottle shifts inside, the store is left with returns, complaints, and a product that no longer feels gift-worthy.
For procurement teams, durability is not a “nice-to-have” quality question. It affects sell-through, staff confidence at checkout, and the likelihood that a retailer will reorder. If the carrier feels flimsy, associates stop recommending it as an add-on gift. If it survives handling, it becomes an easy upsell at the shelf or register.
The right testing plan is not about overengineering. It is about matching the carrier’s construction to the actual retail use case: one bottle, repeated hand carry, mixed bottle shapes, and low tolerance for defects visible at the point of sale. That is why the buying decision should start with fabric weight, stitch construction, and packaging method, then move to print durability and load performance.
A practical buyer mindset helps here: if the bag must survive being picked up, put down, folded, carton-packed, and opened again by a customer who notices every flaw, then the test should simulate those touchpoints. A sample that only looks good on a clean table is not yet a retail-ready item.
Common failure modes worth watching are predictable: handle seam pop, neck opening distortion, bottle slippage, print rub-off, and shipping creases that make the product look old before it reaches the shelf. These are the problems buyers should write into their QC plan before they sign off on the bulk order.
- Single-bottle gift shop SKU: prioritize handle reinforcement and stable bottle fit.
- Premium gift presentation: prioritize print durability and clean edge finishing.
- Transport risk: prioritize seam strength and carton packing that avoids crushing.
- If the carrier will be sold as a gift bag, test it as a gift item, not as a generic tote.
Start with the right canvas spec, not the cheapest quote
Canvas wine carriers are usually quoted by material weight, construction, and finish. For gift shop programs, 14–16 oz canvas is a practical range because it gives enough body for upright presentation and better tear resistance than lightweight promotional fabric. In metric terms, many buyers will see this as roughly 475–540 GSM, depending on weave and finishing. If the supplier offers a much lighter fabric, the carrier may look acceptable in a sample but sag after bottle insertion or show stress at the handle seam.
Do not judge fabric only by thickness in hand. A dense 12 oz canvas from one mill can outperform a loose 14 oz fabric from another. Ask for the actual GSM, weave type, and whether the fabric has been pre-shrunk, washed, or coated. If the supplier cannot explain the fabric source clearly, you may be comparing different cloth standards under the same name.
The weave matters because the fabric is not only holding weight; it is also serving as the display surface for a logo. A cleaner, tighter weave usually improves print edges and reduces the chance of ink sitting unevenly in open fibers. If your design relies on a high-contrast logo, the fabric surface can change how sharp the brand looks on shelf.
If the carrier is dyed or washed for a soft finish, ask how that affects dimensional stability. Washed canvas can feel premium, but it may also introduce more variation in size and seam behavior. For procurement, the useful question is not “does it feel nice?” but “will the same cut pattern stay consistent across the bulk lot?”
The simplest way to prevent confusion is to specify fabric by more than one measure: nominal weight, acceptable tolerance, weave description, and approved swatch. That gives the factory less room to substitute something visually similar but materially different.
- 14–16 oz / 475–540 GSM is a sensible retail-grade range for most single-bottle carriers.
- Natural canvas usually hides minor scuffs better than bright white, but print contrast may differ.
- Pre-shrunk fabric helps reduce size change after steaming or humid transit.
- Ask the supplier to quote the same fabric basis on every revision so changes are visible.
Construction choices that separate a retail carrier from a weak sample
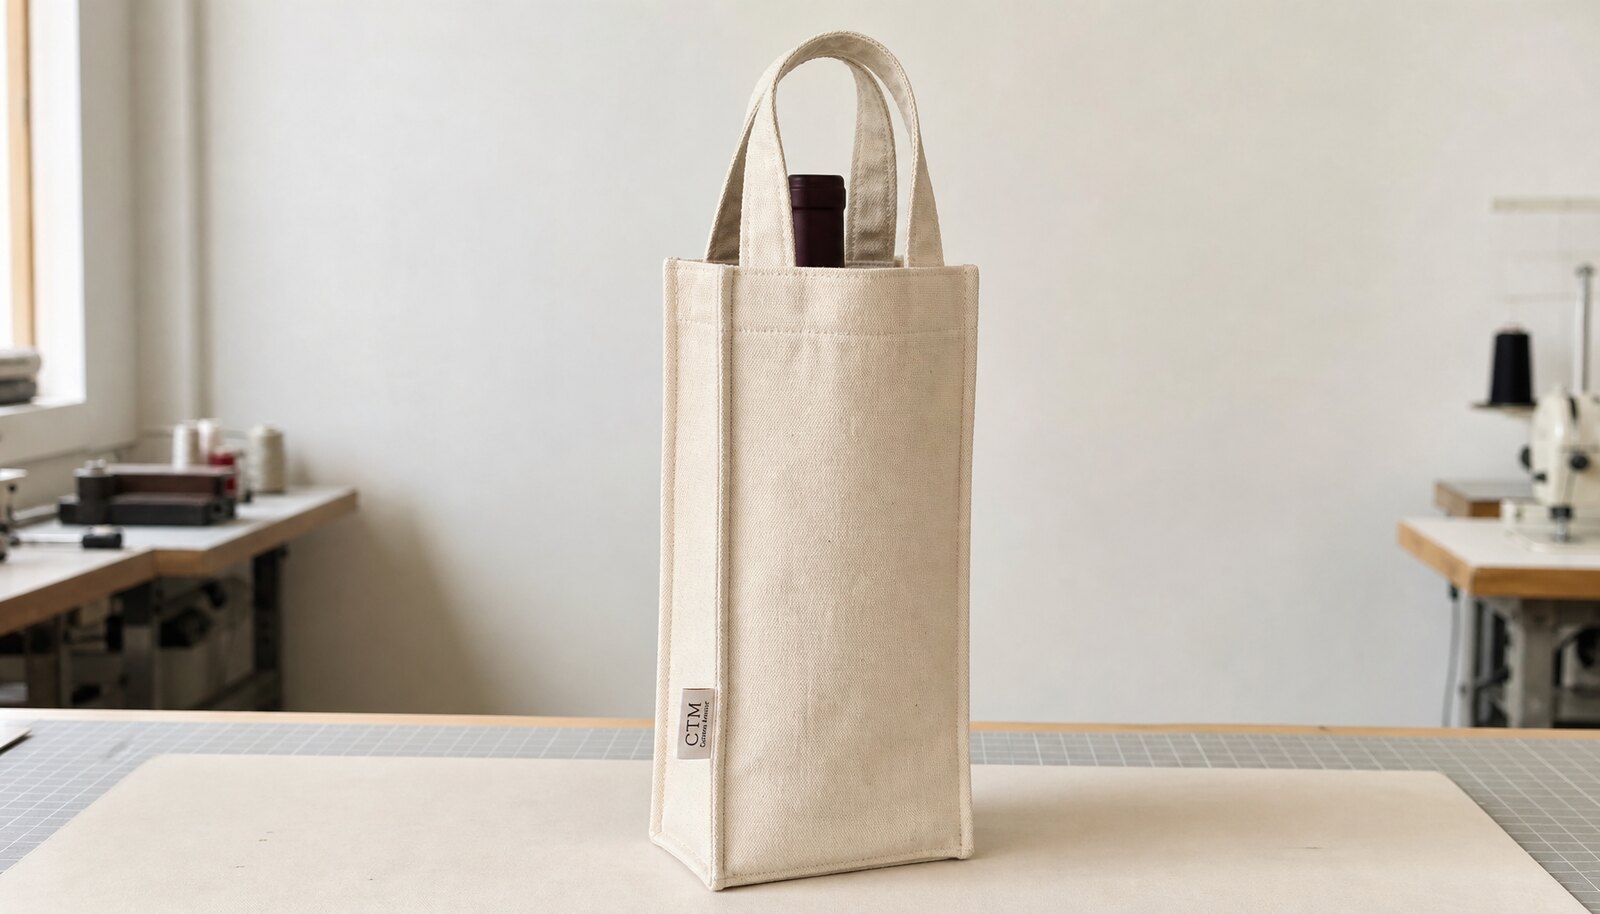
Handle construction is where many low quotes fail. A wine bottle is a concentrated load, and the bag is lifted by narrow top seams every time it leaves the shelf. Double-fold handles with box-X stitching or bar-tacks are more reliable than a simple straight stitch. If the carrier includes a base insert or divider, the pattern should keep the bottle centered so the handle load is vertical rather than pulling the bag sideways.
The bottom seam matters just as much. A flat-felled or reinforced seam reduces the chance of thread pop at the base when the bottle shifts in transit. For gift shop use, a structured top opening also helps the bag stand up on shelf and makes it easier for staff to pack quickly at checkout. The goal is not luxury for its own sake; it is a product that keeps shape after many handoffs.
Buyers should pay attention to seam allowance, thread type, and stitch density because these details often separate a durable item from a reject. A wide enough seam allowance gives the seam more material to hold under stress, while an appropriate thread selection helps prevent breakage when the carrier flexes around a bottle neck or bottle shoulder.
The key procurement control is to request a stitch map. That does not need to be a technical drawing from a garment engineer; it can be a marked photo or annotated sketch showing where the handles attach, how many rows of stitches are used, and where the bar-tacks or box-X patterns sit. Without that, “reinforced” is just a marketing word.
If the design uses an internal divider, ask whether it is stitched in, inserted, or bonded. Each method has a different failure profile. A stitched divider is usually more durable but needs careful alignment; a loose insert can shift during transit; a bonded insert may save time but can loosen after humidity or compression.
- Prefer box-X or bar-tack reinforcement at all handle attachment points.
- Require a stitch map if the carrier uses internal dividers or base inserts.
- Check that seam allowance is wide enough to survive load without edge fraying.
- Ask whether the thread is polyester or cotton-blend; durability expectations change with thread choice.
Make the durability test concrete: weights, cycles, and drop height
This is the part many RFQs leave vague, which makes supplier comparison difficult. If you want a real durability check, define the test in terms the factory can repeat. The sample should be filled with a standard 750 ml bottle or an agreed test load that matches the bottle weight you actually sell. Then test it with repeated lifts, short drops, rubs, and seam inspection after each stage.
A practical starting point for a single-bottle canvas carrier is a 2.0 kg combined load, which is enough to represent a filled bottle plus handling margin for many programs. For handle testing, perform 20 lift-and-hold cycles with the bag suspended by the handles for 10 seconds each. The carrier should show no stitch break, handle tear, or visible seam opening. If the program will carry heavier or irregular bottles, increase the load to reflect that use case.
For a drop test, use a 30 cm drop height onto a flat hard surface for 5 cycles in the normal carry orientation, then 5 cycles in one side orientation. After the drops, check for popped stitches, loose inserts, handle deformation, or bottle shift. The goal is not to recreate lab certification; it is to catch weak sewing and poor load distribution before production starts.
For abrasion or rub testing, you do not need fancy equipment to be useful. Rub the printed area with a dry cotton cloth for 50 double rubs, then repeat 25 rubs with moderate pressure at the fold line. The acceptable result is no peeling, no ink transfer that marks the cloth visibly, and no crack lines that would be obvious to a shopper. If the print is a label or patch, inspect the edges for lifting.
For seam checks, inspect after each test stage rather than only at the end. A seam that survives the first load but starts to creep after the drop test is telling you the stitch margin is too thin. That is why the test order matters: load first, then drop, then rub, then repack and inspect again.
If you are buying a dual-bottle carrier, raise the standard. Test with two full bottles, repeated carry cycles, and a gentle side tilt to see whether one bottle pushes the other outward. The correct acceptance criterion is that the carrier holds shape, keeps both bottles upright, and does not twist enough to stress the handles unevenly.
- Load test: 2.0 kg equivalent, 20 cycles, 10 seconds per lift, no stitch break or seam opening.
- Drop test: 30 cm height, 5 drops flat and 5 drops side orientation, no popped stitches or insert collapse.
- Rub test: 50 dry double rubs on print face plus 25 rubs at fold line, no visible peel or smear.
- Fit test: bottle should enter without force and remain upright without excessive swing.
- Reinspection: inspect after every stage, not only at the end of the sequence.
Use a supplier comparison matrix that shows real tradeoffs
A comparison table is useful only if it helps a buyer decide, not just describe. Procurement teams need to see the tradeoff between price, construction quality, print durability, and supplier control. A very low price may be acceptable if the design is simple and the shop treats the carrier as a low-exposure seasonal item. But if the bag will be branded, handed to customers daily, and reordered, the lowest quote can create cost later through rework, claims, or customer dissatisfaction.
When comparing suppliers, look at material grade, test evidence, and who owns the production steps. A direct factory with sewing and printing in-house usually has more consistent accountability when something goes wrong. A trading company can still be a valid route, but only if they can show traceable sample approval, factory identification, and clear inspection records. If they cannot explain where the sample was made and where the bulk order will be made, the quote should be treated as incomplete.
The table below is structured around buying decisions. Use it to compare what each route tends to do well, where it creates risk, and what documentation you should ask for before you award the order.
Supplier route comparison for gift shop buyers
For canvas wine carriers, the sourcing route matters as much as the spec. A direct factory with sewing control and in-house print can usually give better consistency and clearer corrective action when a sample fails. A trading company may be easier for mixed-category buying, but the buyer must verify who actually controls fabric, printing, and packing. If you are buying for multiple stores or a distributed retail program, hidden handoffs increase risk because the quote owner may not be the party doing the actual sewing.
The best route depends on your volume, customization needs, and tolerance for revision cycles. Small launches can work through a responsive supplier that manages sampling quickly, but if the carrier will be reordered every season, direct factory sourcing gives more reliable cost control and better process visibility. Buyers should also ask whether the factory keeps fabric lots separate by order and whether printed panels are tracked by revision code. That level of traceability matters if a later batch needs comparison to the approved sample.
A useful sourcing control is to ask for three proof points before awarding: a photo of the factory’s sewing line, a photo of their print setup or decoration area, and one recent pack-out photo showing how finished goods are carton-packed. These are not guarantees, but they help confirm whether the supplier really controls the process they are quoting. If the supplier cannot provide basic process photos without delay, the order may be moving through too many middle steps.
The table is not about choosing the “best” supplier in an abstract sense. It is about matching the route to the program. If you need fast customization and moderate volume, a capable trader may be fine. If you need repeated replenishment and predictable durability, direct factory sourcing is usually easier to manage. The important thing is that the buyer can compare the same order on the same terms.
Ask the factory or trading company to identify who owns defect correction. If a sample fails the handle test, who reworks it? If print rubs off, who pays for reprint? If carton count is wrong, who bears the replacement cost? Those questions reveal whether the sourcing route is operationally useful or merely convenient at the quote stage.
- Direct factory: stronger process visibility, usually better for repeat programs and durability correction.
- Trading company: useful for mixed sourcing, but only if sample and bulk factory are clearly identified.
- Decision threshold: if the order will be reordered or distributed widely, traceability matters more than a tiny unit-price gap.
Print method should match handling, not just artwork
For branded gift shop carriers, print durability is often the first visible complaint. Screen print is usually the safest option for bold logos, especially on natural canvas, because it gives strong color and good repeatability at scale. If the brand wants a more premium look, a woven label, sewn patch, or embroidered-style patch can hold up better than fragile surface decoration. Heat transfer can work for short runs or complex art, but it needs validation for rub resistance and edge lifting.
The wrong print method creates avoidable problems in retail. A logo that cracks at the fold line or smears after friction from carton packing will not survive store handling. That is why the sample should be tested after folding, light rubbing, and compression in the carton, not just viewed flat on a table. If the artwork has fine lines, smaller text, or a dark background, ask the supplier how much detail is realistically printable on the selected fabric weight.
A practical buyer control is to define the “worst visible area” before approval. For example, if the carrier folds at the front face, then the front fold is the critical rub zone and should be inspected after testing. If the logo sits close to the side seam, the side seam area should be checked for print distortion. This is where many generic approvals fail: the print looks fine in one orientation but degrades where the consumer actually touches it.
If your assortment includes both premium and value gift-shop carriers, do not use the same print method for both without checking performance. A simpler one-color screen print may be more durable and better suited to a retail program than a complex multi-layer decoration that looks attractive in photos but fails under rubbing. Procurement should choose the method that survives the shelf, not the one that looks best in a render.
- Screen print: best for bold, repeatable logos and lower unit decoration risk.
- Woven label or sewn patch: better when the buyer wants premium durability and tactile branding.
- Heat transfer: only if rub and fold performance is accepted in writing.
- Inspect the fold line, not only the center of the logo.
Packing decisions affect both appearance and damage rate
Canvas wine carriers are not fragile in the way glass is fragile, but they can still arrive damaged-looking. Heavy folds, pressure marks, loose threads, and print scuffing can make a good product feel low value at opening. Flat packing is usually the most efficient option, but it must be done with a clean fold line and enough protection for the printed face. Tissue paper, simple insert cards, or light polybag protection may be worth the added cost if the item sells as a gift rather than as a utility bag.
Master carton planning should match how the gift shop receives stock. If cartons are overfilled, the top layer can crush the lower layer and leave permanent creases. If the count per carton is too low, freight cost per unit rises and replenishment becomes inefficient. Ask the supplier for carton dimensions, gross weight, and packing ratio early, because those numbers affect both freight quotes and warehouse receiving.
A useful QC step is to simulate one reopen cycle: unpack a sample, refold it, and repack it the way the warehouse or store would handle it. If the bag creases badly or the logo scuffs against the carton or neighboring units, the packing method needs revision. This is especially important for gift shops because the customer often sees the carrier before they use it, and first impression can determine whether the item feels premium.
Also confirm whether any accessory items are packed inside the carrier. Tags, tissue, care cards, or small inserts can shift the bag shape or leave indentations if they are placed in the wrong position. Ask the factory to show the exact packing order, not only the finished carton count.
For procurement purposes, the best packing method is the one that protects the product without adding unnecessary warehouse work. If the packaging feels too loose, ask for a tighter bundle. If the pack feels too compressed, reduce carton count or add simple protection. The right balance depends on whether the priority is shelf presentation, freight efficiency, or both.
- Flat pack only if fold lines do not mark the logo or distort the bottle shape.
- Use tissue or simple protective inserts when retail appearance matters at opening.
- Keep carton weight practical for warehouse handling and store replenishment.
- Ask for one unpack-refold-repack test before approving final packing.
How to interpret supplier quotes and avoid apples-to-oranges pricing
A wine carrier quote often looks simple until you compare line items. One supplier may quote only the bag, while another includes print setup, carton packing, labels, tissue, and inspection fees. If you do not normalize those items, the cheapest quote usually becomes the most expensive after hidden add-ons. Procurement teams should ask for a fully itemized structure so that fabric, sewing, decoration, packaging, and testing can be compared separately.
MOQ also changes the math. A factory may offer a lower unit price at 3,000 pcs because print setup, pattern setup, and cutting waste are spread over more pieces. At 500–1,000 pcs, the real cost often rises because the factory has to absorb more handwork and shorter production runs. For custom gift shop orders, it is better to compare landed cost per sellable unit, not only ex-factory unit price.
One practical threshold is to ask each supplier to quote the same assumptions: same fabric weight, same print method, same handle reinforcement, same carton pack, same testing requirement, and same sample condition. If one quote is based on a lighter fabric or a simpler stitch, the comparison is not valid. Buyers should refuse to compare a basic mockup against a final retail-ready bag.
When a quote seems unusually low, ask where the savings come from. Is the factory using lighter canvas, fewer stitches, reduced carton protection, or a smaller sample scope? A good supplier should be able to explain the cost delta in plain language. If they cannot explain it, the buyer cannot control it later.
The cleanest procurement method is to request one base quote and one upgrade quote. Base quote: the minimum spec that still passes your test checklist. Upgrade quote: the premium version with better decoration, label, or packaging. That makes the decision visible and avoids a messy back-and-forth over what was originally included.
- Separate the quote into fabric, sewing, print, packaging, master carton, and test charges.
- Check whether MOQ is per color, per artwork, or per packing configuration.
- Compare total sellable units after rejects, not only raw quoted quantity.
- Ask for a base spec and an upgrade spec if the first quote seems too low to trust.
A practical buyer workflow for approval, pilot run, and bulk release
The safest workflow is simple: approve the construction first, then the decoration, then the packing. Start with a sample that matches final fabric weight and handle reinforcement. Next, confirm the printed version and evaluate rub resistance, fold marks, and edge quality. Finally, review the packed version in carton form so the buyer knows how the item will arrive in the warehouse and on the shelf.
If the order is large or the carrier is a core seasonal item, ask for a pilot bulk run or first article inspection before full packing. This is especially useful when the design includes internal dividers, specialty closures, or premium labels. A short pilot run can reveal stitch tension drift, print misalignment, or packing fatigue that was not visible in the single sample.
A good approval file should include at least four traceable items: approved sample photo, final artwork proof, packing photo, and a written QC checklist with pass/fail notes. If the factory cannot produce those four items, the approval trail is too weak for a retail program. Buyers do not need a complicated system; they need a consistent one that another buyer could understand six months later.
The release point should be explicit. Do not let “OK to proceed” exist only in a casual chat thread. Put the approval in a line item or email that names the sample version, the carton pack, and the production starting point. That reduces disputes if the supplier later claims a different version was used. It also helps the warehouse know exactly what to expect on receipt.
Finally, keep a small reserve of approved samples in procurement files. If a later shipment looks different, you need a direct visual reference, not memory. This simple control saves time when comparing bulk output to the agreed spec.
- Approve structure before decoration.
- Approve decoration before full packing.
- Use first-run photos or pilot bulk checks before mass shipment release.
- Keep a dated approved sample on file for future reorders.
Specification comparison for buyers
| Spec decision | Recommended option | When it fits | Buyer risk to check |
|---|---|---|---|
| Fabric weight | 14–16 oz canvas (about 475–540 GSM) | Gift shop programs that need a premium feel, firmer bottle support, and lower tear risk | Too light and the bag sags; too heavy and cost, sewing strain, and carton weight rise. Confirm the supplier is quoting the same fabric basis weight, not just a visual thickness estimate. |
| Handle construction | Double-fold handles with box-X or bar-tack reinforcement | Single-bottle carriers sold at retail where shoppers may lift the bag by the handles only | Straight stitching only can fail at the top seam after repeated lift/drop use. Ask for stitch count, reinforcement position, and whether the handle folds are one-piece or cut-and-sewn. |
| Bottle retention | Internal divider, sleeve, or base insert for single bottle; center gusset for dual bottle | When bottles vary in shape or the carrier is used for gifting plus carry-out transport | Loose internal fit leads to bottle knock, tilt, and customer complaints about scuffing or breakage. Too tight a fit can stress seams and slow checkout packing. |
| Print method | Screen print for bold logos; woven label, sewn patch, or embroidery-look patch for premium finish | Gift shop SKUs with repeated handling and visible branding at point of sale | Heat transfer can crack or peel on rough canvas if rub resistance is poor. Ask which parts of the surface will touch carton board, tissue, or neighboring bags. |
| Closure style | Open top with structured neck; add tie/velcro only if tested | Fast-pick retail gift sets where shoppers want easy bottle insertion | Weak closures may fail during tilt tests or make the carrier look unfinished. Closures can also interfere with bottle neck clearance. |
| Supplier route | Direct factory with test data and in-house sewing control | Brands and importers ordering regular volumes or multiple replenishments | Trading layers can hide factory capability gaps and slow corrective action when QC fails. Verify who actually cuts, sews, prints, and packs the order. |
| MOQ logic | 1,000–3,000 pcs per color/style for custom production; sample run for new constructions | Custom sizes, custom print, or special trims needing setup amortization | Low MOQ quotes may exclude real setup, packaging, or testing costs and create quote drift later. Clarify whether MOQ is per color, per artwork, or per packaging spec. |
| Packing route | Flat packed with tissue or simple fold, then master carton by size ratio | Retail programs where warehousing efficiency matters and ship-to-store cartons are standardized | Overstuffed cartons crease canvas; loose stacking increases scuff marks and carton deformation. Ask for pack method photos from the factory, not only a written description. |
| Testing approach | Pre-production sample plus drop, seam, rub, and load checks at bulk stage | Any order with printed branding, reinforced handles, or export packaging | Skipping bulk-stage checks can hide sewing drift, print defects, and carton mismatch until after shipment. Demand clear cycles, weights, and acceptance criteria before approval. |
Buyer checklist before sampling
- Confirm the bottle size range: standard 750 ml only, or also Burgundy, Champagne, or square wine bottles. Ask the supplier to state maximum diameter and height in millimeters, not only in generic bottle terms.
- Lock fabric spec in writing: canvas GSM/oz, weave density if available, and whether the material is bleached, natural, dyed, washed, or coated. Ask for a fabric swatch that matches the actual bulk roll, not a showroom sample.
- Define handle length, width, and reinforcement method; require a stitch map or reference photo in the quote. If the carrier uses box-X or bar-tacks, note where each reinforcement starts and ends.
- Choose print method by durability requirement, not by low price alone; ask for rub and crack resistance on the chosen method. Request whether the design uses one-color screen print, multi-pass print, heat transfer, embroidery patch, woven label, or debossed badge.
- Require a pre-production sample and one bulk reference sample before mass packing starts. Label both samples with date, order number, fabric lot, and approval status for traceability.
- Set acceptance criteria for load, seam, and drop testing, including how many cycles or drops are needed. Put the exact weight, drop height, and number of repetitions into the PO or QC appendix.
- State carton pack count, polybag use, tissue use, and any gift-shop barcode or hangtag needs. Include the approved carton dimensions so freight and receiving teams can compare against the final packout.
- Ask for an itemized quote with fabric, sewing, printing, packaging, carton, and test charges separated. If a line is bundled, ask what is included and what counts as an extra.
- Confirm production lead time from sample approval, not from PO date only. Ask the factory to identify which steps are fixed lead-time items and which can move based on artwork or packaging changes.
- Request photos of first-run bulk units, not just a lab sample, before approving shipment. Ask for photos showing front, back, handles, bottom seam, carton pack, and label placement.
Factory quote questions to send
- What canvas weight do you recommend for a single-bottle carrier that must pass repeated handle-load and drop tests, and what basis of measurement do you use?
- Is the handle reinforced with box-X stitching, bar-tacks, or a folded seam, and can you show the exact stitch layout on a drawing or marked sample?
- What is the maximum bottle diameter and height your standard pattern can accept without forcing the opening or stressing the side seam?
- Which print method do you recommend for a retail gift shop item that will be handled frequently, and what is the abrasion risk after folding and carton compression?
- What is your MOQ by color, by print method, and by packaging option? Please separate MOQ for blank bags, printed bags, and special packing.
- Can you separate quote lines for fabric, sewing, print setup, packaging, master cartons, and testing? If something is included in the unit price, please list it clearly.
- What sample type will you provide first: white sample, printed pre-production sample, or bulk-reference sample? Please mark which material lot it uses.
- What packing method prevents canvas crease marks and protects printed areas in transit, and can you show a pack-out photo from a previous order with a similar construction?
- What is the production lead time after sample approval, and what parts of that lead time are fixed versus variable?
- What QC documents or inspection photos can you provide before final balance payment, including seam photos, carton count photos, and first-run approval photos?
Quality-control points to confirm
- Fabric GSM or oz must match the approved sample within an agreed tolerance; do not accept a lighter bulk lot without written approval. A practical control is to keep an approved reference swatch with date, stamp, and order number for side-by-side comparison.
- Handle attachment should survive repeated lift tests with no stitch break, puckering, loose thread, or tearing at the top edge. If the handle length changes, recheck balance and seam tension because even small geometry changes affect load distribution.
- Seams at the bottom, side gusset, and neck area must remain flat after load and drop tests; no popped stitches or needle holes widening. Reject units with visible seam tunneling, open corners, or distortion after testing.
- Print must not crack, peel, or smear after moderate rub testing on the printed face and edge folds. Check both the center of the logo and the fold line because abrasion is often worst at the crease.
- Bottle fit must allow insertion without forcing; the carrier should keep the bottle upright and not twist under normal hand carry. If the bag leans or spins, the cut pattern may be too loose or the base too narrow.
- Carton count, inner packing, and carton dimensions must match the approved packing list exactly. Require a carton photo with a tape measure or dimensions written on the pack-out sheet.
- No visible oil stains, broken yarns, loose threads, or offset print registration beyond the approved tolerance. Set a simple cosmetic threshold and photograph the “worst acceptable” sample before mass production.
- If a divider or insert is used, it must sit straight and not collapse after compression in the carton. Test the insert after at least one pack-unpack cycle, because some cheap inserts bow only after pressure.
- Sample traceability must be intact: approved sample, bulk sample, and shipment samples should be labeled with the same SKU and revision code. If labels or artwork differ, stop approval until the variance is explained.
- First-run bulk units should be inspected before the whole lot is packed. Ask for a first article check on at least the first carton from the line, not only a pre-production sample made off-line.