Why the top hem fold controls tote quality
The top hem fold on a canvas tote bag is not just a finishing detail. It affects how the mouth sits open, how the handles pull against the panel, how the bag folds for packing, and how the product looks when a buyer first picks it up. A hem that is too narrow can expose raw edges and look cheap. A hem that is too wide can make the top bulky and distort the opening, especially on heavier canvas such as 12 oz or 16 oz.
For procurement teams, this matters because top hem problems usually show up after approval, not during quote comparison. A supplier may offer the right fabric weight and a good print method, but still build the hem with inconsistent depth or weak stitch tension. That leads to returns, rework, or a bag that feels different from the approved sample. If you are buying for retail or promotions, the top edge is one of the first places customers judge workmanship.
- A weak hem can expose cut fibers and trigger fraying after repeated handling.
- An uneven hem can make the bag mouth twist, which hurts shelf presentation.
- A bulky hem can interfere with print placement, handle attachment, and flat packing.
Lock the spec before you ask for pricing
The fastest way to get cleaner quotes is to define the hem spec in measurable terms. Do not ask for a neat top fold or standard finish. State the fabric weight in GSM or ounces, the finished hem depth in millimeters, the stitch type, the stitch density, and the relation between the hem and the handle anchor. For canvas tote bags, even a 2 to 3 mm difference in hem depth can change the look once the bag is pressed and folded for shipment.
If your bag uses 8 oz canvas, the fold may lie flatter and allow a tighter top edge. On 10 oz or 12 oz canvas, the fold adds more body and may need slightly more allowance to avoid raw edge exposure. On 16 oz canvas, the hem becomes structurally obvious and can affect the silhouette. A quote that does not separate these variables is harder to compare and often hides extra labor, extra trimming, or a later request for a price adjustment.
- Write the finished hem depth in millimeters, not just as a visual description.
- State the fabric weight, weave type, and whether the canvas is prewashed or raw.
- Define the handle distance from the top edge before you approve the factory quote.
Compare hem constructions before you source
Not every canvas tote needs the same top hem construction. A simple promotional bag may use a double-fold top hem with a clean topstitch. A heavier retail tote may need reinforced handle joins and a more controlled fold to keep the mouth square. If the bag has a print close to the top edge, the hem style also determines whether the logo survives folding and normal customer use. Buyers should compare construction choices the same way they compare fabric weight or print method.
Use the comparison below as a sourcing filter, not as a design rule. The right choice depends on your load target, your shelf presentation, and your packing method. A lightweight event tote and a structured retail canvas tote may use the same material family but need very different hem logic. The wrong choice often shows up as twisting, bulky corners, or a quote that looks cheap until the factory adds hidden reinforcement later.
- Use double-fold hems for most standard canvas totes with a clean retail look.
- Use reinforcement at the handle zone when the bag is expected to carry real weight.
- Keep print areas away from the crease if the tote will be packed flat for export.
Inspect the sample room build, not just the finished bag
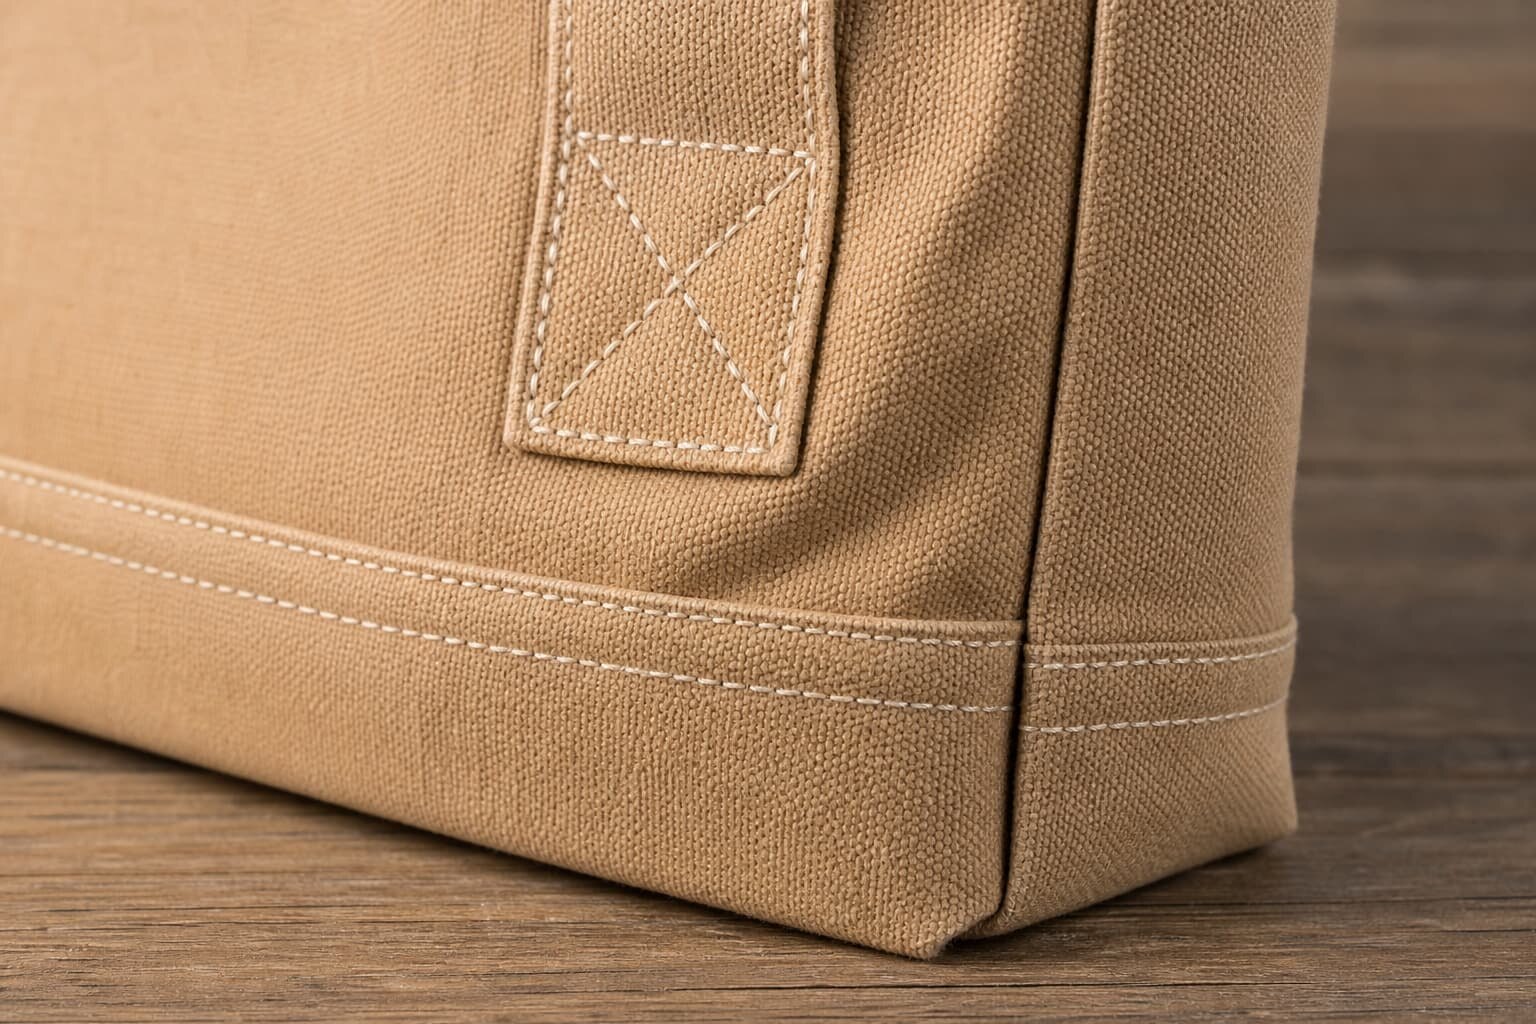
A good sample should answer more than one question. Look at the hem from the outside, then turn the bag inside out if possible and inspect the fold sequence, trimming, and stitch path. Check whether the raw edge is fully enclosed and whether the fold stays even around the entire opening. A sample that looks fine from three feet away may still hide skipped trimming, uneven allowance, or a stitch line that wanders as it rounds the corners.
The sample room is also where you confirm whether the chosen fabric weight behaves the way you expected. On a 10 oz canvas tote, a fold may lay one way on the table and another after pressing. On a heavier 12 oz or 16 oz bag, the hem can hold shape better, but only if the fold width and needle settings are correct. Ask the factory to show the exact sample that will be used as the production reference, because one hand-finished prototype can hide problems that appear in bulk.
- Measure hem depth on the left, center, and right side of the opening.
- Check for loose fibers, cut threads, and uneven pressing at the fold line.
- Confirm the sample uses the same fabric lot, print method, and label method you plan to buy.
Set acceptance criteria for bulk production
Bulk production should not be accepted on visual impression alone. Set clear acceptance criteria before the order starts so the factory knows what will pass and what will be rejected. For the top hem, the most useful checks are depth tolerance, stitch quality, raw edge coverage, symmetry, and handle integration. If you do not define these up front, each inspector may make a different judgment, and the lot can drift until the shipment is already packed.
A practical rule is to approve the top edge against a sealed sample and then measure only the features that affect function or customer perception. For example, a slightly different press mark may be acceptable, but exposed raw edges or uneven mouth width are not. The goal is not cosmetic perfection on every bag. The goal is to prevent variation that changes how the tote hangs, opens, folds, or survives repeated use.
- Set a measurable tolerance for hem depth and stitch position.
- Define zero-tolerance defects for exposed raw edge and broken topstitch.
- Classify handle crowding and mouth twist as defects if they affect use or shelf display.
Top hem folds interact with print, handles, and canvas weight
The top hem is where several production decisions collide. If your logo sits too high, the fold can distort the print. If the handles sit too close to the edge, the reinforcement can crowd the hem and create bulk. If the canvas weight is too light for the bag size, the top edge may collapse instead of holding a clean line. This is why buyers should review the hem together with the artwork placement and the handle pattern, not as separate approvals.
For print method, screen printing is often the safest choice for flat logo placement on canvas, while heat transfer can work if the graphic stays clear of the fold zone. Embroidery adds texture but can stiffen the area near the top edge, so it needs careful placement. A woven label or small side label often avoids the fold problem entirely. The best choice depends on the brand look, the fabric weight, and whether the bag will be packed flat, folded once, or folded multiple times.
- Keep printed elements far enough below the hem so folding does not split the artwork.
- Use heavier canvas when the bag needs a crisp top line and a more structured mouth.
- Check that handle reinforcement does not crush the print or create a ridge at the opening.
Quote logic: MOQ, lead time, and cost drivers
A quote for a canvas tote bag is only useful if you can see what drives the price. The hem itself is a small sewing step, but it can affect the full cost if it requires extra trimming, tighter QC, or slower machine handling. Ask the factory how the price changes by fabric weight, print method, handle style, and packing format. A simple one-color screen print on 8 oz canvas with a standard double-fold hem usually has a different MOQ profile than a multi-color print on 12 oz canvas with reinforced handles and a woven label.
Lead time also shifts with the hem specification. If the factory has to source a special canvas weight, match a custom dye lot, or adjust the folding method for a tighter mouth opening, sampling may take longer and bulk sewing may slow down. Buyers should request separate timing for sample approval, bulk production, and packing. That makes it easier to compare quotes that look similar on paper but are very different in production risk.
- Ask for unit price, setup cost, sample cost, and any packing surcharge separately.
- Ask whether MOQ changes by print color count, label type, or custom fabric weight.
- Ask for the production calendar from sample approval to packed shipment, not just one lead-time number.
Use the top hem check at packing and shipment release
Many tote bag problems are created during packing, not sewing. If the bag is folded too tightly, the top hem can hold a hard crease that changes the mouth shape. If the polybag is too small or the carton is overfilled, the hem can be crushed, and the bag may open with a permanent wave. That matters for retail buyers and distributors because the first handling at distribution center arrival often determines whether the product looks ready for shelf or needs reworking.
Before release, inspect the packed format in the same condition the customer will receive it. Open several cartons, remove random units, and check whether the hem recovers after unfolding. Also confirm that the fold direction is consistent so the bags stack neatly in the carton. A good factory can build a clean top edge and still damage it with poor packing, so the release check must include both sewing and pack-out.
- Check that the fold direction is consistent across units in the same carton.
- Verify that the polybag and carton size do not force a sharp crease across the mouth.
- Inspect random packed units after transit-style handling before shipment release.
Use one checklist from RFQ to final approval
The most useful way to manage a canvas tote bag top hem fold is to carry one checklist through the entire sourcing process. Start with the RFQ, where you define fabric weight, finished hem depth, print method, handle reinforcement, MOQ, and packing format. Move that same checklist into the preproduction sample review, then into inline QC, and finally into shipment release. That way, the factory cannot switch from the approved build to a cheaper or faster one without it being obvious.
For procurement teams, this also makes quote comparison cleaner. If three suppliers all quote a tote bag with the same fabric weight but different hem constructions, you can compare apples to apples. If one supplier omits the seam allowance or handle anchor distance, you already know the quote is incomplete. The best RFQ is not the shortest one. It is the one that removes ambiguity before a single yard of canvas is cut.
- Use the approved sample as the control for both visual and dimensional checks.
- Keep the same hem checklist in RFQ, PP sample approval, and final inspection.
- Reject quotes that hide critical hem details behind generic wording.
Specification comparison for buyers
| Spec decision | Recommended option | When it fits | Buyer risk to check |
|---|---|---|---|
| Top hem construction | Double-fold hem, 20-25 mm finished depth | Most 8-16 oz canvas totes that need a clean mouth opening and stable handle area | Raw edge exposure, uneven fold depth, or a mouth that waves after sewing |
| Stitching at the hem | Single-needle topstitch with 6-8 stitches per inch | Standard promotional and retail canvas totes with moderate load needs | Loose tension, puckering, or stitch lines that drift too close to the fold edge |
| Reinforcement near handle joins | Bartack or box-x at handle anchor points | Totes that carry catalogs, groceries, gifts, or heavier retail items | Needle crowding, skipped stitches, or reinforcement that shifts and distorts the top line |
| Print placement near the fold | Keep logos below the crease zone by 25-35 mm | Screen print, heat transfer, or digital print on the front panel | Cracking, shadowing, or logo distortion when the bag is folded and packed |
| Mouth shape control | Use graded seam allowance and corner trimming at side seam intersections | Structured canvas bags and gusseted totes | Bulky corners, twisted mouth opening, or inconsistent bag height after pressing |
Buyer checklist before sampling
- Confirm the finished top hem depth, the fold direction, and the seam allowance in millimeters, not just in words like standard or neat.
- Ask for a sample with the exact fabric weight, such as 8 oz, 10 oz, 12 oz, or 16 oz canvas, because the fold behaves differently on each one.
- Check that the raw edge is fully enclosed and that no cut yarns show after the final press.
- Measure the hem across the left, center, and right side of the bag to catch drift in the sewing line.
- Verify handle attachment distance from the top edge so bartacks do not crowd the fold or weaken the mouth opening.
- Confirm the print stays outside the crease zone and that no logo element will split, crack, or shadow on a folded bag.
- Review the sample in both open and folded states to see whether the mouth line stays flat in packing.
- Ask for the packaging method, because aggressive folding can crush the hem and create avoidable creases before shipment.
- Request the quote as a line-item breakdown covering fabric, print, sewing, packing, and any sampling or tooling fees.
- Approve one sealed reference sample before bulk production and make it the control for inspection at arrival.
Factory quote questions to send
- What canvas weight did you quote, and is that weight measured before or after finishing and washing?
- What finished top hem depth will you sew, and what tolerance can you hold across the lot?
- What stitch type and stitch density will you use on the hem and on the handle reinforcement?
- How far will the handle anchor sit from the top edge, and will you use bartacks, box-x, or both?
- Which print method is included in the quote, and what are the setup charges for screen count, plates, or files?
- What is the MOQ by color, print method, and label type, and does the MOQ change if we use a woven side label?
- What is the sample lead time for a preproduction sample and the bulk lead time after approval?
- What packing format is quoted, including fold method, polybag, inner bundle count, and master carton quantity?
- What inspection standard will you use for hem defects, and how are major, minor, and critical issues defined?
- Can you show the full cost breakdown so we can compare fabric, labor, print, packing, and overhead separately?
Quality-control points to confirm
- Finished hem depth matches the approved sample and stays within the agreed tolerance across all measured points.
- No raw edge, loose yarn, or cut thread is visible at the top fold after trimming and pressing.
- Stitch line is straight, even, and free of puckering, skipped stitches, or broken thread.
- Handle attachment sits at the specified distance from the top edge and does not distort the hem.
- Bartacks or box-x reinforcement are centered, dense, and consistent on both sides of the bag.
- Top opening remains square and does not twist when the bag is laid flat or held upright.
- Print, embroidery, woven label, or heat transfer stays clear of the crease zone and shows no fold damage.
- Packed bags open without a permanent hard crease that changes the mouth shape or customer perception.
- Carton pack count, bag fold direction, and polybag size match the approved packing instruction.
- Bulk production matches the sealed sample for hem width, stitch finish, and overall visual balance.